Java进击框架:Spring(二)
Java进击框架:Spring(二)
- 前言
-
- 资源
-
- 应用程序上下文和资源路径
- 环境抽象
-
- 定义配置文件
- PropertySource抽象
- 占位符
- 引入配置
- 结合Java和XML配置
- 验证、数据绑定和类型转换
-
- Java Bean验证
-
- 配置自定义约束
- 内置的PropertyEditor
- 类型转换
- 字段格式
前言
本章节主要介绍,Spring的资源访问、数据绑定、类型转换等内容。
资源
Java的标准java.net.URL类和各种URL前缀的标准处理程序还不足以满足对所有低级资源的访问。
spring的Resource接口位于org.springframework.core.io.package是一个更强大的接口,用于抽象对低级资源的访问。
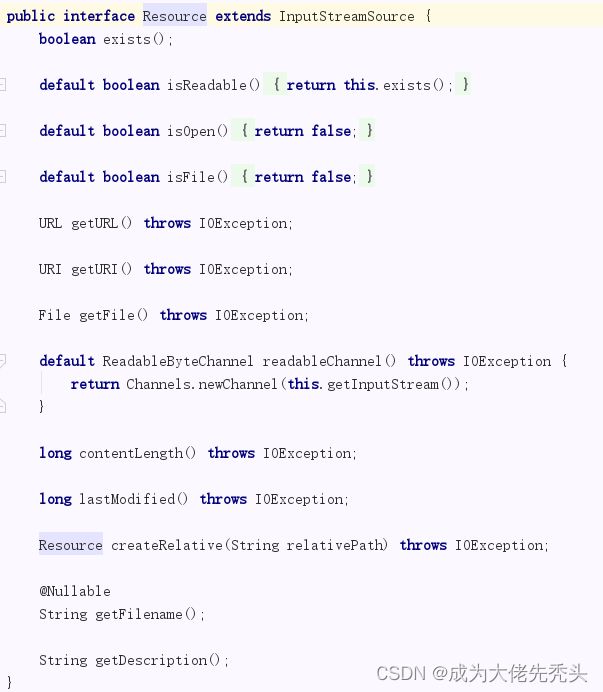
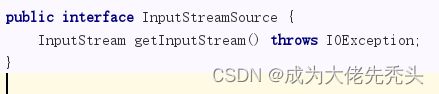
它扩展了InputStreamSource接口
如果你使用过File类或者InputStream流,通过方法名字你应该就清楚他们的作用。
Resource接口的一些实现还为支持写入的资源实现了扩展的WritableResource接口。
- UrlResource
UrlResource包装了一个java.net.URL,可用于访问通常可以通过URL访问的任何对象,如File、HTTPS目标、FTP目标等。所有URL都有一个标准化的String表示,这样就可以使用适当的标准化前缀来表示不同的URL类型。包括file:用于访问文件系统路径,https:用于通过https协议访问资源,ftp:用于通过ftp访问资源,等等。
示例代码如下:
public class Test {
    public static void main(String[] args) {
        try {
//            UrlResource urlResource = new UrlResource("file:C:\\ftlog.log");
            UrlResource urlResource = new UrlResource("https://tenfei04.cfp.cn/creative/vcg/800/version23/VCG41175510742.jpg");
            InputStream file = urlResource.getInputStream();
        } catch (MalformedURLException e) {
            e.printStackTrace();
        } catch (IOException e) {
            e.printStackTrace();
        }
    }
}
需要注意本地资源和网络资源获取方式不同,本地资源使用全路径进行访问;网络资源使用getFile()方法,报FileNotFoundException异常。
- ClassPathResource
该类表示应该从类路径中获取的资源。它使用线程上下文类加载器、给定的类加载器或给定的类来加载资源。
public class Test {
    public static void main(String[] args) {
        try {
            ClassPathResource classPathResource = new ClassPathResource("dao.xml");
            File file = classPathResource.getFile();
        } catch (MalformedURLException e) {
            e.printStackTrace();
        } catch (IOException e) {
            e.printStackTrace();
        }
    }
}
- FileSystemResource
FileSystemResource支持以java.io.File和java.nio.file.Path的形式进行解析。
public class Test {
    public static void main(String[] args) {
//        FileSystemResource fileSystemResource = new FileSystemResource(Paths.get("C:\\ftlog.log"));
        FileSystemResource fileSystemResource = new FileSystemResource(new File("C:\\ftlog.log"));
        boolean exists = fileSystemResource.exists();
    }
}
- PathResource
PathResource实际上是一个基于纯java.nio.path.Path的FileSystemResource替代方案,具有不同的createrrelatiative行为。
public class Test {
    public static void main(String[] args) {
        PathResource pathResource = new PathResource(Paths.get("c:\\ftlog.log"));
        boolean exists = pathResource.exists();
    }
}
- ServletContextResource
这是一个ServletContext资源的资源实现,它解释了相关web应用的根目录中的相对路径。但只有当web应用程序存档被扩展并且资源在文件系统上时,才允许java.io.File访问。不管它是在文件系统中展开,还是直接从JAR或其他地方(如数据库)访问(这是可以想象的),实际上都依赖于Servlet容器。
- InputStreamResource
InputStreamResource是给定InputStream的资源实现。只有在不适用特定资源实现的情况下才应该使用它。特别是,尽可能使用ByteArrayResource或任何基于文件的资源实现。
public class Test {
    public static void main(String[] args) throws FileNotFoundException {
        InputStreamResource inputStreamResource = new InputStreamResource(new FileInputStream("c:\\ftlog.log"));
        boolean exists = inputStreamResource.exists();
    }
}
- ByteArrayResource
这是给定字节数组的资源实现。它为给定的字节数组创建一个ByteArrayInputStream。
public class Test {
    public static void main(String[] args) throws FileNotFoundException {
        ByteArrayResource byteArrayResource = new ByteArrayResource("hello world".getBytes());
    }
}
- ResourceLoader接口
所有应用程序上下文都实现了ResourceLoader接口。因此,所有应用程序上下文都可以用于获取Resource实例。
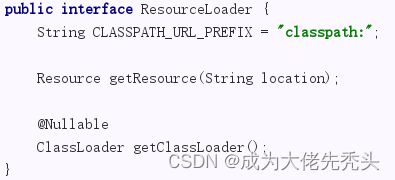
当您在特定的应用程序上下文中调用getResource(),而指定的位置路径没有特定的前缀时,您将得到适合于该特定应用程序上下文中的Resource类型。
public class Test {
    public static void main(String[] args) {
        ClassPathXmlApplicationContext classPathXmlApplicationContext = new ClassPathXmlApplicationContext();
        Resource resource = classPathXmlApplicationContext.getResource("com/example");
    }
}
另一方面,你也可以通过指定特殊的classpath:前缀来强制使用ClassPathResource,而不管应用程序上下文类型是什么,如下例所示:
public class Test {
    public static void main(String[] args) throws IOException {
        ClassPathXmlApplicationContext classPathXmlApplicationContext = new ClassPathXmlApplicationContext();
        Resource resource = classPathXmlApplicationContext.getResource("classpath:applicationContext.xml");
        System.out.println(resource.getFile().getAbsolutePath());
        /** Output:
         *  C:\study\spring\target\classes\applicationContext.xml
         */
    }
}
您可以通过指定任何标准java.net.URL前缀来强制使用UrlResource,比如file:和https:
public class Test {
    public static void main(String[] args) throws IOException {
        ClassPathXmlApplicationContext classPathXmlApplicationContext = new ClassPathXmlApplicationContext();
//        Resource resource = classPathXmlApplicationContext.getResource("file:c:\\ftlog.log");
        Resource resource = classPathXmlApplicationContext.getResource("https://tenfei04.cfp.cn/creative/vcg/800/version23/VCG41175510742.jpg");
    }
}
如果bean本身要通过某种动态过程来确定和提供资源路径,在XML配置文件中可以用该资源的简单字符串进行配置:
<beans>
    <bean id="test" class="com.example.Test">


        <property name="resource" value="com\example">property>
    bean>
beans>
示例代码如下:
public class Test {
    private Resource resource;

    public void setResource(Resource resource) {
        this.resource = resource;
    }

    public static void main(String[] args) throws IOException {
        ClassPathXmlApplicationContext classPathXmlApplicationContext = new ClassPathXmlApplicationContext("applicationContext.xml");
        Test bean = classPathXmlApplicationContext.getBean(Test.class);
        System.out.println(bean.resource.exists());
    }
}
ResourcePatternResolver接口是对ResourceLoader接口的扩展,该接口定义了将位置模式(例如,ant风格的路径模式)解析为资源对象的策略。

从上面可以看出,这个接口还定义了一个特殊的classpath*:类路径中所有匹配资源的资源前缀。
ResourceLoaderAware接口是一个特殊的回调接口,应用程序上下文调用setResourceLoader(ResourceLoader),将其本身作为参数提供(记住,Spring中的所有应用程序上下文都实现了ResourceLoader接口)。

但是,通常情况下,如果需要的话,最好使用专用的ResourceLoader接口。代码只与资源加载接口(可以认为是一个实用程序接口)耦合,而不是与整个Spring ApplicationContext接口耦合。
应用程序上下文和资源路径
应用程序上下文构造器(针对特定的应用程序上下文类型)通常将字符串或字符串数组作为资源的位置路径,例如构成上下文定义的XML文件。
当这样的位置路径没有前缀时,特定的Resource从该路径构建并用于加载bean定义的类型取决于并适合于特定的应用程序上下文。
public class Test {
    public static void main(String[] args) throws IOException {
        ApplicationContext applicationContext = new ClassPathXmlApplicationContext("applicationContext.xml");
    }
}
你也可以使用classpath前缀从类路径加载bean定义。
以FileSystemXmlApplicationContext为例,任何无前缀的路径仍被视为文件系统路径。示例代码如下:
public class Test {
    public static void main(String[] args) throws IOException {
        ApplicationContext applicationContext = new FileSystemXmlApplicationContext("classpath:applicationContext.xml");
    }
}
classpath*:前缀指定必须获得与给定名称匹配的所有类路径资源(在内部,这主要是通过调用ClassLoader.getResources(…))然后合并以形成最终的应用程序上下文定义。如果路径不确定或者有多个,可以使用*通配符匹配。
环境抽象
Environment接口是集成在容器中的抽象,它对应用程序环境的两个关键方面建模:概要文件和属性。
概要文件是一个命名的、逻辑上的bean定义组,只有在给定的概要文件处于活动状态时才向容器注册。bean可以分配给配置文件,无论是用XML定义的还是用注释定义的。与概要文件相关的Environment对象的角色是确定哪些概要文件(如果有的话)当前是活动的,以及默认情况下哪些概要文件(如果有的话)应该是活动的。
属性在几乎所有应用程序中都扮演着重要的角色,并且可能来源于各种来源:属性文件、JVM系统属性、系统环境变量、JNDI、servlet上下文参数、特别的Properties对象、Map对象,等等。与属性相关的Environment对象的作用是为用户提供一个方便的服务接口,用于配置属性源并从中解析属性。
定义配置文件
Bean定义概要文件在核心容器中提供了一种机制,允许在不同的环境中注册不同的bean,有两种方式:使用@Profile注解或XML。
@Profile注解在类声明,示例代码如下:
@Configuration
@Profile("prod")
public class Config {
    @Bean
    public A getA(){
        A a = new A();
        a.setName("张三");
        a.setAge(18);
        return a;
    }
}
@Configuration
@Profile("dev")
public class Config2 {
    @Bean
    public A getA(){
        A a = new A();
        a.setName("李四");
        a.setAge(19);
        return a;
    }
}
XML配置方式如下:
<beans profile="prod">
    <bean id="test" class="com.example.Test" autowire="byType">bean>

    <bean id="getA" class="com.example.A">
        <property name="name" value="张三">property>
        <property name="age" value="18">property>
    bean>
beans>
<beans profile="dev">
    <bean id="test" class="com.example.Test" autowire="byType">bean>

    <bean id="getA2" class="com.example.A">
        <property name="name" value="李四">property>
        <property name="age" value="19">property>
    bean>
beans>
@Profile注解也可以在方法声明,示例代码如下:
@Configuration
public class Config {
    @Bean
    @Profile("prod")
    public A getA(){
        A a = new A();
        a.setName("张三");
        a.setAge(18);
        return a;
    }
    @Bean
    @Profile("dev")
    public A getA2(){
        A a = new A();
        a.setName("李四");
        a.setAge(19);
        return a;
    }
}
XML对应的是
<beans>
    <bean id="test" class="com.example.Test" autowire="byType">bean>

    <beans profile="prod">
        <bean id="getA" class="com.example.A">
            <property name="name" value="张三">property>
            <property name="age" value="18">property>
        bean>
    beans>
    <beans profile="dev">
        <bean id="getA2" class="com.example.A">
            <property name="name" value="李四">property>
            <property name="age" value="19">property>
        bean>
    beans>
beans>
定义好配置文件后,我们需要指示Spring哪个概要文件是活动的。
激活一个概要文件有几种方法,但是最直接的方法是通过编程方式根据EnvironmentAPI,可通过ApplicationContext。
注解方式激活:
@Component
public class Test {
    @Autowired
    private A a;

    public static void main(String[] args) {
        AnnotationConfigApplicationContext ac = new AnnotationConfigApplicationContext();

        ac.getEnvironment().setActiveProfiles("prod");
        ac.register(Config.class,Test.class);
        ac.refresh();

        Test bean = ac.getBean(Test.class);
        System.out.println(JSONObject.toJSONString(bean.a));
        /** Output:
         *  {"age":18,"name":"张三"}
         */

    }
}
XML方式激活:
public class Test {
    private A a;

    public void setA(A a) { this.a = a; }

    public static void main(String[] args) {
        ClassPathXmlApplicationContext ca = new ClassPathXmlApplicationContext("applicationContext.xml");
        ca.getEnvironment().setActiveProfiles("prod");
        ca.refresh();

        Test bean = ca.getBean(Test.class);
        System.out.println(JSONObject.toJSONString(bean.a));
        /** Output:
         *  {"age":18,"name":"张三"}
         */

    }
}
此外,您还可以通过spring.profiles.active属性,可以通过系统环境变量、JVM系统属性、servlet上下文参数web.xml。
比如:idea中设置运行环境,多个环境用逗号分割。
-Dspring.profiles.active=“profile1,profile2”

PropertySource抽象
@PropertySource注解用于加载指定属性文件,为Spring 中的 Environment提供方便和声明机制。
application.properties:
test.b.name=zhangsan
示例代码如下:
public class B {
    private String name;

    public String getName() { return name; }

    public void setName(String name) { this.name = name; }
}
@Configuration
@PropertySource(value = "classpath:application.properties")
public class Config {
    @Autowired
    Environment env;

    @Bean
    public B getB(){
        B b=new B();
        b.setName(env.getProperty("test.b.name"));
        return b;
    }
}
@Component
public class Test {
    @Autowired
    private B b;

    public static void main(String[] args) throws IOException {
        AnnotationConfigApplicationContext applicationContext = new AnnotationConfigApplicationContext("com.example");
        Test bean = applicationContext.getBean(Test.class);
        System.out.println(JSONObject.toJSONString(bean.b));
        /** Output:
         *  {"name":"zhangsan"}
         */
    }
}
也可以和 @Value 组合使用,将自定义属性文件中的属性变量值注入到当前类的使用@Value注解的成员变量中。
占位符
过去,元素中占位符的值只能根据JVM系统属性或环境变量进行解析。现在情况已经不同了。因为环境抽象是在整个容器中集成的,所以很容易通过它路由占位符的解析。这意味着您可以以您喜欢的任何方式配置解析过程。您可以更改搜索系统属性和环境变量的优先级,或者完全删除它们。您还可以根据需要将自己的属性源添加到混合中。
@Configuration
@PropertySource("classpath:/com/${my.placeholder:default/path}/app.properties")
public class AppConfig {}
<beans>
    <import resource="com/bank/service/${customer}-config.xml"/>
beans>
引入配置
通常,每个单独的XML配置文件表示体系结构中的一个逻辑层或模块。您可以使用应用程序上下文构造函数从所有这些XML片段中加载bean定义。或者,使用一次或多次出现的
service.xml:
<beans>
    <bean id="b" class="com.example.B">
        <property name="name" value="test">property>
    bean>
beans>
dao.xml:
<beans>
beans>
applicationContext.xml。引入service.xml和dao.xml:
<beans>
    <import resource="classpath:/dao.xml">import>
    <import resource="service.xml">import>
    <bean id="test" class="com.example.Test">
        <property name="b" ref="b">property>
    bean>
beans>
示例代码如下:
public class Test {
    private B b;

    public void setB(B b) { this.b = b; }

    public static void main(String[] args) throws IOException {
        ClassPathXmlApplicationContext applicationContext = new ClassPathXmlApplicationContext("applicationContext.xml");
        Test bean = applicationContext.getBean(Test.class);
        System.out.println(JSONObject.toJSONString(bean.b));
        /** Output:
         *  {"name":"test"}
         */
    }
}
所有位置路径都相对于执行导入的定义文件,这些路径是相对的,最好不要使用斜杠。您总是可以使用完全限定的资源位置来代替相对路径:例如,file:C:/services.xml或者classpath:services.xml。
你也可以使用@Import注解允许从另一个配置类加载@Bean定义。
@Configuration
public class Config2 {
    @Bean
    public A getA(){
        return new A();
    }
}
@Configuration
@Import(Config2.class)
public class Config {

    @Bean
    public B getB(){
        return new B();
    }
}
public class Test {
    public static void main(String[] args) throws IOException {
        AnnotationConfigApplicationContext applicationContext = new AnnotationConfigApplicationContext("com.example");
        A a = applicationContext.getBean(A.class);
        B b = applicationContext.getBean(B.class);
    }
}
这种方法简化了容器实例化,因为只需要处理一个类,而不需要在构造过程中记住可能大量的@Configuration类。
结合Java和XML配置
@Configuration类是配置容器的主要机制,但仍然有必要至少使用一些XML。如果你想在注解中使用XML的配置,你可以使用@ImportResource注解达到此目的。
<beans>
    <bean id="b" class="com.example.B">
        <property name="name" value="test">property>
    bean>
beans>
示例代码如下:
public class B {
    private String name;

    public String getName() { return name; }

    public void setName(String name) { this.name = name; }
}
@Configuration
@ImportResource(value = "classpath:applicationContext.xml")
public class Config {
    public static void main(String[] args) throws IOException {
        AnnotationConfigApplicationContext applicationContext = new AnnotationConfigApplicationContext("com.example");
        B b = applicationContext.getBean(B.class);
        System.out.println(JSONObject.toJSONString(b));
        /** Output:
         *  {"name":"test"}
         */
    }
}
验证、数据绑定和类型转换
Spring为验证和数据绑定提供了一种设计,具体来说,验证不应该绑定到web层,考虑到这些问题,Spring提供了一个Validator契约,它在应用程序的每一层中都是基本且非常好用的。
数据绑定对于将用户输入动态绑定到应用程序的域模型(或用于处理用户输入的任何对象)非常有用。Spring提供了恰当命名的DataBinder来完成这一任务。Validator和DataBinder组成了验证包,它主要用于但不限于web层。
BeanWrapper是Spring框架中的一个基本概念,您可能不需要直接使用BeanWrapper。Spring的DataBinder和底层的BeanWrapper都使用PropertyEditorSupport实现来解析和格式化属性值。
Spring的core。convert包提供了通用的类型转换功能,以及用于格式化UI字段值的高级格式包。您可以使用这些包作为PropertyEditorSupport实现的更简单的替代方案。
Java Bean验证
正如Java Bean验证中所描述的那样,应用程序可以全局启用一次Bean验证,并专门用于所有的验证需求。Spring通过设置基础设施和Spring自己的Validator契约的适配器来支持Java Bean验证。
public class B {
    private String name;
    private Integer age;

    public String getName() { return name; }

    public void setName(String name) { this.name = name; }

    public Integer getAge() { return age; }

    public void setAge(Integer age) { this.age = age; }
}
实现Validator接口
public class PersonValidator implements Validator {
    @Override
    public boolean supports(Class<?> clazz) {
        return B.class.equals(clazz);//验证指定示例
    }

    @Override
    public void validate(Object target, Errors errors) {
        ValidationUtils.rejectIfEmpty(errors, "name", "name是null");
        B b = (B) target;
        if (b.getAge() <=10){
            errors.rejectValue("age","不能小于10岁");
        }
    }
}
ValidationUtils的静态rejectIfEmpty(..)方法用于在name属性为空或空字符串时拒绝它。
public class Test {
    public static void main(String[] args) throws IOException {
        B b = new B();
        b.setName(null);
        b.setAge(1);
        DataBinder dataBinder = new DataBinder(b);
        dataBinder.setValidator(new PersonValidator());
        dataBinder.validate();
        BindingResult bindingResult = dataBinder.getBindingResult();

        bindingResult.getAllErrors().forEach(item ->{
            System.out.println(item.getCode());
        });
        /** Output:
         *  name是null
         *  不能小于10岁
         */
    }
}
Bean验证通过Java应用程序的约束声明和元数据提供了一种通用的验证方法。要使用它,您需要用声明性验证约束注释域模型属性,然后由运行时强制执行这些约束。有内置的约束,您还可以定义自己的自定义约束。
public class A{
    @NotBlank
    @Size(min = 1,max = 4,message = "超过长度")
    private String name;
    @Min(0)
    private Integer age;
    //忽略get、set方法
}
然后,Bean验证器根据声明的约束验证该类的实例。参见Hibernate验证程序特定约束的文档。
Spring提供了对Bean验证API的全面支持,包括将Bean验证提供者引导为Spring bean。这允许您注入一个jakarta.validation.ValidatorFactory或者jakarta.validation.Validator应用程序中需要验证的地方。
您可以使用LocalValidatorFactoryBean将默认验证器配置为Spring bean,如下例所示:
@Configuration
public class AppConfig {

    @Bean
    public LocalValidatorFactoryBean validator() {
        return new LocalValidatorFactoryBean();
    }
}
XML配置如下:
<bean id="validator" class="org.springframework.validation.beanvalidation.LocalValidatorFactoryBean" />
前面示例中的基本配置通过使用其默认引导机制来触发bean验证初始化。Bean验证提供程序(如Hibernate验证程序)应该出现在类路径中,并且会被自动检测到。
LocalValidatorFactoryBean实现两者jakarta.validation.ValidatorFactory和jakarta.validation.Validator,以及spring的org.springframework.validation.Validator。您可以将对这些接口的引用注入需要调用验证逻辑的beans中。
@Component
public class Test {
    @Autowired
    private Validator validator;

    public static void main(String[] args) throws ParseException {
        AnnotationConfigApplicationContext applicationContext = new AnnotationConfigApplicationContext("com.example");
        Test bean = applicationContext.getBean(Test.class);
        A a = new A();
        a.setAge(12);
        a.setName("123123");
        BindException b = new BindException(a,"a");
        bean.validator.validate(a,b);
        for (ObjectError lists:b.getAllErrors()) {
            System.out.println(lists.getDefaultMessage());
        }
        /** Output:
         *  超过长度
         */
    }
}
配置自定义约束
每个bean验证约束由两个部分组成:
- 一个声明约束及其可配置属性的
@Constraint注释。 jakarta.validation.ConstraintValidator实现约束行为的接口。
要将声明与实现相关联,每个@Constraint批注引用了相应的ConstraintValidator实现类。在运行时,一个ConstraintValidatorFactory当在您的域模型中遇到约束注释时,实例化被引用的实现。
默认情况下LocalValidatorFactoryBean配置SpringConstraintValidatorFactory用弹簧来创造ConstraintValidator实例。这让你的习惯ConstraintValidators像任何其他Spring bean一样受益于依赖注入。
@Target({ElementType.METHOD, ElementType.FIELD})
@Retention(RetentionPolicy.RUNTIME)
@Constraint(validatedBy=MyConstraintValidator.class)
public @interface MyConstraint {
    String message() default "";
}
public class MyConstraintValidator implements ConstraintValidator<MyConstraint,String> {
    @Override
    public void initialize(MyConstraint constraintAnnotation) {
        //获取注解属性定义的值
    }

    @Override
    public boolean isValid(String s, ConstraintValidatorContext constraintValidatorContext) {
        if(s == null || s.length() == 0 || s.trim().length() == 0){
            return false;
        }
        return true;
    }
}
执行结果如下:
public class A{
    @MyConstraint(message = "不能为null")
    private String name;

    public String getName() {
        return name;
    }

    public void setName(String name) {
        this.name = name;
    }
}
@Component
public class Test {
    @Autowired
    private Validator validator;
    public static void main(String[] args) throws ParseException {
        AnnotationConfigApplicationContext applicationContext = new AnnotationConfigApplicationContext("com.example");
        Test bean = applicationContext.getBean(Test.class);
        A a = new A();
        a.setName(" ");
        BindException b = new BindException(a,"a");
        bean.validator.validate(a,b);
        for (ObjectError lists:b.getAllErrors()) {
            System.out.println(lists.getDefaultMessage());
        }
        /** Output:
         *  不能为null
         */
    }
}
您可以将Bean Validation 1.1支持的方法验证特性(作为自定义扩展,Hibernate Validator 4.3也支持)通过MethodValidationPostProcessorbean定义:
@Configuration
public class AppConfig {

    @Bean
    public MethodValidationPostProcessor validationPostProcessor() {
        return new MethodValidationPostProcessor();
    }
}
为了符合Spring驱动的方法验证,所有的目标类都需要用Spring的@Validated注释,它还可以选择声明要使用的验证组。
示例代码如下:
@Service
@Validated
public class TestService {
    public void test(@NotBlank(message = "name不能为null") String name){

    }
}
@Component
public class Test {
    @Autowired
    private TestService testService;

    public static void main(String[] args) throws ParseException {
        AnnotationConfigApplicationContext applicationContext = new AnnotationConfigApplicationContext("com.example");
        Test bean = applicationContext.getBean(Test.class);
        bean.testService.test(null);
        /** Output:
         *  Exception in thread "main" javax.validation.ConstraintViolationException: test.arg0: name不能为null
         */
    }
}
方法验证依赖于AOP代理在目标类周围,要么是接口上方法的JDK动态代理,要么是CGLIB代理。代理的使用有一定的限制,其中一些在理解AOP代理。此外,记住总是在代理类上使用方法和访问器;直接进入现场是行不通的。
内置的PropertyEditor
Spring使用了Java自带的接口PropertyEditor,可以通过实现该接口进行将属性转换成所需的类型,例如,一个Date可以用字符串表示(如String: ‘2007-14-09’)。
PropertyEditor接口主要方法有四个:
void setValue(Object value): 设置属性值。Object getValue(): 获取属性值。String getAsText(): 把属性值转换成 String。void setAsText(String text): 把 String 转换成属性值。
Spring有许多内置的PropertyEditor让实现变得简单。它们都位于org.springframework.beans.propertyeditors包。
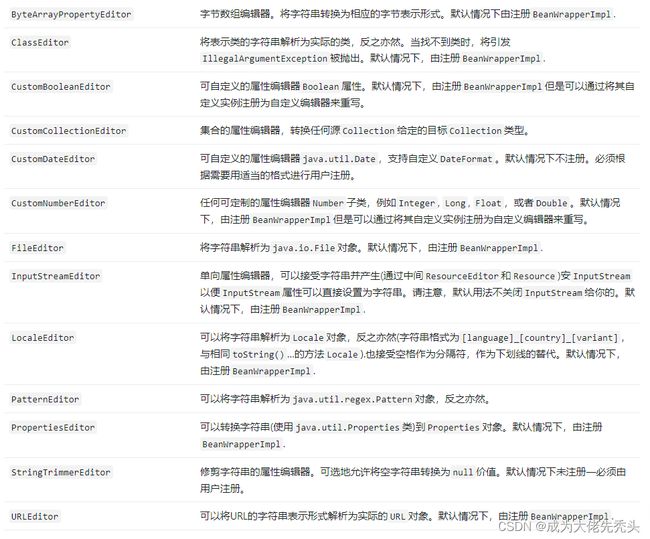
Java 也为我们提供了一个默认的实现类 java.beans.PropertyEditorSupport,上述内置的PropertyEditor均继承此类。
我们以CustomBooleanEditor类为例,讲解他们的转换过程。
示例代码如下:
public class CustomBooleanEditor extends PropertyEditorSupport {
    public static final String VALUE_TRUE = "true";
    public static final String VALUE_FALSE = "false";
    public static final String VALUE_ON = "on";
    public static final String VALUE_OFF = "off";
    public static final String VALUE_YES = "yes";
    public static final String VALUE_NO = "no";
    public static final String VALUE_1 = "1";
    public static final String VALUE_0 = "0";
    @Nullable
    private final String trueString;
    @Nullable
    private final String falseString;
    private final boolean allowEmpty;

    public CustomBooleanEditor(boolean allowEmpty) {
        this((String)null, (String)null, allowEmpty);
    }

    public CustomBooleanEditor(@Nullable String trueString, @Nullable String falseString, boolean allowEmpty) {
        this.trueString = trueString;
        this.falseString = falseString;
        this.allowEmpty = allowEmpty;
    }

    public void setAsText(@Nullable String text) throws IllegalArgumentException {
        String input = text != null ? text.trim() : null;
        if (this.allowEmpty && !StringUtils.hasLength(input)) {
            this.setValue((Object)null);
        } else if (this.trueString != null && this.trueString.equalsIgnoreCase(input)) {
            this.setValue(Boolean.TRUE);
        } else if (this.falseString != null && this.falseString.equalsIgnoreCase(input)) {
            this.setValue(Boolean.FALSE);
        } else if (this.trueString != null || !"true".equalsIgnoreCase(input) && !"on".equalsIgnoreCase(input) && !"yes".equalsIgnoreCase(input) && !"1".equals(input)) {
            if (this.falseString != null || !"false".equalsIgnoreCase(input) && !"off".equalsIgnoreCase(input) && !"no".equalsIgnoreCase(input) && !"0".equals(input)) {
                throw new IllegalArgumentException("Invalid boolean value [" + text + "]");
            }

            this.setValue(Boolean.FALSE);
        } else {
            this.setValue(Boolean.TRUE);
        }

    }

    public String getAsText() {
        if (Boolean.TRUE.equals(this.getValue())) {
            return this.trueString != null ? this.trueString : "true";
        } else if (Boolean.FALSE.equals(this.getValue())) {
            return this.falseString != null ? this.falseString : "false";
        } else {
            return "";
        }
    }
}
我们可以看到最重要的两个方法setAsText()方法和getAsText()方法:
setAsText()方法:我们看到很多静态字符串变量,在setAsText()方法中判断这些字符串转换为对应的boolean类型存储。getAsText()方法:通过调用getAsText()方法将存储的boolean类型转换为字符串类型的"true"或者"false"。
下面简单的介绍使用,示例代码如下:
public class Test {

    public static void main(String[] args) {
        CustomBooleanEditor customBooleanEditor = new CustomBooleanEditor(true);
        customBooleanEditor.setAsText("yes");
        System.out.println(customBooleanEditor.getAsText());
        /** Output:
         *  true
         */
    }
}
如果正常的情况下,将spring注入一个date类型,会报错,如下所示:
<beans>
    <bean id="a" class="com.example.A">
        <property name="date" value="2023-01-01">property>
    bean>
beans>
public class A{
    private Date date;

    public Date getDate() { return date; }

    public void setDate(Date date) { this.date = date; }
}
public class Test {

    public static void main(String[] args) {
        ClassPathXmlApplicationContext applicationContext = new ClassPathXmlApplicationContext("applicationContext.xml");
        Test bean = applicationContext.getBean(A.class);
        System.out.println(JSONObject.toJSONString(bean.a));
        /** Output:
         *  Cannot convert value of type 'java.lang.String' to required type
         * 'java.util.Date' for property 'date': no matching editors or conversion strategy found
         */
    }
}
我们可以通过继承PropertyEditorSupport自定义属性编辑器,解决这个问题,示例代码如下:
public class MyPropertyEditor extends PropertyEditorSupport {
    private static SimpleDateFormat simpleDateFormat = new SimpleDateFormat("yyyy-MM-dd");

    @Override
    public void setAsText(String text) throws IllegalArgumentException {
        try {
            setValue(simpleDateFormat.parse(text));
        } catch (ParseException e) {
            e.printStackTrace();
        }
    }
}
public class Test {

    public static void main(String[] args) {
        ClassPathXmlApplicationContext applicationContext = new ClassPathXmlApplicationContext("applicationContext.xml");
        A bean = applicationContext.getBean(A.class);
        System.out.println(JSONObject.toJSONString(bean));
        /** Output:
         *  {"date":"2023-01-01 00:00:00"}
         */
    }
}
在CustomEditorConfigurer注入自定义的PropertyEditor,这样就可以在需要时使用它。
<beans>
    <bean id="a" class="com.example.A">
        <property name="date" value="2023-01-01">property>
    bean>
    <bean class="org.springframework.beans.factory.config.CustomEditorConfigurer">
        <property name="customEditors">
            <map>
                <entry key="java.util.Date" value="com.example.MyPropertyEditor">entry>
            map>
        property>
    bean>
beans>
还有另一种方式使用PropertyEditorRegistrar接口进行注册,当您需要在几种不同的情况下使用同一组属性编辑器时,这个接口特别有用。您可以编写相应的注册器,并在每种情况下重用它。
示例代码如下:
public class MyPropertyEditorRegistrar implements PropertyEditorRegistrar {
    @Override
    public void registerCustomEditors(PropertyEditorRegistry propertyEditorRegistry) {
        propertyEditorRegistry.registerCustomEditor(Date.class,new MyPropertyEditor());
    }
}
public class Test {

    public static void main(String[] args) {
        ClassPathXmlApplicationContext applicationContext = new ClassPathXmlApplicationContext("applicationContext.xml");
        A bean = applicationContext.getBean(A.class);
        System.out.println(JSONObject.toJSONString(bean));
        /** Output:
         *  {"date":"2023-01-01 00:00:00"}
         */
    }
}
在CustomEditorConfigurer中注入自定义的PropertyEditorRegistrar。
<beans>
    <bean id="a" class="com.example.A">
        <property name="date" value="2023-03-20 12:15:31">property>
    bean>
    <bean class="org.springframework.beans.factory.config.CustomEditorConfigurer">
        <property name="propertyEditorRegistrars">
            <list>
                <ref bean="myPropertyEditorRegistrar">ref>
            list>
        property>
    bean>
    <bean id="myPropertyEditorRegistrar" class="com.example.MyPropertyEditorRegistrar">bean>
beans>
类型转换
Convert包提供了一个通用的类型转换系统。系统定义了一个SPI来实现类型转换逻辑,以及一个API来在运行时执行类型转换。在Spring容器中,您可以使用这个系统作为PropertyEditor实现的替代方案,将外部化的bean属性值字符串转换为所需的属性类型。您还可以在应用程序中需要类型转换的任何地方使用公共API。
@FunctionalInterface
public interface Converter<S, T> {
    @Nullable
    T convert(S source);

    default <U> Converter<S, U> andThen(Converter<? super T, ? extends U> after) {
        Assert.notNull(after, "After Converter must not be null");
        return (s) -> {
            T initialResult = this.convert(s);
            return initialResult != null ? after.convert(initialResult) : null;
        };
    }
}
- Converter
若要创建自己的转换器,请实现Converter接口,S表示原类型,T表示要转换的类型。保证源参数不为空。你的Converter如果转换失败,可能会引发任何未检查的异常。具体来说,它应该引发一个IllegalArgumentException报告无效的源值。请注意确保您的Converter实现是线程安全的。
比如,实现String类型转Date类型,示例代码如下:
public class StringToDate implements Converter<String, Date> {
    private static SimpleDateFormat simpleDateFormat = new SimpleDateFormat("yyyy-MM-dd");
    @Override
    public Date convert(String source) {
        try {
            return simpleDateFormat.parse(source);
        } catch (ParseException e) {
            e.printStackTrace();
        }
        return null;
    }
}
public class Test {
    public static void main(String[] args) {
        Converter stringToDate = new StringToDate();
        Date date = (Date) stringToDate.convert("2023-03-01");
        System.out.println(date);
        /** Output:
         *  Wed Mar 01 00:00:00 CST 2023
         */
    }
}
- ConverterFactory
当需要集中整个类层次结构的转换逻辑时(例如,当从String到Enum对象),您可以实现ConverterFactory,如下例所示:
public interface ConverterFactory<S, R> {
    <T extends R> Converter<S, T> getConverter(Class<T> targetType);
}
S参数化为要转换的类型,将R参数化为定义范围可以转换成的类。然后实现getConverter(Class,其中T是R的子类。
示例代码如下:
public enum SexEnum {
    Girl(0,"女"),
    Boy(1,"男");

    private Integer code;
    private String name;

    SexEnum(Integer code, String name) {
        this.code = code;
        this.name = name;
    }

    public Integer getCode() { return code; }

    public String getName() { return name; }
}
public class StringToEnumConvertFactory implements ConverterFactory<String, Enum> {
    @Override
    public <T extends Enum> Converter<String, T> getConverter(Class<T> targetType) {
        return new StringToEnumConvert(targetType);
    }
}
public class StringToEnumConvert<T extends Enum> implements Converter<String,T> {
    private Class<T> anEnum;

    public StringToEnumConvert(Class<T> anEnum) {
        this.anEnum = anEnum;
    }

    @Override
    public T convert(String source) {
        return (T) Enum.valueOf(this.anEnum,source);
    }
}
public class Test {
    public static void main(String[] args) {
        StringToEnumConvertFactory stringToEnumConvertFactory = new StringToEnumConvertFactory();
        Converter<String, SexEnum> converter = stringToEnumConvertFactory.getConverter(SexEnum.class);
        SexEnum boy = converter.convert("Boy");
        System.out.println(boy);
        /** Output:
         *  Boy
         */
    }
}
除此之外,GenericConverter具有比Converter更灵活但不那么强类型的签名,它支持多个源类型和目标类型之间的转换。比如ArrayToCollectionConverter、ArrayToStringConverter等。
public interface GenericConverter {

    public Set<ConvertiblePair> getConvertibleTypes();

    Object convert(Object source, TypeDescriptor sourceType, TypeDescriptor targetType);
}
你想要一个Converter仅在特定条件成立时运行。例如,您可能希望运行一个Converter仅当目标字段上存在特定的注释时你可以使用ConditionalGenericConverter,它关联GenericConverter和ConditionalConverter。
public interface ConditionalConverter {
    boolean matches(TypeDescriptor sourceType, TypeDescriptor targetType);
}
public interface ConditionalGenericConverter extends GenericConverter, ConditionalConverter {
}
- ConversionService
ConversionService定义了一个统一的API,用于在运行时执行类型转换逻辑。在core.convert.support包中提供了一个健壮的ConversionService实现。GenericConversionService是适用于大多数环境的通用实现。ConversionServiceFactory为创建通用的ConversionService配置提供了一个方便的工厂。
public interface ConversionService {

    boolean canConvert(Class<?> sourceType, Class<?> targetType);

    <T> T convert(Object source, Class<T> targetType);

    boolean canConvert(TypeDescriptor sourceType, TypeDescriptor targetType);

    Object convert(Object source, TypeDescriptor sourceType, TypeDescriptor targetType);
}
依旧以String转Date为例,示例代码如下:
public class MyConvert implements Converter<String, Date> {
    private static SimpleDateFormat simpleDateFormat = new SimpleDateFormat("yyyy-MM-dd");
    @Override
    public Date convert(String source) {
        try {
            return simpleDateFormat.parse(source);
        } catch (ParseException e) {
            e.printStackTrace();
        }
        return null;
    }
}
public class Test {
    public static void main(String[] args) {
        ClassPathXmlApplicationContext applicationContext = new ClassPathXmlApplicationContext("applicationContext.xml");
        ConversionService bean = applicationContext.getBeanFactory().getConversionService();
        Date convert = bean.convert("2023-03-21",Date.class);
        System.out.println(convert);
        /** Output:
         *  Tue Mar 21 00:00:00 CST 2023
         */
    }
}
在Spring中注册一个默认的ConversionService ,默认的ConversionService可以在字符串、数字、枚举、集合、映射和其他常见类型之间进行转换。若要用您自己的自定义转换器补充或重写默认转换器,请设置converters属性。属性值可以实现任何Converter、ConverterFactory或GenericConverter接口。
<beans>
    <bean id="conversionService" class="org.springframework.context.support.ConversionServiceFactoryBean">
        <property name="converters">
            <set>
                <bean class="com.example.MyConvert">bean>
            set>
        property>
    bean>
beans>
在Spring MVC应用程序中使用是常见的(后续讲解)。
除此之外DefaultConversionService 自动注册适用于大多数环境的转换器。这包括集合转换器、标量转换器和基本的对象到字符串转换器。通过addDefaultConverters()方法,可以向任何ConverterRegistry注册相同的转换器。
public class Test {
    public static void main(String[] args) {
        DefaultConversionService defaultConversionService = new DefaultConversionService();
        Integer convertInteger = defaultConversionService.convert("123", Integer.class);
        System.out.println(convertInteger);
        //添加转换器
        defaultConversionService.addConverter(new MyConvert());
        Date convertDate = defaultConversionService.convert("2023-03-01", Date.class);
        System.out.println(convertDate);
        /** Output:
         *  123
         *  Wed Mar 01 00:00:00 CST 2023
         */
    }
}
字段格式
当您在客户端环境(如web应用程序)中工作并需要解析和打印本地化字段值时,可以使用Formatter 接口。
public interface Formatter<T> extends Printer<T>, Parser<T> { }
public interface Printer<T> {
    String print(T object, Locale locale);
}
public interface Parser<T> {
    T parse(String text, Locale locale) throws ParseException;
}
- Formatter
Formatter接口继承Printer和Parser接口,T表示您希望格式化的对象类型,例如,java.util.Date。print()方法用于显示,parse()方法用于解析出T实例。
比如,最经常用的DateFormatter就是实现Formatter接口。
public class DateFormatter implements Formatter<Date> {
	//省略代码......
}
spring提供很多内置类,比如:NumberStyleFormatter、PercentStyleFormatter和CurrencyStyleFormatter等格式化Number。
示例代码如下:
public class Test {
    public static void main(String[] args) {
        try {
            //String类型转换
            NumberFormatter numberFormatter = new NumberFormatter();
            Long string = (Long) numberFormatter.stringToValue("213");
            System.out.println(string);
            //带货币符号
            CurrencyStyleFormatter currencyStyleFormatter = new CurrencyStyleFormatter();
            currencyStyleFormatter.setRoundingMode(RoundingMode.HALF_UP);
            String print = currencyStyleFormatter.print(11.23, Locale.CHINA);
            System.out.println(print);
            //带百分比
            PercentStyleFormatter percentStyleFormatter = new PercentStyleFormatter();
            print = percentStyleFormatter.print(11.23, Locale.CHINA);
            System.out.println(print);
            /** Output:
             *  213
             *  ¥11.23
             *  1,123%
             */
        } catch (ParseException e) {
            e.printStackTrace();
        }
    }
}
除此之外,你也可以自定义格式化转换器,以String转Date为例,示例代码如下:
public class MyFormatter implements Formatter<Date> {
    SimpleDateFormat simpleDateFormat = new SimpleDateFormat("yyyy-MM-dd");
    @Override
    public Date parse(String text, Locale locale) throws ParseException {
        return simpleDateFormat.parse(text);
    }

    @Override
    public String print(Date object, Locale locale) {
        return simpleDateFormat.format(object);
    }
}
public class Test {
    public static void main(String[] args) {
        ClassPathXmlApplicationContext applicationContext = new ClassPathXmlApplicationContext("applicationContext.xml");
        A bean = applicationContext.getBean(A.class);
        System.out.println(JSONObject.toJSONString(bean));
    }
}
再XML中定义一个Bean,向FormattingConversionServiceFactoryBean中注入formatters自定义格式化转换器。
<beans>
    <bean id="a" class="com.example.A">
        <property name="date" value="2023-01-01">property>
    bean>
    <bean id="conversionService" class="org.springframework.format.support.FormattingConversionServiceFactoryBean">
        <property name="formatters">
            <set>
                <bean class="com.example.MyFormatter">bean>
            set>
        property>
    bean>
beans>
注解方式如下:
@Configuration
public class Config {
    @Bean
    public FormattingConversionService conversionService() {
        DefaultFormattingConversionService conversionService = new DefaultFormattingConversionService();
        conversionService.addFormatter(new MyFormatter());
        return conversionService;
    }
}
你也可以使用注解来配置字段格式化,示例代码如下:
public class A{
    @NumberFormat(style = NumberFormat.Style.DEFAULT,pattern = "#,##")
    private int n1;
    @NumberFormat(style = NumberFormat.Style.NUMBER)
    private int n2;
    @NumberFormat(style = NumberFormat.Style.CURRENCY)
    private int n3;
    @NumberFormat(style = NumberFormat.Style.PERCENT)
    private int n4;
    @DateTimeFormat(iso = DateTimeFormat.ISO.DATE)
    private Date date;
可以用@NumberFormat要格式化Number,@DateTimeFormat格式化java.util.Date,ISO日期表示(yyyy-MM-dd)。
- FormatterRegistry
FormatterRegistry是用于注册格式化程序和转换器的接口,FormattingConversionService是适用于大多数环境的FormatterRegistry的实现。您可以通过编程或声明的方式将此变体配置为Spring bean,例如使用FormattingConversionServiceFactoryBean。您可以通过字段类型或注释来注册格式化程序。
public interface FormatterRegistry extends ConverterRegistry {
    void addPrinter(Printer<?> printer);

    void addParser(Parser<?> parser);

    void addFormatter(Formatter<?> formatter);

    void addFormatterForFieldType(Class<?> fieldType, Formatter<?> formatter);

    void addFormatterForFieldType(Class<?> fieldType, Printer<?> printer, Parser<?> parser);

    void addFormatterForFieldAnnotation(AnnotationFormatterFactory<? extends Annotation> annotationFormatterFactory);
}
FormatterRegistrar是一个用于通过FormatterRegistry注册格式化程序和转换器的接口。
public interface PropertyEditorRegistrar {
    void registerCustomEditors(PropertyEditorRegistry var1);
}
FormatterRegistrar在为给定的格式类别(如日期格式)注册多个相关的转换器和格式化程序时非常有用。
示例代码如下:
public class MyFormatterRegistrar implements FormatterRegistrar {
    @Override
    public void registerFormatters(FormatterRegistry registry) {
        registry.addFormatter(new MyFormatter());
    }
}
public class Test {
    public static void main(String[] args) throws ParseException {
        ClassPathXmlApplicationContext applicationContext = new ClassPathXmlApplicationContext("applicationContext.xml");
        A bean = applicationContext.getBean(A.class);
        System.out.println(bean.getDate());
    }
}
注入formatterRegistrars自定义注册器。
<beans xmlns="http://www.springframework.org/schema/beans"
       xmlns:xsi="http://www.w3.org/2001/XMLSchema-instance"
       xsi:schemaLocation="http://www.springframework.org/schema/beans
        https://www.springframework.org/schema/beans/spring-beans.xsd">

    <bean id="a" class="com.example.A">
        <property name="date" value="2023-01-01">property>
    bean>
    <bean id="conversionService" class="org.springframework.format.support.FormattingConversionServiceFactoryBean">
        <property name="formatterRegistrars">
            <set>
                <bean class="com.example.MyFormatterRegistrar">bean>
            set>
        property>
    bean>
beans>