【golang】9、pprof 监控与性能调优
文章目录
- 一、程序性能调优
- 二、[runtime/pprof](https://pkg.go.dev/runtime/pprof#Profile)
-
- 2.1 go test benchmark 的 pprof
- 2.2 代码的 pprof
-
- 2.2.1 采集
- 2.2.2 文本分析
-
- 2.2.2.1 交互式命令行
-
- top
- list
- 2.2.2.2 非交互式文本
- 2.2.3 可视化分析
-
- 2.2.3.1 图形可视化
- 2.2.3.2 浏览器可视化
- 三、[net/http/pprof](https://pkg.go.dev/net/http/pprof)
-
- 3.1 命令行交互分析
- 3.2 web 可视化
一、程序性能调优
通常程序的监控如下:
- CPU:程序对 CPU 的使用时长、占比
- 内存:堆、栈情况,是否泄漏
- IO:程序对 IO 的使用时长、占比
golang 程序特有的监控如下:
- goroutine:使用情况、调用链、泄漏
- dead lock:死锁检测
- data race detector:数据竞争
性能调优的方法:
- Linux 的 top、dstat、perf 等监控工具
- Benchmark:基准测试
- Profiling:程序运行时采样,并画像,无时间线
- Trace:程序运行时采样,并画像,含时间线
golang 用 pprof 来监控运行时状态,具体可见官网,其前身为gperftools,开启 pprof 后,程序会定时采集自身的堆栈、cpu、mem 信息,并形成数据报告。
pprof 以 profile.proto 格式保存数据,用 「go tool pprof 工具」读此数据即可生成可视化报告,支持如下三种形式:
- Report generation:报告生成
- Interactive terminal use:交互式终端
- Web interface:Web 界面
二、runtime/pprof
「runtime/pprof 包」采样程序的运行时信息,转换为 「pprof 可视化工具」需要的格式,一般用于非 web 应用,如一次性的工具。
2.1 go test benchmark 的 pprof
go test 命令默认含 pprof 功能,例如 go test -cpuprofile cpu.prof -memprofile mem.prof -bench . 将在当前路径写入 cpu.prof 和 mem.prof 文件。
首先准备一个 a_test.go 文件,目录结构如下:
$export PS1='bash\$ '
bash$ ls
a_test.go go.mod
测试代码如下:
package main

import "testing"

func Max(a, b int) int {
	if a > b {
		return a
	}
	return b
}

func TestMax(t *testing.T) {
	type args struct {
		a int
		b int
	}
	tests := []struct {
		name string
		args args
		want int
	}{
		{
			name: "test max is pre",
			args: args{
				a: 2,
				b: 1,
			},
			want: 2,
		},
		{
			name: "test max is after",
			args: args{
				a: 2,
				b: 3,
			},
			want: 3,
		},
	}
	for _, tt := range tests {
		t.Run(tt.name, func(t *testing.T) {
			if got := Max(tt.args.a, tt.args.b); got != tt.want {
				t.Errorf("Max() = %v, want %v", got, tt.want)
			}
		})
	}
}
go test 后效果如下:
bash$ go test .
ok  	example.com/m/v2	(cached)
go test benchmark 后效果如下:
bash$ go test -cpuprofile cpu.prof -memprofile mem.prof -bench .
PASS
ok  	example.com/m/v2	0.212s

bash$ ll
total 6088
-rw-r--r--  1 g  staff   599B  3  8 16:32 a_test.go
-rw-r--r--  1 g  staff   106B  3  8 16:39 cpu.prof
-rw-r--r--  1 g  staff    33B  3  8 16:34 go.mod
-rwxr-xr-x  1 g  staff   3.0M  3  8 16:39 m.test
-rw-r--r--  1 g  staff   1.4K  3  8 16:39 mem.prof

bash$ cat cpu.prof
�N��H��������

P��``��22samples2count2cpu2
                           nanoseconds��ز�4N%
2.2 代码的 pprof
2.2.1 采集
通过 os.Create() 打开一个空文件,将文件句柄 f 传给 pprof.StartCPUProfile(f) 即开始 CPU 采样,传给 pprof.WriteHeapProfile(f) 即开始内存采样。
package main

import (
	"bytes"
	"flag"
	"log"
	"math/rand"
	"os"
	"runtime"
	"runtime/pprof"
	"sync"
)

var cpuprofile = flag.String("cpuprofile", "", "write cpu profile to `file`")
var memprofile = flag.String("memprofile", "", "write mem profile to `file`")

func main() {
	flag.Parse()
	if *cpuprofile != "" {
		f, err := os.Create(*cpuprofile)
		if err != nil {
			log.Fatal("could not create CPU profile: ", err)
		}
		defer f.Close()

		if err := pprof.StartCPUProfile(f); err != nil {
			log.Fatal("could not start CPU profile: ", err)
		}
		defer pprof.StopCPUProfile()
	}

	var wg sync.WaitGroup
	wg.Add(200)
	for i := 0; i < 200; i++ {
		go cycleNum(30000, &wg)
	}
	writeBytes()
	wg.Wait()

	if *memprofile != "" {
		f, err := os.Create(*memprofile)
		if err != nil {
			log.Fatal("could not create memory profile: ", err)
		}
		defer f.Close()
		runtime.GC()

		if err := pprof.WriteHeapProfile(f); err != nil {
			log.Fatal("cound not write memory profile: ", err)
		}
	}
}

func cycleNum(num int, wg *sync.WaitGroup) {
	slice := make([]int, 0)
	for i := 0; i < num; i++ {
		for j := 0; j < num; j++ {
			j = i + j
			slice = append(slice, j)
		}
	}
	wg.Done()
}

func writeBytes() *bytes.Buffer {
	var buff bytes.Buffer
	for i := 0; i < 30000; i++ {
		buff.Write([]byte{'0' + byte(rand.Intn(10))})
	}
	return &buff
}
然后编译、采集、分析程序如下:
go build main.go # 编译
./main --cpuprofile=democpu.pprof  --memprofile=demomem.pprof # 用pprof采集数据
go tool pprof democpu.pprof # 分析数据 go tool pprof --help 可查看用法
2.2.2 文本分析
2.2.2.1 交互式命令行
交互式效果如下:
bash$ go tool pprof democpu.pprof
Type: cpu # 分析类型是 cpu
Time: Mar 8, 2023 at 7:14pm (CST)
Duration: 502.62ms, Total samples = 690ms (137.28%) # 程序的执行时长
Entering interactive mode (type "help" for commands, "o" for options)
(pprof) help # 查看帮助
top
top 查看函数的 cpu 耗时和百分比,降序输出:
(pprof) top
Showing nodes accounting for 630ms, 91.30% of 690ms total
Showing top 10 nodes out of 86
      flat  flat%   sum%        cum   cum%
     300ms 43.48% 43.48%      300ms 43.48%  runtime.memmove
      70ms 10.14% 53.62%       70ms 10.14%  runtime.usleep
      60ms  8.70% 62.32%       60ms  8.70%  runtime.memclrNoHeapPointers
      50ms  7.25% 69.57%       50ms  7.25%  runtime.asyncPreempt
      50ms  7.25% 76.81%       60ms  8.70%  runtime.madvise
      40ms  5.80% 82.61%      510ms 73.91%  main.cycleNum # 我们的测试函数
      30ms  4.35% 86.96%       30ms  4.35%  runtime.pthread_kill
      10ms  1.45% 88.41%       10ms  1.45%  bytes.growSlice
      10ms  1.45% 89.86%       10ms  1.45%  runtime.adjustpointers
      10ms  1.45% 91.30%       20ms  2.90%  runtime.callers
top 也可以带参数:
(pprof) top 15
Showing nodes accounting for 680ms, 98.55% of 690ms total
Showing top 15 nodes out of 86
      flat  flat%   sum%        cum   cum%
     300ms 43.48% 43.48%      300ms 43.48%  runtime.memmove
      70ms 10.14% 53.62%       70ms 10.14%  runtime.usleep
      60ms  8.70% 62.32%       60ms  8.70%  runtime.memclrNoHeapPointers
      50ms  7.25% 69.57%       50ms  7.25%  runtime.asyncPreempt
      50ms  7.25% 76.81%       60ms  8.70%  runtime.madvise
      40ms  5.80% 82.61%      510ms 73.91%  main.cycleNum
      30ms  4.35% 86.96%       30ms  4.35%  runtime.pthread_kill
      10ms  1.45% 88.41%       10ms  1.45%  bytes.growSlice
      10ms  1.45% 89.86%       10ms  1.45%  runtime.adjustpointers
      10ms  1.45% 91.30%       20ms  2.90%  runtime.callers
      10ms  1.45% 92.75%       10ms  1.45%  runtime.findfunc
      10ms  1.45% 94.20%       10ms  1.45%  runtime.kevent
      10ms  1.45% 95.65%       10ms  1.45%  runtime.libcCall
      10ms  1.45% 97.10%       10ms  1.45%  runtime.markBits.isMarked (inline)
      10ms  1.45% 98.55%       10ms  1.45%  runtime.pcvalue
其中各列含义如下:
| 字段 | 说明 |
|---|---|
| flat | 当前函数占用 cpu 耗时 |
| flat % | 当前函数占用 cpu 耗时百分比 |
| sum% | 函数占用 cpu 时间累积占比,从小到大一直累积到 100% |
| cum | 当前函数加上调用当前函数的函数占用 cpu 的总耗时 |
| %cum | 当前函数加上调用当前函数的函数占用 cpu 的总耗时占比 |
list
从字段数据我们可以看出哪一个函数比较耗费时间,就可以对这个函数进一步分析。分析用到的命令是 list 。
list 命令:可以列出函数最耗时的代码部分,格式:list 函数名
(pprof) list main.cycleNum
Total: 690ms
ROUTINE ======================== main.cycleNum in /Users/g/Desktop/g/main.go
      40ms      510ms (flat, cum) 73.91% of Total
         .          .     51:	}
         .          .     52:}
         .          .     53:
         .          .     54:func cycleNum(num int, wg *sync.WaitGroup) {
         .          .     55:	slice := make([]int, 0)
      10ms       20ms     56:	for i := 0; i < num; i++ {
      20ms       30ms     57:		for j := 0; j < num; j++ {
      10ms       10ms     58:			j = i + j
         .      440ms     59:			slice = append(slice, j)
         .          .     60:		}
         .          .     61:	}
         .       10ms     62:	wg.Done()
         .          .     63:}
         .          .     64:
         .          .     65:func writeBytes() *bytes.Buffer {
         .          .     66:	var buff bytes.Buffer
         .          .     67:	for i := 0; i < 30000; i++ {
(pprof)
发现最耗时的代码是 59 行:slice = append(slice, j) ,这里耗时有 440ms ,可以对这个地方进行优化。
分析得出耗时的原因应该是 slice 的实时扩容引起的。则优化思路是通过 make([]int, num * num) 固定 slice 的容量,空间换时间提升性能。
2.2.2.2 非交互式文本
格式如下:
go tool pprof <format> [options] [binary] <source>
例如如下:
bash$ go tool pprof -text democpu.pprof
Type: cpu
Time: Mar 8, 2023 at 7:14pm (CST)
Duration: 502.62ms, Total samples = 690ms (137.28%)
Showing nodes accounting for 690ms, 100% of 690ms total
      flat  flat%   sum%        cum   cum%
     300ms 43.48% 43.48%      300ms 43.48%  runtime.memmove
      70ms 10.14% 53.62%       70ms 10.14%  runtime.usleep
      60ms  8.70% 62.32%       60ms  8.70%  runtime.memclrNoHeapPointers
      50ms  7.25% 69.57%       50ms  7.25%  runtime.asyncPreempt
      50ms  7.25% 76.81%       60ms  8.70%  runtime.madvise
      40ms  5.80% 82.61%      510ms 73.91%  main.cycleNum
      30ms  4.35% 86.96%       30ms  4.35%  runtime.pthread_kill
      10ms  1.45% 88.41%       10ms  1.45%  bytes.growSlice
      10ms  1.45% 89.86%       10ms  1.45%  runtime.adjustpointers
      10ms  1.45% 91.30%       20ms  2.90%  runtime.callers
2.2.3 可视化分析
2.2.3.1 图形可视化
除了上面的命令行交互分析,还可以用图形化来分析程序性能。图形化分析前,先要安装 graphviz 软件,下载安装后,把执行文件 bin 放入 Path 环境变量中,然后在终端输入 dot -version 命令查看是否安装成功。
生成可视化文件有 2 个步骤,根据上面采集的数据文件 democpu.pprof 来进行可视化:
- 命令行输入:go tool pprof democpu.pprof
- 输入 web 命令
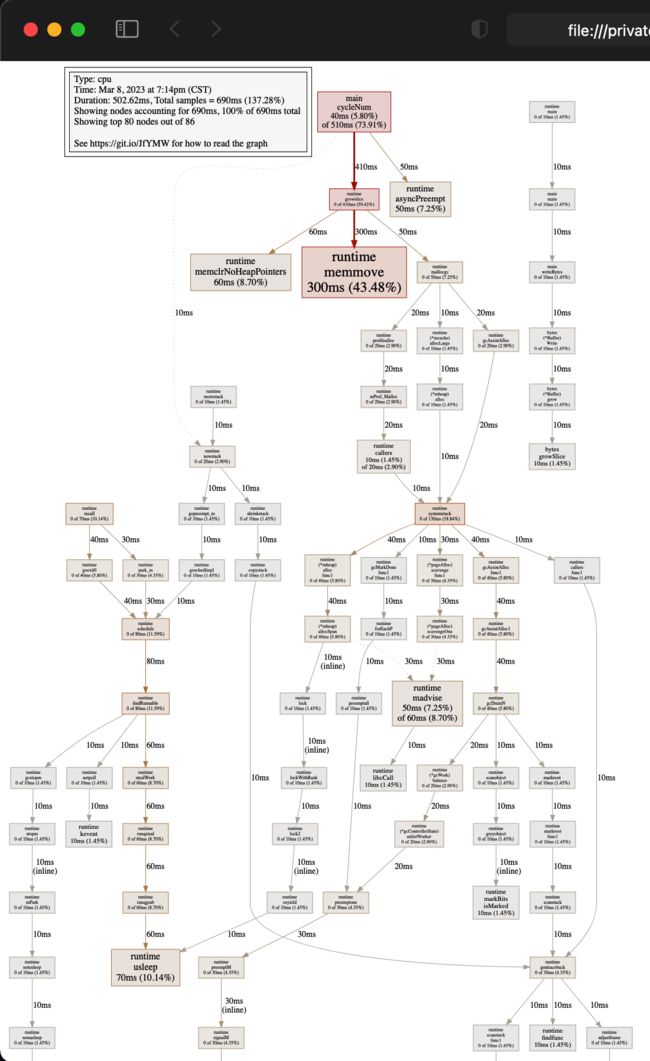
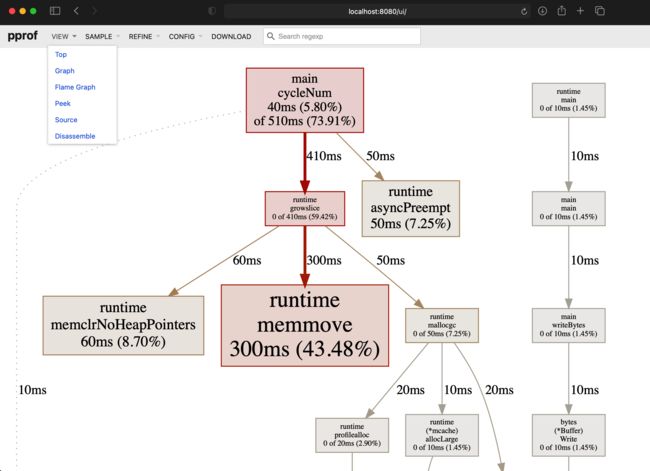
用浏览器打开输出的 svg 图效果如下:
- 每个框代表一个函数,理论上框越大表示占用的 cpu 资源越多
- 每个框之间的线条代表函数之间的调用关系,线条上的数字表示函数调用的耗时
- 每个框中第一行数字表示当前函数占用 cpu 的百分比,第二行数字表示当前函数累计占用 cpu 的百分比
2.2.3.2 浏览器可视化
bash$ go tool pprof -http=:8080 democpu.pprof
Serving web UI on http://localhost:8080
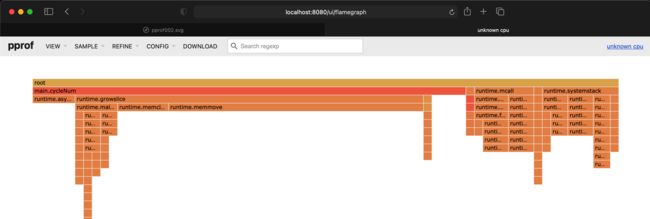
运行后自动在浏览器上打开 http://localhost:8080/ui/,可以在浏览器上查看(如果你在 web 浏览时没有这么多菜单可供选择,那么请先 go get -u github.com/google/pprof 安装原生的 pprof 工具):
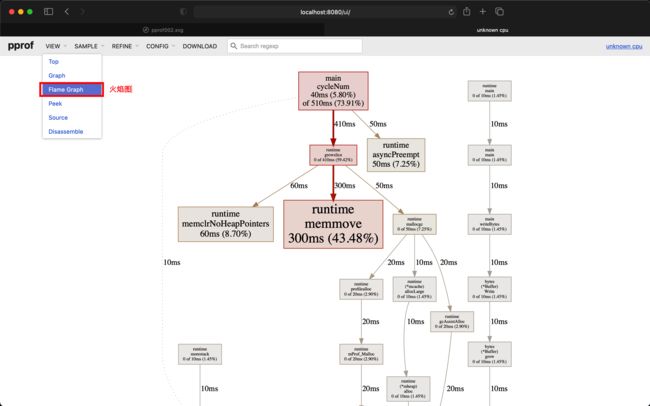
还可以在 VIEW 菜单下的 Flame Graph 查看火焰图。当然还有其他选项可供选择,比如 Top,Graph 等等选项。你可以根据需要选择。
三、net/http/pprof
「net/http/pprof包」采集 HTTP Server 的运行时信息,转换为「pprof 可视化工具」需要的格式,一般用于 Http Server,是对 「runtime/pprof」的封装。
使用方式是通过 import _ "net/http/pprof" 引入此包,必须启动 HttpServer 才能使用,例如:go http.ListenAndServe("localhost:6060", nil),URL 访问路径均以 /debug/pprof/ 为前缀。
示例代码如下:
package main

import (
	"bytes"
	"fmt"
	"io/ioutil"
	"log"
	"math/rand"
	"net/http"
	_ "net/http/pprof"
	"sync"
)

func main() {
	http.HandleFunc("/pprof-test", handler)

	fmt.Println("http server start")
	err := http.ListenAndServe(":8090", nil)
	if err != nil {
		log.Fatal(err)
	}
}

func handler(resp http.ResponseWriter, req *http.Request) {
	var wg sync.WaitGroup
	wg.Add(200)

	for i := 0; i < 200; i++ {
		go cyclenum(30000, &wg)
	}

	wg.Wait()

	wb := writeBytes()
	b, err := ioutil.ReadAll(wb)
	if err != nil {
		resp.Write([]byte(err.Error()))
		return
	}
	resp.Write(b)
}

func cyclenum(num int, wg *sync.WaitGroup) {
	slice := make([]int, 0)
	for i := 0; i < num; i++ {
		for j := 0; j < num; j++ {
			j = i + j
			slice = append(slice, j)
		}
	}
	wg.Done()
}

func writeBytes() *bytes.Buffer {
	var buff bytes.Buffer

	for i := 0; i < 30000; i++ {
		buff.Write([]byte{'a' + byte(rand.Intn(10))})
	}
	return &buff
}
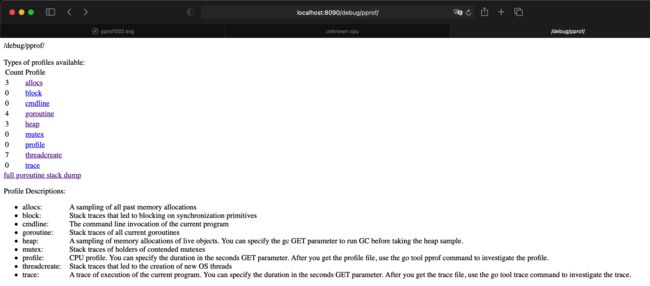
go run demohttp.go
运行效果如下:
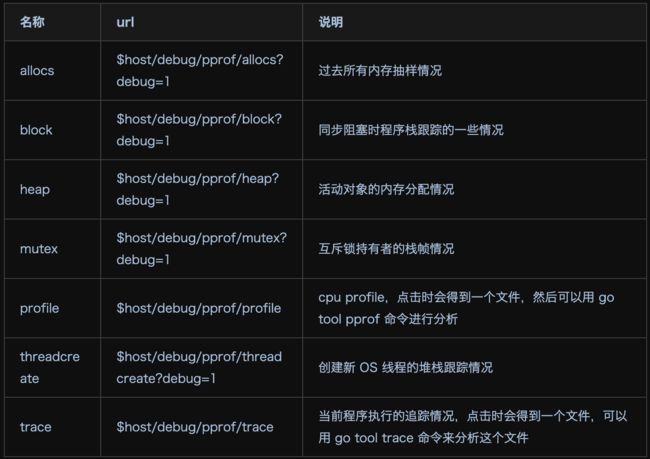
其中各采样含义如下:
3.1 命令行交互分析
点击链接即可查看、或下载文件并用 go tool pprof 分析,示例如下:
# 查看 heap
go tool pprof http://localhost:6060/debug/pprof/heap

# 查看 30-second CPU profile:
go tool pprof http://localhost:6060/debug/pprof/profile?seconds=30

# 查看 goroutine blocking profile, after calling runtime.SetBlockProfileRate in your program:
go tool pprof http://localhost:6060/debug/pprof/block

# 查看 mutex 持有者, after calling runtime.SetMutexProfileFraction in your program:
go tool pprof http://localhost:6060/debug/pprof/mutex

# 查看 5-second 的 go tool trace
curl -o trace.out http://localhost:6060/debug/pprof/trace?seconds=5
go tool trace trace.out

# 查看所有可用的 profiles, open http://localhost:6060/debug/pprof/ in your browser.
以分析 heap 为例,另开启终端执行如下命令 go tool pprof http://localhost:8090/debug/pprof/heap,运行效果如下:
(base) ~/g go tool pprof http://localhost:8090/debug/pprof/heap
Fetching profile over HTTP from http://localhost:8090/debug/pprof/heap
Saved profile in /Users/g/pprof/pprof.alloc_objects.alloc_space.inuse_objects.inuse_space.001.pb.gz
Type: inuse_space
Time: Mar 9, 2023 at 3:55pm (CST)
Entering interactive mode (type "help" for commands, "o" for options)
(pprof) top
Showing nodes accounting for 1024.77kB, 100% of 1024.77kB total
Showing top 10 nodes out of 13
flat flat% sum% cum cum%
512.56kB 50.02% 50.02% 512.56kB 50.02% runtime.allocm
512.20kB 49.98% 100% 512.20kB 49.98% runtime.malg
0 0% 100% 512.56kB 50.02% runtime.mstart
0 0% 100% 512.56kB 50.02% runtime.mstart0
0 0% 100% 512.56kB 50.02% runtime.mstart1
0 0% 100% 512.56kB 50.02% runtime.newm
0 0% 100% 512.20kB 49.98% runtime.newproc.func1
0 0% 100% 512.20kB 49.98% runtime.newproc1
0 0% 100% 512.56kB 50.02% runtime.resetspinning
0 0% 100% 512.56kB 50.02% runtime.schedule
(pprof) web # 打开浏览器
上文讲过,没有用户访问 http server ,需要的程序没有运行,一直阻塞在那里等待客户端的访问连接,所以 go tool pprof 只能采集部分代码运行的信息,而这部分代码又没有消耗多少 cpu。
则可以用 http 测试工具 模拟用户访问,其使用方式如下:
# 安装 hey:
go install github.com/rakyll/hey@latest

# 安装完成后,进行 http 测试:
hey -n 1000 http://localhost:8090/pprof-test

# 同时开启另一终端执行命令:
go tool pprof http://localhost:8090/debug/pprof/profile?seconds=120
# 等待 120s 后,采集信息完成,如下图:
Fetching profile over HTTP from http://localhost:8090/debug/pprof/profile?seconds=120
Saved profile in /Users/g/pprof/pprof.samples.cpu.002.pb.gz
Type: cpu
Time: Mar 9, 2023 at 4:04pm (CST)
Duration: 119.17s, Total samples = 314.39s (263.81%)
Entering interactive mode (type "help" for commands, "o" for options)

(pprof) top
Showing nodes accounting for 277.28s, 88.20% of 314.39s total
Dropped 377 nodes (cum <= 1.57s)
Showing top 10 nodes out of 89
      flat  flat%   sum%        cum   cum%
   139.14s 44.26% 44.26%    139.14s 44.26%  runtime.memmove
    38.04s 12.10% 56.36%    230.79s 73.41%  main.cyclenum
    21.33s  6.78% 63.14%     21.33s  6.78%  runtime.memclrNoHeapPointers
    21.03s  6.69% 69.83%     21.13s  6.72%  runtime.kevent
    18.68s  5.94% 75.77%     18.87s  6.00%  runtime.usleep
    18.49s  5.88% 81.65%     18.54s  5.90%  runtime.pthread_kill
     8.92s  2.84% 84.49%      9.25s  2.94%  runtime.madvise
     6.02s  1.91% 86.41%      6.03s  1.92%  runtime.asyncPreempt
     2.90s  0.92% 87.33%      7.40s  2.35%  runtime.pcvalue
     2.73s  0.87% 88.20%      3.35s  1.07%  runtime.step
(pprof)
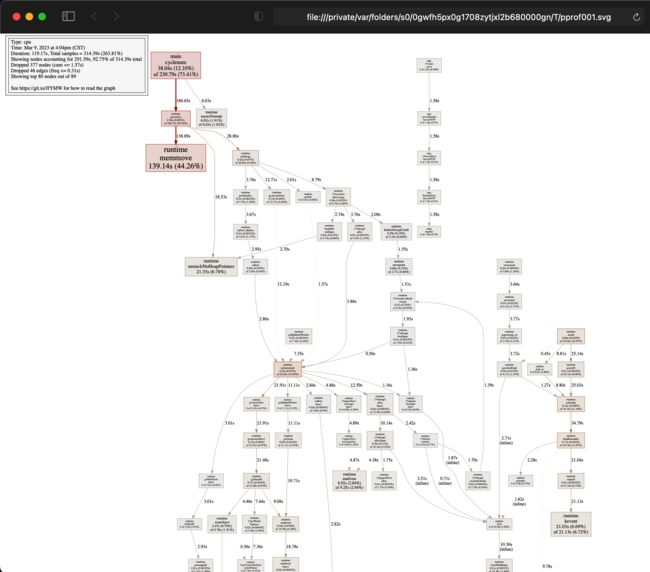
web 效果如下:
可以看到用户定义的一个最耗时函数是:main.cyclenum。如果要查看这个函数最耗时部分代码,可以用 list cyclenum 命令查看,示例如下:
(pprof) list main.cyclenum
Total: 314.39s
ROUTINE ======================== main.cyclenum in /Users/g/Desktop/g/main.go
    38.04s    230.79s (flat, cum) 73.41% of Total
         .          .     40:	resp.Write(b)
         .          .     41:}
         .          .     42:
         .          .     43:func cyclenum(num int, wg *sync.WaitGroup) {
         .          .     44:	slice := make([]int, 0)
     3.61s      4.09s     45:	for i := 0; i < num; i++ {
    22.57s     24.29s     46:		for j := 0; j < num; j++ {
     8.52s      8.77s     47:			j = i + j
     3.34s    193.49s     48:			slice = append(slice, j)
         .          .     49:		}
         .          .     50:	}
         .       70ms     51:	wg.Done()
         .       80ms     52:}
         .          .     53:
         .          .     54:func writeBytes() *bytes.Buffer {
         .          .     55:	var buff bytes.Buffer
         .          .     56:
         .          .     57:	for i := 0; i < 30000; i++ {
(pprof)
3.2 web 可视化
官网安装后,go 官方自带了 go tool pprof 命令。
# 执行命令:
go tool pprof -http=":8080" http://localhost:8090/debug/pprof/profile

# 同时开启另一终端执行测试命令:
hey -n 200 -q 5 http://localhost:8090/pprof-test
上面 go tool pprof 执行完成后,会自动在浏览器打开一个 http 地址,http://localhost:8080/ui/,如下图:
go 官方的 profile 设计博客
参考
