IDEA 创建SpringBoot+Mybatis项目
之前入门了SSM框架,现在学习一下SpringBoot
前置条件
电脑 JAVA环境变量配置(安装JAVA),Maven环境变量配置(安装Maven),IDEA软件
检测是否安装了 JAVA 和 Maven 的方法百度
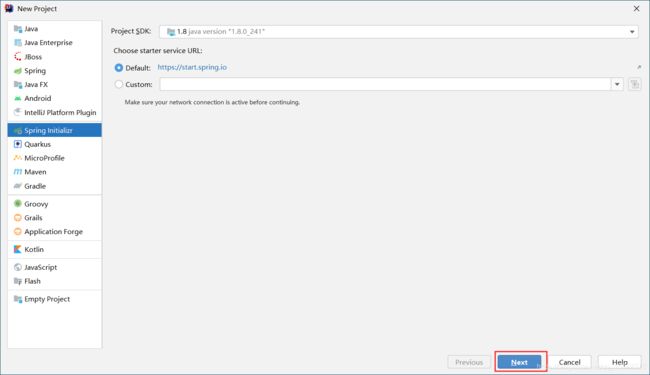
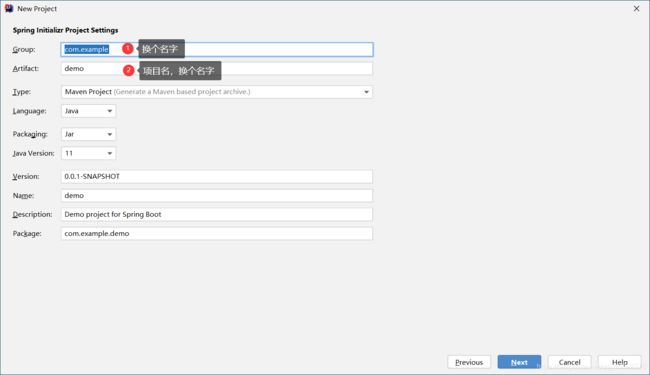
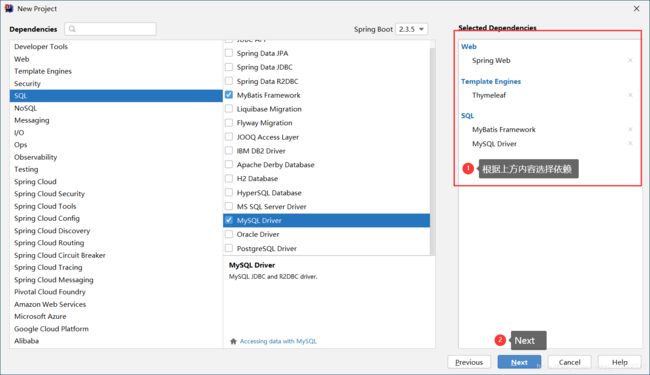
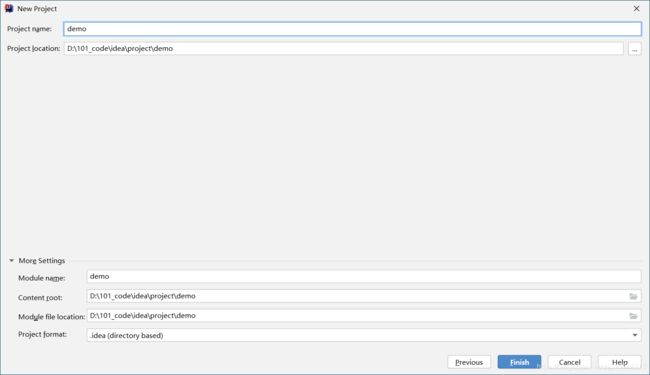
1.创建项目
File->New->Project->Spring Initializr
Next
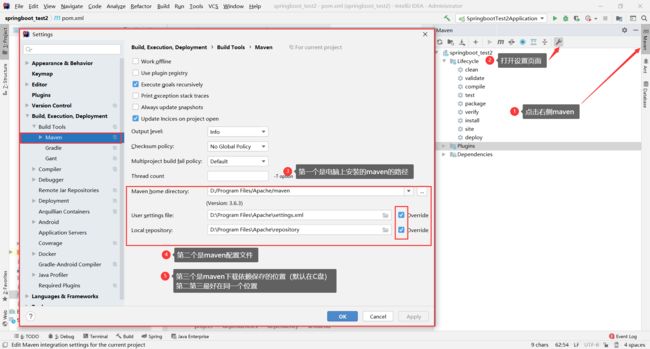
2.项目创建完成,设置maven
这个地方路径设置有时很麻烦,可能不会一次成功
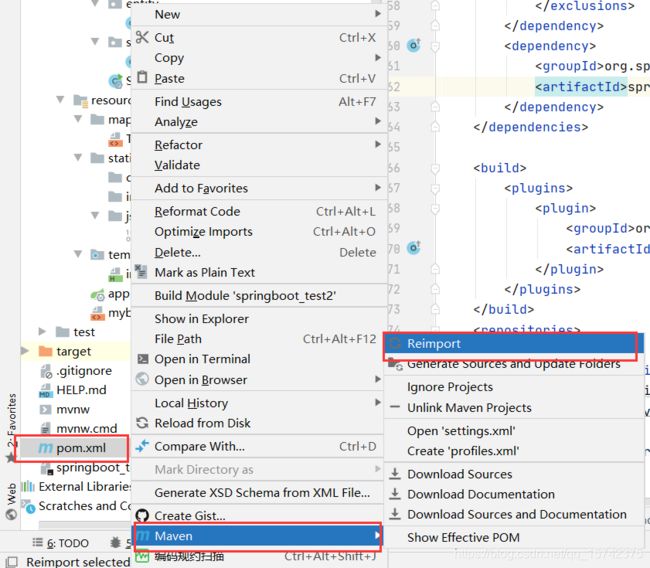
3.重新加载Maven
这个过程会自动下载依赖,有可能会下载的很慢。
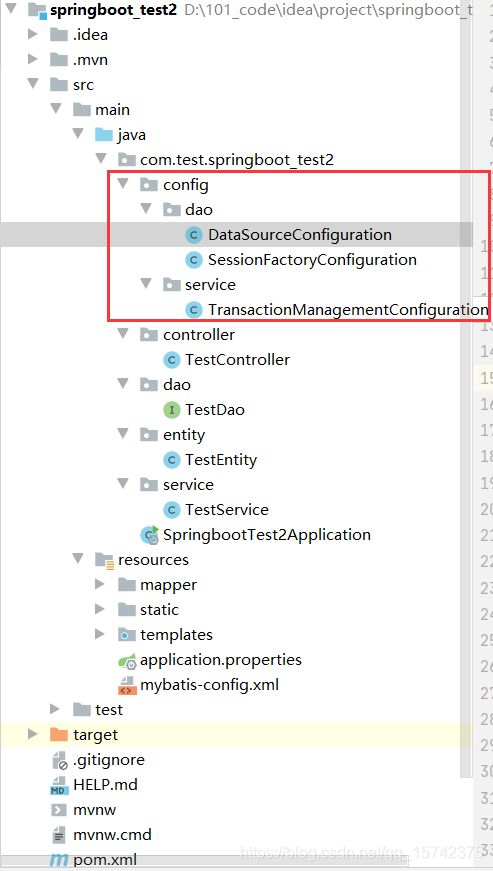
4.创建配置文件
创建图中框框内的 包和java类
DataSourceConfiguration
package com.test.springboot_test2.config.dao;

import org.springframework.beans.factory.annotation.Value;
import org.springframework.context.annotation.Bean;
import org.springframework.context.annotation.Configuration;

import com.mchange.v2.c3p0.ComboPooledDataSource;
import java.beans.PropertyVetoException;

/**
 * Created with IntelliJ IDEA
 * Created By WCT
 * Date: 2020/11/9
 * Time: 14:52
 */
@Configuration
public class DataSourceConfiguration {
    @Value("${jdbc.driver}")
    private String jdbcDriver;
    @Value("${jdbc.url}")
    private String jdbcUrl;
    @Value("${jdbc.username}")
    private String jdbcUsername;
    @Value("${jdbc.password}")
    private String jdbcPassword;

    @Bean(name = "dataSouce")
    public ComboPooledDataSource createDataSouce() throws PropertyVetoException {
        ComboPooledDataSource dataSource = new ComboPooledDataSource();
        dataSource.setDriverClass(jdbcDriver);
        dataSource.setJdbcUrl(jdbcUrl);
        dataSource.setUser(jdbcUsername);
        dataSource.setPassword(jdbcPassword);
        //关闭连接后不自动commit
        dataSource.setAutoCommitOnClose(false);
        return dataSource;

    }
}
SessionFactoryConfiguration
package com.test.springboot_test2.config.dao;

import org.mybatis.spring.SqlSessionFactoryBean;
import org.springframework.beans.factory.annotation.Autowired;
import org.springframework.beans.factory.annotation.Value;
import org.springframework.context.annotation.Bean;
import org.springframework.context.annotation.Configuration;
import org.springframework.core.io.ClassPathResource;
import org.springframework.core.io.support.PathMatchingResourcePatternResolver;

import javax.sql.DataSource;
import java.io.IOException;

/**
 * Created with IntelliJ IDEA
 * Created By WCT
 * Date: 2020/11/9
 * Time: 15:34
 */
@Configuration
public class SessionFactoryConfiguration {
    @Value("${mapper_path}")
    private String mapperPath;

    @Value("${mybatis_config_file}")
    private String mybatisConfigFilePath;

    @Autowired
    private DataSource dataSouce;
    @Value("${entity_package}")
    private String entityPackage;

    @Bean(name="sqlSessionFactory")
    public SqlSessionFactoryBean createSqlSessionFactoryBean() throws IOException {
        SqlSessionFactoryBean sqlSessionFactoryBean = new SqlSessionFactoryBean();
        sqlSessionFactoryBean.setConfigLocation(new ClassPathResource(mybatisConfigFilePath));
        PathMatchingResourcePatternResolver resolver = new PathMatchingResourcePatternResolver();
        String packageSearchPath = PathMatchingResourcePatternResolver.CLASSPATH_ALL_URL_PREFIX+mapperPath;
        sqlSessionFactoryBean.setMapperLocations(resolver.getResources(packageSearchPath));
        sqlSessionFactoryBean.setDataSource(dataSouce);
        sqlSessionFactoryBean.setTypeAliasesPackage(entityPackage);
        return sqlSessionFactoryBean;
    }

}
TransactionManagementConfiguration
package com.test.springboot_test2.config.service;

import org.springframework.beans.factory.annotation.Autowired;
import org.springframework.context.annotation.Configuration;
import org.springframework.jdbc.datasource.DataSourceTransactionManager;
import org.springframework.transaction.PlatformTransactionManager;
import org.springframework.transaction.annotation.TransactionManagementConfigurer;

import javax.sql.DataSource;

/**
 * Created with IntelliJ IDEA
 * Created By WCT
 * Date: 2020/11/9
 * Time: 15:33
 */

@Configuration
public class TransactionManagementConfiguration implements TransactionManagementConfigurer {
    @Autowired
    private DataSource dataSource;

    @Override
    public PlatformTransactionManager annotationDrivenTransactionManager() {
        return new DataSourceTransactionManager(dataSource);
    }
}
DataSourceConfiguration类中 import com.mchange.v2.c3p0.ComboPooledDataSource;可能会报错,需要在pom.xml里加入以下依赖(放在 dependencies 标签内部),并且重新加载(步骤3)
    com.mchange
    c3p0
    0.9.5.2
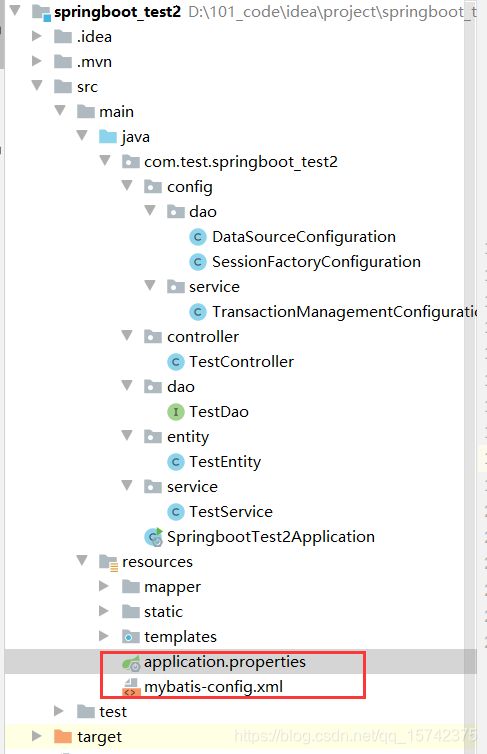
创建 mybatis-config.xml,和application.properties在同一目录下,修改application.properties和mybatis-config.xml
application.properties
启动端口可以自己修改,但不要和电脑上的其他端口冲突,一般常用8080或80端口
jdbc.url中3306是mysql默认的端口号,testdb是需要连接的数据库名称
#1.项目启动的端口
server.port=18902

#2.数据库连接参数
#2.1jdbc驱动,示数据库厂商决定,这是mysql的驱动
jdbc.driver=com.mysql.cj.jdbc.Driver
#2.2数据库连接url,包括ip(127.0.0.1)、端口(3306)、数据库名(testdb)
jdbc.url=jdbc:mysql://127.0.0.1:3306/testdb?useUnicode=true&characterEncoding=utf8
#2.3数据库账号名
jdbc.username=root
#2.4数据库密码
jdbc.password=password

#3.Mybatis配置
#3.1 mybatis配置文件所在路径
mybatis_config_file=mybatis-config.xml
#3.2 mapper文件所在路径,这样写可匹配mapper目录下的所有mapper,包括其子目录下的
mapper_path=/mapper/**/**.xml
#3.3 entity所在包
entity_package=com.test.springboot_test2.entity


spring.thymeleaf.prefix=classpath:/templates/
spring.thymeleaf.suffix=.html
spring.thymeleaf.cache=false
mybatis-config.xml
5.创建项目各个层(包)
项目的层级结构都是大同小异 ,以下几行是我的理解和一些小经验,并不是完全正确,仅供参考
controller层,entity/bean 层,service层,dao/mapper 层,mapper(用于写mapper的xml文件)
SSM框架还有serviceimpl的包,用于实现service接口。这个项目里service层里直接是类
根据目录创建各个层,并且创建类和接口,代码在下面附上
TestController.java
package com.test.springboot_test2.controller;

import com.test.springboot_test2.entity.TestEntity;
import com.test.springboot_test2.service.TestService;
import org.springframework.beans.factory.annotation.Autowired;
import org.springframework.stereotype.Controller;
import org.springframework.web.bind.annotation.*;

/**
 * Created with IntelliJ IDEA
 * Created By WCT
 * Date: 2020/11/9
 * Time: 15:43
 */
//@RestController
/**
 * 使用@RestController不用写 @ResponseBody ,但是不能返回jsp,html页面
 * 使用@Controller 可以返回页面,在返回json数据的时候需要加@ResponseBody的注解
 */
@Controller
@RequestMapping("/test")
public class TestController {
    @Autowired
    private TestService testService ;

    @RequestMapping(value = "/get/{id}",method = RequestMethod.GET)
    @ResponseBody
    public TestEntity test(@PathVariable Integer id){
        System.out.println("id:" + id);
        return testService.getById(id);
    }

    @RequestMapping("/getId")
    @ResponseBody
    public TestEntity getId(int id){
        return testService.getById(id);
    }


    @RequestMapping("index")
    public String index(){
        return "index";
    }
}
TestDao
package com.test.springboot_test2.dao;

import com.test.springboot_test2.entity.TestEntity;
import org.apache.ibatis.annotations.Mapper;

/**
 * Created with IntelliJ IDEA
 * Created By WCT
 * Date: 2020/11/9
 * Time: 15:43
 */
@Mapper
public interface TestDao {

    public TestEntity getById(Integer id);
}
TestEnity (getter、setter、tostring 和 构造函数 都可以使用软件自动生成)
package com.test.springboot_test2.entity;

/**
 * Created with IntelliJ IDEA
 * Created By WCT
 * Date: 2020/11/9
 * Time: 15:44
 */
public class TestEntity {
    protected Integer id ;

    protected String magicId ;

    protected String firstName ;

    protected String lastName ;

    public Integer getId() {
        return id;
    }

    public void setId(Integer id) {
        this.id = id;
    }

    public String getMagicId() {
        return magicId;
    }

    public void setMagicId(String magicId) {
        this.magicId = magicId;
    }

    public String getFirstName() {
        return firstName;
    }

    public void setFirstName(String firstName) {
        this.firstName = firstName;
    }

    public String getLastName() {
        return lastName;
    }

    public void setLastName(String lastName) {
        this.lastName = lastName;
    }

    public TestEntity(Integer id, String magicId, String firstName, String lastName) {
        this.id = id;
        this.magicId = magicId;
        this.firstName = firstName;
        this.lastName = lastName;
    }

    public TestEntity() {
    }

    @Override
    public String toString() {
        return "TestEntity{" +
                "id=" + id +
                ", magicId='" + magicId + '\'' +
                ", firstName='" + firstName + '\'' +
                ", lastName='" + lastName + '\'' +
                '}';
    }
}
TestService
package com.test.springboot_test2.service;

import com.test.springboot_test2.dao.TestDao;
import com.test.springboot_test2.entity.TestEntity;
import org.springframework.beans.factory.annotation.Autowired;
import org.springframework.stereotype.Service;

/**
 * Created with IntelliJ IDEA
 * Created By WCT
 * Date: 2020/11/9
 * Time: 15:44
 */
@Service
public class TestService {
    @Autowired
    private TestDao testDao;

    public TestEntity getById(Integer id){
        return testDao.getById(id);
    }
}
TestDaoMapper.xml (注意别忘了修改 namespace)
数据库中的test表模仿着TestEntity的成员变量 建立,自行添加几条数据
6.运行测试
上面全部配置和创建完成如果没有报错等信息就可以运行了
右上角工具栏选择要运行的项目,debug(绿色虫子),看下方日志,检查有无报错,如有报错->百度一下
打开浏览器输入网址:http://localhost:18902/test/get/1
其中localhost可以使用127.0.0.1 替代
18902是application.properties中设置的端口号
运行成功是这样:返回json格式的数据,查询数据库***中test表中第一行,并且返回
7.网页文件
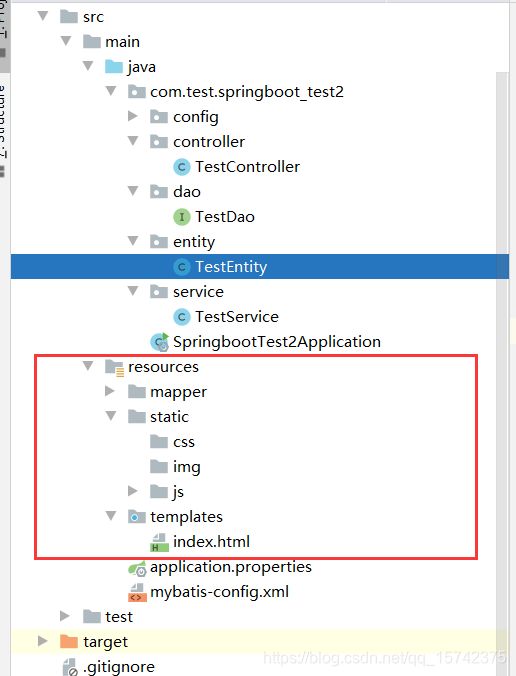
templates文件中 放html和jsp文件(可以创建个文件夹以便分类)
static放置静态文件,CSS IMG JS等。
我在js目录下放了 jquery3.3.1.min.js ,这个具体在网上自己找资源下载。
index.html文件
Title
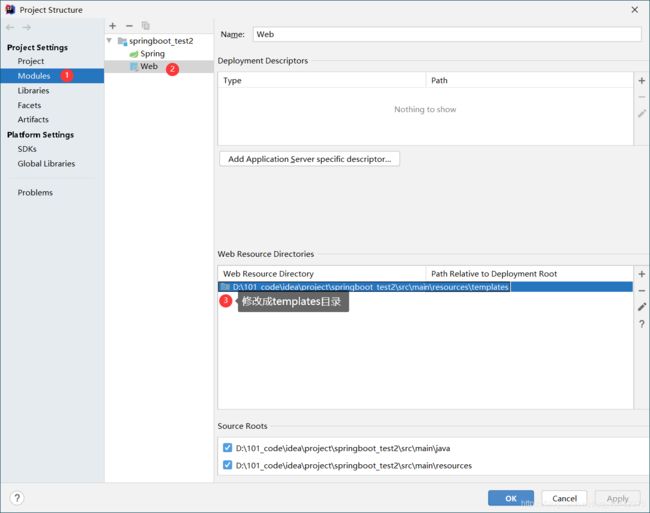
File->Project Structure (这一步不确定是不是必须要设置)
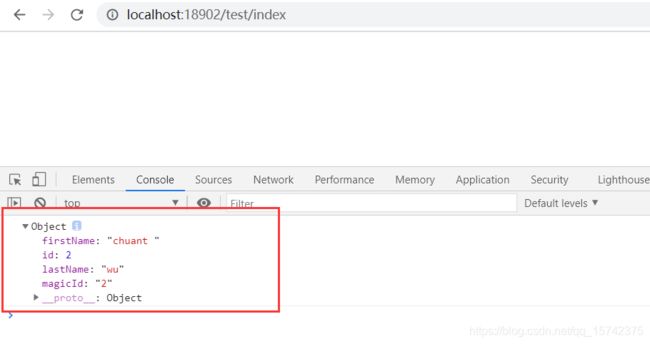
运行项目(debug),如果没有报错,浏览器输入地址 http://localhost:18902/test/index
F12查看控制台Console,运行成功如下
