02、Flink Client 实现原理与源码解析
文章目录
- Flink Client 实现原理
-
- Flink Client 主要功能
- Application Code 运行
- ExecutionEnvironment 分类
- CliFrontend
-
- 构建CliFrontend 对象
- 调用 parseAndRun方法来执行任务
-
- run 方法
-
- ProgramOptions 属性
- PackagedProgram
-
- URLClassLoader
- Flink 的类加载机制
- executeProgram执行用户代码
个人公众号:

Flink Client 实现原理
在我们解读Flink Client 源码之前,我们先要了解清楚它的实现原理。
Flink Client 主要功能

我们可以看到,FLink Client 主要三个任务,第一个是运行Application,第二个是是对任务的操作管理,第三个是在Client端对集群的管理。
##Flink Client 主要组件
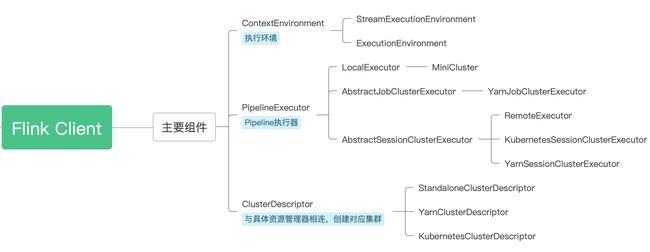
ContexEnvironment: 构建出不同的执行环境
PipelineExecutor: 对 Stream Graph的执行生成JobGraph
CluterDescriptor: 对不同集群的连接
Application Code 运行

当我们提交运行我们代码的代码时,客户端同时主要做三件事:
1、通过ClusterClientServiceLoader去加载ClusterClientFactory, 从而创建集群。
2、通过ContexEnvironmentFactory去创建ContexEnvironment,从而构建StreamExecutionEnvironment
3、构建PackagedProgram,获得Flink任务运行时所需要的环境,从而通过反射调用我们的代码的main()方法,进儿通过StreamExecutionEnvironment去执行execute()方法获得StreamGraph,将StreamGraph提交给PipelineExecutor去执行生成JobGraph对象,最终将JobGraph提交给Cluster。
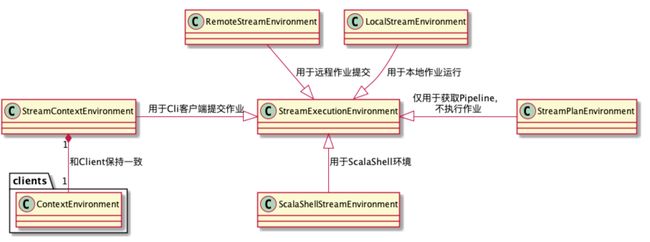
ExecutionEnvironment 分类
#Flink Client 源码解析
通过上问的解答,我们大概了解了Flink Client 提交作业的流程,那么接下来让我们走进源码中,看看时如何实现的。
CliFrontend
当我们用户在客户端运行任务时,flink run.sh 会调用 CliFrontend 类中的main()方法,那么就让我们具体看下main()方法。
  /** Submits the job based on the arguments. */
    public static void main(final String[] args) {
        // 从系统环境中( 环境变量或者当前目录的 conf 或者 ../conf 目录)获取配置文件( flink-conf.yaml )位置
        EnvironmentInformation.logEnvironmentInfo(LOG, "Command Line Client", args);

        // 1. find the configuration directory  解析 flink-conf.yaml 文件,把属性放到 Configuration 里面
        final String configurationDirectory = getConfigurationDirectoryFromEnv();

        // 2. load the global configuration  加载全局配置并添加给定的动态属性配置。
        final Configuration configuration =
                GlobalConfiguration.loadConfiguration(configurationDirectory);

        // 3. load the custom command lines  初始化自定义的命令行参数
        final List<CustomCommandLine> customCommandLines =
                loadCustomCommandLines(configuration, configurationDirectory);

        int retCode = 31;
        try {
            //4. 初始化 CliFronted ,使用构造函数,把 CliFrontend 类的一些属性赋值,给后续执行时提供属性
            final CliFrontend cli = new CliFrontend(configuration, customCommandLines);

            SecurityUtils.install(new SecurityConfiguration(cli.configuration));
            //5. 调用 parseAndRun 方法来执行任务
            retCode = SecurityUtils.getInstalledContext().runSecured(() -> cli.parseAndRun(args));
        } catch (Throwable t) {
            final Throwable strippedThrowable =
                    ExceptionUtils.stripException(t, UndeclaredThrowableException.class);
            LOG.error("Fatal error while running command line interface.", strippedThrowable);
            strippedThrowable.printStackTrace();
        } finally {
            System.exit(retCode);
        }
    }
构建CliFrontend 对象
我们看到前面三步都是加载配置文件,第四步是通过前面的配置构造出 CliFrontend 对象,让我们进一步看下 CliFrontend 的属性
    public CliFrontend(Configuration configuration, List<CustomCommandLine> customCommandLines) {
        this(configuration, new DefaultClusterClientServiceLoader(), customCommandLines);
    }

    public CliFrontend(
            Configuration configuration,
            ClusterClientServiceLoader clusterClientServiceLoader,
            List<CustomCommandLine> customCommandLines) {
        // 初始化了配置,就是 flink-conf.yaml 的属性
        this.configuration = checkNotNull(configuration);
        // 初始化了自定义的命令行参数
        this.customCommandLines = checkNotNull(customCommandLines);
        //初始化了 clusterClientServiceLoader,使用 SPI 加载了 org.apache.flink.client.deployment.StandaloneClientFactory 类
        this.clusterClientServiceLoader = checkNotNull(clusterClientServiceLoader);

        FileSystem.initialize(
                configuration, PluginUtils.createPluginManagerFromRootFolder(configuration));

        this.customCommandLineOptions = new Options();

        for (CustomCommandLine customCommandLine : customCommandLines) {
            customCommandLine.addGeneralOptions(customCommandLineOptions);
            customCommandLine.addRunOptions(customCommandLineOptions);
        }
        //初始化了客户端超时时间
        this.clientTimeout = configuration.get(ClientOptions.CLIENT_TIMEOUT);
        // 初始化了默认的并行度
        this.defaultParallelism = configuration.getInteger(CoreOptions.DEFAULT_PARALLELISM);
    }
我们看到在掉用CliFrontend构造时,初始化了DefaultClusterClientServiceLoader(),而该类实现了ClusterClientServiceLoader接口,在ClusterClientServiceLoader接口中定义了两个方法,getClusterClientFactory,一个是getApplicationModeTargetNames。
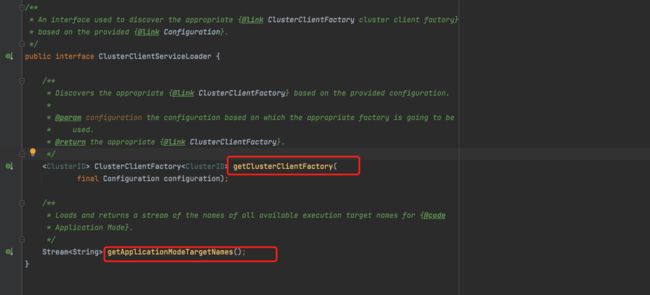
我们进一步看下 DefaultClusterClientServiceLoader类中对 getClusterClientFactory 方法的实现

我们可以看到getClusterClientFactory()通过SPI技术加载了ClusterClientFactory,而ClusterClientFactory接口中创建了Flink集群客户端所需的所有信息,为创建集群做准备。

调用 parseAndRun方法来执行任务
parseAndRun 方法里有一个 switch case,根据命令行不同的动作类型,执行不同的动作,这里我们重点看执行的 run 方法

run 方法
run 方法中,用两个对象,ProgramOptions(执行程序选项)和 Configuration (配置),来构建一个 PackagedProgram,去执行程序。
 /**
     * Executions the run action.
     *
     * @param args Command line arguments for the run action.
     */
    protected void run(String[] args) throws Exception {
        LOG.info("Running 'run' command.");

        final Options commandOptions = CliFrontendParser.getRunCommandOptions();
        final CommandLine commandLine = getCommandLine(commandOptions, args, true);

        // evaluate help flag
        if (commandLine.hasOption(HELP_OPTION.getOpt())) {
            CliFrontendParser.printHelpForRun(customCommandLines);
            return;
        }

        final CustomCommandLine activeCommandLine =
                validateAndGetActiveCommandLine(checkNotNull(commandLine));

        //1. ProgramOptions(执行程序选项)
        final ProgramOptions programOptions = ProgramOptions.create(commandLine);

        final List<URL> jobJars = getJobJarAndDependencies(programOptions);
        //2. Configuration (获得配置)
        final Configuration effectiveConfiguration =
                getEffectiveConfiguration(activeCommandLine, commandLine, programOptions, jobJars);

        LOG.debug("Effective executor configuration: {}", effectiveConfiguration);
        //3.来构建一个 PackagedProgram(打包的程序,就是把所有必要的信息,包括运行时参数和程序配置打包到一个对象里面)
        try (PackagedProgram program = getPackagedProgram(programOptions, effectiveConfiguration)) {
          // 4.执行用户代码
            executeProgram(effectiveConfiguration, program);
        }
    }
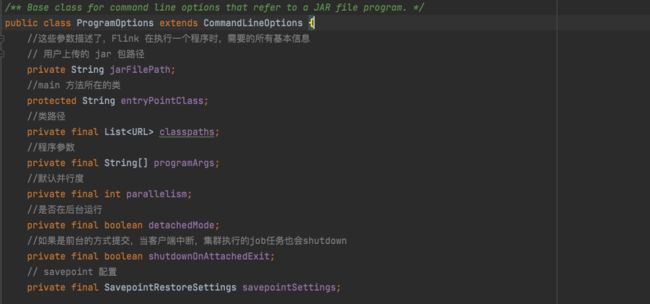
ProgramOptions 属性
在ProgramOptions中的属性描述了,Flink 在执行一个程序时,需要的所有基本信息
PackagedProgram
我们可以看到PackagedProgram 描述了Flink 任务运行时所需要的环境,有了这些属性,我们的任务就可以运行了。

URLClassLoader
这里我们想要表达的是,Flink 的类加载机制和 Java 虚拟机默认提供的类加载机制是不同的。
Java 虚拟机提供的默认类加载机制,我们可以再复习一下,(双亲委派),如果一个类加载器收到了类加载请求,自己默认不加载,而是把这个请求委派给父类加载器去加载,一直传递到顶层的 BootStrap ClassLoader 中。父加载器加载不到才让下面的类加载器加载。
如果 Flink 使用这种类加载机制,可能会带来的问题是:Flink 集群运行着 Flink 框架的代码,这些代码包括了 Flink 的各种依赖。而用户编写的复杂的应用程序,可能也会包含很多复杂的依赖。其中必然有类全限定名同名的类。那么在加载用户的类时,一看已经被父类加载器加载了,就不会再加载了,那用户的程序必然就会报错了。
Flink 的类加载机制
Flink 可以在 flink-conf.yml 中配置不同的类加载机制(默认就是 child-first):
classloader.resolve-order: parent-first
classloader.resolve-order: child-first
我们直接看一下这个 ChildFirstClassLoader 类的 loadClassWithoutExceptionHandling 方法:
 @Override
 protected Class<?> loadClassWithoutExceptionHandling(String name, boolean resolve) throws ClassNotFoundException {

  // 首先,检查这个类是否已经被加载过
  Class<?> c = findLoadedClass(name);

  if (c == null) {
   // alwaysParentFirstPatterns 中配置的类,要在父类中优先加载
   for (String alwaysParentFirstPattern : alwaysParentFirstPatterns) {
    if (name.startsWith(alwaysParentFirstPattern)) {
     return super.loadClassWithoutExceptionHandling(name, resolve);
    }
   }

   try {
    // 用户的类,不让父类加载器加载,而是自己直接加载
    c = findClass(name);
   } catch (ClassNotFoundException e) {
    // let URLClassLoader do it, which will eventually call the parent
    c = super.loadClassWithoutExceptionHandling(name, resolve);
   }
  } else if (resolve) {
   resolveClass(c);
  }

  return c;
 }
简单描述一下如下:
- 调用 findLoadedClass() 方法检查全限定名对应的类是否已经加载过,若没有加载过,再继续往下执行;
- 检查要加载的类是否以 alwaysParentFirstPatterns 集合中的前缀开头。如果是,则调用父类的对应方法,以 parent-first 的方式来加载它;
- 如果类不符合 alwaysParentFirstPatterns 集合的条件,就调用 findClass() 方法在用户代码中查找并获取该类的定义(该方法在URLClassLoader中有默认实现)。如果找不到,再fallback到父加载器来加载。
那这样就说完了 Flink 的类加载机制了。
executeProgram执行用户代码
PackagedProgram 构建完后,开始执行用户代码。
// --------------------------------------------------------------------------------------------
//  Interaction with programs and JobManager
// --------------------------------------------------------------------------------------------
protected void executeProgram(final Configuration configuration, final PackagedProgram program) throws ProgramInvocationException {
  ClientUtils.executeProgram(new DefaultExecutorServiceLoader(), configuration, program, false, false);
 }
我们看 ClientUtils.executeProgram() 方法,在executeProgram方法执行的时候初始化了DefaultExecutorServiceLoader对象,而DefaultExecutorServiceLoader实现了PipelineExecutorServiceLoader接口,从而通过SPI技术获得PipelineExecutorFactory,最后创建了PipelineExecutor。
同时在ClientUtils.executeProgram方法中通过Cline 端获取了 ContextEnvironment和StreamContextEnvironment 的环境,

而StreamContextEnvironment集成了StreamExecutionEnvironment类,重写了execute 方法,在execute 方法中通过StreamGraph 得到了JobExecutionResult。
public JobExecutionResult execute(StreamGraph streamGraph) throws Exception {
    final JobClient jobClient = executeAsync(streamGraph);
    final List jobListeners = getJobListeners();

    try {
        final JobExecutionResult jobExecutionResult = getJobExecutionResult(jobClient);
        jobListeners.forEach(
                jobListener -> jobListener.onJobExecuted(jobExecutionResult, null));
        return jobExecutionResult;
    } catch (Throwable t) {
        jobListeners.forEach(
                jobListener ->
                        jobListener.onJobExecuted(
                                null, ExceptionUtils.stripExecutionException(t)));
        ExceptionUtils.rethrowException(t);

        // never reached, only make javac happy
        return null;
    }
}
在executeProgram() 方法中有一个相当经典的 ContextClassLoader 的使用方式

先把 ContextClassLoader 切换为 UserCodeClassLoader,使用这个类加载器来加载 main 方法的代码;
执行完了之后,再把上下文类加载器切换回去。程序在执行代码的时候,当需要执行每个类时,ClassLoader 就会去加载这个类,可以通过 Debug ClassLoader 类的 loadClass() 方法看出来。
//通过反射的方式, 调用用户程序的mian方法..
program.invokeInteractiveModeForExecution();
我们看到通过反射调用我们程序的主方法。
public void invokeInteractiveModeForExecution() throws ProgramInvocationException {
    FlinkSecurityManager.monitorUserSystemExitForCurrentThread();
    try {
        //过调用底层的callMainMethod方法,通过反射的方式去调用main方法
        callMainMethod(mainClass, args);
    } finally {
        FlinkSecurityManager.unmonitorUserSystemExitForCurrentThread();
    }
}
当mainMethod.invoke开始执行的时候,各个operator会生成对应的Transformation等封装的逻辑实例,直到运行到StreamExecutionEnvironment.execute()后,才开始懒执行。类似于Spark中的action算子,才开始真正的执行代码。