Ubuntu20.04 安装 Anaconda步骤
下载Anconda安装包
安装Anaconda之前需要先下载安装包,这里提供两种下载方式:网页手动下载、wget命令下载。两种方式均可,我自己使用的是wget命令行下载。因为wget命令非常稳定。
方法1:网页手动下载
在Ubuntu系统里面使用浏览器进入Anaconda官网:https://www.anaconda.com/ 直接选择Download,会自动识别系统下载最新的版本。
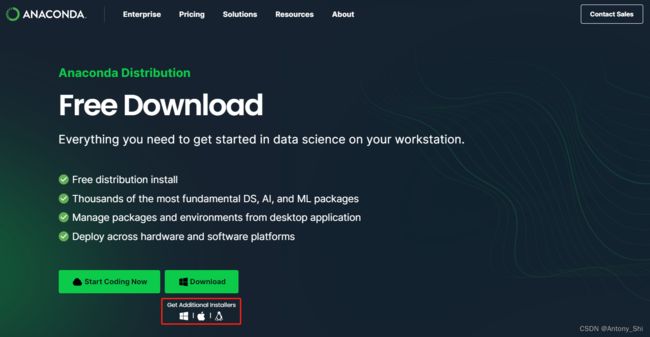
也可以点上图中红色方框位置跳转下载页面。
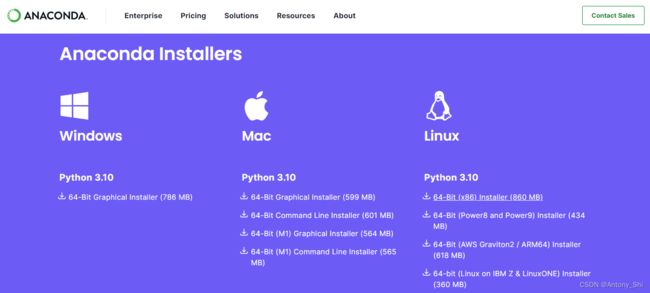
点击Download下载到本地(PS:Anaconda会根据访问网页所使用的系统,推荐对应的Anaconda版本,用户无需担心版本错误。如果有特定版本需要的朋友,则可以根据需要自行下载对应版本的Anaconda)。
方法2:wget命令下载
可以去清华大学开软软件镜像站:https://mirrors.tuna.tsinghua.edu.cn/anaconda/archive/下载各种版本的Anaconda。
我使用的是Ubuntu,安装命令如下:wget https://mirrors.tuna.tsinghua.edu.cn/anaconda/archive/Anaconda3-2023.03-1-Linux-x86_64.sh
也可以到官方网站下载 wget https://repo.anaconda.com/archive/Anaconda3-2023.03-1-Linux-x86_64.sh
下面是官方路径下载结果:
root@interactive4805:/opt/data/private# wget https://repo.anaconda.com/archive/Anaconda3-2023.03-1-Linux-x86_64.sh
--2023-06-01 01:37:08--  https://repo.anaconda.com/archive/Anaconda3-2023.03-1-Linux-x86_64.sh
Resolving repo.anaconda.com (repo.anaconda.com)... 104.16.130.3, 104.16.131.3, 2606:4700::6810:8303, ...
Connecting to repo.anaconda.com (repo.anaconda.com)|104.16.130.3|:443... connected.
HTTP request sent, awaiting response... 200 OK
Length: 902411137 (861M) [application/x-sh]
Saving to: 'Anaconda3-2023.03-1-Linux-x86_64.sh'

Anaconda3-2023.03-1-Linux-x86_64.sh     100%[=====================================>] 860.61M  7.10MB/s    in 2m 10s

2023-06-01 01:39:20 (6.60 MB/s) - 'Anaconda3-2023.03-1-Linux-x86_64.sh' saved [902411137/902411137]
- 安装Anaconda
STEP1:使用bash命令安装Anaconda
root@interactive4805:/opt/data/private# bash Anaconda3-2023.03-1-Linux-x86_64.sh -p /usr/local/anaconda3
注意bash指令后面 -p 指定anaconda3安装路径。
指令执行结果:
root@interactive4805:/opt/data/private# bash Anaconda3-2023.03-1-Linux-x86_64.sh -p /usr/local/anaconda3

Welcome to Anaconda3 2023.03-1

In order to continue the installation process, please review the license
agreement.
Please, press ENTER to continue
>>>
安装过程中,看到提示“In order to continue the installation process, please review the license agreement.”(“请浏览许可证协议以便继续安装。”),点击“Enter”查看“许可证协议”。
STEP2:阅读并接受安装协议
在STEP1中已经执行了安装命令。指令执行结果首先让我们审阅安装协议,这里一直按Enter直到出现 Do you accept the license terms? [yes|no] ,表示协议阅读完毕输入yes即可继续安装,如下:
Export; Cryptography Notice
===========================

You must comply with all domestic and international export laws and regulations that apply to the software, which include restrictions on destinations, end users, and end use.  Anaconda Distribution includes cryptographic software. The
country in which you currently reside may have restrictions on the import, possession, use, and/or re-export to another country, of encryption software. BEFORE using any encryption software, please check your country's laws, regulations
 and policies concerning the import, possession, or use, and re-export of encryption software, to see if this is permitted. See the Wassenaar Arrangement http://www.wassenaar.org/ for more information.

Anaconda has self-classified this software as Export Commodity Control Number (ECCN) EAR99 which includes mass market information security software using or performing cryptographic functions with asymmetric algorithms. No license is re
quired for export of this software to non-embargoed countries.

The Intel Math Kernel Library contained in Anaconda Distribution is classified by Intel as ECCN 5D992.c with no license required for export to non-embargoed countries.

The following packages listed on https://www.anaconda.com/cryptography are included in the repository accessible through Anaconda Distribution that relate to cryptography.

Last updated February 25, 2022


Do you accept the license terms? [yes|no]
[no] >>> yes
STEP3:确认安装位置
在STEP2输入yes后会提示确认安装位置,这里点击Enter,默认即可,界面如下:
Anaconda3 will now be installed into this location:
/usr/local/anaconda3

  - Press ENTER to confirm the location
  - Press CTRL-C to abort the installation
  - Or specify a different location below

[/usr/local/anaconda3] >>>
接下来Anaconda就会开始安装。
STEP4:初始化Anaconda(包含环境变量的设置)
执行完STEP3Anaconda在Ubuntu系统里面的安装基本完毕了,但是还需要最后一步 初始化Anaconda,这一步只需要根据提示输入yes即可,如下:
Preparing transaction: done
Executing transaction: -

    Installed package of scikit-learn can be accelerated using scikit-learn-intelex.
    More details are available here: https://intel.github.io/scikit-learn-intelex

    For example:

        $ conda install scikit-learn-intelex
        $ python -m sklearnex my_application.py


done
installation finished.
Do you wish the installer to initialize Anaconda3
by running conda init? [yes|no]
[no] >>> yes
如果出现以下界面,那么恭喜你已经成功在Ubuntu系统里面安装上Anaconda啦,鼓掌撒花~,那么接下来就是进一步的学习和使用了。
no change     /usr/local/anaconda3/condabin/conda
no change     /usr/local/anaconda3/bin/conda
no change     /usr/local/anaconda3/bin/conda-env
no change     /usr/local/anaconda3/bin/activate
no change     /usr/local/anaconda3/bin/deactivate
no change     /usr/local/anaconda3/etc/profile.d/conda.sh
no change     /usr/local/anaconda3/etc/fish/conf.d/conda.fish
no change     /usr/local/anaconda3/shell/condabin/Conda.psm1
no change     /usr/local/anaconda3/shell/condabin/conda-hook.ps1
no change     /usr/local/anaconda3/lib/python3.10/site-packages/xontrib/conda.xsh
no change     /usr/local/anaconda3/etc/profile.d/conda.csh
modified      /root/.bashrc

==> For changes to take effect, close and re-open your current shell. <==

If you'd prefer that conda's base environment not be activated on startup,
   set the auto_activate_base parameter to false:

conda config --set auto_activate_base false

Thank you for installing Anaconda3!
总结安装步骤:运行 bash Anaconda3-2023.03-1-Linux-x86_64.sh -p /usr/local/anaconda3 点击Enter(回车键),终端的下方会出现more一直回车,直到能提示需要输入yes/no,输入yes+继续回车+yes+回车,安装完成!
PS:Anaconda安装完成以后可能出现问题
1.提示找不到conda指令
最后一步选择了默认的no,然后在终端中输入conda,提示command not found,把它加到系统环境中解决方案是:
#将anaconda的bin目录加入PATH,根据版本不同,也可能是 /usr/local/anaconda3
echo 'export PATH="/usr/local/anaconda3:$PATH"' >> ~/.bashrc
#更新bashrc以立即生效
source ~/.bashrc
运行就可以发现conda可以正常运行,通过conda -V来查看当前版本号:
root@interactive4805:/opt/data/private# source ~/.bashrc
(base) root@interactive4805:/opt/data/private# conda -V
conda 23.3.1
PS:Anaconda安装完成以后出现的个提示解读
1.For changes to take effect, close and re-open your current shell.,翻译过来就是:关闭当前命令行,并重新打开,刚刚安装和初始化Anaconda设置才可以生效,重新打开一个命令行后直接就进入了conda的base环境,如下:
(base) root@interactive4805:/opt/data/private#
2.If you’d prefer that conda’s base environment not be activated on startup, set the auto_activate_base parameter to false: ,翻译过来就是:如果您希望 conda 的基础环境在启动时不被激活,请将 auto_activate_base 参数设置为 false,命令如下:
conda config --set auto_activate_base false
当然这一条命令执行完毕后,想要再次进入conda的base环境,只需要使用对应的conda指令即可,如下:
conda activate base