spring源码-value,PostConstruct,PreDestroy,InitializingBean,DisposableBean,init-method,destroy-method顺序
- demo
- Value注解
- properties配置解析
- PropertyPlaceholderConfigurer
- value解析
- properties配置解析
- PostConstruct
- bean创建
- destroy
- 总结
项目中用到value注解,再根据value值初始化一些配置,所以就看了下spring源码关于这几个的调用顺序。
demo
application.properties
request.order.service=orderService
request.order.method=queryOrder
beans-auto.xml
<beans xmlns="http://www.springframework.org/schema/beans"
    xmlns:xsi="http://www.w3.org/2001/XMLSchema-instance" xmlns:context="http://www.springframework.org/schema/context"
    xsi:schemaLocation="
           http://www.springframework.org/schema/beans
           http://www.springframework.org/schema/beans/spring-beans-3.0.xsd
           http://www.springframework.org/schema/context
           http://www.springframework.org/schema/context/spring-context-3.0.xsd">

    <context:property-placeholder location="classpath:/conf/application.properties" />


    <bean class="org.springframework.beans.factory.annotation.AutowiredAnnotationBeanPostProcessor" />
    <bean class="org.springframework.context.annotation.CommonAnnotationBeanPostProcessor" />


    <bean id="orderService" class="com.chris.test.OrderService" init-method="myInit" destroy-method="myDetory"/>

beans>
OrderService.java
import javax.annotation.PostConstruct;
import javax.annotation.PreDestroy;

import org.springframework.beans.factory.DisposableBean;
import org.springframework.beans.factory.InitializingBean;
import org.springframework.beans.factory.annotation.Value;

/**
 * OrderService

 */
public class OrderService implements InitializingBean, DisposableBean{

    @Value("${request.order.service}")
    private String requestService;

    @Value("${request.order.method}")
    private String requestOrderMethod;

    @Override
    public void afterPropertiesSet() throws Exception {
        System.out.println("call-InitializingBean-afterPropertiesSet");
    }

    @Override
    public void destroy() throws Exception {
        System.out.println("call-destroy");
    }

    @PostConstruct
    private void showPostConstruct(){
        System.out.println("Value-requestService"+requestService);
        System.out.println("Value-requestOrderMethod"+requestOrderMethod);
        System.out.println("call-PostConstruct");
    }

    @PreDestroy
    private void showPreDestroy(){
        System.out.println("call-PreDestroy");
    }

    private void myInit(){
        System.out.println("call-myInit");
    }

    private void myDetory(){
        System.out.println("call-myDetory");
    }

}
OrderServiceTest.java
import org.springframework.context.support.ClassPathXmlApplicationContext;

/**
 * OrderServiceTest

 */
public class OrderServiceTest {

    public static void main(String[] args){
        ClassPathXmlApplicationContext  ctx=new ClassPathXmlApplicationContext("beans-auto.xml");
        ctx.close();
    }
}这里我们可以调用顺序:
初始化顺序:
value–>postConstruct–>InitializingBean–>自定义的init-method
销毁时的顺序:
PreDestroy–>DisposableBean–>destroy-method
Value注解
properties配置解析
xml中配置properties:
<context:property-placeholder location="classpath:/conf/application.properties" />
如果你熟悉spring的标签解析,你就会明白必然会有个XXXNamespaceHandler来处理这个。这里使用的是ContextNamespaceHandler来处理。
ContextNamespaceHandler:
public class ContextNamespaceHandler extends NamespaceHandlerSupport {

    public void init() {
        // 这里专注properties标签处理
        registerBeanDefinitionParser("property-placeholder", new PropertyPlaceholderBeanDefinitionParser());
        registerBeanDefinitionParser("property-override", new PropertyOverrideBeanDefinitionParser());
        registerBeanDefinitionParser("annotation-config", new AnnotationConfigBeanDefinitionParser());
        registerBeanDefinitionParser("component-scan", new ComponentScanBeanDefinitionParser());
        registerBeanDefinitionParser("load-time-weaver", new LoadTimeWeaverBeanDefinitionParser());
        registerBeanDefinitionParser("spring-configured", new SpringConfiguredBeanDefinitionParser());
        registerBeanDefinitionParser("mbean-export", new MBeanExportBeanDefinitionParser());
        registerBeanDefinitionParser("mbean-server", new MBeanServerBeanDefinitionParser());
    }

}这里不关心标签的解析,大部分的套路基本上都是对标签属性的取值然后设置到bean里面去,我们要关心的是这个bean是谁,通过PropertyPlaceholderBeanDefinitionParser的方法getBeanClass根据配置得到这个beanPropertySourcesPlaceholderConfigurer或PropertyPlaceholderConfigurer,我们只分析下PropertyPlaceholderConfigurer。
PropertyPlaceholderConfigurer
看下类继承关系:
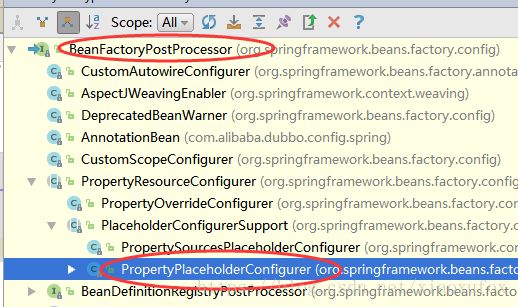
我们看到这个类实现了BeanFactoryPostProcessor接口,而这个接口是spring的beanFactory后置处理器,在获取beanfactory后调用硬编码或配置所有实现这个接口的process(希望你知道我说的是啥),如果对这里不清楚的,可以看下AbstractApplicationContext的refresh方法。
我们看下PropertyResourceConfigurer对这个接口的实现:
public void postProcessBeanFactory(ConfigurableListableBeanFactory beanFactory) throws BeansException {
        try {
            // 加载properties文件
            Properties mergedProps = mergeProperties();

            // Convert the merged properties, if necessary.
            convertProperties(mergedProps);

            // Let the subclass process the properties.
            // 子类处理properties
            processProperties(beanFactory, mergedProps);
        }
        catch (IOException ex) {
            throw new BeanInitializationException("Could not load properties", ex);
        }
    }
PropertyPlaceholderConfigurer:
@Override
    protected void processProperties(ConfigurableListableBeanFactory beanFactoryToProcess, Properties props)
            throws BeansException {

        StringValueResolver valueResolver = new PlaceholderResolvingStringValueResolver(props);

        this.doProcessProperties(beanFactoryToProcess, valueResolver);
    }
记住这里的StringValueResolver,后面对value注解内容替换会使用到这个。
PlaceholderConfigurerSupport:
protected void doProcessProperties(ConfigurableListableBeanFactory beanFactoryToProcess,
            StringValueResolver valueResolver) {

        BeanDefinitionVisitor visitor = new BeanDefinitionVisitor(valueResolver);

        String[] beanNames = beanFactoryToProcess.getBeanDefinitionNames();
        for (String curName : beanNames) {
            // Check that we're not parsing our own bean definition,
            // to avoid failing on unresolvable placeholders in properties file locations.
            // 这里使用visitor模式设置bean的一些配置的value替换,对于开发人员来说很少会用这到这里东西,除非你要自定义bean替换,后面有空单独写个访问者模式的短文
            if (!(curName.equals(this.beanName) && beanFactoryToProcess.equals(this.beanFactory))) {
                BeanDefinition bd = beanFactoryToProcess.getBeanDefinition(curName);
                try {
                    visitor.visitBeanDefinition(bd);
                }
                catch (Exception ex) {
                    throw new BeanDefinitionStoreException(bd.getResourceDescription(), curName, ex.getMessage(), ex);
                }
            }
        }

        // New in Spring 2.5: resolve placeholders in alias target names and aliases as well.
        beanFactoryToProcess.resolveAliases(valueResolver);

        // New in Spring 3.0: resolve placeholders in embedded values such as annotation attributes.
        // 会将上面说的StringvalueResolver加入
            beanFactoryToProcess.addEmbeddedValueResolver(valueResolver);
    }
AbstractBeanFactory:
// 将resolver加入embeddedValueResolvers,后面处理value的时候会for循环使用这个embeddedValueResolvers解析
public void addEmbeddedValueResolver(StringValueResolver valueResolver) {
        Assert.notNull(valueResolver, "StringValueResolver must not be null");
        this.embeddedValueResolvers.add(valueResolver);
    }
value解析
value注解是由xml里面配置的AutowiredAnnotationBeanPostProcessor处理,看下构造方法:
public AutowiredAnnotationBeanPostProcessor() {
        this.autowiredAnnotationTypes.add(Autowired.class);
        this.autowiredAnnotationTypes.add(Value.class);
        ....
    }
发现autowire注解同样由这个类处理。
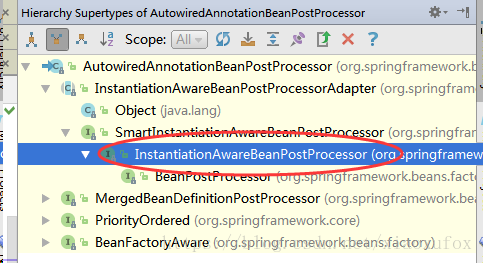
红框中这个接口就是处理bean实例化前,实例化后的一个process,后面会讲到在什么地方调用,这里先记得有这个接口,此外这个类还有个方法:
PropertyValues postProcessPropertyValues(
            PropertyValues pvs, PropertyDescriptor[] pds, Object bean, String beanName)
            throws BeansException;
这个就是处理bean属性的注入和propreties替换的东东。
AutowiredAnnotationBeanPostProcessor里面有postProcessPropertyValues的实现,跟源码看就行了。
AutowiredAnnotationBeanPostProcessor:
@Override
    public PropertyValues postProcessPropertyValues(
            PropertyValues pvs, PropertyDescriptor[] pds, Object bean, String beanName) throws BeansException {

        // 查找上面构造里面加入的注解,autowire和value
        InjectionMetadata metadata = findAutowiringMetadata(beanName, bean.getClass());
        try {
            // 注解注入
            metadata.inject(bean, beanName, pvs);
        }
        catch (Throwable ex) {
            throw new BeanCreationException(beanName, "Injection of autowired dependencies failed", ex);
        }
        return pvs;
    }
会跳转到InjectionMetadata过下,再回到AutowiredAnnotationBeanPostProcessor,回来后我们这里只关注字段上面的inject:
@Override
        protected void inject(Object bean, String beanName, PropertyValues pvs) throws Throwable {
            ....
                    // 解析value的值
                    value = beanFactory.resolveDependency(descriptor, beanName, autowiredBeanNames, typeConverter);
                    ....
                if (value != null) {
                    ReflectionUtils.makeAccessible(field);
                    // 设置值
                    field.set(bean, value);
                }
            ....
    }
我们看下resolveDependency方法。
DefaultListableBeanFactory:
public Object resolveDependency(DependencyDescriptor descriptor, String beanName,
        ...
            return doResolveDependency(descriptor, descriptor.getDependencyType(), beanName, autowiredBeanNames, typeConverter);
        ...
    }

protected Object doResolveDependency(DependencyDescriptor descriptor, Class type, String beanName,
            Set autowiredBeanNames, TypeConverter typeConverter) throws BeansException {
    // 这里只关注value注解,获取到value的是value注解的内容${"XXX"},不是真正的值
        Object value = getAutowireCandidateResolver().getSuggestedValue(descriptor);
        if (value != null) {
            if (value instanceof String) {
                // 获取到properties注入的值
                String strVal = resolveEmbeddedValue((String) value);
                BeanDefinition bd = (beanName != null && containsBean(beanName) ? getMergedBeanDefinition(beanName) : null);
                value = evaluateBeanDefinitionString(strVal, bd);
            }
            ...
    }
AbstractBeanFactory
public String resolveEmbeddedValue(String value) {
        String result = value;
        for (StringValueResolver resolver : this.embeddedValueResolvers) {
            if (result == null) {
                return null;
            }
            result = resolver.resolveStringValue(result);
        }
        return result;
    }
还记得这个StringValueResolver嘛?就是之前properties配置里面解析注入的。
那么到这里这就完成了value的分析,只留下了一疑问:InstantiationAwareBeanPostProcessor这个接口什么时候才会调用?
PostConstruct
xml配置:
class="org.springframework.context.annotation.CommonAnnotationBeanPostProcessor" />
看下这个类的构造:
public CommonAnnotationBeanPostProcessor() {
        setOrder(Ordered.LOWEST_PRECEDENCE - 3);
        setInitAnnotationType(PostConstruct.class);
        setDestroyAnnotationType(PreDestroy.class);
        ignoreResourceType("javax.xml.ws.WebServiceContext");
}so,这个类就是专门用来处理PostConstruct和PreDestroy注解的,我们这里只看PostConstruct,另一个没什么区别。其实这个类也处理其他几个注解,比较常见的就是@Resouce注解,可以按照上面value注解分析的思路,看下这个类,最后重点关注下postProcessPropertyValues方法。
看下类继承:
看到了BeanPostProcessor接口,这个接口是有2个方法,在bean初始化前\后添加个process。
在父类InitDestroyAnnotationBeanPostProcessor中实现了2个接口:
public Object postProcessBeforeInitialization(Object bean, String beanName) throws BeansException {
    // 找到class中带有post和pre2个注解的方法,封装了下
        LifecycleMetadata metadata = findLifecycleMetadata(bean.getClass());
        try {
            // 调用带有postConstruct注解的方法
            metadata.invokeInitMethods(bean, beanName);
        }
        catch (InvocationTargetException ex) {
            throw new BeanCreationException(beanName, "Invocation of init method failed", ex.getTargetException());
        }
        catch (Throwable ex) {
            throw new BeanCreationException(beanName, "Couldn't invoke init method", ex);
        }
        return bean;
    }
现在也清除了postConstruct的注解,留下个疑问,BeanPostProcessor这个接口什么时候调用?
bean创建
上面留下2个疑问:
1. InstantiationAwareBeanPostProcessor这个接口什么时候才会调用?
2. BeanPostProcessor这个接口什么时候调用?
要解决这2个问题,需要了解下spring对bean解析创建的整体流程:
1. 加载xml配置文件,解析配置标签,注册bean;
2. 自动创建各种singleton的bean。
是不是有点简单,具体可以看下AbstractApplicationContext类的refresh方法,整个spring的bean加载创建流程都在这里,spring的代码写的真牛逼。
我们现在关注下bean创建流程中对这2个接口的处理部分。
AbstractAutowireCapableBeanFactory:
protected Object doCreateBean(final String beanName, final RootBeanDefinition mbd, final Object[] args) {
        ....
            // 处理bean的属性
            populateBean(beanName, mbd, instanceWrapper);
            if (exposedObject != null) {
                // 初始化bean
                exposedObject = initializeBean(beanName, exposedObject, mbd);
            }
        ....
        // 注册disposbean
        registerDisposableBeanIfNecessary(beanName, bean, mbd);
        ....
}populateBean方法:
protected void populateBean(String beanName, RootBeanDefinition mbd, BeanWrapper bw) {
        ....

        if (hasInstAwareBpps || needsDepCheck) {
            PropertyDescriptor[] filteredPds = filterPropertyDescriptorsForDependencyCheck(bw, mbd.allowCaching);
            if (hasInstAwareBpps) {
                for (BeanPostProcessor bp : getBeanPostProcessors()) {
                    // 这里解决上面value的问题,调用InstantiationAwareBeanPostProcessor所有实现,处理属性解析
                    if (bp instanceof InstantiationAwareBeanPostProcessor) {
                        InstantiationAwareBeanPostProcessor ibp = (InstantiationAwareBeanPostProcessor) bp;
                        pvs = ibp.postProcessPropertyValues(pvs, filteredPds, bw.getWrappedInstance(), beanName);
                        if (pvs == null) {
                            return;
                        }
                    }
                }
            }
            ....
}initializeBean方法:
protected Object initializeBean(final String beanName, final Object bean, RootBeanDefinition mbd) {
if (System.getSecurityManager() != null) {
AccessController.doPrivileged(new PrivilegedActioninvokeInitMethods方法:
protected void invokeInitMethods(String beanName, final Object bean, RootBeanDefinition mbd)
throws Throwable {
boolean isInitializingBean = (bean instanceof InitializingBean);
if (isInitializingBean && (mbd == null || !mbd.isExternallyManagedInitMethod("afterPropertiesSet"))) {
if (logger.isDebugEnabled()) {
logger.debug("Invoking afterPropertiesSet() on bean with name '" + beanName + "'");
}
if (System.getSecurityManager() != null) {
try {
AccessController.doPrivileged(new PrivilegedExceptionActiondestroy
还是在上面的doCreateBean里面:
protected Object doCreateBean(final String beanName, final RootBeanDefinition mbd, final Object[] args) {
        ....
            // 处理bean的属性
            populateBean(beanName, mbd, instanceWrapper);
            if (exposedObject != null) {
                // 初始化bean
                exposedObject = initializeBean(beanName, exposedObject, mbd);
            }
        ....
        // 注册disposbean
        registerDisposableBeanIfNecessary(beanName, bean, mbd);
        ....
}registerDisposableBeanIfNecessary:
protected void registerDisposableBeanIfNecessary(String beanName, Object bean, RootBeanDefinition mbd) {
        AccessControlContext acc = (System.getSecurityManager() != null ? getAccessControlContext() : null);
        if (!mbd.isPrototype() && requiresDestruction(bean, mbd)) {
            if (mbd.isSingleton()) {
                // Register a DisposableBean implementation that performs all destruction
                // work for the given bean: DestructionAwareBeanPostProcessors,
                // DisposableBean interface, custom destroy method.
                // DisposableBean,自定义的destroy方法
                registerDisposableBean(beanName,
                        new DisposableBeanAdapter(bean, beanName, mbd, getBeanPostProcessors(), acc));
            }
            else {
                // A bean with a custom scope...
                Scope scope = this.scopes.get(mbd.getScope());
                if (scope == null) {
                    throw new IllegalStateException("No Scope registered for scope '" + mbd.getScope() + "'");
                }
                scope.registerDestructionCallback(beanName,
                        new DisposableBeanAdapter(bean, beanName, mbd, getBeanPostProcessors(), acc));
            }
        }
}在这里会注册bean,新建个DisposableBeanAdapter类用来收集DisposableBean接口实现,自定义的destroy方法,还有实现DestructionAwareBeanPostProcessor这个接口的processor,而我们处理PostConstruct和preDestroy的类CommonAnnotationBeanPostProcessor也实现这个接口:

而在CommonAnnotationBeanPostProcessor父类InitDestroyAnnotationBeanPostProcessor有这个接口的实现方法:
public void postProcessBeforeDestruction(Object bean, String beanName) throws BeansException {
        LifecycleMetadata metadata = findLifecycleMetadata(bean.getClass());
        try {
            // 调用preDestroy注解方法
            metadata.invokeDestroyMethods(bean, beanName);
        }
        catch (InvocationTargetException ex) {
            String msg = "Invocation of destroy method failed on bean with name '" + beanName + "'";
            if (logger.isDebugEnabled()) {
                logger.warn(msg, ex.getTargetException());
            }
            else {
                logger.warn(msg + ": " + ex.getTargetException());
            }
        }
        catch (Throwable ex) {
            logger.error("Couldn't invoke destroy method on bean with name '" + beanName + "'", ex);
        }
}我们的context在close的时候会调用销毁所有注册的singletonbean,最终会调用到DisposableBeanAdapter的destroy方法:
public void destroy() {
if (this.beanPostProcessors != null && !this.beanPostProcessors.isEmpty()) {
for (DestructionAwareBeanPostProcessor processor : this.beanPostProcessors) {
// 这里处理preDestroy注解的方法
processor.postProcessBeforeDestruction(this.bean, this.beanName);
}
}
if (this.invokeDisposableBean) {
if (logger.isDebugEnabled()) {
logger.debug("Invoking destroy() on bean with name '" + this.beanName + "'");
}
try {
if (System.getSecurityManager() != null) {
AccessController.doPrivileged(new PrivilegedExceptionAction因此销毁的时候顺序是:
PreDestroy–>DisposableBean–>destroy-method自定义的方法。
总结
- 不明白的地方要多看源码,自己写demo测试,知行合一,不能手高眼低;
- 学习spring的代码编写习惯;


