详解cv2.addWeighted函数【使用 OpenCV 添加(混合)两个图像-Python版本】
文章目录
- 简介
- 函数原型
- 代码示例
- 参考资料
简介
有的时候我们需要将两张图片在alpha通道进行混合,比如深度学习数据集增强方式MixUp。OpenCV的addWeighted提供了相关操作,瓷片博客将详细介绍这个函数,并给出代码示例。
函数原型
o u t p u t I m g = s a t u r a t e ( α ∗ i n p u t I m g 1 + β ∗ i n p u t I m g 2 + γ ) \rm outputImg=saturate( \alpha*inputImg1+ \beta*inputImg2 + \gamma) outputImg=saturate(α∗inputImg1+β∗inputImg2+γ)
cv.addWeighted( src1, alpha, src2, beta, gamma[, dst[, dtype]] ) -> dst
| 参数 | 说明 |
|---|---|
| src1 | 图片1 |
| alpha | 图片1的权重 |
| src2 | 图片2 |
| beta | 图片2的权重 |
| gamma | 添加到每个总和的标量。一般为0 |
| dst | 输出图片,Python版本不需要指定 |
| dtype | 输出数组的可选深度,默认即可 |
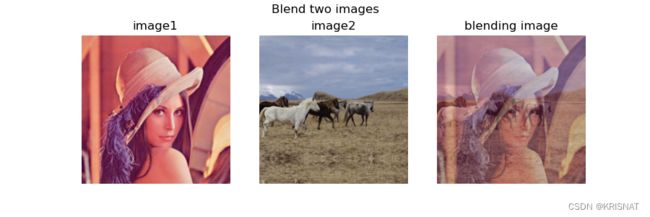
代码示例
import cv2
import matplotlib.pyplot as plt

# 加载两张图片
img1 = cv2.imread(filename="Lenna.png")
img2 = cv2.imread(filename="horses.jpg")

# 将两张图片都调整到640*640
shape1 = img1.shape  # HWC
shape2 = img2.shape  # HWC
max1 = max(shape1[0], shape1[1])
max2 = max(shape2[0], shape2[1])
img1 = cv2.copyMakeBorder(
    src=img1,
    top=int((max1 - shape1[0])/2),
    bottom=int((max1 - shape1[0])/2),
    left=int((max1 - shape1[1])/2),
    right=int((max1 - shape1[1])/2),
    borderType=cv2.BORDER_REFLECT101,
)
img1 = cv2.resize(src=img1, dsize=(640, 640), interpolation=cv2.INTER_LINEAR)
img2 = cv2.copyMakeBorder(
    src=img2,
    top=int((max2 - shape2[0])/2),
    bottom=int((max2 - shape2[0])/2),
    left=int((max2 - shape2[1])/2),
    right=int((max2 - shape2[1])/2),
    borderType=cv2.BORDER_REFLECT101,
)
img2 = cv2.resize(src=img2, dsize=(640, 640), interpolation=cv2.INTER_LINEAR)

# 按照比例将两张图片进行混合
alpha = 0.5
beta = 1.0 - alpha
img_blending = cv2.addWeighted(src1=img1, alpha=alpha, src2=img2, beta=beta, gamma=.0)

# 绘制图片
fig = plt.figure(figsize=(9, 3))
fig.suptitle(t="Blend two images")

ax1 = fig.add_subplot(1, 3, 1)
ax2 = fig.add_subplot(1, 3, 2)
ax3 = fig.add_subplot(1, 3, 3)

ax1.set_title(label="image1")
ax1.spines["top"].set_visible(b=False)
ax1.spines["bottom"].set_visible(b=False)
ax1.spines["left"].set_visible(b=False)
ax1.spines["right"].set_visible(b=False)
ax1.axes.xaxis.set_visible(b=False)
ax1.axes.yaxis.set_visible(b=False)
ax1.imshow(X=cv2.cvtColor(src=img1, code=cv2.COLOR_BGR2RGB))

ax2.set_title(label="image2")
ax2.spines["top"].set_visible(b=False)
ax2.spines["bottom"].set_visible(b=False)
ax2.spines["left"].set_visible(b=False)
ax2.spines["right"].set_visible(b=False)
ax2.axes.xaxis.set_visible(b=False)
ax2.axes.yaxis.set_visible(b=False)
ax2.imshow(X=cv2.cvtColor(src=img2, code=cv2.COLOR_BGR2RGB))

ax3.set_title(label="blending image")
ax3.spines["top"].set_visible(b=False)
ax3.spines["bottom"].set_visible(b=False)
ax3.spines["left"].set_visible(b=False)
ax3.spines["right"].set_visible(b=False)
ax3.axes.xaxis.set_visible(b=False)
ax3.axes.yaxis.set_visible(b=False)
ax3.imshow(X=cv2.cvtColor(src=img_blending, code=cv2.COLOR_BGR2RGB))

plt.show()
参考资料
- Computer Vision: Algorithms and Applications
- OpenCV文档:Adding (blending) two images using OpenCV
- OpenCV文档:addWeighted()
收集整理和创作不易, 若有帮助, 请帮忙点赞➕收藏❤️, 谢谢!✨✨