nacos服务注册,发现与调用及配置中心
1.下载安装并启动nacos
之前的文章有详细的下载地址和安装教程
nacos下载传送门:2020年最新版nacos1.3.1免费下载_深蓝格调_的博客-CSDN博客_nacos1.3.1
nacos安装传送门:linux完美安装nacos(可集群)_深蓝格调_的博客-CSDN博客
2.服务的发现与消费
2.1注册发现
2.1.1添加依赖
springcloudalibaba使用时要注意各个依赖的版本对应,以下是版本对应表
(详见:版本说明 · alibaba/spring-cloud-alibaba Wiki · GitHub)
毕业版本依赖关系
| Spring Cloud Version | Spring Cloud Alibaba Version | Spring Boot Version |
|---|---|---|
| Spring Cloud Hoxton.SR3 |
2.2.1.RELEASE |
2.2.5.RELEASE |
| Spring Cloud Hoxton.RELEASE |
2.2.0.RELEASE |
2.2.X.RELEASE |
| Spring Cloud Greenwich |
2.1.2.RELEASE |
2.1.X.RELEASE |
| Spring Cloud Finchley |
2.0.2.RELEASE |
2.0.X.RELEASE |
| Spring Cloud Edgware |
1.5.1.RELEASE(停止维护,建议升级) |
1.5.X.RELEASE |
因为是在原项目基础上添加注册中心的,所以这里以项目springboot2.0.4版本为例(如果觉得版本太低可以根据对照表更新版本)
pom依赖
        Finchley.RELEASE
        2.0.2.RELEASE


                org.springframework.cloud
                spring-cloud-dependencies
                ${spring-cloud.version}
                pom
                import


                com.alibaba.cloud
                spring-cloud-alibaba-dependencies
                ${spring-cloud-alibaba.version}
                pom
                import


            org.springframework.boot
            spring-boot-starter-web


            com.alibaba.cloud
            spring-cloud-starter-alibaba-nacos-discovery


                    javax.ws.rs
                    jsr311-api
2.1.2yml配置
server:
  port: 20001

spring:
  cloud:
    nacos:
      discovery:
        # 服务注册中心
        server-addr: 192.168.32.129:8848
  application:
    #服务名
    name: base-provider
2.1.3开启注解(如果springcloud版本在E之后即可省略此步骤)
在application启动类添加@EnableDiscoveryClient
启动项目后即可在nacos看到本服务
2.2服务消费
消费者和提供者的注册方式相同,只不过在此基础上添加了openfeign的服务调用功能
2.2.1依赖
        1.8
        Finchley.RELEASE
        2.0.4.RELEASE


                org.springframework.cloud
                spring-cloud-dependencies
                ${spring-cloud.version}
                pom
                import


                com.alibaba.cloud
                spring-cloud-alibaba-dependencies
                ${spring-cloud-alibaba.version}
                pom
                import


            com.alibaba.cloud
            spring-cloud-starter-alibaba-nacos-discovery


            org.springframework.boot
            spring-boot-starter-web


            org.springframework.cloud
            spring-cloud-starter-openfeign
2.2.2yml配置
spring:
  application:
    # 服务名
    name: service-comsumer
  cloud:
    nacos:
      discovery:
        # 服务注册中心
        server-addr: 192.168.32.129:8848

server:
  # 服务端口
  port: 8070

management:
  # 端点检查(健康检查)
  endpoints:
    web:
      exposure:
        include: "*"
2.2.3开启注解(如果springcloud版本在E之后即可省略此步骤)
在application启动类添加@EnableDiscoveryClient
2.2.4openfeign的使用
使用openfeign仍采用常规的controller-service开发习惯,逻辑代码在service中实现(@Component:类交给spring管理;@FeignClient:标识扫描的远程调用接口,name为服务名;@GetMapping后为调用目标方法的路径名)
service
package com.example.demo.service;

import org.springframework.cloud.openfeign.FeignClient;
import org.springframework.stereotype.Component;
import org.springframework.web.bind.annotation.GetMapping;
import org.springframework.web.bind.annotation.PathVariable;

/**
 * @ClassName TestService
 * @Description
 * @Author Administrator
 * @Date 2020/8/21 0021 9:46
 * @Version 1.0
 */
@Component
@FeignClient(name="base-provider")
public interface TestService {

    /**
     * 查询
     * @return
     */
    @GetMapping("/api/tradeinfo/weather")
    String getServiceInfo();

    /**
     * 查询
     * @param id
     * @return
     */
    @GetMapping("/api/tradeinfo/{id}")
    String selectById(@PathVariable("id") String id);

}
controller
package com.example.demo.controller;

import com.example.demo.service.TestService;
import org.springframework.beans.factory.annotation.Autowired;
import org.springframework.web.bind.annotation.GetMapping;
import org.springframework.web.bind.annotation.RequestMapping;
import org.springframework.web.bind.annotation.RequestParam;
import org.springframework.web.bind.annotation.RestController;

@RestController
@RequestMapping("/demo")
public class TestController {

    @Autowired
    TestService testService;

    @GetMapping("/test")
    public String Test(@RequestParam String id) {
        String s = testService.selectById(id);
        return s;
    }

    @GetMapping("/test1")
    public String Test1() {
        return testService.getServiceInfo();
    }

}
以下是调用consumer接口返回的数据
3.nacos作为配置中心
3.1 依赖
        1.8
        Finchley.RELEASE
        2.0.4.RELEASE


                org.springframework.cloud
                spring-cloud-dependencies
                ${spring-cloud.version}
                pom
                import


                com.alibaba.cloud
                spring-cloud-alibaba-dependencies
                ${spring-cloud-alibaba.version}
                pom
                import


            com.alibaba.cloud
            spring-cloud-starter-alibaba-nacos-discovery


            com.alibaba.cloud
            spring-cloud-starter-alibaba-nacos-config


            org.springframework.boot
            spring-boot-starter-web


            org.springframework.cloud
            spring-cloud-starter-openfeign
3.2 更名原有的application.yml为bootstrap.yml(由于application的加载优先级较低的缘故,不更名会报无法读取配置中心数据的错误)
3.3 添加配置文件内容
spring:
  application:
    # 服务名
    name: service-comsumer
  cloud:
    nacos:
      discovery:
        # 服务注册中心
        server-addr: 127.0.0.1:8848
      config:
        # 配置中心地址
        server-addr: 127.0.0.1:8848
        # 读取配置文件格式(根据nacos配置中心自定义配置文件而定,默认properties)
        file-extension: yaml
  profiles:
    active: dev

server:
  # 服务端口
  port: 8070

management:
  # 端点检查(健康检查)
  endpoints:
    web:
      exposure:
        include: "*"
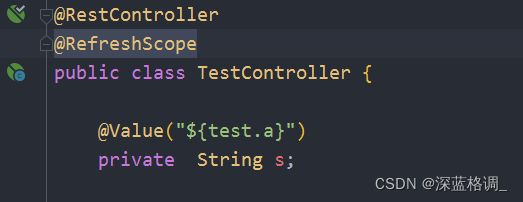
3.4 添加注解@RefreshScope(此注解可以使更新配置中心内容时同步刷新项目)
3.5 nacos添加配置
示例:(此处data id严格按照此格式:服务名+(-扩展名)+“.配置文件类型”)


