【virtualBox 搭建PXE boot环境】自动安装CentOS7.9
目录
1)PXE工作原理
2)VirtualBox安装
3)安装虚拟机
4)配置PXE
1)安装依赖包
2)配置tftp,并enable
3)上传CentOS镜像到虚拟机
4)pxelinux基本目录
1) default 配置
2)安装引导文件
3) DHCP配置
4)开启服务
4)验证PXE安装系统
1)PXE工作原理
PXE(Pre-boot execution environment)是intel公司开发的一个技术,支持工作站从远程服务器上下载镜像,并由此启动操作系统。在启动过程中,终端请求分配IP地址,在使用TFTP协议下载一个启动软件包到本地内存中执行,最后由这个启动软件包完成终端基本软件的设置,从而完成操作系统的安装,其工作流程如下:

2)VirtualBox安装
利用virtualBox 扩展功能搭建PXE远程安装系统,方便无人值守的机房进行装机,VirtualBox 安装过程。
安装VirtualBox到本地主机,然后安装extend pack。官网可以download安装包
![]()

3)安装虚拟机
实验使用的是Centos7.9作为PXE server端。(Virtualbox 安装centos指导参见)
注意:这里网卡设置统一为桥接模式,使host和虚拟机处于同一网络环境,Host <-->VM互通。
pxe部署需要服务器网卡的功能支持,基于系统启动方式的不同,pxe启动分为UEFI,legacy两种方式。其中UEFI启动方式需要特定网卡功能的配合,legacy模式则大部分无盘系统网卡均可支持。以下为legacy方式的实现说明。
4)配置PXE
1)安装依赖包
centos7.9虚机里需要安装如下package
yum -y install dhcp vsftpd dnsmasq syslinux httpd xinetd tftp-server tftp其中:
- dhcp 提供部署网段的dhcp next server,pxelinux引导
- vsftpd 使用ftp方式远端传送文件
- dnsmasq 如果使用dnsmasq自带的dhcp/tftp
- syslinux 提供pxe引导需要的引导文件(从/usr/share/syslinux/下copy到/var/ftp/)
- httpd 使用http方式传送文件(推荐,效率高)
- xinetd tftp方式的管理界面
- tftp-server tftp 部署tftp功能
2)配置tftp,并enable
[root@localhost ~]# cat /etc/xinetd.d/tftp
 service tftp
 {
         socket_type             = dgram
          protocol                = udp
         wait                    = yes
        user                    = root
          server                  = /usr/sbin/in.tftpd
           server_args             = -s /var/ftp
           disable                 = no
           per_source              = 11
          cps                     = 100 2
              flags                   = IPv4
}
3)上传CentOS镜像到虚拟机
使用winscp工具,上传至/var/ftp/img文件夹下,然后挂载iso文件。/var/ftp目录下有一个mount.sh脚本
[root@bogon ftp]# cat mount.sh
mount /var/ftp/img/CentOS-7-x86_64-DVD-2009.iso /var/ftp/sources/centos79
4)pxelinux基本目录
见/var/ftp/(也可以指定到其他目录,只需要在tftp配置文件里修改即可)
[root@bogon ftp]# tree | head -n 50
.
├── img
│   └── CentOS-7-x86_64-DVD-2009.iso
├── menu.c32
├── mount.sh
├── netboot
│   ├── centos79
│   │   ├── centos7p9.cfg
│   │   ├── initrd.img
│   │   └── vmlinuz
│   └── ubuntu22
│       ├── grub.cfg
│       ├── initrd
│       ├── unicode.pf2
│       └── vmlinuz
├── pub
├── pxelinux.0
├── pxelinux.cfg
│   └── default
├── pxe_service_start.sh
└── sources
    ├── centos79
其中:
- img 用于存放镜像文件
- netboot /centos79存放初始化引导文件,initrd.img/vmlinuz可以从对应的完整安装源中提取(images/pxeboot/)。
- pxelinux.0 为syslinux 提供的pxe引导文件, /usr/share/syslinux/pxelinux.0
- default为安装引导配置
- menu.32 可以从对应的安装源中提去(/isolinux/)
- sources 系统镜像挂载文件夹
- pxe_service_start.sh 启动相关服务脚本

![]()
1) default 配置
[root@bogon pxelinux.cfg]# cat default
DEFAULT menu.c32
TIMEOUT 300
MENU TITLE linux PXE Menu

LABEL centos7p9
  MENU LABLE centos7p9
  MENU DEFAULT
  KERNEL /netboot/centos79/vmlinuz
  APPEND initrd=netboot/centos79/initrd.img ks=ftp://192.168.1.12/netboot/centos79/centos7p9.cfg nofb text biosdevname=0 ksdevice=bootif
  IPAPPEND 2
2)安装引导文件
[root@bogon netboot]# cat centos79/
centos7p9.cfg  initrd.img     vmlinuz
[root@bogon netboot]# cat centos79/centos7p9.cfg
#platform=x86, AMD64, or Intel EM64T
#version=DEVEL
# Install OS instead of upgrade
install
# Keyboard layouts
keyboard 'us'
# Root password
rootpw --iscrypted $1$uxL6qMul$qX3IPggKYzPhAc82LQpLw1
# System language
lang en_US
# System authorization information
auth  --useshadow  --passalgo=sha512
# Use text mode install
# text
# SELinux configuration
selinux --disabled
# Do not configure the X Window System
skipx


# Firewall configuration
firewall --disabled
# Reboot after installation
reboot
# System timezone
timezone Asia/Shanghai
# Use network installation
 url --url="ftp://192.168.1.12/sources/centos79"
# System bootloader configuration
# bootloader --location=mbr
# Clear the Master Boot Record
zerombr
# Partition clearing information
clearpart --all --initlabel
# part /boot --fstype="xfs" --size=1024
# part / --fstype="xfs" --size=51200
# part swap --fstype="swap" --size=4096
# part /home --fstype="xfs" --grow --size=1
# autopart

part /boot --asprimary --fstype="xfs" --size=1024
part swap --fstype="swap" --size=8192
part / --fstype="xfs" --grow --size=1

%packages
# @core
 lrzsz
 tree
 vim

%end


%post

# set to local yum source
# mkdir /etc/yum.repos.d/bak
# mv /etc/yum.repos.d/*repo /etc/yum.repos.d/bak
# cat > /etc/yum.repos.d/base.repo<
3) DHCP配置
[root@bogon netboot]# cat /etc/dhcp/dhcpd.conf
#
# DHCP Server Configuration file.
#   see /usr/share/doc/dhcp*/dhcpd.conf.example
#   see dhcpd.conf(5) man page
#
option space PXE;
option PXE.mtftp-ip  code 1 = ip-address;
option PXE.mtftp-cport code 2 = unsigned integer 16;
option PXE.mtftp-sport code 3 = unsigned integer 16;
option PXE.mtftp-tmout code 4 = unsigned integer 8;
option PXE.mtftp-delay code 5 = unsigned integer 8;
option architecture-type code 93 = unsigned integer 16; # RFC4578


ddns-update-style interim;
ignore client-updates;
authoritative;
allow booting;
allow bootp;
allow unknown-clients;

# internal subnet for my DHCP Server
# # IP of PXE Server
#
default-lease-time 600;
max-lease-time 7200;


# internal subnet for my DHCP server
#IP of PXE Server
subnet 192.168.1.0 netmask 255.255.255.0{
        range 192.168.1.100 192.168.1.200;
        option domain-name-servers 114.114.114.114;
        option routers 192.168.1.1;
        option broadcast-address 192.168.1.255;
}

# class "pxeclients"{
if substring (option vendor-class-identifier, 0, 9) = "PXEClient" {
   next-server 192.168.1.12;
        if option architecture-type = 00:00{
           filename "pxelinux.0";
        }else
         if option architecture-type = 00:07 or option architecture-type = 00:06 {
           filename "uefi/shim.EFI";
        }else if option architecture-type = 00:09{
           filename "uefi/shim.EFI";
        }
        else{
           filename "pxelinux.0";
        }
}
4)开启服务
[root@bogon ftp]# cat pxe_service_start.sh
systemctl start xinetd
systemctl start tftp
systemctl start httpd
systemctl start dhcpd.service
systemctl start vsftpd
systemctl enable vsftpd
systemctl enable xinetd
systemctl enable httpd
systemctl enable xinetd
systemctl stop firewalld
systemctl disable firewalld
setenforce 0
4)验证PXE安装系统
注意:建立好虚拟机后,需要在system里,优先选择网络启动
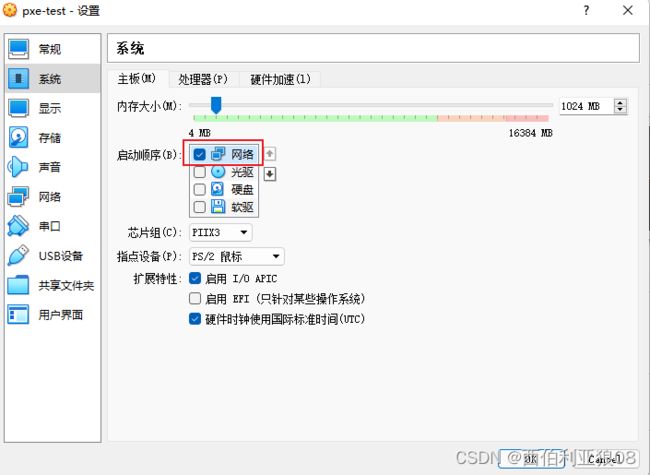
安装完成界面


注意,安装完成之后需要关闭系统网络启动
