Vue3学习之旅–爱上Vue3–Vue3基础语法(一)--以及vscode基本使用和快速生成代码片段
Vue3学习之旅–爱上Vue3–Vue3基础语法(一)
续上文:
vue3学习之旅–邂逅vue3-了解认识Vue3
vue3学习之旅–邂逅vue3-了解认识Vue3(二)
methods方法绑定this
问题回顾:
问题一:为什么不能使用箭头函数(官方文档有给出解释)?
问题二:不使用箭头函数的情况下,this到底指向的是什么?(可以作为一道面试题)
不能使用箭头函数的原因?
我们在methods中要使用data返回对象中的数据:
那么这个this是必须有值的,并且应该可以通过this获取到data返回对象中的数据。
那么我们这个this能不能是window呢?
不可以是window,因为window中我们无法获取到data返回对象中的数据;但是如果我们使用箭头函数,那么这个this就会是window了;
为什么是window呢?
这里涉及到箭头函数使用this的查找规则,它会在自己的上层作用于中来查找this;
最终刚好找到的是script作用于中的this,所以就是window;
this到底是如何查找和绑定的呢?
且听下回分解。
this到底指向什么?
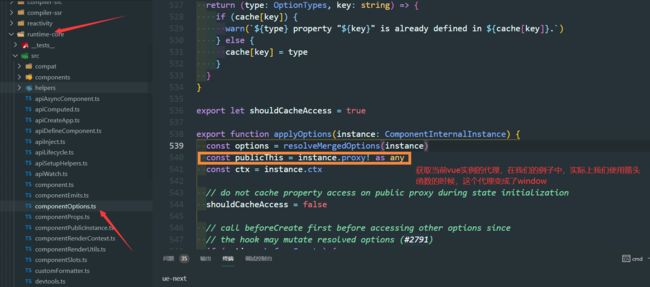
事实上Vue的源码当中就是对methods中的所有函数进行了遍历,并且通过bind绑定了this:
当然学过vue2的小伙伴可能觉得有点熟系。看不懂也没关系,以后慢慢我们可以看懂的。此处可以略过。
DOCTYPE html>
<html lang="en">

<head>
  <meta charset="UTF-8">
  <meta http-equiv="X-UA-Compatible" content="IE=edge">
  <meta name="viewport" content="width=device-width, initial-scale=1.0">
  <title>Documenttitle>
head>

<body>
  <div id="app">div>
  <script src="../vue3/vue3.js">script>


  <template id="mao">
    <div>
      <h2>{{message}}h2>
      <h2>{{counter}}h2>
      <button @click='increment'>+button>
      <button @click='decrement'>-button>


      <button @click='increment'>验证箭头函数的指向button>
    div>
  template>

  <script>
    Vue.createApp({
      template: '#mao',
      // 数据
      data() {
        return {
          message: 'hello Vue3!',
          counter: 0
        }
      },
      // 方法
      // 问题:为什么我们定义在methods里面的方法,不能使用箭头函数?
      // 使用箭头函数,我们发现这个简单的计数器并不会动
      methods: {
        // 使用箭头函数的问题:

        increment: () => {
          // this === window ? 很明显是不能这样做的
          // window对象里面哪里来的counter属性,就算有,和我的vue实例又有什么关系呢?
          // 写出箭头函数的时候,这个this就指向了window
          console.log(this); // 打印的对象的确是window
          console.log(this === window); // true
          // 那么问题来了:为什么使用箭头函数,this就指向window了
          // 很明显:不难想象,肯定和vue的this绑定规则有关
          // 我们知道:箭头函数是不会绑定this的,箭头函数在哪个作用域中,this就指向那个作用域的对象
          // 那么你可能觉得,我箭头函数当前不就在 methods的作用域里面吗?
          // 其实不然:methods只是在定义对象  methods是什么,是对象啊
          // 什么是作用域: () 肯定是在括号里面啦
          // 所以箭头函数最终找到的this就到了最顶层的window
          this.counter++;
        },
        decrement: () => {
          this.counter--;
          console.log(this);
        }
      }
    }).mount('#app');

    window.name = 'win'
    const fn = function () {
      console.log(this.name);
    }
    fn() // 'win' 实际上执行的是 window.fn()  隐式绑定

    const obj = { name: '毛', fn: fn }
    obj.fn() // '毛'
  script>
body>

html>
补充:vscode代码片段
我们在前面练习Vue的过程中,有些代码片段是需要经常写的,我们再VSCode中我们可以生成一个代码片段,方 便我们快速生成。
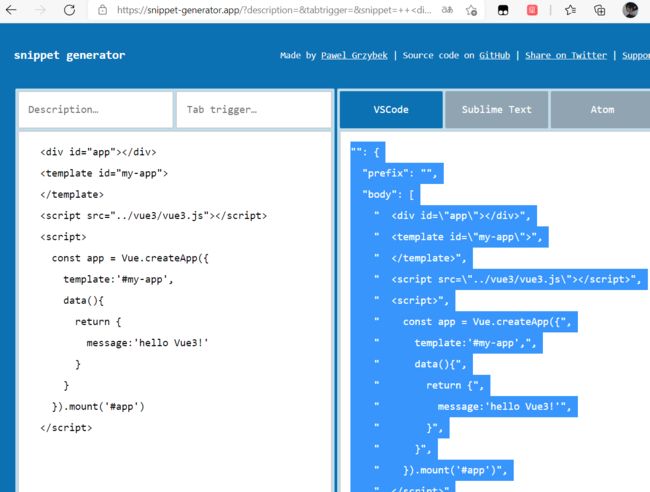
VSCode中的代码片段有固定的格式,所以我们一般会借助于一个在线工具来完成。
具体的步骤如下:
- 复制自己需要生成代码片段的代码
- https://snippet-generator.app/在该网站中生成代码片段;
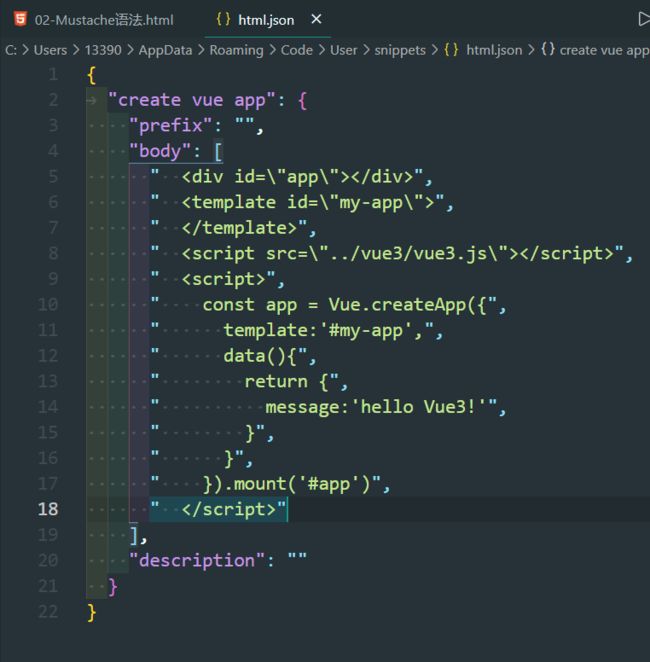
- 在VSCode中配置代码片段
需要生成的代码片段
  <div id="app">div>
  <template id="my-app">
  template>
  <script src="../vue3/vue3.js">script>
  <script>
    const app = Vue.createApp({
      template:'#my-app',
      data(){
        return {
          message:'hello Vue3!'
        }
      }
    }).mount('#app')
  script>
vscode–> 设置 --> 用户代码片段
选择我们需要生成的文件类型
将需要生成的代码片段拷贝到上面的那个网站
在html.json 中进行配置
保存,就ok
接下来直接使用prefix的属性值,敲出来 前缀然后回车,自动生成模板骨架。
模板语法
React的开发模式:
- React使用的jsx,所以对应的代码都是编写的类似于js的一种语法;
- 之后通过Babel将jsx编译成 React.createElement 函数调用
Vue也支持jsx的开发模式(后续有时间也会讲到):
- 但是大多数情况下,使用基于HTML的模板语法;
- 在模板中,允许开发者以声明式的方式将DOM和底层组件实例的数据绑定在一起;
- 在底层的实现中,Vue将模板编译成虚拟DOM渲染函数,这个我会在后续给大家讲到;
所以,对于学习Vue来说,学习模板语法是非常重要的。
Mustache双大括号语法
如果我们希望把数据显示到模板(template)中,使用最多的语法是 “Mustache”语法 (双大括号) 的文本插值。
- 并且我们前端提到过,data返回的对象是有添加到Vue的响应式系统中;
- 当data中的数据发生改变时,对应的内容也会发生更新。
- 当然,Mustache中不仅仅可以是data中的属性,也可以是一个JavaScript的表达式。
<div id="app">div>
  <template id="my-app">


    <h2>{{message}}h2>

    <h2>{{age * 10}}h2>
    <h2>{{age / 10}}h2>


    <h2>{{message.split('').reverse().join('')}}h2>

    <h2>{{getReverseMessage()}}h2>


    <h2>{{isShow? '哈哈' : '呵呵'}}h2>

    <h2>{{name}} {{message}}h2>
  template>
  <script src="../vue3/vue3.js">script>
  <script>
    Vue.createApp({
      template: '#my-app',
      data() {
        return {
          message: 'hello Vue3!',
          name: '毛毛',
          age: 22,
          isShow:true
        }
      },
      methods: {
        getReverseMessage() {
          return this.message.split('').reverse().join('');
        }
      },
    }).mount('#app')
  script>
另外这种用法是错误的:
    <h2>{{const a = '10'}}h2>

    <h2>{{if(isShow) {return '哈哈哈'}}}h2>
Vue指令
v-once指令
v-once用于指定元素或者组件只渲染一次:
-
当数据发生变化时,元素或者组件以及其所有的子元素将视为静态内容并且跳过;
-
该指令可以用于性能优化;
    <h2 v-once>{{counter}}h2>
    <h2>{{counter}}h2>
    <button @click='increment'>+button><br>
如果是子节点,也是只会渲染一次:
    <div v-once>
      <h2>{{counter}}h2>
      <button @click='increment'>+button><br>
    div>
<div id="app">div>
  <template id="my-app">

    <h2 v-once>{{counter}}h2>
    <h2>{{counter}}h2>
    <button @click='increment'>+button><br>

    <div v-once>
      <h2>{{counter}}h2>
      <button @click='increment'>+button><br>
    div>
  template>
  <script src="../vue3/vue3.js">script>
  <script>
    Vue.createApp({
      template: '#my-app',
      data() {
        return {
          counter: 100
        }
      },
      methods: {
        increment() {
          this.counter++;
        }
      },
    }).mount('#app')
  script>
v-text 指令
用于更新元素的 textContent:
也就是用于更新元素的文本内容。
    <template id="my-app">

      <h2 v-text='message'>h2>

      <h3>{{message}}h3>

    template>
v-html指令
默认情况下,如果我们展示的内容本身是 html 的,那么vue并不会对其进行特殊的解析。
如果我们希望这个内容被Vue可以解析出来,那么可以使用 v-html 来展示;
<div id="app">div>
  <template id="my-app">
    <div>{{message}}div>

    <div v-html='message'>div>
  template>
  <script src="../vue3/vue3.js">script>
  <script>
    Vue.createApp({
      template: '#my-app',
      data() {
        return {
          message: '毛毛'
        }
      }
    }).mount('#app')
  script>
v-pre 指令
- v-pre用于跳过元素和它的子元素的编译过程,显示原始的Mustache标签
- 跳过不需要编译的节点,加快编译的速度;
<h2 v-pre>{{message}}h2>
v-cloak 指令
这个指令保持在元素上直到关联组件实例结束编译。和 CSS 规则如 [v-cloak] { display: none } 一起用时,这个指令可以隐藏未编译的 Mustache 标签直到组件实 例准备完毕。
  <style>
    [v-cloak]{
      display: none;
    }
  style>


    <h2 v-cloak>{{message}}h2>
这个h2标签在vue解析完全之前,不会显示。
以下的指令都为常用的指令,是本次学习的重点!
v-bind的绑定属性
1. 基本使用
前面讲的一系列指令,主要是将值插入到模板内容中。
但是,除了内容需要动态来决定外,某些属性我们也希望动态来绑定。
比如:
- 动态绑定a元素的href属性;
- 动态绑定img元素的src属性;
绑定属性我们使用v-bind:
缩写::
预期:any (with argument) | Object (without argument)
参数:attrOrProp (optional)
修饰符:.camel - 将 kebab-case attribute 名转换为 camelCase。
用法:动态地绑定一个或多个 attribute,或一个组件 prop 到表达式。
2. 绑定基本属性
v-bind用于绑定一个或多个属性值,或者向另一个组件传递props值(这个学到组件时再介绍);
在开发中,有哪些属性需要动态进行绑定呢?
还是有很多的,比如图片的链接src、网站的链接href、动态绑定一些类、样式等等
v-bind有一个对应的语法糖(,也就是简写方式。
在开发中,我们通常会使用语法糖的形式,因为这样更加简洁。
<div id="app">div>


    <template id="my-app">

      <img v-bind:src="imgUrl" alt="">
      <a v-bind:href="url2">百度a><br>

      <a :href="url">我的博客a>
    template>
    <script src="../vue3/vue3.js">script>
    <script>
      Vue.createApp({
        template:'#my-app',
        data(){
          return {
            message:'hello Vue3!',
            imgUrl: 'https://gitee.com/mao0826/picture/raw/master/images/image-20210714225551729.png',
            url: 'https://blog.csdn.net/weixin_45747310/article/details/118691744',
            url2: 'https://blog.csdn.net/weixin_45747310/article/details/118683938'
          }
        }
      }).mount('#app')
    script>
3. 绑定class属性
介绍
在开发中,有时候我们的元素class也是动态的,比如:
- 当数据为某个状态时,字体显示红色.
- 当数据另一个状态时,字体显示黑色.
绑定class的两种方式:
- 对象语法
- 数组语法
对象语法
我们可以传给 :class (v-bind:class 的简写) 一个对象,以动态地切换 class。
<style>
    .active {
      color: red;
    }

    .bgColor {
      background-color: aquamarine;
    }

    .default {
      font-size: 40px;
    }
  style>


<div id="app">div>
  <template id="my-app">


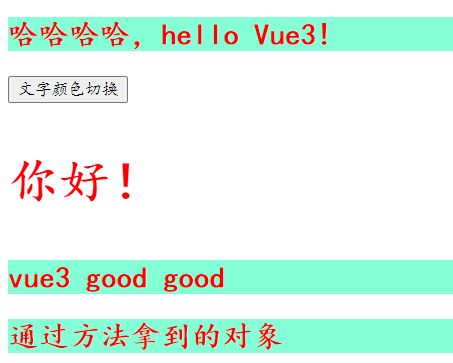
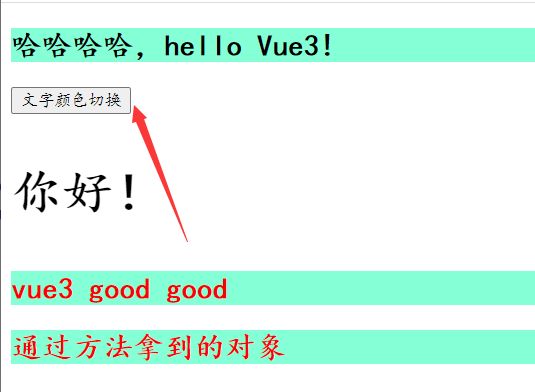
    <h2 :class="{'bgColor':true,active:isActive}">哈哈哈哈,{{message}}h2>
    <button @click='toggle'>文字颜色切换button>

    <h3 class='default' :class='{active:isActive}'>你好!h3>

    <h2 :class='classNameObj'>vue3 good good h2>


    <h2 :class='getClass()'>通过方法拿到的对象h2>
  template>
  <script src="../vue3/vue3.js">script>
  <script>
    Vue.createApp({
      template: '#my-app',
      data() {
        return {
          message: 'hello Vue3!',
          isActive: true,
          // 一般在定义属性存放数据的时候,不会嵌套的引用其他属性的值
          // 比如  classNameObj = {active:isActive} 这种写法是不被允许的
          classNameObj: {
            active: true,
            bgColor: true
          }
        }
      },
      methods: {
        toggle() {
          this.isActive = !this.isActive;
        },
        getClass() {
          return {
            active: true,
            bgColor: true
          };
        }
      },
    }).mount('#app')
  script>
数组语法
我们可以把一个数组传给 :class,以应用一个 class 列表
<style>
    .active {
      color: red;
    }

    .bgColor {
      background-color: aquamarine;
    }

    .default {
      font-size: 40px;
    }
  style>
head>

<body>
  <div id="app">div>
  <template id="my-app">


    <h2 :class="['default','bgColor']">呵呵额和h2>

    <h3 :class="['bgColor',isActive?'active':'']">{{message}}h3>

    <h2 :class="['bgColor',{'active':isActive}]">{{message}}h2>
  template>
  <script src="../vue3/vue3.js">script>
  <script>
    Vue.createApp({
      template: '#my-app',
      data() {
        return {
          message: 'hello Vue3!',
          isActive: true,
          // 一般在定义属性存放数据的时候,不会嵌套的引用其他属性的值
          // 比如  classNameObj = {active:isActive} 这种写法是不被允许的
          classNameObj: {
            active: true,
            bgColor: true
          }
        }
      },
      methods: {
        toggle() {
          this.isActive = !this.isActive;
        },
        getClass() {
          return {
            active: true,
            bgColor: true
          };
        }
      },
    }).mount('#app')
  script>
4. 绑定style
介绍:我们可以利用v-bind:style来绑定一些CSS内联样式。
因为:某些样式我们需要根据数据动态来决定。比如文字的颜色,大小,行间距,行高等。
CSS property 名可以用驼峰式 (camelCase) 或短横线分隔 (kebab-case,记得用引号括起来) 来命名
绑定class有两种方式:
- 对象语法
- 数组语法
对象语法
-
不动态绑定时
<h2 style="color: aquamarine;">{{message}}h2> -
动态绑定style
<div id="app">div>
  <template id="my-app">

    <h2 style="color: aquamarine;">{{message}}h2>


    <h2 :style="{color: '#ccc'}">1111111111111111111111h2>

    <h2 :style="{color: myOrange}">222222222222222h2>

    <h3 :style="{backgroundColor: '#aadacc'}">3333333333333333h3>

    <h3 :style="{'background-color': '#dddacc'}">4444444444444444h3>

    <h2 :style="{fontSize:myFontSize + 'px'}">555555555555555555h2>

    <h2 :style="{backgroundColor,fontSize}">666666666666h2>

    <h2 :style="myStyle">7777777777777h2>

    <h2 :style="getStyle()">8888888888888h2>
  template>
  <script src="../vue3/vue3.js">script>
  <script>
    Vue.createApp({
      template: '#my-app',
      data() {
        return {
          message: 'hello Vue3!',
          myOrange: 'orange',
          myFontSize: 30,
          backgroundColor: '#aedcfa',
          fontSize: '40px',
          myStyle: {
            color: '#eae',
            fontSize: '30px',
            backgroundColor: '#ccc'
          }
        }
      },
      methods: {
        getStyle(){
          return {
            color: '#eaa',
            fontSize: '40px',
            backgroundColor: '#bdc'
          }
        }
      },
    }).mount('#app')
  script>
数组语法
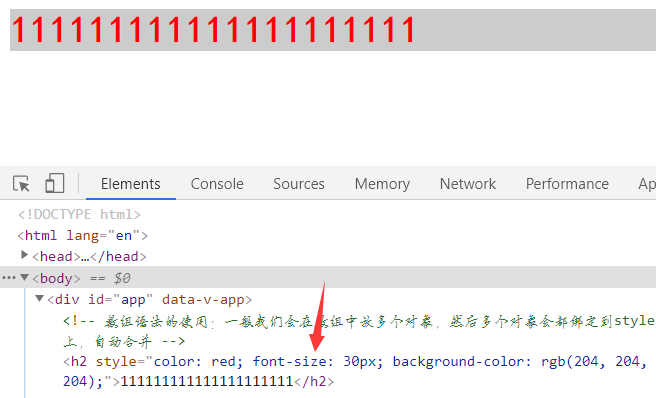
style 的数组语法可以将多个样式对象应用到同一个元素上
<div id="app">div>
  <template id="my-app">

    <h2 :style="[style1,style2]">111111111111111111111h2>
  template>
  <script src="../vue3/vue3.js">script>
  <script>
    Vue.createApp({
      template: '#my-app',
      data() {
        return {
          message: 'hello Vue3!',
          style1: { color: 'red', fontSize: '30px' },
          style2: { backgroundColor: '#ccc' }
        }
      }
    }).mount('#app')
  script>
5. 动态绑定属性
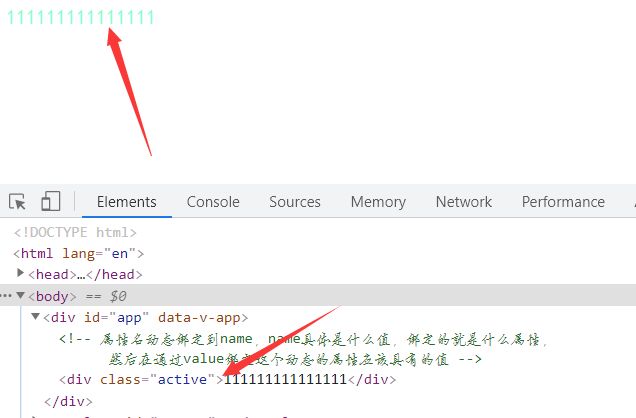
在某些情况下,我们属性的名称可能也不是固定的:
- 前端我们无论绑定src、href、class、style,属性名称都是固定的;
- 如果属性名称不是固定的,我们可以使用 :[属性名]=“值” 的格式来定义;
- 这种绑定的方式,我们称之为动态绑定属性;
<style>
    .active {
      color: aquamarine;
    }
  style>

  <div id="app">div>
  <template id="my-app">

    <div :[name]="value">111111111111111div>
  template>
  <script src="../vue3/vue3.js">script>
  <script>
    Vue.createApp({
      template: '#my-app',
      data() {
        return {
          message: 'hello Vue3!',
          name: 'class',
          value: 'active'
        }
      }
    }).mount('#app')
  script>
6. 绑定一个对象
如果我们希望将一个对象的所有属性,绑定到元素上的所有属性,应该怎么做呢?
非常简单,我们可以直接使用 v-bind 绑定一个 对象;
例如:info对象会被拆解成div的各个属性
<div id="app">div>
  <template id="my-app">


    <div v-bind="info">{{message}}div>

    <div :="info">{{message}}div>

  template>
  <script src="../vue3/vue3.js">script>
  <script>
    Vue.createApp({
      template: '#my-app',
      data() {
        return {
          message: 'hello Vue3!',
          info: {
            name: '哈哈',
            style: 'color:red',
            age: 22,
            data: '你好!'
          }
        }
      }
    }).mount('#app')
  script>
v-on指令 绑定事件
前面我们绑定了元素的内容和属性,在前端开发中另外一个非常重要的特性就是交互。
在前端开发中,我们需要经常和用户进行各种各样的交互:
这个时候,我们就必须监听用户发生的事件,比如点击、拖拽、键盘事件等等
在Vue中如何监听事件呢?使用v-on指令。
接下来我们来看一下v-on的用法:
v-on的使用:
缩写:@
预期:Function | Inline Statement | Object
参数:event
(事件)修饰符:
- .stop - 调用 event.stopPropagation()。
- .prevent - 调用 event.preventDefault()
- .capture - 添加事件侦听器时使用 capture 模式
- .self - 只当事件是从侦听器绑定的元素本身触发时才触发回调
- .{keyAlias} - 仅当事件是从特定键触发时才触发回调
- .once - 只触发一次回调。
- .left - 只当点击鼠标左键时触发
- .right - 只当点击鼠标右键时触发。
- .middle - 只当点击鼠标中键时触发
- .passive - { passive: true } 模式添加侦听器
用法:绑定事件监听
基本使用
我们可以使用v-on来监听一下点击的事件:
<button v-on:click="btnClick1">按钮1button><br>
v-on:click可以写成@click,是它的语法糖写法:
<button @click="btnClick1">按钮1button><br>
当然,我们也可以绑定其他的事件:
<div v-on:mousemove="btn2Move">鼠标在移动事件div>
如果我们希望一个元素绑定多个事件,这个时候可以传入一个对象:
<button @="{'click':btnClick1,'mousemove':btn2Move}" @click="btnClick2">绑定多个事件,两个点击事件都会生效button>
**基本使用总览:**大家多多尝试
<style>
    .dd{
      width: 200px;
      height: 200px;
      background-color: aquamarine;
    }
  style>

<div id="app">div>
  <template id="my-app">

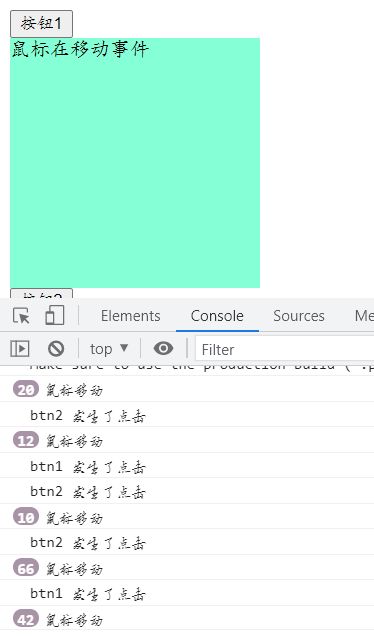
    <button v-on:click="btnClick1">按钮1button><br>

    <div class="dd" v-on:mousemove="btn2Move">鼠标在移动事件div>

    <button @click="btnClick2">按钮2button><br>

    <button @click="counter++">点击数字加一button> <span style="color: blueviolet;">{{counter}}span>


    <button v-on="{'click':btnClick1,'click':btnClick2}">只有第二个点击事件生效button><br>

    <button @="{'click':btnClick1,'mousemove':btn2Move}" @click="btnClick2">绑定多个事件,两个点击事件都会生效button>
  template>
  <script src="../vue3/vue3.js">script>
  <script>
    Vue.createApp({
      template: '#my-app',
      data() {
        return {
          message: 'hello Vue3!',
          counter: 0
        }
      },
      methods: {
        btnClick1() {
          console.log('btn1 发生了点击');
        },
        btn2Move(){
          console.log('鼠标移动');
        },
        btnClick2() {
          console.log('btn2 发生了点击');
        },
      },
    }).mount('#app')
  script>
v-on参数传递
当通过methods中定义方法,以供@click调用时,需要注意参数问题:
-
如果该方法不需要额外参数,那么方法后的()可以不添加
<button @click="btnClick">按钮button> -
如果方法本身中有一个参数,那么会默认将原生事件event参数传递进去
<button @click="btnClick">按钮button> -
如果需要同时传入某个参数,同时需要event时,可以通过$event传入事件。
<button @click="btnClick2($event,'你好!')">按钮button> -
如果事件处理函数带括号了,不传递参数,默认是接收不到 event事件的
<button @click="btnClick3()">按钮button>
总览:
<div id="app">div>
  <template id="my-app">

    <button @click="btnClick">按钮button>


    <button @click="btnClick2($event,'你好!')">按钮button>

    <button @click="btnClick3()">按钮button>
  template>
  <script src="../vue3/vue3.js">script>
  <script>
    Vue.createApp({
      template: '#my-app',
      data() {
        return {
          message: 'hello Vue3!'
        }
      },
      methods: {
        btnClick(event) {
          console.log(event);
        },
        btnClick2(event,data) {
          console.log(event);
          console.log(data);
        },
        btnClick3(event) {
          console.log(event);
        }
      },
    }).mount('#app')
  script>
v-on 事件修饰符
v-on支持修饰符,修饰符相当于对事件进行了一些特殊的处理:
- .stop - 调用 event.stopPropagation()。
- .prevent - 调用 event.preventDefault()
- .capture - 添加事件侦听器时使用 capture 模式
- .self - 只当事件是从侦听器绑定的元素本身触发时才触发回调
- .{keyAlias} - 仅当事件是从特定键触发时才触发回调
- .once - 只触发一次回调。
- .left - 只当点击鼠标左键时触发
- .right - 只当点击鼠标右键时触发。
- .middle - 只当点击鼠标中键时触发
- .passive - { passive: true } 模式添加侦听器
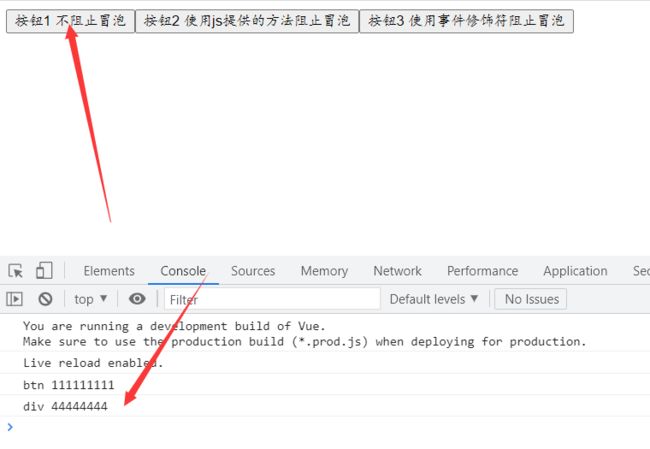
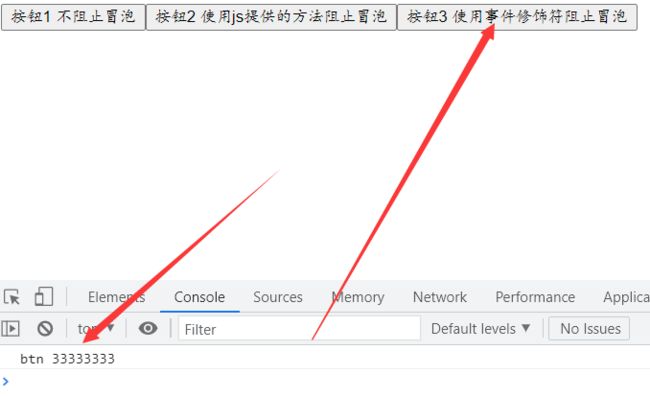
例如:.stop的使用如下:
<div id="app">div>
  <template id="my-app">
    <div @click="divClick">
      <button @click="btnClick1">按钮1 不阻止冒泡button>
      <button @click="btnClick2">按钮2 使用js提供的方法阻止冒泡button>
      <button @click.stop="btnClick3">按钮3 使用事件修饰符阻止冒泡button>
    div>
  template>
  <script src="../vue3/vue3.js">script>
  <script>
    Vue.createApp({
      template: '#my-app',
      data() {
        return {
          message: 'hello Vue3!'
        }
      },
      methods: {
        btnClick1() {
          console.log('btn 111111111')
        },
        btnClick2(event) {
          // 阻止冒泡
          event.stopPropagation()
          console.log('btn 222222222')
        },
        btnClick3() {
          console.log('btn 33333333')
        },
        divClick(){
          console.log('div 44444444');
        }
      }
    }).mount('#app')
  script>
事件修饰符的其他使用可以自行练习。emmm,具体的细节我会再出一个博客专门讲解修饰符以及相关案例。
今日分享结束!冲冲冲

