iOS Core Graphics绘图
Core Graphics Framework是一套基于C的API框架,使用了Quartz作为绘图引擎。它提供了低级别、轻量级、高保真度的2D渲染。
上下文
Core Graphics API所有的操作都在上下文中进行。所以在绘图之前需要获取该上下文并传入执行渲染的函数内。有许多方式获得一个上下文
第一种方法就是创建一个图片类型的上下文。
// 获得用来处理图片的图形上下文
UIGraphicsBeginImageContext(rect.size);

// 获取当前上下文
CGContextRef context = UIGraphicsGetCurrentContext();

// 添加一个红色线条矩阵
CGContextSetStrokeColorWithColor(context, [UIColor redColor].CGColor);
CGContextSetLineWidth(context, 5);
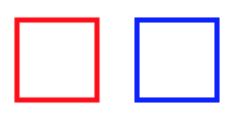
CGContextStrokeRect(context, CGRectMake(10, 10, 80, 80));

// 当前上下文中获取一个UIImage对象
UIImage *theImage = UIGraphicsGetImageFromCurrentImageContext();
// 关闭图形上下文
UIGraphicsEndImageContext();
第二种方法是利用一个UIView并实现了自己的drawRect:,当drawRect方法被调用时,UIView的绘图上下文属于当前图形上下文
- (void)drawRect:(CGRect)rect {
    // 获取当前上下文
    CGContextRef context = UIGraphicsGetCurrentContext();

    // 填充白色背景
    CGContextSetFillColorWithColor(context, [UIColor whiteColor].CGColor);
    CGContextFillRect(context, rect);

    // 添加一个蓝色线条矩阵
    CGContextSetStrokeColorWithColor(context, [UIColor blueColor].CGColor);
    CGContextSetLineWidth(context, 5);
    CGContextStrokeRect(context, CGRectMake(10, 10, 80, 80));
}
设置绘图上下文
UIGraphicsPushContext(context): 把context压入栈中,并把context设置为当前绘图上下文UIGraphicsPopContext(): 将栈顶的上下文弹出,恢复先前的上下文,但是绘图状态不变
- (void)drawRect:(CGRect)rect {
    [[UIColor redColor] setFill];

    UIGraphicsPushContext(UIGraphicsGetCurrentContext());
    [[UIColor blackColor] setFill];
    UIGraphicsPopContext();

    UIRectFill(rect); // black color
}
设置绘图状态
CGContextSaveGState(context): 保存context的状态CGContextRestoreGState: 恢复保存context的状态
- (void)drawRect:(CGRect)rect {
  [[UIColor redColor] setFill];

  CGContextSaveGState(UIGraphicsGetCurrentContext());
  [[UIColor blackColor] setFill];
  CGContextRestoreGState(UIGraphicsGetCurrentContext());

  UIRectFill(rect); // red color
}
绘图函数
颜色
// 线条颜色
CGContextSetRGBStrokeColor(CGContextRef cg_nullable c, CGFloat red, CGFloat green, CGFloat blue, CGFloat alpha)
CGContextSetGrayStrokeColor(CGContextRef cg_nullable c, CGFloat gray, CGFloat alpha)
CGContextSetStrokeColorWithColor(CGContextRef cg_nullable c, CGColorRef cg_nullable color)

// 填充颜色
CGContextSetRGBFillColor(CGContextRef cg_nullable c, CGFloat red, CGFloat green, CGFloat blue, CGFloat alpha)
CGContextSetGrayFillColor(CGContextRef cg_nullable c, CGFloat gray, CGFloat alpha)
CGContextSetFillColorWithColor(CGContextRef cg_nullable c, CGColorRef cg_nullable color)
线条样式
// 线条的宽度
CGContextSetLineWidth(context, 1);
CGContextMoveToPoint(context, 10, 5);
CGContextAddLineToPoint(context, 250, 5);
CGContextStrokePath(context);

CGContextSetLineWidth(context, 3);
CGContextMoveToPoint(context, 10, 15);
CGContextAddLineToPoint(context, 250, 15);
CGContextStrokePath(context);

CGContextSetLineWidth(context, 5);
CGContextMoveToPoint(context, 10, 25);
CGContextAddLineToPoint(context, 250, 25);
CGContextStrokePath(context);

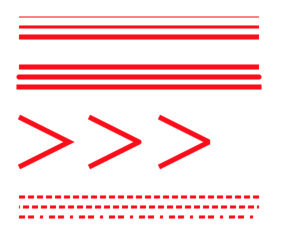
// 线帽,kCGLineCapButt(默认值,无端点)
CGContextMoveToPoint(context, 10, 55);
CGContextAddLineToPoint(context, 250, 55);
CGContextStrokePath(context);

// kCGLineCapRound(圆形)
CGContextSetLineCap(context, kCGLineCapRound);
CGContextMoveToPoint(context, 10, 65);
CGContextAddLineToPoint(context, 250, 65);
CGContextStrokePath(context);

// kCGLineCapSquare(方形)
CGContextSetLineCap(context, kCGLineCapSquare);
CGContextMoveToPoint(context, 10, 75);
CGContextAddLineToPoint(context, 250, 75);
CGContextStrokePath(context);

// 联接点样式,kCGLineJoinMiter(默认值,尖角)
CGContextMoveToPoint(context, 10, 105);
CGContextAddLineToPoint(context, 60, 130);
CGContextAddLineToPoint(context, 10, 155);
CGContextStrokePath(context);

// kCGLineJoinRound(圆角)
CGContextSetLineJoin(context, kCGLineJoinRound);
CGContextMoveToPoint(context, 80, 105);
CGContextAddLineToPoint(context, 130, 130);
CGContextAddLineToPoint(context, 80, 155);
CGContextStrokePath(context);

// kCGLineJoinBevel(缺角)
CGContextSetLineJoin(context, kCGLineJoinBevel);
CGContextMoveToPoint(context, 150, 105);
CGContextAddLineToPoint(context, 200, 130);
CGContextAddLineToPoint(context, 150, 155);
CGContextStrokePath(context);

// 最大斜接长度(只有在使用kCGLineJoinMiter是才有效),边角的角度越小,斜接长度就会越大
// 为了避免斜接长度过长,使用miterLimit限制
// 如果斜接长度超过miterLimit,边角就会以KCALineJoinBevel类型来显示
// CGContextSetMiterLimit(context, 10);

// 虚线样式,phase表示线的偏移量,lengths表示如何交替绘制,count是数组长度
CGFloat lengths[] = {6, 3, 6, 3};

// lengths表示如何交替显示,值是{6, 3, 6, 3},效果是显示6个点,跳过3个点,再显示6个点,跳过3个点。
CGContextMoveToPoint(context, 10, 185);
CGContextAddLineToPoint(context, 250, 185);
CGContextSetLineDash(context, 0, lengths, 4);
CGContextStrokePath(context);

// phase为偏移量,phase值为5,跳过5个点。
CGContextMoveToPoint(context, 10, 195);
CGContextAddLineToPoint(context, 250, 195);
CGContextSetLineDash(context, 5, lengths, 4);
CGContextStrokePath(context);

// count值是3,效果是显示6个点,跳过3个点,显示6个点,跳过6个点,显示3个点,跳过3个点。
CGContextMoveToPoint(context, 10, 205);
CGContextAddLineToPoint(context, 250, 205);
CGContextSetLineDash(context, 0, lengths, 3);
CGContextStrokePath(context);
路径
// 移至当前点
CGContextMoveToPoint(contex, 10, 10);

// 添加线
CGContextAddLineToPoint(contex, 60, 35);
CGContextAddLineToPoint(contex, 10, 60);
// 关闭当前路径,回到起点
CGContextClosePath(contex);

// 矩阵
CGContextAddRect(contex, CGRectMake(10, 80, 80, 60));

//圆形
CGContextAddEllipseInRect(contex, CGRectMake(20, 160, 60, 60));
// 椭圆
CGContextAddEllipseInRect(contex, CGRectMake(5, 240, 90, 60));

// 描边
CGContextStrokePath(contex);

// 圆弧(x, y)中心点,radiu圆弧半径,startAngle圆弧起点,endAngle圆弧终点,clockwise顺时针0,逆时针1
CGContextAddArc(contex, 50, 350, 30, 0, M_PI_2, 0);
CGContextStrokePath(contex);

[[UIColor blueColor] setStroke];
CGContextAddArc(contex, 50, 350, 30, 0, -M_PI, 1);
CGContextStrokePath(contex);

CGPoint points[] = {CGPointMake(150, 10), CGPointMake(200, 35),
    CGPointMake(200, 35), CGPointMake(150, 60)};
CGContextAddLines(contex, points, 4);
CGContextClosePath(contex);

CGContextAddRect(contex, CGRectMake(150, 80, 80, 60));

CGContextAddEllipseInRect(contex, CGRectMake(160, 160, 60, 60));
CGContextAddEllipseInRect(contex, CGRectMake(145, 240, 90, 60));

CGContextFillPath(contex);

CGContextAddArc(contex, 190, 350, 30, 0, M_PI_2, 0);
CGContextFillPath(contex);

[[UIColor greenColor] setFill];
CGContextAddArc(contex, 190, 350, 30, 0, -M_PI, 1);
CGContextFillPath(contex);
添加路径后,CGContextStrokePath方法绘制线条,CGContextFillPath方法则进行填充操作。

绘制弧线
CGContextMoveToPoint(contex, 20, 100);
// 绘制弧线
CGContextAddArcToPoint(contex, 120, 100, 80, 20, 20);

CGContextMoveToPoint(contex, 20, 250);
// 绘制贝赛尔曲线
CGContextAddQuadCurveToPoint(contex, 130, 150, 200, 250);

CGContextMoveToPoint(contex, 20, 350);
// 绘制二次曲线
CGContextAddCurveToPoint(contex, 100, 280, 180, 400, 200, 350);
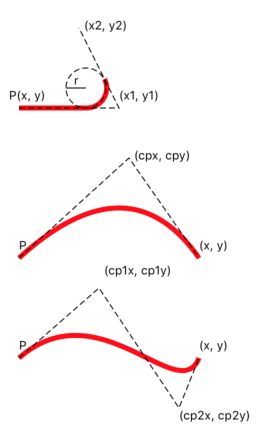
绘制弧线时,P1是当前路径所在的点,坐标是(x, y)。P1(x, y)和(x1, y1)构成切线,(x1, y1)和(x2, y2)构成切线,r 是上面函数中的radius, 红色的线就是CGContextAddArcToPoint绘制的曲线. 它不会画到 (x2, y2)这个点, 绘制到圆弧的终点就会停止.
贝赛尔曲线,(cpx, cpy)是控制点,(x, y)是终点,详见必须要理解掌握的贝塞尔曲线(原创)

其他
CGContextSetLineWidth(contex, 5);

CGPoint points[] = {CGPointMake(10, 10), CGPointMake(100, 50),
    CGPointMake(100, 50), CGPointMake(10, 90)};

// 绘制直线,0 -> 1, 2 -> 3
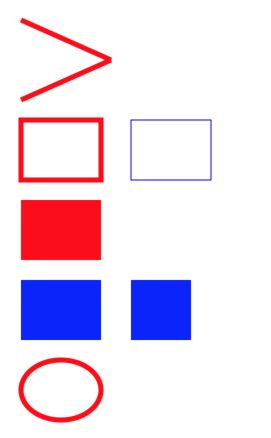
CGContextStrokeLineSegments(contex, points, 4);

// 绘制矩阵线条
CGContextStrokeRect(contex, CGRectMake(10, 110, 80, 60));

// 绘制矩阵线条,指定线条宽度
CGContextStrokeRectWithWidth(contex, CGRectMake(120, 110, 80, 60), 1);

// 填充矩阵
CGContextFillRect(contex, CGRectMake(10, 190, 80, 60));

CGRect rects[] = {CGRectMake(10, 270, 80, 60), CGRectMake(120, 270, 60, 60)};
// 填充多个矩阵
CGContextFillRects(contex, rects, 2);

// 绘制椭圆线条
CGContextStrokeEllipseInRect(contex, CGRectMake(10, 350, 80, 60));

// 填充椭圆
CGContextFillEllipseInRect(contex, CGRectMake(120, 350, 80, 60));
相关文章
iOS Core Graphics绘图
iOS UIBezierPath绘图


