搭建vue后台管理系统框架
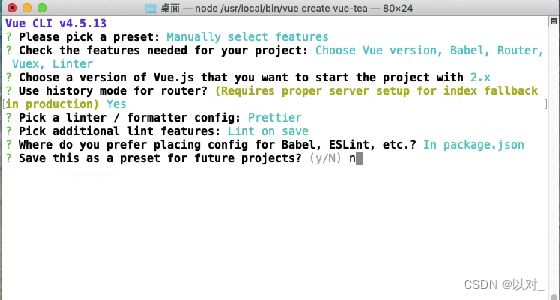
第一步:创建vue项目vue create 项目名称,并安装element-ui

Vue CLI v3.1.3
? Please pick a preset: Manually select features
? Check the features needed for your project: Babel, Router, CSS Pre-processors, Linter
1、是否使用history模式的路由 选择 “N” 或者 “Y”.
? Use history mode for router? (Requires proper server setup for index fallback in production) Yes
2、CSS预处理器选择(vue2没有此选项)
? Pick a CSS pre-processor (PostCSS, Autoprefixer and CSS Modules are supported by default): Sass/SCSS
3、选择哪个ESLint自动化代码格式化检测
? Pick a linter / formatter config:
  > ESLint with error prevention only
  	ESLint + Airbnb config
  	ESLint + Standard config // 标准
  	ESLint + Prettier
4、 选择语法检查的时期
? Pick additional lint features:
  >(*) Lint on save  //语法检查配置文件保存时检查
 	 ( ) Lint and fix on commit  //文件提交时检查
5、 配置文件的存放位置
? Where do you prefer placing config for Babel, PostCSS, ESLint, etc.?
  > In dedicated config files  //放独立文件放置
  	In package.json  //放package.json里
6、是否保存此预设(选择yes的话本次选择就会储存为一个模板)
? Save this as a preset for future projects? (y/N)
第二步:修改app.vue文件,引入home文件
<template>
  <div id="app">
    <Home></Home>
  </div>
</template>

<script>
import Home from './views/Home.vue'
export default {
    components:{
      Home
    }
}
</script>
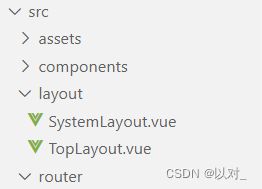
第三步:修改home页面,并新建 SystemLayout 文件和 TopLayout 文件

<template>
  <el-container>
    <!-- 左侧导航 -->
    <el-aside width="103px">
      <div class="home-logo">
      	<!-- 左上角logo -->
        <img alt="" src="../assets/logo.png">
      </div>
      <SystemLayout></SystemLayout>
    </el-aside>
    <el-container>
      <!-- 顶部导航 -->
      <el-header height="40px">
        <TopLayout></TopLayout>
      </el-header>

      <el-main>
        <router-view/>
      </el-main>
    </el-container>
  </el-container>
</template>

<script>
import SystemLayout from '../layout/SystemLayout.vue';
import TopLayout from '../layout/TopLayout.vue';
export default {
    components:{
        SystemLayout,
        TopLayout
    }
}
</script>
<style scope>
  .home-logo {
    height: 100px;
    line-height: 100px;
  }
  .el-header {
    background-color: #fff;
    color: #333;
    line-height: 40px;
  }
  .el-aside {
    height: 100vh;
    background: #2D41FF;
    color: #fff;
    text-align: center;
    line-height: 200px;
  }
  .el-main {
    height: calc(100vh - 40px);
    background-color: #E9EEF3;
    color: #333;
    text-align: center;
    line-height: 160px;
  }
  .el-card__body,.playing {
    padding: 0!important;
  }
  body > .el-container {
    margin-bottom: 40px;
  }
  .el-container:nth-child(5) .el-aside,
  .el-container:nth-child(6) .el-aside {
    line-height: 260px;
  }
  .el-container:nth-child(7) .el-aside {
    line-height: 320px;
  }
</style>
第四步:在两个导航文件中写入以下内容
systemLayout
<template>
 <div>
  <el-menu
    default-active="2"
    class="el-menu-vertical-demo"
    background-color="#FFFFFF4D"
    router
    >
    <el-menu-item index="/live">
      <img src="" alt="">
      <span slot="title">菜单1</span>
    </el-menu-item>
  </el-menu>
 </div>
</template>

<style scope>
.el-menu {
  border: 0;
}
.el-menu-item {
  width: 100%;
}
.el-menu-item.is-active {
  color: #fff;
}
</style>
TopLayout
<template>
  <div class="container">
    <div class="top-news">顶部导航</div>
    <div class="top-userinfo">
      <div @click="goUserInfo">
        用户
      </div>
    </div>
  </div>
</template>

<script>
import { mapMutations } from 'vuex';

export default {
  computed: {
  },
  methods:{
    ...mapMutations(['goAsideStatus']),
    goUserInfo(){
      if( this.$route.path != '/userinfo' ){
        this.$router.push({
          name:"Userinfo"
        })
        this.goAsideStatus()
      }
    }
  }
}
</script>

<style scoped>
  .container {
    display: flex;
    justify-content: space-between;
  }
  a,.router-link-active {
    text-decoration: none;
    color: #333;
  }
</style>
import Vue from 'vue'
import VueRouter from 'vue-router'

Vue.use(VueRouter)

const routes = [
  {
    path: "/",
    redirect: "/live",
  },
  {
    path: '/home',
    name: 'Home',
    component: () => import('../views/Home.vue')
  },
  {
    path: '/live',
    name: 'LiveAdmin',
    component: () => import('../views/live/live-admin.vue'),
    meta:{
      istrun:true
    },
  },
  {
    path: '/live-detail',
    name: 'liveDetail',
    component: () => import('../views/live/live-detail.vue'),
    meta:{
      istrun:true
    },
  },
  {
    path: '/userinfo',
    name: 'Userinfo',
    component: () => import(/* webpackChunkName: "about" */'../views/user/userinfo.vue')
  }
]

const router = new VueRouter({
  mode: 'history',
  base: process.env.BASE_URL,
  routes
})

export default router
