零基础部署nginx mysql springboot
参考:写给开发人员看的Docker干货,零基础部署nginx mysql springboot
一、连接linux
阿里云
参考:部署到Linux
可能需要购买:购买链接
二、安装docker
# 先切换到root用户下
sudo su

# 更新apt-get,保证apt-get最新版本
apt-get update

# 安装docker
apt-get install -y docker.io

# 查看docker版本
docker version

# 启动docker服务(有可能不需要这一步,多执行一遍也不会有错)
service docker start

# 再执行一次version,看到Client、Service说明启动成功了
docker version
Client:
 Version:           18.09.7
 API version:       1.39
 Go version:        go1.10.4
 Git commit:        2d0083d
 Built:             Fri Aug 16 14:19:38 2019
 OS/Arch:           linux/amd64
 Experimental:      false

Server:
 Engine:
  Version:          18.09.7
  API version:      1.39 (minimum version 1.12)
  Go version:       go1.10.4
  Git commit:       2d0083d
  Built:            Thu Aug 15 15:12:41 2019
  OS/Arch:          linux/amd64
  Experimental:     false
出现问题 1:bash: apt-get: command not found
bash: apt-get: command not found
apt-get: command not found,这个的出现是因为系统的原因。
Linux系统分为两种:
1.RedHat系列:Redhat、Centos、Fedora等2.Debian系列:Debian、Ubuntu等
RedHat系列的包管理工具是yum
Debian系列的包管理工具是apt-get
查看系统版本:
cat /proc/version
---------------------------Linux version 4.18.0-305.3.1.el8.x86_64 ([email protected]) (gcc version 8.4.1 20200928 (Red Hat 8.4.1-1) (GCC)) #1 SMP Tue Jun 1 16:14:33 UTC 2021
我的是Red Hat,所以因该用yum
yum update
成功!
问题 2:重启系统
![]()
直接在阿里云ESC- 实例重启
问题 3:Failed to download metadata for repo ‘appstream’: Cannot prepare internal mirrorlist: No URLs in mirrorlist
可能是 CentOS 已经停止维护的问题。2020 年 12 月 8 号,CentOS 官方宣布了停止维护 CentOS Linux
的计划,并推出了 CentOS Stream 项目,CentOS Linux 8 作为 RHEL 8 的复刻版本,生命周期缩短,于 2021
年 12 月 31 日停止更新并停止维护(EOL),更多的信息可以查看 CentOS 官方公告。如果需要更新 CentOS,需要将镜像从
mirror.centos.org 更改为 vault.centos.org
首先,进入到 yum 的 repos 目录
cd /etc/yum.repos.d/
修改 centos 文件内容
编辑模式:按 i 进入编辑
退出编辑 :电脑左上角 ESC
保存::wq
sed -i 's/mirrorlist/#mirrorlist/g' /etc/yum.repos.d/CentOS-*
sed -i 's|#baseurl=http://mirror.centos.org|baseurl=http://vault.centos.org|g' /etc/yum.repos.d/CentOS-*
生成缓存更新
yum makecache
运行 yum update 并重新安装 vim编辑器
yum update -y
yum -y install vim
确认一下你的VIM是否已经安装
rpm -qa|grep vim
如果已安装,会显示:
[root@localhost usr]# rpm -qa|grep vim
vim-minimal-7.4.629-6.el7.x86_64
vim-filesystem-7.4.629-6.el7.x86_64
vim-enhanced-7.4.629-6.el7.x86_64
vim-common-7.4.629-6.el7.x86_64
vim-X11-7.4.629-6.el7.x86_64
如果缺少了其中某个
yum -y install vim-enhanced
如果上面三个包一个都没有显示,则直接输入命令:
yum -y install vim*
我的还是没有x11,不管了,继续安装docker
yum install docker -y
启动
start docker.service
Failed to start docker.service: Unit docker.service not found.
CentOS安装Docker,启动时候报错Failed to start docker.service: Unit
docker.service not
found.(如下:),原因是CentOS默认使用podman代替docker,所以需要将podman卸载.
yum erase podman buildah
安装依赖环境
yum install -y yum-utils
安装配置镜像
sudo yum-config-manager \
    --add-repo \
    http://mirrors.aliyun.com/docker-ce/linux/centos/docker-ce.repo
问题 4:Repository extras is listed more than once in the configuration
可能是镜像重复了,不管了,直接启动
sudo yum install -y docker-ce docker-ce-cli containerd.io
成功!
启动Docker服务
systemctl start docker
成功!
Client: Docker Engine - Community
 Version:           24.0.6
 API version:       1.43
 Go version:        go1.20.7
 Git commit:        ed223bc
 Built:             Mon Sep  4 12:33:07 2023
 OS/Arch:           linux/amd64
 Context:           default

Server: Docker Engine - Community
 Engine:
  Version:          24.0.6
  API version:      1.43 (minimum version 1.12)
  Go version:       go1.20.7
  Git commit:       1a79695
  Built:            Mon Sep  4 12:32:10 2023
  OS/Arch:          linux/amd64
  Experimental:     false
 containerd:
  Version:          1.6.24
  GitCommit:        61f9fd88f79f081d64d6fa3bb1a0dc71ec870523
 runc:
  Version:          1.1.9
  GitCommit:        v1.1.9-0-gccaecfc
 docker-init:
  Version:          0.19.0
  GitCommit:        de40ad0
三、第一个Docker镜像hello world
- 先用pull命令从远端拉镜像到本地
- 用images命令查看所有镜像
- run命令运行镜像
# pull: 从仓库拉取镜像
# docker pull [options] name[:tag]
# docker pull [可选参数] 镜像名[:版本号](如果不填默认为最新版本)
docker pull hello-world
# 默认从docker官方获取镜像,很可能因为网络原因需要多拉取几次

# 查看本机上的所有镜像
# docker images [可选参数]
docker images
# 看到hello-world说明拉取成功了
REPOSITORY          TAG                 IMAGE ID            CREATED             SIZE
hello-world         latest              fce289e99eb9        15 months ago       1.84kB

# 运行镜像
# docker run [options] image[:tag] [command] [args]
# docker run [可选参数] 镜像名[:版本号] [镜像运行时要执行的命令] [命令参数]
docker run hello-world

Hello from Docker!
# 当你看到这条消息说明安装成功了
This message shows that your installation appears to be working correctly.
# 生成这条信息,docker做了以下几个步骤
To generate this message, Docker took the following steps:
 # client端(也就是终端,命令行)连接到daemon端(指的是我们本地docker)
 1. The Docker client contacted the Docker daemon.
 # daemon端(本地docker)到Docker hub仓库中拉取了hello-world镜像
 2. The Docker daemon pulled the "hello-world" image from the Docker Hub.
    (amd64)
 # daemon端(本地docker)从镜像中创建了一个容器,这个镜像运行了当前看到输出的代码
 3. The Docker daemon created a new container from that image which runs the
    executable that produces the output you are currently reading.
 # daemon端(本地docker)将输出流给client端(命令行),显示到终端
 4. The Docker daemon streamed that output to the Docker client, which sent it
    to your terminal.
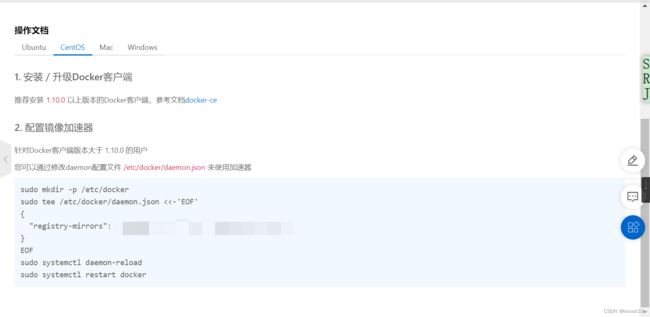
配置加速器(已经科学上网的可以忽略)
镜像加速器
四、运行nginx
# 拉取nginx镜像
docker pull nginx

# 查看镜像
docker images

# REPOSITORY          TAG                 IMAGE ID            CREATED             SIZE
nginx               latest              ed21b7a8aee9        12 days ago         127MB
hello-world         latest              fce289e99eb9        15 months ago       1.84kB
运行方式
刚刚run命令运行了hello world,这里详细将一下,运行方式有2种,前台运行和后台运行,前台运行则会占用终端,一般都会选择让容器在后台运行
网络
桥接(Bridge):也是最常用的方式,该模式下会将ubuntu主机上的端口映射到docker容器的端口上,例如8080:8081则会将主机上的8080端口映射到docker容器的8081端口
共享(Host):ubuntu主机与docker共享同一端口
无网络(None):docker没有网络,外界无法访问
桥接 Bridge
1. -p 指定端口模式
# docker run -d -p 主机端口:容器端口 image[:tag]
docker run -d -p 8080:80 nginx
5e0cc45d89288faf9ba04b5e8b30548b8c14409a6d93e1abdd297676a7b7769a

docker stop 5e
5e:容器端口的前两个字母
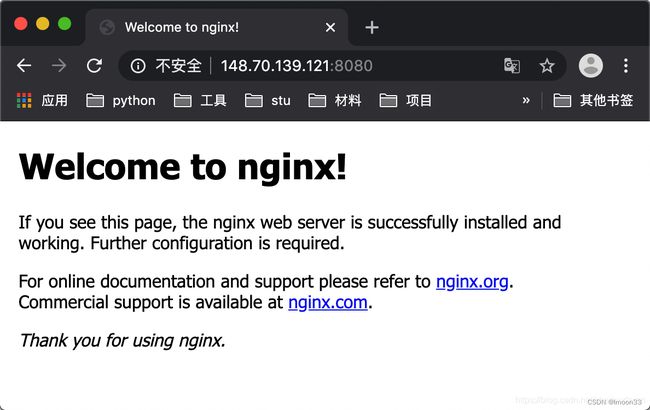
可以通过:8080访问nginx了
可能出现的问题:不能访问8080
添加安全组
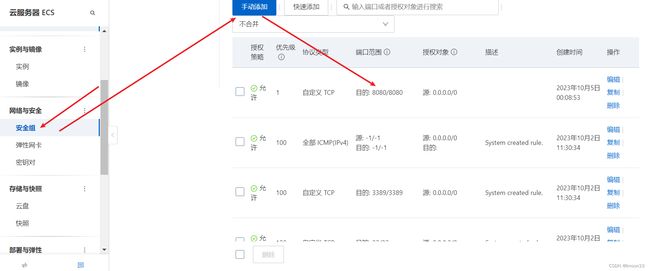
自己实例的 IP地址:8080 就可以访问了
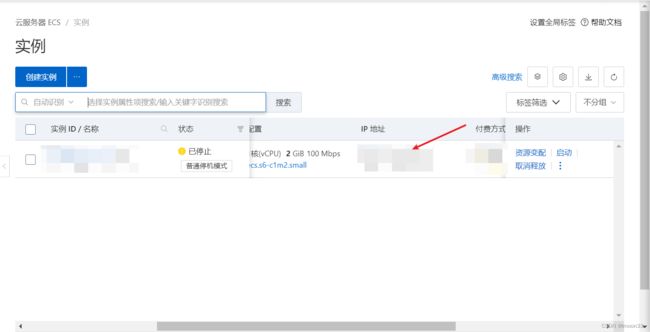
实例
找不到哪里需要 r 命令了,这里说一下安装 r 命令
yum install R
2. -P 随机端口
# 随机开启一个端口映射到容器
# docker run -d -P image[:tag]
docker run -d -P nginx

docker ps
# 可以看到是32768端口映射到80端口
CONTAINER ID        IMAGE               COMMAND                  CREATED             STATUS              PORTS                   NAMES
be30acaeb546        nginx               "nginx -g 'daemon of…"   10 seconds ago      Up 9 seconds        0.0.0.0:32768->80/tcp   trusting_keller

docker stop be
五、运行mysql
从远端仓库拉取mysql 通过docker run运行
-d进行后台运行
-p指定端口映射
-e后面跟着的是mysql的参数,通过上方连接可以查询到通过MYSQL_ROOT_PASSWORD设置数据库密码、MYSQL_DATABASE设置数据库名
docker pull mysql

docker run -d -p 3306:3306 -e MYSQL_ROOT_PASSWORD=leilema -e MYSQL_DATABASE=leilema mysql:latest
安装成别人的数据库了
#查看所有容器
docker ps
#停止所有容器
docker stop 容器id前两位
#删除容器
docker rm 容器id前两位
#查看所有镜像
docker images
#删除镜像
docker rmi 镜像id前两位
六、制作自己的镜像
编写Dockerfile,说明镜像要如何进行创建,跟makefile有点像
通过docker build命令构建镜像
编写Dockerfile
使用git拉取项目(或者自己通过rz命令将jar包传到服务器上)
cd到jar包目录下,在同级目录开始编写Dockerfile文件
get clone https://gitee.com/chaitou/hello-springboot

cd hello-springboot
vim Dockerfile
get命令找不到
安装git命令也可以
yum -y install git
git clone https://gitee.com/chaitou/hello-springboot

cd hello-springboot
vim Dockerfile
dockerfile文件如下
# 依赖的基础镜像
from java:8
# 创建者
MAINTAINER bugpool xxx@163.com
# 将当前目录下的jar复制到容器/目录下
COPY hello-springboot.jar /hello-springboot.jar
# 指定启动时运行java -jar 命令
ENTRYPOINT ["java", "-jar","/hello-springboot.jar"]
构建镜像
需要从仓库先pull一下java镜像
使用docker build构建镜像,-t指定镜像名:版本号,最后一个.表示当前目录
启动镜像,如果使用的是上面我提供的jar包,我特意将其运行端口改为8081来练习一下-p桥接网络的使用。
# 拉取java8
docker pull java:8
# 构建镜像
docker build -t hello-springboot:1.0 .
# 启动镜像
docker run -p 80:8081 hello-springboot:1.0
这里也需要设置一下安全组


完成!