TatukGIS Developer Kernel使用教程:如何为FMX创建第一个应用程序
概述:TatukGIS Developer Kernel(DK)是一个用于开发自定义地理信息系统(GIS)应用程序以及解决方案的综合性软件开发工具包(SDK)。本篇文章主要介绍用DK11为FMX创建一个应用程序,现在就跟着小编来了解一下吧~
# 31款JAVA开发必备控件和工具 # 界面/文档管理/报表/IDE等4000款产品火热销售中 >>
TatukGIS Developer Kernel(DK)是一个用于开发自定义地理信息系统(GIS)应用程序以及解决方案的综合性软件开发工具包(SDK)。其功能强大,价格适中,个人、公司及政府等客户都需喜欢使用。感兴趣的朋友可以下载来用一下哦^-^
点击下载TatukGIS Developer Kernel免费版
本篇文章主要介绍用DK11为FMX创建一个应用程序,现在就跟着小编来了解一下吧~
创建新项目
创建多设备应用程序。然后选择空白应用程序。

设计形式
打开“设计”选项卡并在空白表单上添加控件。从工具选项板中选择控件。
工具选项板包含设计表单的所有组件。专用TatukGIS组件包含在“TatukGIS”类别中。

对象检查器包含与指定对象关联的属性和事件。在本节中,您可以设置:标题、名称、对齐、位置、大小等。

1、添加TStatusBar并将TLabel放在上面。更改lblPosition的标签名称,并将其文本设置为“Position:”。
2、添加TGIS_ViewerWND。将其名称更改为“GIS”。在对象检查器中,将“对齐”设置为“客户端”。
3、添加TToolBar,将对齐设置为“顶部”。
4、向TToolBar添加四个按钮(TButton):
-
名称:btnOpen,文本:打开
-
名称:btnSelect,文本:选择
-
名称:btnDrag,文本:拖动
-
名称:btnZoom,文本:缩放
设置每个按钮对齐到“左边”。
5、添加TGIS_ControlLegend。在对象检查器中将GIS_Viewer设置为“GIS”并将“对齐”设置为“左”。双击图例中的图层调用“可视化属性”对话框。
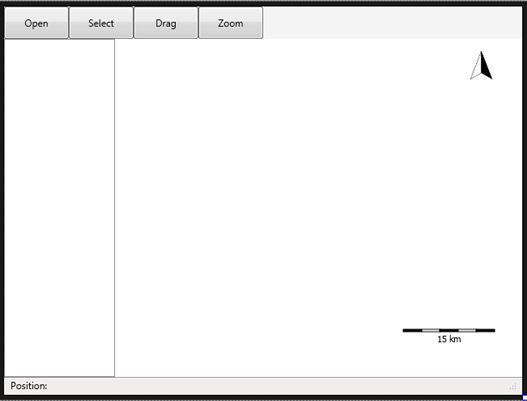
6、将TGIS_ControlScale和TGIS_ControlNorthArrow添加到GIS(在Structure窗口中,您可以拖放组件以设置层次结构)。在对象检查器中,将“GIS”指定为GIS_Viewer。
最终结果应如下所示:
添加代码
设计表单后,转到“代码”选项卡。
在实现部分的{$ R * .fmx}下方添加“使用System.IOUtils,GisLicense,GisTypes,GisAllLayers,GisUtils,GisLayerVector”。
-
System.IOUtils
返回用户的主路径或应用程序的可写临时目录或存储,如TPath.GetDocumentsPath。
-
GisLicense
包含有关TatukGIS许可证的信息。
-
Mistypes
常见的常量和类型,如TGIS_Point。经常被客户端代码频繁使用并包含它几乎是一个要求。
-
GisAllLayers
允许使用TatukGIS Samples数据文件夹中的图层。
-
GisUtils
GisPoint()等常用方法包含在TGIS_Utils类方法中。经常被客户端代码使用并包含它几乎是一个要求。
GisLayerVector - 包含类似TGIS_Shape、TGIS_LayerVector的类型。
附加事件
接下来将事件附加到组件。要附加事件处理程序,请在“对象检查器”中选择“事件”选项卡,然后双击该事件。如果要调用“OnClick”事件,也可以双击组件。在此示例中,我们使用以下事件:
-
btnaopenclick
procedure TForm2.btnOpenClick(Sender: TObject);
begin
  GIS.RotationAngle := 0 ;
  {$IFDEF WIN32}
    GIS.Open( TGIS_Utils.GisSamplesDataDir + '/world/worldDCW/world.shp');
  {$ELSEIF Defined(MACOS) and Defined(IOS)}
    GIS.Open( TPath.GetDocumentsPath + PathDelim + 'world.shp')  ;
  {$ELSE ANDROID}
    GIS.Open( TPath.GetDocumentsPath + PathDelim + 'ne_10m_admin_0_countries.shp')  ;
  {$ENDIF}
end;
-
btnSelectClick
procedure TForm2.btnSelectClick(Sender: TObject);
begin
  GIS.Mode := TGIS_ViewerMode.Select ;
end;
-
btnDragClick
procedure TForm2.btnDragClick(Sender: TObject);
begin
  GIS.Mode := TGIS_ViewerMode.Drag ;
-
btnZoomClick
procedure TForm2.btnZoomClick(Sender: TObject);
begin
  GIS.Mode := TGIS_ViewerMode.Zoom ;
end;
-
GISTapSimpleEvent
点击简单事件在所选形状上闪烁,并在状态栏中显示光标的位置。要调用该事件,请使用以下代码:
 procedure TForm2.GISTapSimpleEvent(Sender: TObject; Button: TMouseButton;
  Shift: TShiftState; X, Y: Single);
var
  ptg : TGIS_Point ;
  shp : TGIS_Shape ;
begin
  if GIS.IsEmpty then
    exit ;
  if GIS.Mode <> TGIS_ViewerMode.Select then
    exit ;
  ptg := GIS.ScreenToMap( Point(Round(X), Round(Y)) ) ;
  shp := TGIS_Shape( GIS.Locate( ptg, 5 / GIS.Zoom ) ) ;
  if not Assigned( shp ) then exit ;
  shp.Flash ;
lblPosition.Text := Format( 'x: %.4f, y: %.4f ', [ptg.X,  ptg.Y] ) ;
end;
将文件添加到部署
在部署中添加文件和设置路径。
使用“项目/部署”菜单项,选择Android和iOS设备平台,并为每个平台添加要与应用程序一起部署的文件,并设置“远程路径”列值:
-
设置Android的远程路径:assets \ internal \

-
设置iOS的远程路径:StartUp \ Documents \
如果要同时为几个文件设置远程路径,请单击图标DK11
![]()
。
测试
编译并运行项目。
源代码
最终代码应如下所示:
unit Unit2;

interface

uses

System.SysUtils,
System.Types, System.UITypes, System.Classes, System.Variants, FMX.Types,
FMX.Controls, FMX.Forms, FMX.Graphics, FMX.Dialogs, FMX.StdCtrls,
FMX.GisControlNorthArrow, FMX.GisControlScale, FMX.Layouts, FMX.TreeView,
FMX.GisControlLegend, GisTypesUI, FMX.GisViewerWnd, FMX.Controls.Presentation ;

type
  TForm2 = class(TForm)
    ToolBar1: TToolBar;
    statusBar: TStatusBar;
    GIS: TGIS_ViewerWnd;
    GIS_ControlLegend1: TGIS_ControlLegend;
    GIS_ControlScale1: TGIS_ControlScale;
    GIS_ControlNorthArrow1: TGIS_ControlNorthArrow;
    btnOpen: TButton;
    btnSelect: TButton;
    btnDrag: TButton;
    btnZoom: TButton;
    lblPosition: TLabel;
    procedure GISTapSimpleEvent(Sender: TObject; Button: TMouseButton;
      Shift: TShiftState; X, Y: Single);
    procedure btnOpenClick(Sender: TObject);
    procedure btnSelectClick(Sender: TObject);
    procedure btnDragClick(Sender: TObject);
    procedure btnZoomClick(Sender: TObject);
  private
    { Private declarations }
  public
    { Public declarations }
  end;

var
  Form2: TForm2;

implementation


{$R *.fmx}

uses System.IOUtils, GisLicense, GisTypes, GisAllLayers, GisUtils, GisLayerVector;

procedure TForm2.btnDragClick(Sender: TObject);
begin
  GIS.Mode := TGIS_ViewerMode.Drag ;
end;

procedure TForm2.btnOpenClick(Sender: TObject);
begin
  GIS.RotationAngle := 0 ;
  {$IFDEF WIN32}
    GIS.Open( TGIS_Utils.GisSamplesDataDir + '/world/worldDCW/world.shp' );
  {$ELSEIF Defined(MACOS) and Defined(IOS)}
    GIS.Open( TPath.GetDocumentsPath + PathDelim + 'world.shp' )  ;
  {$ELSE ANDROID}
  GIS.Open( TPath.GetDocumentsPath + PathDelim + 'ne_10m_admin_0_countries.shp' )  ;
  {$ENDIF}
end;

procedure TForm2.btnSelectClick(Sender: TObject);
begin
  GIS.Mode := TGIS_ViewerMode.Select ;
end;

procedure TForm2.btnZoomClick(Sender: TObject);
begin
  GIS.Mode := TGIS_ViewerMode.Zoom ;
end;

procedure TForm2.GISTapSimpleEvent(Sender: TObject; Button: TMouseButton;
  Shift: TShiftState; X, Y: Single);
var
  ptg : TGIS_Point ;
  shp : TGIS_Shape ;
begin
  if GIS.IsEmpty then
    exit ;
  if GIS.Mode <> TGIS_ViewerMode.Select then
    exit ;
  ptg := GIS.ScreenToMap( Point(Round(X), Round(Y) ) ) ;
  shp := TGIS_Shape( GIS.Locate( ptg, 5/GIS.Zoom ) ) ;

  if not Assigned( shp ) then exit ;
  shp.Flash ;
  lblPosition.Text := Format( 'x: %.4f, y: %.4f', [ptg.X, ptg.Y] ) ;
end;

end.