207、SpringBoot 整合 RabbitMQ 实现消息的发送 与 接收(监听器)
目录
- ★ 发送消息
- ★ 创建队列的两种方式
- 代码演示
-
- 需求1:发送消息
-
- 1、ContentUtil 先定义常量
- 2、RabbitMQConfig 创建队列的两种方式之一:
-
- 配置式:
-
- 问题:
- 3、MessageService 编写逻辑
- PublishController 控制器
- application.properties 配置属性
- 测试:消息发送
- ★ 接收消息
-
- 代码演示:
-
- 测试: 消息接收
- ★ 定制监听器容器工厂
- 完整代码:
-
- application.properties RabbitMQ的连接等属性配置
- ContentUtil 常量工具类
- RabbitMQConfig 配置式创建消息队列
- MessageService 发送消息的业务代码
- PublishController.java 发送消息的控制层
- MyRabbitMQListener 监听器,监听消息队列
- pom.xml
★ 发送消息
- Spring Boot可以将AmqpAdmin和AmqpTemplate注入任何其他组件,
  接下来该组件即可通过AmqpAdmin来管理Exchange、队列和绑定,还可通过AmqpTemplate来发送消息。

- Spring Boot还会自动配置一个RabbitMessagingTemplate Bean(RabbitAutoConfiguration负责配置),
  如果想使用它来发送、接收消息,
  可使用RabbitMessagingTemplate代替上面的AmqpTemplate,两个Template的注入方式完全相同。
★ 创建队列的两种方式
 方式一(编程式):在程序中通过AmqpAdmin创建队列。

 方式二(配置式):在容器中配置 org.springframework.amqp.core.Queue 类型的Bean,
                  RabbitMQ将会自动为该Bean创建对应的队列。
代码演示
需求1:发送消息
1、ContentUtil 先定义常量
2、RabbitMQConfig 创建队列的两种方式之一:
配置式:
在容器中配置 org.springframework.amqp.core.Queue 类型的Bean,RabbitMQ将会自动为该Bean创建对应的队列。
就是在配置类中创建一个生成消息队列的@Bean。
问题:
用 @Configuration 注解声明为配置类,但是项目启动的时候没有自动生成这个队列。
据了解是因为RabbitMQ使用了懒加载,大概是没有消费者监听这个队列,就没有创建。
但是当我写后面的代码后,这个消息队列就生成了,但是并没有消费者去监听这个队列。
这有点想不通。
不知道后面是哪里的代码让这个配置类能成功声明这个消息队列出来。

水落石出:
经过测试:
在下面的MessageService 这个类中,依赖注入了 AmqpAdmin 和 AmqpTemplate 这两个对象,当我们通过这两个对象去声明队列、Exchange 和绑定的时候,配置类中的创建消息队列的bean就能成功创建队列。
这张图结合下面的 MessageService 中的代码就可得知:
这是依赖注入 AmqpAdmin 和 AmqpTemplate 这两个对象的有参构造器中声明的。

3、MessageService 编写逻辑
声明Exchange 、 消息队列 、 Exchange和消息队列的绑定、发送消息的方法等


PublishController 控制器
application.properties 配置属性
测试:消息发送
★ 接收消息
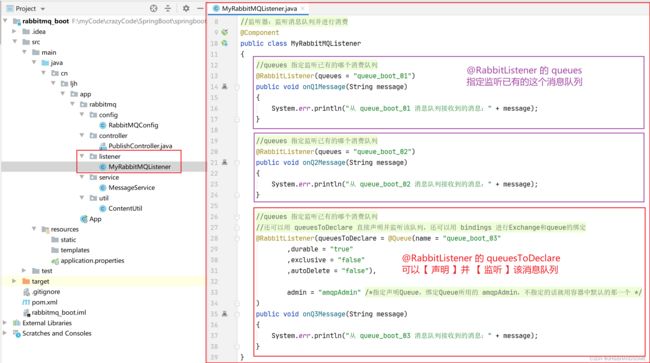
@RabbitListener 注解修饰的方法将被注册为消息监听器方法。
 【备注】:该注解可通过queues属性指定它要监听的、已有的消息队列,
  它也可使用queuesToDeclare来声明队列,并监听该队列。


 - 如果没有显式配置监听器容器工厂(RabbitListenerContainerFactory),
 Spring Boot会在容器中自动配置一个SimpleRabbitListenerContainerFactory Bean作为监听器容器工厂,
 如果希望使用DirectRabbitListenerContainerFactory,可在application.properties文件中添加如下配置:
  spring.rabbitmq.listener.type=direct

 ▲ 如果在容器中配置了MessageRecoverer或MessageConverter,
   它们会被自动关联到默认的监听器容器工厂。
代码演示:
创建个消息队列的监听器就可以了。
@RabbitListener 注解修饰的方法将被注册为消息监听器方法。
该注解可通过queues属性指定它要监听的、已有的消息队列,
它也可使用queuesToDeclare来声明队列,并监听该队列,
还可以用 bindings 进行 Exchange和queue的绑定操作。

测试: 消息接收
★ 定制监听器容器工厂
▲ 如果要定义更多的监听器容器工厂或覆盖默认的监听器容器工厂,

可通过Spring Boot提供的SimpleRabbitListenerContainerFactoryConfigurer
或DirectRabbitListenerContainerFactoryConfigurer来实现,

它们可对SimpleRabbitListenerContainerFactory
或DirectRabbitListenerContainerFactory进行与自动配置相同的设置。

▲ 有了自定义的监听器容器工厂之后,可通过@RabbitListener注解的containerFactory属性
  来指定使用自定义的监听器容器工厂,
例如如下注解代码:

@RabbitListener(queues = "myQueue1", containerFactory="myFactory")
完整代码:
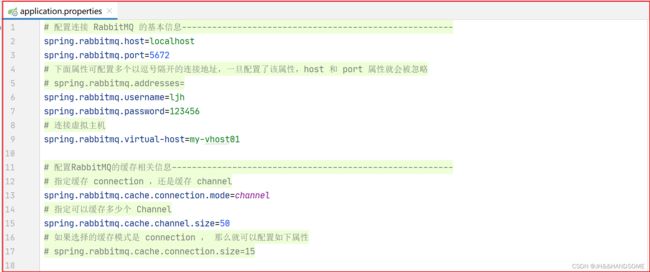
application.properties RabbitMQ的连接等属性配置
# 配置连接 RabbitMQ 的基本信息------------------------------------------------------
spring.rabbitmq.host=localhost
spring.rabbitmq.port=5672
# 下面属性可配置多个以逗号隔开的连接地址,一旦配置了该属性,host 和 port 属性就会被忽略
# spring.rabbitmq.addresses=
spring.rabbitmq.username=ljh
spring.rabbitmq.password=123456
# 连接虚拟主机
spring.rabbitmq.virtual-host=my-vhost01

# 配置RabbitMQ的缓存相关信息--------------------------------------------------------
# 指定缓存 connection ,还是缓存 channel
spring.rabbitmq.cache.connection.mode=channel
# 指定可以缓存多少个 Channel
spring.rabbitmq.cache.channel.size=50
# 如果选择的缓存模式是 connection , 那么就可以配置如下属性
# spring.rabbitmq.cache.connection.size=15

# 配置 和 RabbitTemplate 相关的属性--------------------------------------------------
# 指定 RabbitTemplate 发送消息失败时会重新尝试
spring.rabbitmq.template.retry.enabled=true
# RabbitTemplate 发送消息失败后每隔1秒重新尝试发送消息
spring.rabbitmq.template.retry.initial-interval=1s
# RabbitTemplate 发送消息失败时,最多尝试重新发送消息的次数
spring.rabbitmq.template.retry.max-attempts=5
# 设置每次尝试重新发送消息的时间间隔是一个等比数列:1s, 2s, 4s, 8s, 16s
# 第一次等1s后尝试,第二次等2s后尝试,第三次等4s后尝试重新发送消息......
spring.rabbitmq.template.retry.multiplier=2
# 指定发送消息时默认的Exchange名
spring.rabbitmq.template.exchange=""
# 指定发送消息时默认的路由key
spring.rabbitmq.template.routing-key="test"

# 配置和消息监听器的容器工厂相关的属性--------------------------------------------------
# 指定监听器容器工厂的类型
spring.rabbitmq.listener.type=simple
# 指定消息的确认模式
spring.rabbitmq.listener.simple.acknowledge-mode=auto
# 指定获取消息失败时,是否重试
spring.rabbitmq.listener.simple.retry.enabled=true
# 发送消息失败时,最多尝试重新发送消息的次数
spring.rabbitmq.listener.simple.retry.max-attempts=2
# 发送消息失败后每隔1秒重新尝试发送消息
spring.rabbitmq.listener.simple.retry.initial-interval=1s
ContentUtil 常量工具类
package cn.ljh.app.rabbitmq.util;


//常量
public class ContentUtil
{
    //定义Exchange的常量-----fanout:扇形,就是广播类型
    public static final String EXCHANGE_NAME = "boot.fanout";

    //消息队列数组
    public static final String[] QUEUE_NAMES =new String[] {"queue_boot_01","queue_boot_02","queue_boot_03"};


}
RabbitMQConfig 配置式创建消息队列
package cn.ljh.app.rabbitmq.config;


import org.springframework.amqp.core.Queue;
import org.springframework.context.annotation.Bean;
import org.springframework.context.annotation.Configuration;


//配置式:在容器中配置 org.springframework.amqp.core.Queue 类型的Bean,RabbitMQ将会自动为该Bean创建对应的队列
//声明这个类为配置类
@Configuration
public class RabbitMQConfig
{

    //用配置式的方式在RabbitMQ中定义队列
    @Bean
    public Queue myQueue()
    {
        //在容器中配置一个 Queue Bean,Spring 就会为它在 RabbitMQ 中自动创建对应的 Queue
        return new Queue("queue_boot",   /* Queue 消息队列名 */
                true,         /* 是否是持久的消息队列 */
                false,       /* 是否是独占的消息队列,独占就是是否只允许该消息消费者消费该队列的消息 */
                false,     /* 是否在没有消息的时候自动删除消息队列 */
                null       /* 额外的一些消息队列的参数 */
        );
    }
}
MessageService 发送消息的业务代码
声明Exchange 、Queue ,Exchange 绑定Queue,发送消息代码
package cn.ljh.app.rabbitmq.service;

import cn.ljh.app.rabbitmq.util.ContentUtil;
import org.springframework.amqp.core.*;
import org.springframework.stereotype.Service;


//业务逻辑:声明Exchange 和 Queue 消息队列,发送消息的方法
@Service
public class MessageService
{
    //AmqpAdmin来管理Exchange、队列和绑定
    private final AmqpAdmin amqpAdmin;

    //AmqpTemplate来发送消息
    private final AmqpTemplate amqpTemplate;

    //通过有参构造器进行依赖注入
    public MessageService(AmqpAdmin amqpAdmin, AmqpTemplate amqpTemplate)
    {
        this.amqpAdmin = amqpAdmin;
        this.amqpTemplate = amqpTemplate;

        //由于声明 Exchange 、 队列 、 绑定(Exchange绑定队列),都只需要做一次即可,因此放在此处构造器中完成即可
        //创建 fanout 类型的 Exchange ,使用FanoutExchange实现类
        FanoutExchange exchange = new FanoutExchange(
                ContentUtil.EXCHANGE_NAME,
                true,    /* Exchange是否持久化 */
                false, /* 是否自动删除 */
                null   /* 额外的参数属性 */
        );
        //声明 Exchange
        this.amqpAdmin.declareExchange(exchange);


        //此处循环声明 Queue ,也相当于代码式创建 Queue
        for (String queueName : ContentUtil.QUEUE_NAMES)
        {
            Queue queue = new Queue(queueName,   /* Queue 消息队列名 */
                    true,         /* 是否是持久的消息队列 */
                    false,       /* 是否是独占的消息队列,独占就是是否只允许该消息消费者消费该队列的消息 */
                    false,     /* 是否在没有消息的时候自动删除消息队列 */
                    null       /* 额外的一些消息队列的参数 */
            );
            //此处声明 Queue ,也相当于【代码式】创建 Queue
            this.amqpAdmin.declareQueue(queue);

            //声明 Queue 的绑定
            Binding binding = new Binding(
                    queueName,  /* 指定要分发消息目的地的名称--这里是要发送到这个消息队列里面去 */
                    Binding.DestinationType.QUEUE, /* 分发消息目的的类型,指定要绑定 queue 还是 Exchange */
                    ContentUtil.EXCHANGE_NAME, /* 要绑定的Exchange */
                    "x", /* 因为绑定的Exchange类型是 fanout 扇形(广播)模式,所以路由key随便写,没啥作用 */
                    null
                    );
            //声明 Queue 的绑定
            amqpAdmin.declareBinding(binding);
        }
    }

    //发送消息的方法
    public void publish(String content)
    {
        //发送消息
        amqpTemplate.convertAndSend(
                ContentUtil.EXCHANGE_NAME, /* 指定将消息发送到这个Exchange */
                "",  /* 因为Exchange是fanout 类型的(广播类型),所以写什么路由key都行,都没意义 */
                content /* 发送的消息体 */
        );
    }
}
PublishController.java 发送消息的控制层
package cn.ljh.app.rabbitmq.controller;

import cn.ljh.app.rabbitmq.service.MessageService;
import org.springframework.web.bind.annotation.GetMapping;
import org.springframework.web.bind.annotation.PathVariable;
import org.springframework.web.bind.annotation.RestController;

//发送消息
@RestController
public class PublishController
{
    private final MessageService messageService;
    //有参构造器进行依赖注入
    public PublishController(MessageService messageService)
    {
        this.messageService = messageService;
    }

    @GetMapping("/publish/{message}")
    //因为{message}是一个路径参数,所以方法接收的时候需要加上注解 @PathVariable
    public String publish(@PathVariable String message)
    {
        //发布消息
        messageService.publish(message);
        return "消息发布成功";
    }

}
MyRabbitMQListener 监听器,监听消息队列
package cn.ljh.app.rabbitmq.listener;


import org.springframework.amqp.rabbit.annotation.Queue;
import org.springframework.amqp.rabbit.annotation.RabbitListener;
import org.springframework.stereotype.Component;

//监听器:监听消息队列并进行消费
@Component
public class MyRabbitMQListener
{
    //queues 指定监听已有的哪个消费队列
    @RabbitListener(queues = "queue_boot_01")
    public void onQ1Message(String message)
    {
        System.err.println("从 queue_boot_01 消息队列接收到的消息:" + message);
    }

    //queues 指定监听已有的哪个消费队列
    @RabbitListener(queues = "queue_boot_02")
    public void onQ2Message(String message)
    {
        System.err.println("从 queue_boot_02 消息队列接收到的消息:" + message);
    }

    //queues 指定监听已有的哪个消费队列
    //还可以用 queuesToDeclare 直接声明并监听该队列,还可以用 bindings 进行Exchange和queue的绑定
    @RabbitListener(queuesToDeclare = @Queue(name = "queue_boot_03"
            ,durable = "true"
            ,exclusive = "false"
            ,autoDelete = "false"),

            admin = "amqpAdmin" /*指定声明Queue,绑定Queue所用的 amqpAdmin,不指定的话就用容器中默认的那一个 */
    )
    public void onQ3Message(String message)
    {
        System.err.println("从 queue_boot_03 消息队列接收到的消息:" + message);
    }
}
pom.xml
<?xml version="1.0" encoding="UTF-8"?>
<project xmlns="http://maven.apache.org/POM/4.0.0" xmlns:xsi="http://www.w3.org/2001/XMLSchema-instance"
         xsi:schemaLocation="http://maven.apache.org/POM/4.0.0 https://maven.apache.org/xsd/maven-4.0.0.xsd">
    <modelVersion>4.0.0</modelVersion>
    <parent>
        <groupId>org.springframework.boot</groupId>
        <artifactId>spring-boot-starter-parent</artifactId>
        <version>2.4.5</version>
    </parent>
    <groupId>cn.ljh</groupId>
    <artifactId>rabbitmq_boot</artifactId>
    <version>1.0.0</version>
    <name>rabbitmq_boot</name>
    <properties>
        <java.version>11</java.version>
        <project.build.sourceEncoding>UTF-8</project.build.sourceEncoding>
    </properties>
    <dependencies>
        <!-- RabbitMQ 的依赖 -->
        <dependency>
            <groupId>org.springframework.boot</groupId>
            <artifactId>spring-boot-starter-amqp</artifactId>
        </dependency>
        <!-- web 依赖-->
        <dependency>
            <groupId>org.springframework.boot</groupId>
            <artifactId>spring-boot-starter-web</artifactId>
        </dependency>
        <!-- 开发者工具的依赖-->
        <dependency>
            <groupId>org.springframework.boot</groupId>
            <artifactId>spring-boot-devtools</artifactId>
            <scope>runtime</scope>
            <optional>true</optional>
        </dependency>
        <!-- lombok 依赖-->
        <dependency>
            <groupId>org.projectlombok</groupId>
            <artifactId>lombok</artifactId>
            <optional>true</optional>
        </dependency>
        <dependency>
            <groupId>org.springframework.boot</groupId>
            <artifactId>spring-boot-starter-test</artifactId>
            <scope>test</scope>
        </dependency>
        <dependency>
            <groupId>org.springframework.amqp</groupId>
            <artifactId>spring-rabbit-test</artifactId>
            <scope>test</scope>
        </dependency>
    </dependencies>

    <build>
        <plugins>
            <plugin>
                <groupId>org.springframework.boot</groupId>
                <artifactId>spring-boot-maven-plugin</artifactId>
                <configuration>
                    <excludes>
                        <exclude>
                            <groupId>org.projectlombok</groupId>
                            <artifactId>lombok</artifactId>
                        </exclude>
                    </excludes>
                </configuration>
            </plugin>
        </plugins>
    </build>

</project>


