- 家政一城一店融合小程序怎么开通,需要哪些资质?
郑州拽牛科技
开源软件系统架构大数据小程序微信小程序
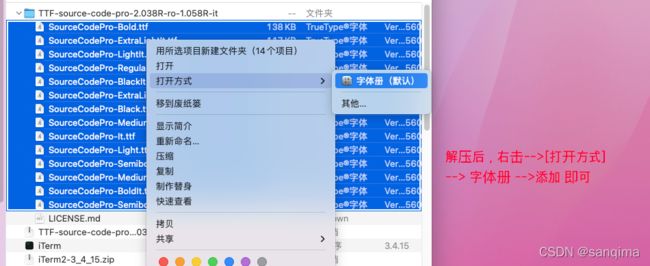
手把手教你开通洗衣洗鞋团购上门融合小程序!⚠️抖音新规重大调整!2025年起家政洗护必须"一城一店"(全国仅限365家连锁资质,地级市单店垄断!)开通秘籍三步走:✅核心资质:营业执照+法人身份证+商标注册证✅硬件证明:门头实拍图+室内全景视频+高德精准定位✅平台认证:ICP许可证+电信增值业务许可证(缺一不可!)遇到难题?90%商家都卡在这3个环节:1️⃣资质不全无法过审?2️⃣小程序功能不会搭建
- 【Multipath网络层协议】MPTCP工作原理
码上为赢
Multipath精通之路multipathMPTCP
常见网络层多路径协议介绍MPTCP(MultipathTCP)MPTCP是在传统TCP基础上进行扩展的协议,它允许在源端和目的端之间建立多个TCP子流,这些子流可以通过不同的网络路径传输数据。例如,一台笔记本电脑同时连接了Wi-Fi网络和以太网网络,当使用MPTCP进行数据传输时,它可以将数据分别通过Wi-Fi和以太网这两条不同的路径发送到目标服务器,从而充分利用两条链路的带宽。LISP(Loca
- spring boot、spring cloud、spring cloud alibaba 之间的版本对应关系
薄荷街的兔比先生
springbootspringcloudjava
大家在引用pom的时候还是要以官方推荐版本为主,不然容易出现未知的问题。1.springboot和springcloud的版本关系官方提供的版本对照表https://start.spring.io/actuator/info{"git":{"branch":"93e528fc7e79e41a513e493d057499401a15eb67","commit":{"id":"93e528f","ti
- ArrayList 源码分析
2401_85327573
java开发语言
ArrayList简介ArrayList的底层是数组队列,相当于动态数组。与Java中的数组相比,它的容量能动态增长。在添加大量元素前,应用程序可以使用ensureCapacity操作来增加ArrayList实例的容量。这可以减少递增式再分配的数量。ArrayList继承于AbstractList,实现了List,RandomAccess,Cloneable,java.io.Serializabl
- C语言——转义字符
糙米薏仁汤女士
c语言开发语言
转义字符,顾名思义,就是转变原来字符的意思\?在书写连续多个问号时使用,防止他们被解析成三字母词\'用于表示字符常量'\"用于表示一个字符串内部的双引号\\用于表示一个反斜杠,防止它被解释为一个转义序列符\a警告字符,触发电脑的蜂鸣\b退格符\f进纸符\n换行\r回车\t水平制表符\v垂直制表符\dddddd表示1~3个八进制的数字。如:\130X(八进制的130转化为十进制—88,所对应的ASC
- 记录更换电脑硬盘并克隆数据
鱼干~
电脑
1.傲梅安装在c盘2.删除旧机械硬盘里无用的软件以及数据3.删除新固态硬盘里的无用数据,并备份数据到其他电脑硬盘或存储设备4.打开傲梅==》克隆硬盘==>选择源旧机械硬盘》目标新固态硬盘》弹窗提示点击是==》设置里选中“让分区适应整个硬盘大小”》点击保存》提交里点击执行即可5.执行完毕后关机,拆掉旧机械硬盘,换上新固态硬盘6.开机后,在计算机管理–》存储==》磁盘管理==》更改新固态硬盘的驱动器号
- 小红的字母游戏(A组)
练习时长两年半1
游戏
链接:登录—专业IT笔试面试备考平台_牛客网来源:牛客网题目描述小红有一个长度为nnn的字符串sss,仅包含小写字母,小红可以选出kkk个字符,组成一个新的字符串ttt,对于ttt的每一个字符tit_iti,如果tit_iti在ttt中出现的次数为yyy,则小红会获得yyy的分数,现在小红想知道,她最多能获得多少分。输入描述:第一行两个整数n,kn,kn,k,表示字符串sss的长度和小红选出的字符
- Composer如何通过GitHub Personal Access Token安装私有包:完整教程
lihuang319
composergithubphp
使用Composer安全管理您的PHP私有依赖包一、前言在PHP开发中,我们经常需要将内部工具包托管为私有仓库。传统的账号密码验证方式存在安全隐患,而GitHubPersonalAccessToken(PAT)提供了一种更安全的鉴权方案。本文将通过4个核心步骤+3个避坑指南,手把手教您在Composer中优雅地使用PAT安装私有包。二、为什么要用PAT?安全性:细粒度权限控制(可设置过期时间/单仓
- Linux驱动开发: USB驱动开发
DS小龙哥
Linux系统编程与驱动开发linuxUSB驱动嵌入式
一、USB简介1.1什么是USB?USB是连接计算机系统与外部设备的一种串口总线标准,也是一种输入输出接口的技术规范,被广泛地应用于个人电脑和移动设备等信息通讯产品,USB就是简写,中文叫通用串行总线。最早出现在1995年,伴随着奔腾机发展而来。自微软在Windows98中加入对USB接口的支持后,USB接口才推广开来,USB设备也日渐增多,如数码相机、摄像头、扫描仪、游戏杆、打印机、键盘、鼠标等
- 如何使用Python编程实现捕获笔记本电脑麦克风的音频并通过蓝牙耳机实时传输
winfredzhang
python音视频实时传输蓝牙耳机
在现代的工作和生活环境中,音频传输的需求日益增加。无论是远程会议、在线教育,还是家庭娱乐,音频的实时传输都扮演着至关重要的角色。今天,我将向大家介绍一个简单而实用的应用程序,它能够捕获笔记本电脑麦克风的音频,并通过蓝牙耳机实时传输。这款应用程序特别适用于需要在会议室等场景中远程听取声音的情况。接下来,我将详细讲解这个应用程序的实现过程,并提供完整的代码和使用指南。引言想象一下这样的场景:你需要离开
- 怎么在体育直播系统进行足球赛事的直播
sanx18
java阿里云
在网络直播技术的带动下,体育赛事直播平台看比赛变得越来越普及。下面就详细介绍如何运用源码搭建一个的体育直播系统,让大家能够进行足球赛事的直播。第一步:搭建系统平台首先需要得到一个体育直播系统源码。该源代码有一套完整的平台框架,功能对标虎牙和斗鱼等各大体育直播平台。第二步:注册和申请主播认证完成搭建系统后,接下去需要添加用户或进行注册。通过注册账户,能申请成为主播。申请后,需要登录后台进行审核通过,
- 以笔触编织计算机领域的故事**
爱编程的Loren
活动文章活动文章
###活动启事 大学生们,是时候拿起你的笔,释放你的创造力了!我们正在举办一个为期14天的写作博客创作挑战赛,邀请你一同参与,挖掘你的创作潜能,展现你的写作才华。这个活动旨在发掘写作的魅力,共同编织我们的故事。 ####活动背景 这个挑战赛专为热爱写作的大学生博主设立,意在为大家提供一个展现自己计算机领域专业知识、观点与创意的平台。无论是想要深入探索某个计算机技术领域,还是分享个人编程经
- 最通用的跨平台引擎:ShiVa 3D引擎
pizi0475
图形图像其它文章图形引擎游戏引擎引擎跨平台脚本服务器sslsoap
ShiVa3D引擎是最通用的跨平台引擎,可以在Web浏览器运行并且也支持Windows,Mac,Linux,Wii,iPhone,iPad,Android,WebOS和AirplaySDK。该引擎支持SSL–securized插件扩展,很像PhysX引擎,FMOD声音库,ARToolkit和ScaleformHUD引擎。ClassicGeometry经典的图形处理支持多边形网,其中包括:-静态网格
- 探索React的深度应用:React Survey——构建问卷神器
傅尉艺Maggie
探索React的深度应用:ReactSurvey——构建问卷神器去发现同类优质开源项目:https://gitcode.com/在浩瀚的前端开发世界里,React与Redux已成为构建复杂Web应用的得力助手,但它们的强大往往隐藏在基础教程之后。今天,让我们一同探索【ReactSurvey】,一个将React与Redux之力发挥至极致的开源项目,教你如何轻松打造专业的在线问卷系统。项目介绍Reac
- 推荐使用:react-native-cn-quill - 为React Native打造的富文本编辑器
秋玥多
推荐使用:react-native-cn-quill-为ReactNative打造的富文本编辑器react-native-cn-quillQuillrich-texteditorforreact-native项目地址:https://gitcode.com/gh_mirrors/re/react-native-cn-quill项目介绍react-native-cn-quill是一个基于QuillA
- 探索表单设计新境界:React JSON Schema Form 编辑器
包椒浩Leith
探索表单设计新境界:ReactJSONSchemaForm编辑器react-json-schema-form-builderVisualeditorforformsbasedonjsonschema,builtinReactJS项目地址:https://gitcode.com/gh_mirrors/re/react-json-schema-form-builder在当今快速迭代的软件开发领域,灵活
- 开目MOM数字化制造运营管理系统介绍
开目软件
制造
开目MOM系统是制造业数据化架构中的重要组成部分,为企业提供制造数据管理、制造运营管理、质量管理、仓储管理、工具工装管理、设备管理等模块,打造一个可靠、全面的制造协同管理平台。开目MOM系统-即制造运营管理系统,是面向CPS的新一代数字化管理解决方案。随着企业对制造运营管控的认知和升级,MOM逐渐被广泛应用于市场中,MOM概念首次于2000年被提出,MOM系统覆盖了制造运营管理的全部活动范围,其主
- 大型园区网华为ENSP毕业设计
滑杏舒
大型园区网华为ENSP毕业设计【下载地址】大型园区网华为ENSP毕业设计本项目聚焦于构建一个高度可靠、高效且可扩展的大型园区网络环境,采用华为设备仿真平台ENSP(EnterpriseNetworkSimulationPlatform)。通过实施标准的双星型拓扑结构,本设计旨在展示如何在复杂的网络环境中实现业务连续性、高可用性和负载均衡的关键原则。本README将详细介绍MSTP(多生成树协议)、
- 构建高效可靠的大型园区网络:华为ENSP毕业设计项目推荐
裴涓斐Kathy
构建高效可靠的大型园区网络:华为ENSP毕业设计项目推荐【下载地址】大型园区网华为ENSP毕业设计本项目聚焦于构建一个高度可靠、高效且可扩展的大型园区网络环境,采用华为设备仿真平台ENSP(EnterpriseNetworkSimulationPlatform)。通过实施标准的双星型拓扑结构,本设计旨在展示如何在复杂的网络环境中实现业务连续性、高可用性和负载均衡的关键原则。本README将详细介绍
- IoT安全软件:Tenable二次开发_TenableIoT数据处理与分析
chenlz2007
物联网物联网自动化运维网络协议网络
TenableIoT数据处理与分析在上一节中,我们介绍了如何使用TenableIoT进行资产发现和漏洞扫描。接下来,我们将深入探讨如何处理和分析TenableIoT生成的数据,以便更好地理解网络中的安全态势,并采取适当的措施来保护我们的IoT设备。1.数据导出与格式转换在处理TenableIoT数据之前,首先需要将数据从TenableIoT平台导出,并转换为适合进一步分析的格式。TenableIo
- OPC UA 资料收藏
小毛驴850
软件工程
1、教程OPCUAClient:UaExpert教程-无公害水果-博客园2、代码OpcUaHelper:一个通用的opcua客户端类库,基于.net4.6.1创建,基于官方opcua基金会跨平台库创建,封装了节点读写,批量节点读写,引用读取,特性读取,历史数据读取,方法调用,节点订阅,批量订阅等操作。还提供了一个节点浏览器工具
- 电脑开机无显示的故障原因
小魚資源大雜燴
电脑windows
硬件问题电源故障电源供应不足:电源功率无法满足电脑硬件的需求,可能导致硬件无法正常启动,尤其是在电脑配置较高且电源功率较低的情况下容易出现。电源损坏:电源内部的电路元件可能出现故障,如电容爆浆、短路等,导致无法正常输出电力,电脑无法开机。主板故障主板电路故障:主板上的电路出现断路、短路等问题,会影响到硬件之间的通信和电力供应,导致开机无显示。BIOS故障:BIOS芯片损坏、BIOS设置错误或BIO
- 【redis】redis key 分析
武昌库里写JAVA
面试题汇总与解析毕业设计课程设计springbootvue.js源码
redis_key_sizes.shhttps://gist.github.com/epicserve/5699837redis-cli,theRediscommandlineinterfacehttps://redis.io/topics/rediscliRedisScripting:EVALscriptnumkeyskey[key...]arg[arg...]https://www.w3res
- python爬虫项目(一百九十八):电商平台用户行为数据分析与推荐系统、爬取电商平台用户行为数据
人工智能_SYBH
爬虫试读2025年爬虫百篇实战宝典:从入门到精通python爬虫数据分析开发语言信息可视化okhttp
在现代电商平台中,用户的行为数据对于优化用户体验、提升销量以及个性化推荐至关重要。通过抓取和分析用户的浏览、点击、购买等行为数据,电商平台能够更好地了解用户的偏好,从而推荐相关产品,增加用户的黏性和购买意愿。本篇博客将详细介绍如何通过爬虫技术抓取电商平台的用户行为数据,并结合数据分析和推荐算法,构建一个简单的推荐系统。目录一、电商平台用户行为数据二、爬虫技术实现2.1网站分析2.2使用Seleni
- 【云原生】Docker搭建知识库文档协作平台Confluence
逆风飞翔的小叔
运维ConfluenceConfluence搭建Confluence使用Confluence搭建与使用Confluence使用详解
目录一、前言二、企业级知识库文档工具部署形式2.1开源工具平台2.1.1开源工具优点2.1.2开源工具缺点2.2私有化部署2.3混合部署三、如何选择合适的知识库平台工具3.1明确目标和需求3.2选择合适的知识库平台工具四、Confluence介绍4.2confluence特点4.3Confluence中的几个概念4.3.1空间(Space)4.3.2Dashboard4.3.3页面(Page)4.
- 小巧免费的笔记本电池检测工具
ITdgr
电脑
BatteryInfoView是一款免费的笔记本电池检测软件,适用于笔记本电脑和上网本。该软件能够提供电池的详细信息,包括电池名称、制造商名称、序列号、制造日期、电源状态(充电/放电)、当前电池容量、完全充电容量、设计容量、充电放电比率以及电池温度等。用户可以通过BatteryInfoView全面了解自己笔记本电池的状态,例如电池的健康度、损耗度等信息,这些数据对于电池管理和维护非常有帮助。此外,
- OpenCV开源机器视觉软件
视觉人机器视觉
杂说opencv开源人工智能
OpenCV(OpenSourceComputerVisionLibrary)是一个开源的计算机视觉和机器学习软件库,广泛应用于实时图像处理、视频分析、物体检测、人脸识别等领域。它由英特尔实验室于1999年发起,现已成为计算机视觉领域最流行的工具之一,支持多种编程语言(如C++、Python、Java)和操作系统(Windows、Linux、macOS、Android、iOS)。核心功能图像处理基
- 使用内置命令查看笔记本电池健康状态
jay丿
电脑单片机嵌入式硬件
如何使用powercfg/batteryreport命令查看笔记本电池健康状态在Windows系统中,了解笔记本电池的健康状态对于维护电脑性能和预测电池寿命至关重要。Windows10和Windows11系统提供了一个内置命令powercfg/batteryreport,可以生成一份详细的电池使用情况报告,帮助我们评估电池的健康状态。以下是使用此命令的详细教程:一、打开命令提示符快捷键打开:按下键
- 视频HDR技术详解,你的电脑怎么播放HDR视频?
modest —YBW
音视频
闲聊:前两天在b站上面看到影视飓风的视频,让我有点疑惑,我不知道为什么播放视频有设备撑不住一说,所以感兴趣去ytb下载了4k原片30hz刷新的,然后测试一下我的电脑能不能播放,发现还是可以的,视觉上看起来是十分震撼的,所以想借此机会学习一下HDR,感兴趣的同学可以也下载一下这个片子,我给一个百度网盘链接,看看自己的电脑能不能播放:通过网盘分享的文件:HDR视频播放测试与播放器potplayer的安
- 镜像解决,向量数据库Milvus报错
zwzscnds
dockermilvus
MilvusMilvus是一款开源的向量数据库,具有高度的灵活性、稳定可靠性以及高速查询等特点。它支持针对TB级向量的增删改操作和近实时查询,适用于大规模向量数据的存储和检索。Milvus的官网:https://milvus.ioGithub上Milvus的链接:https://github.com/milvus-ioDockerDocker是一种容器化技术,它允许开发者将应用程序及其依赖项打包到
- Java实现的基于模板的网页结构化信息精准抽取组件:HtmlExtractor
yangshangchuan
信息抽取HtmlExtractor精准抽取信息采集
HtmlExtractor是一个Java实现的基于模板的网页结构化信息精准抽取组件,本身并不包含爬虫功能,但可被爬虫或其他程序调用以便更精准地对网页结构化信息进行抽取。
HtmlExtractor是为大规模分布式环境设计的,采用主从架构,主节点负责维护抽取规则,从节点向主节点请求抽取规则,当抽取规则发生变化,主节点主动通知从节点,从而能实现抽取规则变化之后的实时动态生效。
如
- java编程思想 -- 多态
百合不是茶
java多态详解
一: 向上转型和向下转型
面向对象中的转型只会发生在有继承关系的子类和父类中(接口的实现也包括在这里)。父类:人 子类:男人向上转型: Person p = new Man() ; //向上转型不需要强制类型转化向下转型: Man man =
- [自动数据处理]稳扎稳打,逐步形成自有ADP系统体系
comsci
dp
对于国内的IT行业来讲,虽然我们已经有了"两弹一星",在局部领域形成了自己独有的技术特征,并初步摆脱了国外的控制...但是前面的路还很长....
首先是我们的自动数据处理系统还无法处理很多高级工程...中等规模的拓扑分析系统也没有完成,更加复杂的
- storm 自定义 日志文件
商人shang
stormclusterlogback
Storm中的日志级级别默认为INFO,并且,日志文件是根据worker号来进行区分的,这样,同一个log文件中的信息不一定是一个业务的,这样就会有以下两个需求出现:
1. 想要进行一些调试信息的输出
2. 调试信息或者业务日志信息想要输出到一些固定的文件中
不要怕,不要烦恼,其实Storm已经提供了这样的支持,可以通过自定义logback 下的 cluster.xml 来输
- Extjs3 SpringMVC使用 @RequestBody 标签问题记录
21jhf
springMVC使用 @RequestBody(required = false) UserVO userInfo
传递json对象数据,往往会出现http 415,400,500等错误,总结一下需要使用ajax提交json数据才行,ajax提交使用proxy,参数为jsonData,不能为params;另外,需要设置Content-type属性为json,代码如下:
(由于使用了父类aaa
- 一些排错方法
文强chu
方法
1、java.lang.IllegalStateException: Class invariant violation
at org.apache.log4j.LogManager.getLoggerRepository(LogManager.java:199)at org.apache.log4j.LogManager.getLogger(LogManager.java:228)
at o
- Swing中文件恢复我觉得很难
小桔子
swing
我那个草了!老大怎么回事,怎么做项目评估的?只会说相信你可以做的,试一下,有的是时间!
用java开发一个图文处理工具,类似word,任意位置插入、拖动、删除图片以及文本等。文本框、流程图等,数据保存数据库,其余可保存pdf格式。ok,姐姐千辛万苦,
- php 文件操作
aichenglong
PHP读取文件写入文件
1 写入文件
@$fp=fopen("$DOCUMENT_ROOT/order.txt", "ab");
if(!$fp){
echo "open file error" ;
exit;
}
$outputstring="date:"." \t tire:".$tire."
- MySQL的btree索引和hash索引的区别
AILIKES
数据结构mysql算法
Hash 索引结构的特殊性,其 检索效率非常高,索引的检索可以一次定位,不像B-Tree 索引需要从根节点到枝节点,最后才能访问到页节点这样多次的IO访问,所以 Hash 索引的查询效率要远高于 B-Tree 索引。
可能很多人又有疑问了,既然 Hash 索引的效率要比 B-Tree 高很多,为什么大家不都用 Hash 索引而还要使用 B-Tree 索引呢
- JAVA的抽象--- 接口 --实现
百合不是茶
抽象 接口 实现接口
//抽象 类 ,方法
//定义一个公共抽象的类 ,并在类中定义一个抽象的方法体
抽象的定义使用abstract
abstract class A 定义一个抽象类 例如:
//定义一个基类
public abstract class A{
//抽象类不能用来实例化,只能用来继承
//
- JS变量作用域实例
bijian1013
作用域
<script>
var scope='hello';
function a(){
console.log(scope); //undefined
var scope='world';
console.log(scope); //world
console.log(b);
- TDD实践(二)
bijian1013
javaTDD
实践题目:分解质因数
Step1:
单元测试:
package com.bijian.study.factor.test;
import java.util.Arrays;
import junit.framework.Assert;
import org.junit.Before;
import org.junit.Test;
import com.bijian.
- [MongoDB学习笔记一]MongoDB主从复制
bit1129
mongodb
MongoDB称为分布式数据库,主要原因是1.基于副本集的数据备份, 2.基于切片的数据扩容。副本集解决数据的读写性能问题,切片解决了MongoDB的数据扩容问题。
事实上,MongoDB提供了主从复制和副本复制两种备份方式,在MongoDB的主从复制和副本复制集群环境中,只有一台作为主服务器,另外一台或者多台服务器作为从服务器。 本文介绍MongoDB的主从复制模式,需要指明
- 【HBase五】Java API操作HBase
bit1129
hbase
import java.io.IOException;
import org.apache.hadoop.conf.Configuration;
import org.apache.hadoop.hbase.HBaseConfiguration;
import org.apache.hadoop.hbase.HColumnDescriptor;
import org.apache.ha
- python调用zabbix api接口实时展示数据
ronin47
zabbix api接口来进行展示。经过思考之后,计划获取如下内容: 1、 获得认证密钥 2、 获取zabbix所有的主机组 3、 获取单个组下的所有主机 4、 获取某个主机下的所有监控项
- jsp取得绝对路径
byalias
绝对路径
在JavaWeb开发中,常使用绝对路径的方式来引入JavaScript和CSS文件,这样可以避免因为目录变动导致引入文件找不到的情况,常用的做法如下:
一、使用${pageContext.request.contextPath}
代码” ${pageContext.request.contextPath}”的作用是取出部署的应用程序名,这样不管如何部署,所用路径都是正确的。
- Java定时任务调度:用ExecutorService取代Timer
bylijinnan
java
《Java并发编程实战》一书提到的用ExecutorService取代Java Timer有几个理由,我认为其中最重要的理由是:
如果TimerTask抛出未检查的异常,Timer将会产生无法预料的行为。Timer线程并不捕获异常,所以 TimerTask抛出的未检查的异常会终止timer线程。这种情况下,Timer也不会再重新恢复线程的执行了;它错误的认为整个Timer都被取消了。此时,已经被
- SQL 优化原则
chicony
sql
一、问题的提出
在应用系统开发初期,由于开发数据库数据比较少,对于查询SQL语句,复杂视图的的编写等体会不出SQL语句各种写法的性能优劣,但是如果将应用系统提交实际应用后,随着数据库中数据的增加,系统的响应速度就成为目前系统需要解决的最主要的问题之一。系统优化中一个很重要的方面就是SQL语句的优化。对于海量数据,劣质SQL语句和优质SQL语句之间的速度差别可以达到上百倍,可见对于一个系统
- java 线程弹球小游戏
CrazyMizzz
java游戏
最近java学到线程,于是做了一个线程弹球的小游戏,不过还没完善
这里是提纲
1.线程弹球游戏实现
1.实现界面需要使用哪些API类
JFrame
JPanel
JButton
FlowLayout
Graphics2D
Thread
Color
ActionListener
ActionEvent
MouseListener
Mouse
- hadoop jps出现process information unavailable提示解决办法
daizj
hadoopjps
hadoop jps出现process information unavailable提示解决办法
jps时出现如下信息:
3019 -- process information unavailable3053 -- process information unavailable2985 -- process information unavailable2917 --
- PHP图片水印缩放类实现
dcj3sjt126com
PHP
<?php
class Image{
private $path;
function __construct($path='./'){
$this->path=rtrim($path,'/').'/';
}
//水印函数,参数:背景图,水印图,位置,前缀,TMD透明度
public function water($b,$l,$pos
- IOS控件学习:UILabel常用属性与用法
dcj3sjt126com
iosUILabel
参考网站:
http://shijue.me/show_text/521c396a8ddf876566000007
http://www.tuicool.com/articles/zquENb
http://blog.csdn.net/a451493485/article/details/9454695
http://wiki.eoe.cn/page/iOS_pptl_artile_281
- 完全手动建立maven骨架
eksliang
javaeclipseWeb
建一个 JAVA 项目 :
mvn archetype:create
-DgroupId=com.demo
-DartifactId=App
[-Dversion=0.0.1-SNAPSHOT]
[-Dpackaging=jar]
建一个 web 项目 :
mvn archetype:create
-DgroupId=com.demo
-DartifactId=web-a
- 配置清单
gengzg
配置
1、修改grub启动的内核版本
vi /boot/grub/grub.conf
将default 0改为1
拷贝mt7601Usta.ko到/lib文件夹
拷贝RT2870STA.dat到 /etc/Wireless/RT2870STA/文件夹
拷贝wifiscan到bin文件夹,chmod 775 /bin/wifiscan
拷贝wifiget.sh到bin文件夹,chm
- Windows端口被占用处理方法
huqiji
windows
以下文章主要以80端口号为例,如果想知道其他的端口号也可以使用该方法..........................1、在windows下如何查看80端口占用情况?是被哪个进程占用?如何终止等. 这里主要是用到windows下的DOS工具,点击"开始"--"运行",输入&
- 开源ckplayer 网页播放器, 跨平台(html5, mobile),flv, f4v, mp4, rtmp协议. webm, ogg, m3u8 !
天梯梦
mobile
CKplayer,其全称为超酷flv播放器,它是一款用于网页上播放视频的软件,支持的格式有:http协议上的flv,f4v,mp4格式,同时支持rtmp视频流格 式播放,此播放器的特点在于用户可以自己定义播放器的风格,诸如播放/暂停按钮,静音按钮,全屏按钮都是以外部图片接口形式调用,用户根据自己的需要制作 出播放器风格所需要使用的各个按钮图片然后替换掉原始风格里相应的图片就可以制作出自己的风格了,
- 简单工厂设计模式
hm4123660
java工厂设计模式简单工厂模式
简单工厂模式(Simple Factory Pattern)属于类的创新型模式,又叫静态工厂方法模式。是通过专门定义一个类来负责创建其他类的实例,被创建的实例通常都具有共同的父类。简单工厂模式是由一个工厂对象决定创建出哪一种产品类的实例。简单工厂模式是工厂模式家族中最简单实用的模式,可以理解为是不同工厂模式的一个特殊实现。
- maven笔记
zhb8015
maven
跳过测试阶段:
mvn package -DskipTests
临时性跳过测试代码的编译:
mvn package -Dmaven.test.skip=true
maven.test.skip同时控制maven-compiler-plugin和maven-surefire-plugin两个插件的行为,即跳过编译,又跳过测试。
指定测试类
mvn test
- 非mapreduce生成Hfile,然后导入hbase当中
Stark_Summer
maphbasereduceHfilepath实例
最近一个群友的boss让研究hbase,让hbase的入库速度达到5w+/s,这可愁死了,4台个人电脑组成的集群,多线程入库调了好久,速度也才1w左右,都没有达到理想的那种速度,然后就想到了这种方式,但是网上多是用mapreduce来实现入库,而现在的需求是实时入库,不生成文件了,所以就只能自己用代码实现了,但是网上查了很多资料都没有查到,最后在一个网友的指引下,看了源码,最后找到了生成Hfile
- jsp web tomcat 编码问题
王新春
tomcatjsppageEncode
今天配置jsp项目在tomcat上,windows上正常,而linux上显示乱码,最后定位原因为tomcat 的server.xml 文件的配置,添加 URIEncoding 属性:
<Connector port="8080" protocol="HTTP/1.1"
connectionTi