kafka安装和使用的入门教程
这篇文章简单介绍如何在ubuntu上安装kafka,并使用kafka完成消息的发送和接收。
一、安装kafka
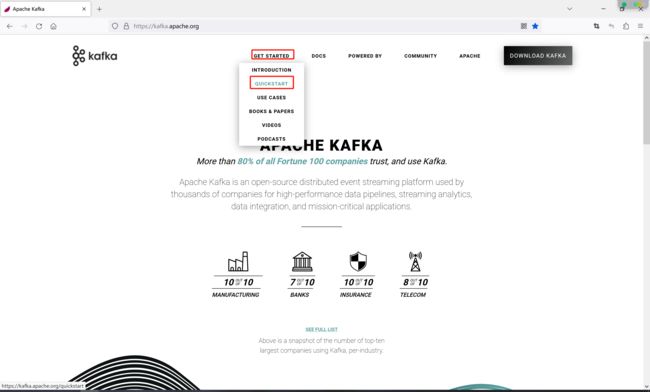
访问kafka官网Apache Kafka,然后点击快速开始
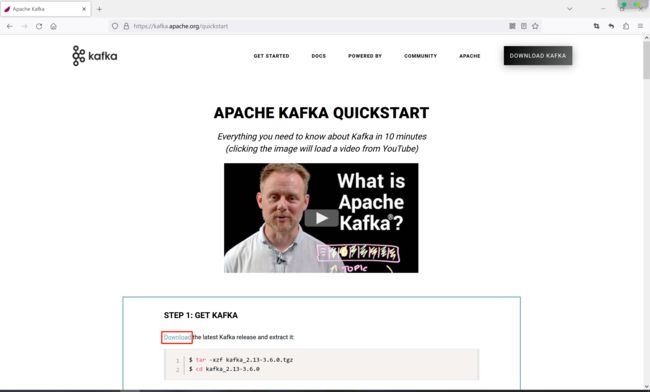
紧接着,点击Download
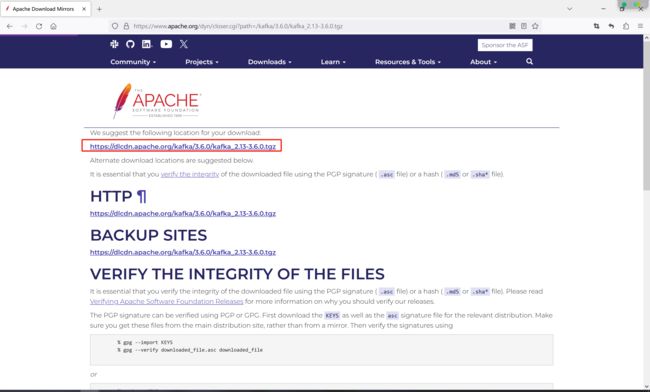
最后点击下载链接下载安装包
如果下载缓慢,博主已经把安装包上传到百度网盘:
链接:https://pan.baidu.com/s/1nZ1duIt64ZVUsimaQ1meZA?pwd=3aoh
提取码:3aoh
--来自百度网盘超级会员V3的分享
二、启动kafka
经过上一步下载完成后,按照页面的提示启动kafka
1、通过远程连接工具,如finalshell、xshell上传kafka_2.13-3.6.0.tgz到服务器上的usr目录
2、切换到usr目录,解压kafka_2.13-3.6.0.tgz
cd /usr

tar -zxzf kafka_2.13-3.6.0.tgz
3、启动zookeeper
修改配置文件confg/zookeeper.properties,修改一下数据目录
dataDir=/usr/local/zookeeper然后通过以下命令启动kafka自带的zookeeper
bin/zookeeper-server-start.sh config/zookeeper.properties4、启动kafka
修改配置文件confg/server.properties,修改一下kafka保存日志的目录
log.dirs=/usr/local/kafka/logs然后新开一个连接窗口,通过以下命令启动kafka
bin/kafka-server-start.sh config/server.properties三、kafka发送、接收消息
创建topic
bin/kafka-topics.sh --create --topic hello --bootstrap-server localhost:9092生产消息
往刚刚创建的topic里发送消息,可以一次性发送多条消息,点击Ctrl+C完成发送
bin/kafka-console-producer.sh --broker-list localhost:9092 --topic hello消费消息
消费最新的消息
新开一个连接窗口,在命令行输入以下命令拉取topic为hello上的消息
bin/kafka-console-consumer.sh --bootstrap-server localhost:9092 --topic hello消费之前的消息
bin/kafka-console-consumer.sh --bootstrap-server localhost:9092 --from-beginning --topic hello指定偏移量消费
指定从第几条消息开始消费,这里--offset参数设置的偏移量是从0开始的。
bin/kafka-console-consumer.sh --bootstrap-server localhost:9092 --partition 0 --offset 1 --topic hello消息的分组消费
bin/kafka-console-consumer.sh --bootstrap-server localhost:9092 --consumer-property group.id=helloGroup --topic hello四、Java中使用kafka
通过maven官网搜索kafka的maven依赖版本
https://central.sonatype.com/search?q=kafka![]() https://central.sonatype.com/search?q=kafka然后通过IntelliJ IDEA创建一个maven项目kafka,在pom.xml中添加kafka的依赖
https://central.sonatype.com/search?q=kafka然后通过IntelliJ IDEA创建一个maven项目kafka,在pom.xml中添加kafka的依赖
    4.0.0

    org.example
    kafka
    1.0-SNAPSHOT


        8
        8


            org.apache.kafka
            kafka_2.12
            3.6.0
创建消息生产者
生产者工厂类
package producer;

import org.apache.kafka.clients.producer.KafkaProducer;
import org.apache.kafka.clients.producer.Producer;
import org.apache.kafka.clients.producer.ProducerConfig;

import java.util.Properties;

/**
 * 消息生产者工厂类
 * @author heyunlin
 * @version 1.0
 */
public class MessageProducerFactory {

    private static final String BOOTSTRAP_SERVERS = "192.168.254.128:9092";

    public static Producer getProducer() {
        //PART1:设置发送者相关属性
        Properties props = new Properties();
        // 此处配置的是kafka的端口
        props.put(ProducerConfig.BOOTSTRAP_SERVERS_CONFIG, BOOTSTRAP_SERVERS);
        // 配置key的序列化类
        props.put(ProducerConfig.KEY_SERIALIZER_CLASS_CONFIG, "org.apache.kafka.common.serialization.StringSerializer");
        // 配置value的序列化类
        props.put(ProducerConfig.VALUE_SERIALIZER_CLASS_CONFIG, "org.apache.kafka.common.serialization.StringSerializer");

        return new KafkaProducer<>(props);
    }

}
测试发送消息
package producer;

import org.apache.kafka.clients.producer.Callback;
import org.apache.kafka.clients.producer.Producer;
import org.apache.kafka.clients.producer.ProducerRecord;
import org.apache.kafka.clients.producer.RecordMetadata;

/**
 * @author heyunlin
 * @version 1.0
 */
public class MessageProducer {

    private static final String TOPIC = "hello";

    public static void main(String[] args) {
        ProducerRecord record = new ProducerRecord<>(TOPIC, "1", "Message From Producer.");
        Producer producer = MessageProducerFactory.getProducer();

        // 同步发送消息
        producer.send(record);

        // 异步发送消息
        producer.send(record, new Callback() {
            @Override
            public void onCompletion(RecordMetadata recordMetadata, Exception e) {
                String topic = recordMetadata.topic();
                long offset = recordMetadata.offset();
                int partition = recordMetadata.partition();
                String message = recordMetadata.toString();

                System.out.println("topic = " + topic);
                System.out.println("offset = " + offset);
                System.out.println("message = " + message);
                System.out.println("partition = " + partition);
            }
        });

        // 加上这行代码才会发送消息
        producer.close();
    }

}
创建消息消费者
消费者工厂类
package consumer;

import org.apache.kafka.clients.consumer.Consumer;
import org.apache.kafka.clients.consumer.ConsumerConfig;
import org.apache.kafka.clients.consumer.KafkaConsumer;

import java.util.Properties;

/**
 * 消息生产者工厂类
 * @author heyunlin
 * @version 1.0
 */
public class MessageConsumerFactory {

    private static final String BOOTSTRAP_SERVERS = "192.168.254.128:9092";

    public static Consumer getConsumer() {
        //PART1:设置发送者相关属性
        Properties props = new Properties();

        //kafka地址
        props.put(ConsumerConfig.BOOTSTRAP_SERVERS_CONFIG, BOOTSTRAP_SERVERS);
        //每个消费者要指定一个group
        props.put(ConsumerConfig.GROUP_ID_CONFIG, "helloGroup");
        //key序列化类
        props.put(ConsumerConfig.KEY_DESERIALIZER_CLASS_CONFIG, "org.apache.kafka.common.serialization.StringDeserializer");
        //value序列化类
        props.put(ConsumerConfig.VALUE_DESERIALIZER_CLASS_CONFIG, "org.apache.kafka.common.serialization.StringDeserializer");

        return new KafkaConsumer<>(props);
    }

}
测试消费消息
package consumer;

import org.apache.kafka.clients.consumer.Consumer;
import org.apache.kafka.clients.consumer.ConsumerRecord;
import org.apache.kafka.clients.consumer.ConsumerRecords;

import java.time.Duration;
import java.util.Collections;

/**
 * @author heyunlin
 * @version 1.0
 */
public class MessageConsumer {

    private static final String TOPIC = "hello";

    public static void main(String[] args) {
        Consumer consumer = MessageConsumerFactory.getConsumer();
        consumer.subscribe(Collections.singletonList(TOPIC));

        while (true) {
            ConsumerRecords records = consumer.poll(Duration.ofNanos(100));

            for (ConsumerRecord record : records) {
                System.out.println(record.key() + ": " + record.value());
            }

            // 提交偏移量,避免消息重复推送
            consumer.commitSync(); // 同步提交
            // consumer.commitAsync(); // 异步提交
        }
    }

}
五、springboot整合kafka
开始前的准备工作
然后通过IntelliJ IDEA创建一个springboot项目springboot-kafka,在pom.xml中添加kafka的依赖
    org.springframework.kafka
    spring-kafka
然后修改application.yml,添加kafka相关配置
spring:
  kafka:
    bootstrap-servers: 192.168.254.128:9092
    producer:
      acks: 1
      retries: 3
      batch-size: 16384
      properties:
        linger:
          ms: 0
      buffer-memory: 33554432
      key-serializer: org.apache.kafka.common.serialization.StringSerializer
      value-serializer: org.apache.kafka.common.serialization.StringSerializer
    consumer:
      group-id: helloGroup
      enable-auto-commit: false
      auto-commit-interval: 1000
      auto-offset-reset: latest
      properties:
        request:
          timeout:
            ms: 18000
        session:
          timeout:
            ms: 12000
      key-deserializer: org.apache.kafka.common.serialization.StringDeserializer
      value-deserializer: org.apache.kafka.common.serialization.StringDeserializer
创建消息生产者
package com.example.springboot.kafka.producer;

import org.springframework.beans.factory.annotation.Autowired;
import org.springframework.kafka.core.KafkaTemplate;
import org.springframework.web.bind.annotation.RequestMapping;
import org.springframework.web.bind.annotation.RequestMethod;
import org.springframework.web.bind.annotation.RestController;

/**
 * @author heyunlin
 * @version 1.0
 */
@RestController
@RequestMapping(path = "/producer", produces = "application/json;charset=utf-8")
public class KafkaProducer {

    private final KafkaTemplate kafkaTemplate;

    @Autowired
    public KafkaProducer(KafkaTemplate kafkaTemplate) {
        this.kafkaTemplate = kafkaTemplate;
    }

    @RequestMapping(value = "/sendMessage", method = RequestMethod.GET)
    public String sendMessage(String message) {
        kafkaTemplate.send("hello", message);

        return "发送成功~";
    }

}
创建消息消费者
package com.example.springboot.kafka.consumer;

import org.apache.kafka.clients.consumer.ConsumerRecord;
import org.springframework.kafka.annotation.KafkaListener;
import org.springframework.stereotype.Component;

/**
 * @author heyunlin
 * @version 1.0
 */
@Component
public class KafkaConsumer {

    @KafkaListener(topics = "hello")
    public void receiveMessage(ConsumerRecord record) {
        String topic = record.topic();
        long offset = record.offset();
        int partition = record.partition();

        System.out.println("topic = " + topic);
        System.out.println("offset = " + offset);
        System.out.println("partition = " + partition);
    }

}
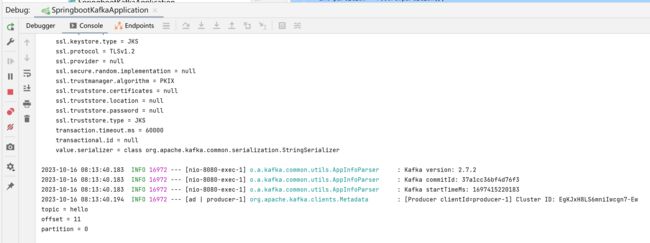
然后访问网址http://localhost:8080/producer/sendMessage?message=hello往topic为hello的消息队列发送消息。控制台打印了参数,成功监听到发送的消息。
文章涉及的项目已经上传到gitee,按需获取~
Java中操作kafka的基本项目![]() https://gitee.com/he-yunlin/kafka.git
https://gitee.com/he-yunlin/kafka.git
springboot整合kafka案例项目![]() https://gitee.com/he-yunlin/springboot-kafka.git
https://gitee.com/he-yunlin/springboot-kafka.git


