基于Spring boot轻松实现一个多数据源框架
Spring Boot 提供了 Data JPA 的包,允许你使用类似 ORM 的接口连接到 RDMS。它很容易使用和实现,只需要在 pom.xml 中添加一个条目(如果使用的是 Maven,Gradle 则是在 build.gradle 文件中)。
            org.springframework.boot
            spring-boot-starter


            org.springframework.boot
            spring-boot-starter-data-jpa
在Main Spring Application类中添加 2 个注释:
@SpringBootApplication
@EnableJpaRepositories
@EnableAutoConfiguration
public class SpringMainApplication {

    public static void main(String[] args) {
        SpringApplication.run(SpringMainApplication.class, args);
    }
}
最后添加一个数据库连接包,配置数据库连接即可实现与数据库通信。
接下来,我们开始配置多数据源连接。
注意:多个数据库应该具有相同的驱动程序。无法连接到不同的数据库,如 MySql 和 Postgres SQL 数据库。数据库必须相同。此外,数据库模式必须相同,不同模式的 2 个数据库无法进行连接。
多数据源有哪些应用场景?
1.支持具有相同模式的同一应用程序内的多租户。
2.动态模拟多个环境数据库上的行为 ,而不需要重新启动应用程序。 例如,你可以动态连接到开发数据库或 QA 数据库,而无需重新启动应用程序。
3.支持多个数据库来模拟各种自动化测试场景。不同数据库可能具有不同的配置和静态信息,意味着你可以用一个自动化测试脚本覆盖多个测试用例。
4.在同一个应用程序中支持多个组织。根据用户登录,可以动态决定他们的数据应进入哪个组织的数据库。
5.一次性为多个数据库插入数据。例如,你有一个从脚本创建数据的批处理作业,你可以一次性连接到多个数据库,并对所有这些数据库运行脚本,而无需指向不同的应用程序或重新启动服务器来执行此操作。
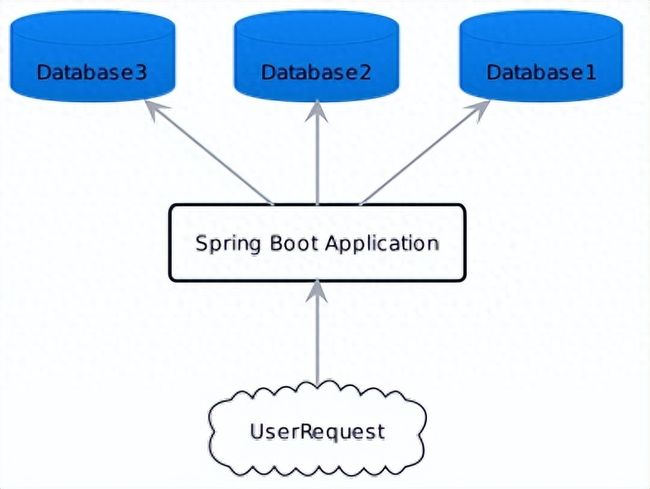
多数据源示意图如下:
第一步:添加 pom 依赖
            org.springframework.boot
            spring-boot-starter


            org.springframework.boot
            spring-boot-starter-actuator


            org.springframework.boot
            spring-boot-devtools


            org.springframework.boot
            spring-boot-starter-data-jpa


            org.springframework.boot
            spring-boot-starter-web


            io.springfox
            springfox-swagger2
            2.9.2


            io.springfox
            springfox-swagger-ui
            2.9.2


            org.projectlombok
            lombok
            1.18.12
            provided


            org.postgresql
            postgresql


            org.springframework.boot
            spring-boot-starter-test
            test


                    org.junit.vintage
                    junit-vintage-engine


                org.springframework.cloud
                spring-cloud-starter-parent
                ${spring-cloud-dependencies.version}
                pom
                import


                org.springframework.cloud
                spring-cloud-gcp-dependencies
                ${project.version}
                pom
                import


                org.springframework.boot
                spring-boot-maven-plugin


                org.apache.maven.plugins
                maven-surefire-plugin
第二步:添加数据库连接配置
app.datasource.db1.jdbc-url=jdbc:postgresql://db1.com:5432/dbname1
app.datasource.db1.username=postgres
app.datasource.db1.password=password

app.datasource.db2.jdbc-url=jdbc:postgresql://db2.com:5432/dbname2
app.datasource.db2.username=postgres
app.datasource.db2.password=password

app.datasource.db3.jdbc-url=jdbc:postgresql://db3.com:5432/dbname3
app.datasource.db3.username=postgres
app.datasource.db3.password=password
这是 3 个独立的 PostgresSQL 实例,具有相同的模式但具有不同的数据。
第三步:添加多数据库配置。
首先,在 Spring 应用程序主文件中添加注解:
@SpringBootApplication
@EnableJpaRepositories
@EnableAutoConfiguration
public class MultidatabaseApplication {

    public static void main(String[] args) {
        SpringApplication.run(MultidatabaseApplication.class, args);
    }
}
添加配置类:
@Configuration
@EnableTransactionManagement
@EnableJpaRepositories(
        entityManagerFactoryRef = "multiEntityManager",
        transactionManagerRef = "multiTransactionManager")
@EntityScan("com.sample.client.repositories.dto.entity")
public class DatabaseConfiguration {
    //添加 JPA 实体路径
    private final String PACKAGE_SCAN = "com.sample.client.repositories.dto.entity";

    // 将db1设置为主数据库
    @Primary
    @Bean(name = "db1DataSource")
    @ConfigurationProperties("app.datasource.db1")
    public DataSource db1DataSource() {
        return DataSourceBuilder.create().type(HikariDataSource.class).build();
    }

    //db2连接数据源注入
    @Bean(name = "db2DataSource")
    @ConfigurationProperties("app.datasource.db2")
    public DataSource db2DataSource() {
        return DataSourceBuilder.create().type(HikariDataSource.class).build();
    }
    //db3连接数据源注入
    @Bean(name = "db3DataSource")
    @ConfigurationProperties("app.datasource.db3")
    public DataSource db3DataSource() {
        return DataSourceBuilder.create().type(HikariDataSource.class).build();
    }

    //多数据源配置
    @Bean(name = "multiRoutingDataSource")
    public DataSource multiRoutingDataSource() {
        Map targetDataSources = new HashMap<>();
        targetDataSources.put(ClientNames.DB1, db1DataSource());
        targetDataSources.put(ClientNames.DB2, db2DataSource());
        targetDataSources.put(ClientNames.DB3, db3DataSource());
        MultiRoutingDataSource multiRoutingDataSource
            = new MultiRoutingDataSource();
        multiRoutingDataSource.setDefaultTargetDataSource(db1DataSource());
        multiRoutingDataSource.setTargetDataSources(targetDataSources);
        return multiRoutingDataSource;
    }

    //多实体配置代码
    @Bean(name = "multiEntityManager")
    public LocalContainerEntityManagerFactoryBean multiEntityManager() {
        LocalContainerEntityManagerFactoryBean em
            = new LocalContainerEntityManagerFactoryBean();
        em.setDataSource(multiRoutingDataSource());
        em.setPackagesToScan(PACKAGE_SCAN);
        HibernateJpaVendorAdapter vendorAdapter
            = new HibernateJpaVendorAdapter();
        em.setJpaVendorAdapter(vendorAdapter);
        em.setJpaProperties(hibernateProperties());
        return em;
    }

    @Bean(name = "multiTransactionManager")
    public PlatformTransactionManager multiTransactionManager() {
        JpaTransactionManager transactionManager
                = new JpaTransactionManager();
        transactionManager.setEntityManagerFactory(
                multiEntityManager().getObject());
        return transactionManager;
    }

    @Primary
    @Bean(name="entityManagerFactory")
    public LocalSessionFactoryBean dbSessionFactory() {
        LocalSessionFactoryBean sessionFactoryBean = new LocalSessionFactoryBean();
        sessionFactoryBean.setDataSource(multiRoutingDataSource());
        sessionFactoryBean.setPackagesToScan(PACKAGE_SCAN);
        sessionFactoryBean.setHibernateProperties(hibernateProperties());
        return sessionFactoryBean;
    }

    //添加 hibernate 属性
    private Properties hibernateProperties() {
        Properties properties = new Properties();
        properties.put("hibernate.show_sql", true);
        properties.put("hibernate.format_sql", true);
        properties.put("hibernate.dialect", "org.hibernate.dialect.PostgreSQLDialect");
        properties.put("hibernate.id.new_generator_mappings", false);
        properties.put("hibernate.jdbc.lob.non_contextual_creation", true);
        return properties;
    }
}
这样就完成了我们的多数据库配置。
com.sample.client.repositories.dto.entity — 此目录包含 3 个数据库通用的 JPA 实体。
MultiRoutingDataSource类是我们的实际实现,允许我们连接到多个数据库
接下来,我们还需要一个DBContextHolder类来保存数据库引用并在运行时动态更改数据库。
public class DBContextHolder {
    private static final ThreadLocal contextHolder = new ThreadLocal<>();
    public static void setCurrentDb(ClientNames dbType) {
        contextHolder.set(dbType);
    }
    public static ClientNames getCurrentDb() {
        return contextHolder.get();
    }
    public static void clear() {
        contextHolder.remove();
    }
}
ClientNames枚举类如下:
public enum ClientNames {
    DB1, DB2, DB3
}接下来我们需要对MultiRoutingDataSource进行重写:
public class MultiRoutingDataSource extends AbstractRoutingDataSource {
    @Override
    protected Object determineCurrentLookupKey() {
        return DBContextHolder.getCurrentDb();
    }
}
determineCurrentLookupKey 方法用于决定应用程序应该动态连接到哪个数据库。
好了,我们的配置就完成了。接下来,我们测试下多数据源是否生效:
@RestController
@RequestMapping("/client")
public class ClientDataController {

    @Autowired
    private ClientMasterService clientMasterService;

    @GetMapping("/{clientdb}")
    public String findFromDatabase(@PathVariable String clientdbName) {
        return clientMasterService.getClientNames(clientdbName);
    }
}
ClientMasterService实现如下:
@Service
public class ClientMasterService {

    @Autowired
    private ClientMasterRepository clientMasterRepository;

    public String getClientNames(String client) {
        switch (client) {
            case "db1":
                DBContextHolder.setCurrentDb(ClientNames.DB1);
                break;
            case "db2":
                DBContextHolder.setCurrentDb(ClientNames.DB2);
                break;
            case "db3":
                DBContextHolder.setCurrentDb(ClientNames.DB3);
                break;
        }
        Entity1 e1 = clientMasterRepository.findByEntity1Name("John Doe");
        if(e1 != null) {
            return "found in database: " + client + " with id " + e1.getId();
        }
        return "found in " + client + " nada!";
    }
}
ClientMasterService使用DBContextHolder类根据从 Rest 端点传入的数据库名称(db1、db2 或 db3)设置要指向的数据库。
最后,编写 JPA Repository 基础代码:
@Repository
public interface ClientMasterRepository extends JpaRepository {
    Entity1 findByEntity1Name(String name);
}
Entity1 类如下:
@Entity
@Table(name = "entity1")
@Getter
@Setter
public class Entity1 implements Serializable {
  @Id
  @Column(name = "id", nullable = false)
  private Integer id;

  @Column(name = "entity1Name")
  private String entity1Name;
}
这样就完成了整个多数据源的配置!!!
总结
如果你有多租户需求,或者多环境测试需求等,可以自己尝试编写一个多数据源框架,也可以引入第三方库来解决此需求。