初探Vue3
本 篇 文 章 目 录 \textcolor{green}{本篇文章目录} 本篇文章目录
新 构 建 工 具 V i t e \textcolor{blue}{新构建工具Vite} 新构建工具Vite
C o m p o s i t i o n A P I 火 爆 来 袭 \textcolor{blue}{Composition API火爆来袭} CompositionAPI火爆来袭
C o m p o s i t i o n A P I 的 基 本 使 用 \textcolor{blue}{Composition API的基本使用} CompositionAPI的基本使用
计 算 属 性 的 使 用 \textcolor{blue}{计算属性的使用} 计算属性的使用
事 件 处 理 \textcolor{blue}{事件处理} 事件处理
侦 听 器 \textcolor{blue}{侦听器} 侦听器
引 用 对 象 : 单 个 原 始 值 响 应 化 \textcolor{blue}{引用对象:单个原始值响应化} 引用对象:单个原始值响应化
体 验 逻 辑 组 合 \textcolor{blue}{体验逻辑组合} 体验逻辑组合
vite
如今Vue3出现后,搭建Vue项目的方式有三种,除了可以通过 vue-cli 和 webpack 搭建脚手架外 官方还提供了一种新的脚手架搭建工具 vite,前面两种方式我们并不陌生,我们重点来看一下Vite
Vite 是 Vue 作者开发的一款意图取代 webpack 的工具,实现原理是利用 ES6 的 import 会发送请求去加载文件的特性,拦截这些请求,做一些预编译,省去 webpack 冗长的打包时间
使用vite快速创建一款Vue3项目
使用vite创建vue3的步骤
npm install -g create-vite-app
create-vite-app vue3-demo
cd vue3-demo
npm install
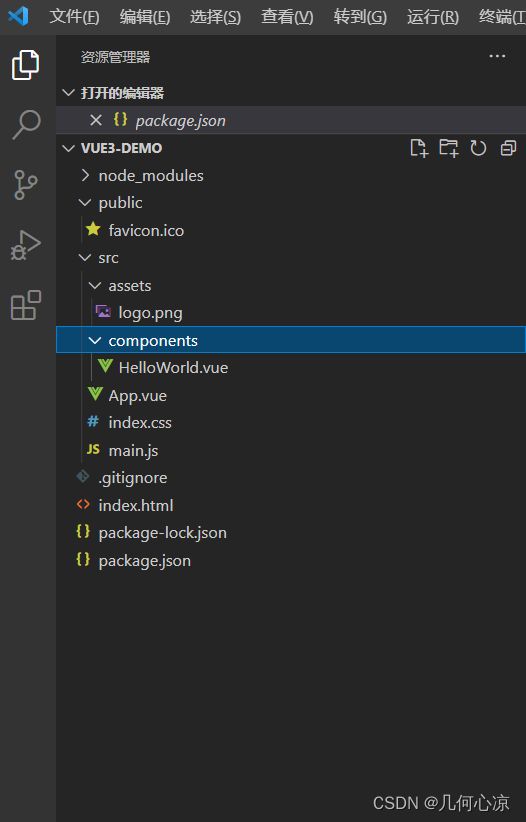
创建目录如下

还是老样子我们看一下项目中的package.json

确实我们的项目中的vue版本是3,并且我们的运行以及打包都是依赖Vite,现在我们npm run dev看一下

就一个字 贼快!!!!! 下面我们看一下main.js文件

我们就发现了陌生而又熟悉的地方:
Vue3是通过createApp创建vue实例的而不是new
Vue2中的所有内容都是挂载到new出来的vue构造函数(跟实例)上面的
现在vue3都是挂再到app上面
关于Vite的相关内容我们暂时就介绍这么多,更多的内容大家可以在网上找到更多的资料
Composition API火爆来袭
Composition API字面意思是组合API,它是为了实现基于函数的逻辑复用机制而产生的。是Vue的一大亮点,和Vue2的区别我们下面揭晓
下面两张图让您直白的看出差距

在vue2中使用的统称为选项api(optionApi) 比如我们需要定义数据需要我们在data选项去定义,如果我们定义方法我们就需要在methods的选项下
Vue2所运用的option api的缺点:例如我们抽离一个很简单的组件 组建功能就是一个累加的功能,而vue抽离出去后的代码是分散的 我们需要在data中去定义一个num 然后我们需要在methods中去创建一个add方法,功能代码比较分散,这仅仅是一个小功能组件,如果是更复杂的逻辑呢?

Vue3中运用的是compostion Api运用的是一个功能就是一块代码,阅读性可维护性会更高些
Composition API的基本使用
DOCTYPE html>
<html lang="en">

<head>
  <meta charset="UTF-8">
  <meta name="viewport" content="width=device-width, initial-scale=1.0">
  <meta http-equiv="X-UA-Compatible" content="ie=edge">
  <title>Documenttitle>
  <script src="../dist/vue.global.js">script>
head>

<body>
  <div id="app">
    <h1>Composition APIh1>
    <div>count: {{ state.count }}div>
  div>
  <script>
    const {
      createApp,
      reactive
    } = Vue;
    // 声明组件
    const App = {
      // setup是一个新的组件选项,它是组件内使用Composition API的入口
      // 调用时刻是初始化属性确定后,beforeCreate之前
      setup() {
        // 响应化:接收一个对象,返回一个响应式的代理对象
        const state = reactive({ count: 0 })
        // 返回对象将和渲染函数上下文合并
        return { state }
      }
    }
    createApp(App).mount('#app')
  script>
body>

html>
计算属性的使用
<div>doubleCount: {{doubleCount}}div>
const { computed } = Vue;
const App = {
  setup () {
    const state = reactive({
      count: 0,
      // computed()返回一个不可变的响应式引用对象
      // 它封装了getter的返回值
      doubleCount: computed(() => state.count * 2)
    })
  }
}
事件处理
<div @click="add">count: {{ state.count }}div>
const App = {
  setup () {
    // setup中声明一个add函数
    function add () {
      state.count++
    }
    // 传入渲染函数上下文
    return { state, add }
  }
}
侦听器
const { watch } = Vue;
const App = {
  setup () {
    // state.count变化cb会执行
    // 常用方式还有watch(()=>state.count, cb)
    watch(() => {
      console.log('count变了:' + state.count);
    })
  }
}
引用对象:单个原始值响应化
<div>counter: {{ counter }}div>
const { ref } = Vue;
const App = {
  setup () {
    // 返回响应式的Ref对象
    const counter = ref(1)
    setTimeout(() => {
      // 要修改对象的value
      counter.value++
    }, 1000);
    // 添加counter
    return { state, add, counter }
  }
}
体验逻辑组合
const { createApp, reactive, onMounted, onUnmounted, toRefs } = Vue;
// 鼠标位置侦听
function useMouse () {
  // 数据响应化

  const state = reactive({ x: 0, y: 0 })
  const update = e => {
    state.x = e.pageX
    state.y = e.pageY
  }
  onMounted(() => {
    window.addEventListener('mousemove', update)
  })
  onUnmounted(() => {
    window.removeEventListener('mousemove', update)
  })
  // 转换所有key为响应式数据
  return toRefs(state)
}
// 事件监测
function useTime () {
  const state = reactive({ time: new Date() })
  onMounted(() => {
    setInterval(() => {
      state.time = new Date()
    }, 1000)
  })
  return toRefs(state)
}
// 逻辑组合
const MyComp = {
  template: `
x: {{ x }} y: {{ y }}
time: {{time}}
`,
  setup () {
    // 使用鼠标逻辑
    const { x, y } = useMouse()
    // 使用时间逻辑
    const { time } = useTime()
    // 返回使用
    return { x, y, time }
  }
}
createApp().mount(MyComp, '#app')
想了解更多关注我,持续推送
✨ 原 创 不 易 , 还 希 望 各 位 大 佬 支 持 一 下 \textcolor{blue}{原创不易,还希望各位大佬支持一下} 原创不易,还希望各位大佬支持一下
点 赞 , 你 的 认 可 是 我 创 作 的 动 力 ! \textcolor{green}{点赞,你的认可是我创作的动力!} 点赞,你的认可是我创作的动力!
⭐️ 收 藏 , 你 的 青 睐 是 我 努 力 的 方 向 ! \textcolor{green}{收藏,你的青睐是我努力的方向!} 收藏,你的青睐是我努力的方向!
✏️ 评 论 , 你 的 意 见 是 我 进 步 的 财 富 ! \textcolor{green}{评论,你的意见是我进步的财富!} 评论,你的意见是我进步的财富!