Flutter视图原理之三棵树的建立过程
目录
-
- 三棵树的关系
- 树的构建过程
-
- 1.updateChild函数(element的复用)
- 2.inflateWidget函数
- 3.mount函数
-
- 3.1 componentElement的实现
- 3.2 RenderObjectElement的实现
-
- 3.2.1 attachRenderObject函数
- 4.performRebuild函数
- 总结三棵树创建流程
三棵树的关系
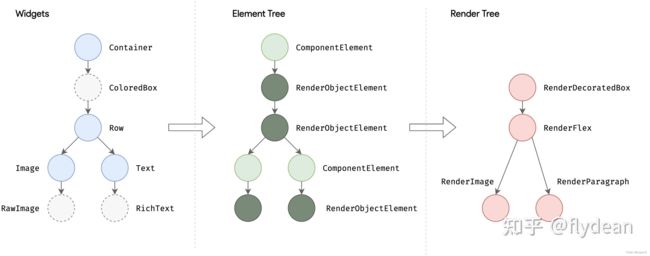
Flutter 中存在 Widget 、 Element 、RenderObject 三棵树,其中 Widget与 Element 是一对多的关系 ,Element 与 RenderObject 是一一对应的关系。
Element 中持有Widget 和 RenderObject , 而 Element 与 RenderObject 是一一对应的关系(除去 Element 不存在 RenderObject 的情况,如 ComponentElement是不具备 RenderObject),当 RenderObject 的 isRepaintBoundary 为 true 时,那么个区域形成一个 Layer,所以不是每个 RenderObject 都具有 Layer 的,因为这受 isRepaintBoundary 的影响。
Flutter 中 Widget 不可变,每次保持在一帧,如果发生改变是通过 State 实现跨帧状态保存,而真实完成布局和绘制数组的是 RenderObject , Element 充当两者的桥梁, State 就是保存在 Element 中。
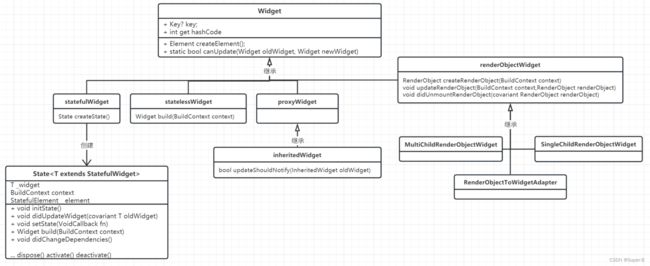
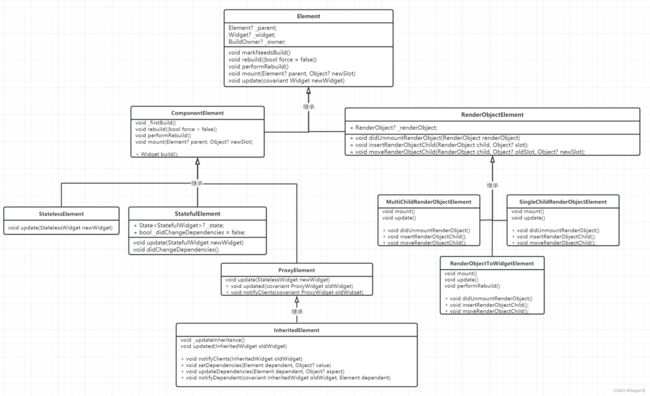
对应的element继承关系:
通过上图可以看出,每个widget对应一个element类型,但是只有renderObjectElement类持有renderObject,只有renderObjectWidget才能创建render对象。因此flutter视图的三棵树结构,widget和element是一一对应的,但是renderObjectElement才对应一个render节点。
树的构建过程
flutter视图的入口是:
runApp(const MyApp());
class MyApp extends StatelessWidget {
const MyApp({super.key});
Widget build(BuildContext context) {
return MaterialApp(
/....省略
);
}
}
跟踪进入runApp函数:
void runApp(Widget app) {
	//1
  final WidgetsBinding binding = WidgetsFlutterBinding.ensureInitialized();
  assert(binding.debugCheckZone('runApp'));
	//2
  binding
    ..scheduleAttachRootWidget(binding.wrapWithDefaultView(app))
    //3
    ..scheduleWarmUpFrame();
}
- 第一步首先确认engine绑定flutter framework,是个阻塞过程
scheduleAttachRootWidget将app组件添加到根视图树上- 向native平台层请求绘制一帧的信号
先看第二步:
  void attachRootWidget(Widget rootWidget) {
    final bool isBootstrapFrame = rootElement == null;
    _readyToProduceFrames = true;

    _rootElement = RenderObjectToWidgetAdapter<RenderBox>(
      container: renderView,
      debugShortDescription: '[root]',
      child: rootWidget,
    ).attachToRenderTree(buildOwner!, rootElement as RenderObjectToWidgetElement<RenderBox>?);

    if (isBootstrapFrame) {
      SchedulerBinding.instance.ensureVisualUpdate();
    }
  }
RenderObjectToWidgetAdapter有两个成员,child:孩子widget,container:提供render功能容器,将rootWidget作为的child元素,renderView作为container。重点是attachToRenderTree函数,
  RenderObjectToWidgetElement<T> attachToRenderTree(BuildOwner owner, [ RenderObjectToWidgetElement<T>? element ]) {
    if (element == null) {
       //。。。省略
      owner.buildScope(element!, () {
        element!.mount(null, null);
      });
    } else {
    	//。。。省略
    }
    return element!;
  }
第一次element为空,那么进入第一个判断,首先调用buildScope,内部会回调element!.mount方法,
void buildScope(Element context, [ VoidCallback? callback ]) {
    if (callback == null && _dirtyElements.isEmpty) {
      return;
    }
    try {
      _scheduledFlushDirtyElements = true;

	   callback();

      _dirtyElements.sort(Element._sort);
      _dirtyElementsNeedsResorting = false;
      int dirtyCount = _dirtyElements.length;
      int index = 0;
      while (index < dirtyCount) {
        final Element element = _dirtyElements[index];

    	element.rebuild();

        index += 1;
       	//。。。省略
      }
      return true;
      }());
    }
  }
首先回调callback,接着对脏元素集合调用rebuild方法。第一次肯定列表是空的,那么应该执行callback方法,也就进入了element.mount方法中,
void mount(Element? parent, Object? newSlot) {
assert(parent == null);
super.mount(parent, newSlot);
_rebuild();
assert(_child != null);
}
mount方法也是个关键函数,函数的注释:
将此元素添加到给定父级的给定插槽中的树中。
当新创建的元素添加到
树是第一次。使用此方法初始化状态
取决于有父母。独立于父级的状态可以
更容易在构造函数中初始化。
此方法将元素从“初始”生命周期状态转换为
“活动”生命周期状态。
重写此方法的子类可能也希望重写
[update], [visitChildren], [RenderObjectElement.insertRenderObjectChild],
[RenderObjectElement.moveRenderObjectChild],以及
[RenderObjectElement.removeRenderObjectChild]。
此方法的实现应从调用继承的
方法,如 ‘super.mount(parent, newSlot)’。
注:其中newSlot参数,是parent renderObject的插槽位置对象,parent的子renderObject组成一个顺序列表或者是单个节点,插槽的结构是列表中的索引位置和前一个插槽元素的对象,parent将插槽传递给child保存起来,child可以确认自己在parent的布局位置。
首先调用_rebuild()方法,
RenderObjectToWidgetElement类
void _rebuild() {
      _child = updateChild(_child, (widget as RenderObjectToWidgetAdapter<T>).child, _rootChildSlot);
}
Element类
Element? updateChild(Element? child, Widget? newWidget, Object? newSlot) {
	//。。。省略
    final Element newChild;
    if (child != null) {
      bool hasSameSuperclass = true;
      // When the type of a widget is changed between Stateful and Stateless via
      // hot reload, the element tree will end up in a partially invalid state.
      // That is, if the widget was a StatefulWidget and is now a StatelessWidget,
      // then the element tree currently contains a StatefulElement that is incorrectly
      // referencing a StatelessWidget (and likewise with StatelessElement).
      //
      // To avoid crashing due to type errors, we need to gently guide the invalid
      // element out of the tree. To do so, we ensure that the `hasSameSuperclass` condition
      // returns false which prevents us from trying to update the existing element
      // incorrectly.
      //
      // For the case where the widget becomes Stateful, we also need to avoid
      // accessing `StatelessElement.widget` as the cast on the getter will
      // cause a type error to be thrown. Here we avoid that by short-circuiting
      // the `Widget.canUpdate` check once `hasSameSuperclass` is false.

      	//1
   		bool hasSameSuperclass = true;

        final int oldElementClass = Element._debugConcreteSubtype(child);
        final int newWidgetClass = Widget._debugConcreteSubtype(newWidget);

        hasSameSuperclass = oldElementClass == newWidgetClass;

      if (hasSameSuperclass && child.widget == newWidget) {
        // We don't insert a timeline event here, because otherwise it's
        // confusing that widgets that "don't update" (because they didn't
        // change) get "charged" on the timeline.
        if (child.slot != newSlot) {
          updateSlotForChild(child, newSlot);
        }
        newChild = child;
      } else if (hasSameSuperclass && Widget.canUpdate(child.widget, newWidget)) {
        if (child.slot != newSlot) {
          updateSlotForChild(child, newSlot);
        }

        child.update(newWidget);

        newChild = child;
      } else {
        deactivateChild(child);
        // The [debugProfileBuildsEnabled] code for this branch is inside
        // [inflateWidget], since some [Element]s call [inflateWidget] directly
        // instead of going through [updateChild].
        newChild = inflateWidget(newWidget, newSlot);
      }
    } else {
      // The [debugProfileBuildsEnabled] code for this branch is inside
      // [inflateWidget], since some [Element]s call [inflateWidget] directly
      // instead of going through [updateChild].
      newChild = inflateWidget(newWidget, newSlot);
    }

    return newChild;
  }
1.updateChild函数(element的复用)
更新element对象分为下面几种情况:
- child不为空
element的创建,首先判断旧的child element元素是否和新的widget元素class类型匹配,对应匹配关系如下:
| element | widget | hasSameSuperclass |
|---|---|---|
| StatefulElement | StatefulWidget | Y |
| StatelessElement | StatelessWidget | Y |
- 如果匹配hasSameSuperclass,并且element.widget和新传递进来的newWidget对象相同,那么说明widget是复用的(我们知道widget是不可变的,每次都要新建widget,所以在使用const定义的widget的情况下,widget使用的常量对象,符合这个判断),对child做slot更新,newChild更新为child。
- 如果匹配hasSameSuperclass,并且widget.canUpdate判断成立,这个判断判断element对应的widget和newWidget对应的class类型和key是否相同(这种情况下,如果给widget定义了globalKey,并且参数使用const定义的话,那么判断是可以成立的),对child做slot更新,调用child.update(newWidget),newChild更新为child。
2.1 child.update方法,首先更新element的widget,然后根据子类的覆写实现,statelessElement的实现是直接调用element的rebuild方法,statefullElement实现是更新state的widget并且回调didUpdateWidget钩子函数,然后调用rebuild方法
  static bool canUpdate(Widget oldWidget, Widget newWidget) {
    return oldWidget.runtimeType == newWidget.runtimeType
        && oldWidget.key == newWidget.key;
  }
- 如果旧的element无法更新的话,需要解除绑定关系,将旧的element回收,用于后面的视图build复用;然后inflateWidget根据newWidget新建一个element。
void deactivateChild(Element child) {
assert(child._parent == this);
child._parent = null;
child.detachRenderObject();
owner!._inactiveElements.add(child); // this eventually calls child.deactivate()
}
- child为空
- inflateWidget根据newWidget新建一个element
2.inflateWidget函数
Element inflateWidget(Widget newWidget, Object? newSlot) {
	//。。。s省略
    try {
      final Key? key = newWidget.key;

      if (key is GlobalKey) {
        final Element? newChild = _retakeInactiveElement(key, newWidget);

        if (newChild != null) {
  		  newChild._parent == null

          newChild._activateWithParent(this, newSlot);

          final Element? updatedChild = updateChild(newChild, newWidget, newSlot);

          return updatedChild!;
        }
      }

      final Element newChild = newWidget.createElement();

      newChild.mount(this, newSlot);

      return newChild;
    }
  }
- 首先判断newWidget是否拥有globalKey,如果有的话尝试从复用池中获取拥有相同key的element元素,然后对该元素进行updateChild操作,这样又回到上面的起点了,这样看起来element更新是深度递归的。
- 如果没有key,那么直接创建一个新的element,然后element进行mount挂载操作,也就是将element加入到这个element树中。
3.mount函数
重点看看mount函数:
  void mount(Element? parent, Object? newSlot) {
    assert(_lifecycleState == _ElementLifecycle.initial);
    assert(_parent == null);
    assert(parent == null || parent._lifecycleState == _ElementLifecycle.active);
    assert(slot == null);
    _parent = parent;
    _slot = newSlot;
    _lifecycleState = _ElementLifecycle.active;
    _depth = _parent != null ? _parent!.depth + 1 : 1;
    if (parent != null) {
      // Only assign ownership if the parent is non-null. If parent is null
      // (the root node), the owner should have already been assigned.
      // See RootRenderObjectElement.assignOwner().
      _owner = parent.owner;
    }
    assert(owner != null);
    final Key? key = widget.key;
    if (key is GlobalKey) {
      owner!._registerGlobalKey(key, this);
    }
    _updateInheritance();
    attachNotificationTree();
  }
- 首先对该widget进行参数判断,因为是新的widget,所以依赖关系都是空的,这里需要进行parent关联操作,生命周期设置,树的深度设置,owner是和parent使用的同一个,注册全局key。
- _updateInheritance,保存来自parent的_inheritedElements对象,这个对象集合里面包含着这棵树所有的inheritedElement(如果自己也是inheritedElement,也要将自己加入集合),这个类型的element具有从上下文继承数据的功能,可以根据类型读取数据,对应类型数据改变,可以通知所有依赖这个数据的inheritedElement去更新视图。
- attachNotificationTree,保存parent的_notificationTree集合,如果自己是NotifiableElementMixin类型,会将自己加入到parent._notificationTree集合中,这个集合是接受通知集合,一般的widget也不需要这个功能(不去深究)。
注: 从上面代码分析可知,mount是element从initial -> active的时间点。
mount是element基本接口,子类会对其进行复写,并且super调用
3.1 componentElement的实现
componentElement类,是负责组合子element的作用的,相当于Android View视图中的viewGroup,但是它也没有绘制功能,仅仅是负责排列组合子element。
component Element的复写:
  void mount(Element? parent, Object? newSlot) {
    super.mount(parent, newSlot);
 	firstBuild();
  }

  void _firstBuild() {
    rebuild(); // This eventually calls performRebuild.
  }

  void rebuild({bool force = false}) {、
  	//。。。省略
    if (_lifecycleState != _ElementLifecycle.active || (!_dirty && !force)) {
      return;
    }
    //。。。省略
    try {
      performRebuild();
    }
  }
会进行一次rebuild操作,内部直接调用的performRebuild()。
3.2 RenderObjectElement的实现
RenderObjectElement类,是起绘制作用的element,相当于Android View视图中的view,视图的正真的绘制操作都在里面实现。
RenderObjectElement复写:
  void mount(Element? parent, Object? newSlot) {
    super.mount(parent, newSlot);

    _renderObject = (widget as RenderObjectWidget).createRenderObject(this);

    attachRenderObject(newSlot);

    super.performRebuild(); // clears the "dirty" flag
  }
- 由RenderObjectWidget创建RenderObject,这个RenderObject是正真实现绘制功能的类。
- attachRenderObject函数,主要是将parent.newSlot传递给自己,然后和parent建立关联,这个关联主要是renderTree的关联。
3.2.1 attachRenderObject函数
  void attachRenderObject(Object? newSlot) {
    assert(_ancestorRenderObjectElement == null);
    _slot = newSlot;
    _ancestorRenderObjectElement = _findAncestorRenderObjectElement();
    _ancestorRenderObjectElement?.insertRenderObjectChild(renderObject, newSlot);
    final ParentDataElement<ParentData>? parentDataElement = _findAncestorParentDataElement();
    if (parentDataElement != null) {
      _updateParentData(parentDataElement.widget as ParentDataWidget<ParentData>);
    }
  }
- _ancestorRenderObjectElement,
  RenderObjectElement? _findAncestorRenderObjectElement() {
    Element? ancestor = _parent;
    while (ancestor != null && ancestor is! RenderObjectElement) {
      ancestor = ancestor._parent;
    }
    return ancestor as RenderObjectElement?;
  }
向上递归获取第一个RenderObjectElement类型的祖先,然后将当前子renderObject插入到这个祖先RenderObjectElement的孩子中或者孩子队列中。
可以看出也不是所有的element都是RenderObjectElement类型的,componentElement以及它的子类就不是,那么就会被跳过继续向上递归。
进而也就有了文章开头的那三棵树的关系,widget和element是一对一关系的,build过程中,element创建一定需要widget去配置或者更新,renderObject的创建只有RenderObjectWidget才有这个接口功能,因此像componentElement类型的就没有renderObject。
SingleChildRenderObjectElement类的实现,这个类只包含一个单独的renderObject,直接赋值子child,:
  void insertRenderObjectChild(RenderObject child, Object? slot) {
    final RenderObjectWithChildMixin<RenderObject> renderObject = this.renderObject as RenderObjectWithChildMixin<RenderObject>;
    assert(slot == null);
    assert(renderObject.debugValidateChild(child));
    renderObject.child = child;
    assert(renderObject == this.renderObject);
  }
MultiChildRenderObjectElement类的实现,这个类包含多个renderObject,按照自己定义的排列规则排列子renderObject,将child插入到子child队列中对应的位置,上面说了slot已经将child的位置定下来了,可以根据slot的位置,将child插入到指定位置。
  void insertRenderObjectChild(RenderObject child, IndexedSlot<Element?> slot) {
    final ContainerRenderObjectMixin<RenderObject, ContainerParentDataMixin<RenderObject>> renderObject = this.renderObject;
    assert(renderObject.debugValidateChild(child));
    renderObject.insert(child, after: slot.value?.renderObject);
    assert(renderObject == this.renderObject);
  }

  void insert(ChildType child, { ChildType? after }) {
    adoptChild(child);
    _insertIntoChildList(child, after: after);
  }

  void adoptChild(RenderObject child) {
    setupParentData(child);
    markNeedsLayout();
    markNeedsCompositingBitsUpdate();
    markNeedsSemanticsUpdate();
    child._parent = this;
    if (attached) {
      child.attach(_owner!);
    }
    redepthChild(child);
  }
adoptChild函数所作的事情是,绑定parentData数据,child根据parent的布局数据layout的时候有用,接下来就是标记parent需要重新layout,child和parent进行关联。
void _insertIntoChildList(ChildType child, { ChildType? after }) {
    final ParentDataType childParentData = child.parentData! as ParentDataType;

    _childCount += 1;
    assert(_childCount > 0);
    if (after == null) {
      // insert at the start (_firstChild)
      childParentData.nextSibling = _firstChild;
      if (_firstChild != null) {
        final ParentDataType firstChildParentData = _firstChild!.parentData! as ParentDataType;
        firstChildParentData.previousSibling = child;
      }
      _firstChild = child;
      _lastChild ??= child;
    } else {
      final ParentDataType afterParentData = after.parentData! as ParentDataType;
      if (afterParentData.nextSibling == null) {
        // insert at the end (_lastChild); we'll end up with two or more children
        assert(after == _lastChild);
        childParentData.previousSibling = after;
        afterParentData.nextSibling = child;
        _lastChild = child;
      } else {
        // insert in the middle; we'll end up with three or more children
        // set up links from child to siblings
        childParentData.nextSibling = afterParentData.nextSibling;
        childParentData.previousSibling = after;
        // set up links from siblings to child
        final ParentDataType childPreviousSiblingParentData = childParentData.previousSibling!.parentData! as ParentDataType;
        final ParentDataType childNextSiblingParentData = childParentData.nextSibling!.parentData! as ParentDataType;
        childPreviousSiblingParentData.nextSibling = child;
        childNextSiblingParentData.previousSibling = child;
        assert(afterParentData.nextSibling == child);
      }
    }
  }
插入操作,以下几种情况:
- 前驱为空,那么当前插入的child是队列的第一个元素,直接插入;
- 前驱不为空,如果前驱的next指针为空,那么前驱是尾部元素,child插入到尾部;
- 前驱不为空,并且前驱在队列中间,那么将child插入到前驱的后面。
- parentDataElement
  ParentDataElement<ParentData>? _findAncestorParentDataElement() {
    Element? ancestor = _parent;
    ParentDataElement<ParentData>? result;
    while (ancestor != null && ancestor is! RenderObjectElement) {
      if (ancestor is ParentDataElement<ParentData>) {
        result = ancestor;
        break;
      }
      ancestor = ancestor._parent;
    }
  }
向上递归获取第一个parentDataElement类型的祖先,然后将当前子renderObject传递给祖先,祖先会验证自己的data和子child的data的数据是否一致,不一致会标记脏,下一帧会重新layout,否则不管。
  void _updateParentData(ParentDataWidget<ParentData> parentDataWidget) {
    if (applyParentData) {
      parentDataWidget.applyParentData(renderObject);
    }
  }

   void applyParentData(RenderObject renderObject) {
   		//。。。s省略
   		if (needsLayout) {
  			markNeedsLayout();
  		}
  }
其中实现了ParentDataWidget的子类有:
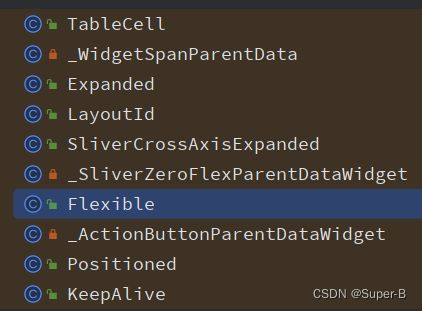
这些布局也说明了一个问题,子child的布局属性变化,会导致parent布局重新layout,这样好像会影响性能。
4.performRebuild函数
performRebuild也是element的基本接口,
  void performRebuild() {
    _dirty = false;
  }
不同的子类也会有不同的实现,component Element的复写:
  void performRebuild() {
    Widget? built;
    try {
      built = build();
    }
    try {
      _child = updateChild(_child, built, slot);
    }
  }

  Widget build();
-
调用build方法,构建出本element所需要的widget组件;widget的build函数由子类实现提供,componentElement的子类主要有StatelessElement,StatefulElement,ProxyElement三个,
1.1 StatelessElement使用child的widget来构建,Widget build() => (widget as StatelessWidget).build(this);
1.2 ProxyElement直接使用childWidget build() => (widget as ProxyWidget).child;
1.3 StatefulElement使用state来创建Widget build() => state.build(this); -
调用updateChild,用新构建出的widget去更新旧的child element元素,这个
updateChild方法上面已经讲过,可以知道,如果element的子element还有child的话,一直递归调用updateChild函数,可以推测出,element树的构建也是深度递归进行的。
总结三棵树创建流程
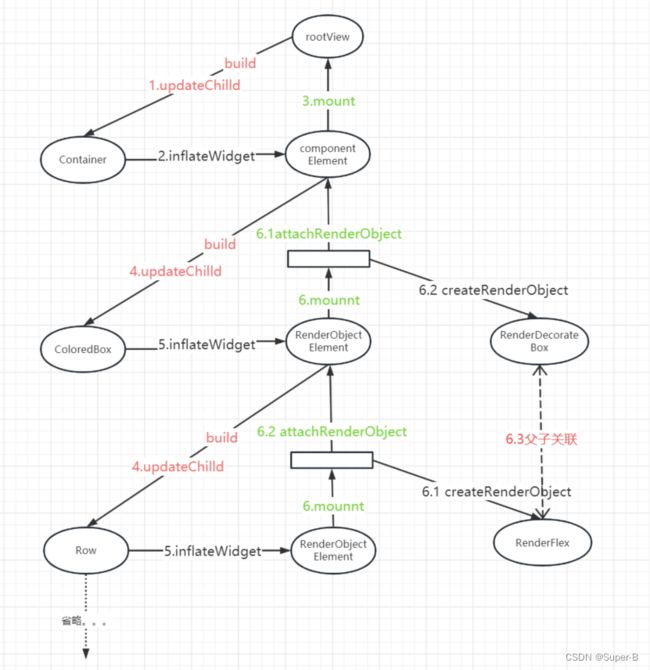
上面梳理了整个树创建的过程,调用链:updateChild -> inflateWidget -> mount -> performRebuild -> (child -> updateChild递归调用)
假如有以下widget树:
return Container(
      decoration: BoxDecoration(
        borderRadius: BorderRadius.all(Radius.circular(8.0.r)),
        border: Border.all(color: CtrColor.lineRegular, width: 1),
      ),
      child: const Row(
        children: [
          Image(image: AssetImage("static/images/ic_net_error.png")),
          Text("data")
        ],
      )
    );
