设计模式之装饰器模式
文章目录
- 一、介绍
- 二、主要角色
- 三、通用写法示例
-
- 1. 核心组件抽象接口(`Component`)
- 2. 核心组件具体实现(`ComponentImpl`)
- 3. 抽象装饰器(`AbsDecoration`)
- 4. 具体装饰器(`Decoration`)
- 5. 演示demo
- 四、装饰器模式在jdk的应用
-
- 1. 被装饰对象的初始化
- 2. 装饰器对目标方法进行增强
- 五、优缺点
一、介绍
装饰器模式(Decoration Pattern),属于结构型设计模式,用于在不改变现有对象的基础上,对该对象的方法动态地添加新的功能,实现对该对象原有方法的增强。
装饰器模式的设计思想是将对象的核心功能和附加功能独立开来。核心功能由现有对象提供,附加功能由装饰器提供。
装饰器的实现思路是存在一个抽象的装饰器类,该装饰器类用于对现有的对象进行包装,然后通过该装饰器的具体子类对包装的类的方法进行增强。推而论之,在存在多个装饰器具体子类的情况下,可以动态地对现有对象随心所欲进行嵌套包装,对现有对象进行包装后,可以在已包装基础上进行多层嵌套包装。
多个装饰器可以对被装饰对象进行嵌套地装饰,通过多个装饰器不同的排列组合,可以实现多种不同的效果。
-
使用装饰器模式可以解决什么问题?
可以避免多个被装饰对象与多个装饰器而导致最终类数量上的膨胀。
假设项目中有3个被装饰的对象,还有3种装饰器,通过不同的排列组合,我们将不得不创建相当数量的不同的最终类。
在一个被装饰对象只允许被一个装饰器装饰的情况下,将产生9个不同的最终类。
在一个被装饰对象需要被多个装饰器嵌套装饰的情况下,将产生21个不同的最终类,这种结果将是相当可怕的。
二、主要角色
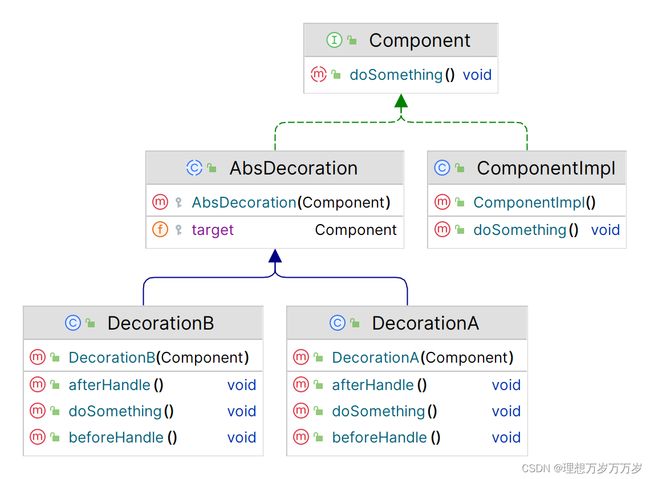
在装饰器模式中,主要包含以下四个角色:
-
核心组件抽象接口(
Component)规定了被装饰对象的行为。
-
核心组件具体实现(
ComponentImpl)实现核心组件抽象接口,对接口规定的行为进行具体实现。
-
抽象装饰器(
AbsDecoration)通用的装饰
ComponentImpl的装饰器,该装饰器必须包含一个以被装饰对象为参数的构造方法。该装饰器设定为抽象类的原因是通过其构造函数管理被装饰的对象,以此来限制具体装饰器的构造方法必须传入被装饰的对象。
-
具体装饰器(
Decoration)继承抽象装饰器。用于增强对被装饰对象某一功能的特定装饰逻辑。
装饰器模式的通用类图如下所示
三、通用写法示例
我们以上面通用类图为例,以demo的形式对该类图进行演示。
1. 核心组件抽象接口(Component)
新建一个接口类Component,并在该接口中定义方法doSomething()。
public interface Component {

    void doSomething();
}
2. 核心组件具体实现(ComponentImpl)
新建Component接口的具体实现类ComponentImpl,并对接口中定义的方法进行实现。
public class ComponentImpl implements Component{

    @Override
    public void doSomething() {
        // 处理逻辑
        System.out.println("处理逻辑");
    }
}
3. 抽象装饰器(AbsDecoration)
新建抽象装饰器类AbsDecoration,并实现Component接口。声明被装饰对象,通过构造方法对被装饰对象进行初始化。由于装饰器对象和被装饰的对象都实现于核心抽象接口,根据面向接口编程原则,它们具有相同的行为。同理,装饰器不仅可以将已有对象进行包装,也可以对装饰器对象嵌套包装。
public abstract class AbsDecoration implements Component {

    protected final Component target;

    protected AbsDecoration(Component target) {
        this.target = target;
    }
}
4. 具体装饰器(Decoration)
新建具体装饰器DecorationA,并继承抽象装饰器类AbsDecoration。声明构造函数。实现核心组件抽象接口(Component)中定义的方法doSomething()。在doSomething()方法中真正调用被装饰对象的doSomething()方法,此时可以对被装饰对象的逻辑进行装饰。
public class DecorationA extends AbsDecoration{

    public DecorationA(Component target) {
        super(target);
    }

    @Override
    public void doSomething() {
        // 在核心逻辑执行前进行装饰
        beforeHandle();
        // 核心逻辑
        target.doSomething();
        // 在核心逻辑执行后进行装饰
        afterHandle();

    }

    public void beforeHandle() {
        System.out.println("装饰器DecorationA 对目标对象进行前置装饰");
    }

    public void afterHandle() {
        System.out.println("装饰器DecorationA 对目标对象进行后置装饰");
    }
}
同理,我们再新建一个具体装饰器类DecorationB。
public class DecorationB extends AbsDecoration{

    public DecorationB(Component target) {
        super(target);
    }

    @Override
    public void doSomething() {
        // 在核心逻辑执行前进行装饰
        beforeHandle();
        // 核心逻辑
        target.doSomething();
        // 在核心逻辑执行后进行装饰
        afterHandle();

    }

    public void beforeHandle() {
        System.out.println("装饰器DecorationB 对目标对象进行前置装饰");
    }

    public void afterHandle() {
        System.out.println("装饰器DecorationB 对目标对象进行后置装饰");
    }
}
5. 演示demo
新建一个演示类DecorationTest,在main()方法中对装饰器模式进行演示。
public class DecorationTest {

    public static void main(String[] args) {
        // 装饰前
        Component component = new ComponentImpl();
        component.doSomething();
        System.out.println();

        // 使用装饰器A对已有对象进行方法增强
        System.out.println("使用装饰器A对已有对象进行方法增强...");
        Component decorationA = new DecorationA(component);
        decorationA.doSomething();
        System.out.println();

        // 使用装饰器B对已有对象进行方法增强
        System.out.println("使用装饰器B对已有对象进行方法增强...");
        Component decorationB = new DecorationB(component);
        decorationB.doSomething();
        System.out.println();

        // 使用装饰器B对已装饰器A进行嵌套地方法增强
        System.out.println("使用装饰器B对已装饰器A进行嵌套地方法增强...");
        Component decorationAB = new DecorationB(decorationA);
        decorationAB.doSomething();
    }
}
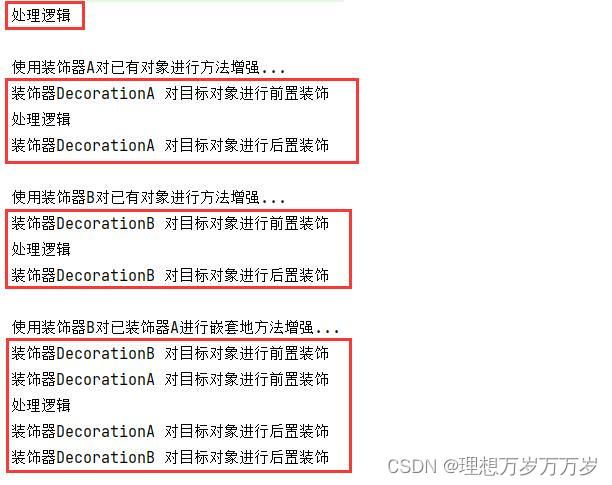
运行后得到以下结果
四、装饰器模式在jdk的应用
装饰器模式在jdk中应用广泛,io的filter模式就是对装饰器模式的一种实现。
在io编程中,我们常常使用FileInputStream读取一个文件,然后通过调用其read()方法读取文件内容。但往往遇到较大的文件时这种方式读取较慢,因此我们尝尝将FileInputStream对象作为参数,构造一个BufferedInputStream对象,通过调用BufferedInputStream对象的read()方法读取文件时就变得快了许多。
使用方式如下:
FileInputStream fis = new FileInputStream("/data/text.txt");
InputStream is = new BufferedInputStream(fis);
is.read();
或
InputStream is = new BufferedInputStream(new FileInputStream("/data/text.txt"));
is.read();
因此我们可以看出,BufferedInputStream作为装饰器类,对被装饰对象FileInputStream进行包装。
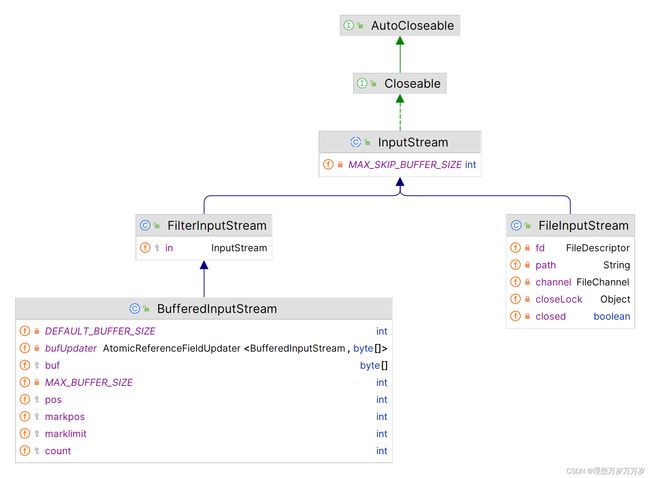
下面我们看一下其类图
从上图中我们看到,抽象类InputStream作为接口Closeable的补充,充当装饰器的核心组件抽象接口Component;FilterInputStream类中包含一个被装饰的InputStream对象,因此充当抽象装饰器类AbsDecoration;FileInputStream类作为InputStream子类,充当核心组件具体实现类;而FilterInputStream类则充当具体装饰器类。
下面我们通过源码分析,了解一下jdk是如何应用装饰器模式的。
1. 被装饰对象的初始化
BufferedInputStream的构造方法如下所示,无论哪个构造方法,都是需要接受一个InputStream数据源对象作为参数,最终通过super(in)将数据源提交给其父类FilterInputStream(即抽象装饰器类)
public BufferedInputStream(InputStream in) {
    this(in, DEFAULT_BUFFER_SIZE);
}

public BufferedInputStream(InputStream in, int size) {
    super(in);
    if (size <= 0) {
        throw new IllegalArgumentException("Buffer size <= 0");
    }
    buf = new byte[size];
}
在抽象装饰器类FilterInputStream的构造方法中,则直接对其被装饰对象in进行初始化
public class FilterInputStream extends InputStream {
    // 被装饰对象
    protected volatile InputStream in;

    protected FilterInputStream(InputStream in) {
        this.in = in;
    }
}
2. 装饰器对目标方法进行增强
当我们构造一个BufferedInputStream类的对象后,通过调用其read()方法读取文件,在该方法中,核心逻辑仍然是调用被装饰对象InputStream的read()方法,其余逻辑均为对被装饰对象的逻辑增强。
我们以read(byte b[], int off, int len)方法为例,在该方法中,我们只需要将注意力放在int nread = read1(b, off + n, len - n)这一行代码中,其余均为对被装饰对象的read()方法增强的逻辑。
public synchronized int read(byte b[], int off, int len) throws IOException
{
    getBufIfOpen(); // Check for closed stream
    if ((off | len | (off + len) | (b.length - (off + len))) < 0) {
        throw new IndexOutOfBoundsException();
    } else if (len == 0) {
        return 0;
    }

    int n = 0;
    for (;;) {
        int nread = read1(b, off + n, len - n);
        if (nread <= 0)
            return (n == 0) ? nread : n;
        n += nread;
        if (n >= len)
            return n;
        // if not closed but no bytes available, return
        InputStream input = in;
        if (input != null && input.available() <= 0)
            return n;
    }
}
点击进入read1()方法中,同样需要将注意力放在return getInIfOpen().read(b, off, len)这一行代码,其余也可以理解为增强逻辑的一部分。
private int read1(byte[] b, int off, int len) throws IOException {
    int avail = count - pos;
    if (avail <= 0) {
        /* If the requested length is at least as large as the buffer, and
               if there is no mark/reset activity, do not bother to copy the
               bytes into the local buffer.  In this way buffered streams will
               cascade harmlessly. */
        if (len >= getBufIfOpen().length && markpos < 0) {
            return getInIfOpen().read(b, off, len);
        }
        fill();
        avail = count - pos;
        if (avail <= 0) return -1;
    }
    int cnt = (avail < len) ? avail : len;
    System.arraycopy(getBufIfOpen(), pos, b, off, cnt);
    pos += cnt;
    return cnt;
}
在getInIfOpen().read(b, off, len)中,首先通过getInIfOpen()方法获取装饰器中的被装饰对象in,然后调用该对象的read()方法。
下面是getInIfOpen()方法源码,我们在构造装饰器对象BufferedInputStream时,传入的被装饰对象(数据源)就是该方法中的in,其引用是InputStream,但实际类型则为FileInputStream,判断该对象如果不为空的话,则将其返回。
private InputStream getInIfOpen() throws IOException {
    InputStream input = in;
    if (input == null)
        throw new IOException("Stream closed");
    return input;
}
获得数据源后,调用数据源的read()方法,此时才是真正调用被装饰对象的read()方法。
public int read() throws IOException {
    return read0();
}

private native int read0() throws IOException;
五、优缺点
优点:
- 由于装饰器对象和被装饰的对象都实现于核心抽象接口,根据面向接口编程原则,它们具有相同的行为。
- 装饰器不仅可以将已有对象进行包装,也可以对装饰器对象嵌套包装。
- 通过使用不同装饰类以及这些装饰类的排列组合,可以实现不同效果。
- 避免多个被装饰对象与装饰器而导致最终类数量上的膨胀。
缺点:
- 每当为被装饰对象添加新的功能,都需要为其新建一个装饰类。
纸上得来终觉浅,绝知此事要躬行。
————————我是万万岁,我们下期再见————————


