快速Vue入门
Vue
1.vsCode中Vue的结构目录
| 目录/文件 | 说明 |
|---|---|
| build | 项目构建(webpack)相关代码 |
| config | 配置目录,包括端口号等 |
| node_modules | npm 加载的项目依赖模块 |
| src | 这里是我们要开发的目录,基本上要做的事情都在这个目录里。里面包含了几个目录及文件: assets: 放置一些图片,如logo等。 components: 目录里面放了一个组件文件,可以不用。 App.vue: 项目入口文件,我们也可以直接将组件写这里,而不使用 components 目录。 main.js: 项目的核心文件。 |
| static | 静态资源目录,如图片、字体等。 |
| test | 初始测试目录,可删除 |
| .xxxx文件 | 这些是一些配置文件,包括语法配置,git配置等。 |
| index.html | 首页入口文件,你可以添加一些 meta 信息或统计代码啥的。 |
| package.json | 项目配置文件。 |
| README.md | 项目的说明文档,markdown 格式 |
- App.vue代码
<template>
  <div id="app">
    <img src="./assets/logo.png">
    <router-view/>
  </div>
</template>

//导入组件
<script>
import Hello from './components/HelloWorld.vue'
export default {
  name: 'App',
  components:{
    Hello
  }
}
</script>
<!--样式代码-->
<style>
#app {
  font-family: 'Avenir', Helvetica, Arial, sans-serif;
  -webkit-font-smoothing: antialiased;
  -moz-osx-font-smoothing: grayscale;
  text-align: center;
  color: #2c3e50;
  margin-top: 60px;
}
</style>
- 修改components下的HellowWordl.vue代码
<template>
  <div class="hello">
    <h1>{{ msg }}</h1>
  </div>
</template>

<script>
export default {
  name:'hello',
  data() {
    return{
       msg:'欢迎来到菜鸟教程!'
    }
  }
}
</script>
2.Vue简单实例
编写一个html文件,出现 结合javascript语法: 3.1.1 v-text 前端初始界面: 和 使用 程序运行: 父元素和子元素之间的关系 然而 3.6.3 capture修饰符 当点击 单击按钮只输出一次child…,并没有计数 3.7.1 enter修饰符 3.8.1 条件渲染(1) 当flag等于false时,并没有显示hello 3.9.1 遍历列表 3.9.4 取值范围 3.10.1 文本框 复选框 一输入并不是实时加载要等一会 4.1.2 局部注册 已知 提示错误信息: 不报错误信息: 提示错误信息: 引用子组件:非定义的props属性,自动合并到子组件上,class和style也会自动合并 4.7.1 自定义事件 具名插槽:拥有名字的插槽,可以指定插槽的位置。 可以随意切换组件,关键是 父组件对子组件的的引用,通过 Vue 在插入、更新或者移除 DOM 时,提供多种不同方式的应用过渡效果。 代码解释: 下载 引入该模板不需要给 通过 先看style属性,其中设置进入和离开过过渡时间都为5s,通过设置 列表过渡中需要使用到 要实现如下功能,输入 可以看出代码过于繁琐,需要用事件来解决 可以发现这里取消了事件的触发,运用 第一个参数代表监听的属性,第二个参数代表回调函数,同时也可以实现多属性的监听 主要的作用和前面两个相反 在set方法中必须添加形参,不然get方法获取还是原来的旧值 Vue创建之后需要经过一系列的初始化过程,例如:设置数据监听,编译模板,挂载实例DOM,在数据变化时更新DOM等。常用的生命周期钩子函数: 除了Vue自带的一些指令,比如:v-model,v-show等,我们还可以自定义设置一些指令,包含全局指令和局部指令。 这里通过设置获取焦点的方式来讲解全局指令,下面是不获取焦点的结果 其中: 局部指令只能在实例中使用,使用 钩子函数中的参数: 其中binding: 一个对象,包含以下属性: 10.4.1 设置每个图片的样式 10.4.2 懒加载程序 如果不使用延时程序就会直接加载图片,这里在加载图片之前先加载了背景颜色 自定义过滤器可以再两种形式下使用,用 通过 Vue.js 可以实现多视图的单页Web应用(single page web application,SPA)。 缺点: 首先需要导入 通过路由可以传递参数,通过以下两种方式: 其中 重点是 用到一个钩子函数 12.3.1 push() 展示第四种方法: 跟 最主要的是components而非children 重定向三种方式 取别名用到 在组件中使用 13.1.1 在全局组件中使用 每当 13.1.2 在子组件中使用 注意必须使用 13.1.3 mapState 有时候我们需要从 13.2.1 mapGetters 更改 Vuex 的 实现传参的定义: 调用函数时使用 上述提交过于复杂,Vuex提供了一种便捷的方式,即 Action 类似于 mutation,不同在于: &enspAction 函数接受一个与 store 实例具有相同方法和属性的 context 对象: 其中 方法的提交使用 Vuex 允许我们将 !可以自动编写DOCTYPE,vue.min.js从官网下载,div#app
DOCTYPE html>
<html lang="en">
<head>
<meta charset="UTF-8">
<meta http-equiv="X-UA-Compatible" content="IE=edge">
<meta name="viewport" content="width=device-width, initial-scale=1.0">
<title>Documenttitle>
<script src="./lib/vue.min.js">script>
head>
<body>
<div id="app">
{{text}}
div>
<script>
//编写Vue组件
new Vue({
el:'#app', //elemrent的简写,挂载元素
data:{ //组件内部数据
text:'Hello Vue!'
}
});
script>
body>
html>
DOCTYPE html>
<html lang="en">
<head>
<meta charset="UTF-8">
<meta http-equiv="X-UA-Compatible" content="IE=edge">
<meta name="viewport" content="width=device-width, initial-scale=1.0">
<title>Documenttitle>
<script src="./lib/vue.min.js">script>
head>
<body>
<div id="app">
<div>{{text}}div>
<div>{{num+1}}div>
<div>{{flag?'喜欢':'不喜欢'}}div>
<div>{{text.split('').reverse().join('')}}div>
div>
<script>
//编写Vue组件
new Vue({
el:'#app', //elemrent的简写,挂载元素
data:{ //组件内部数据
text:'Hello Vue!',
num:12,
flag:false
}
});
script>
body>

3.文本指令和属性绑定
3.1 文本指令
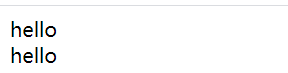
v-text和{{}}显示的结果是一样的:<div id="app">
<div v-text="text">div>
<div>{{text}}div>
div>
<script>
var app=new Vue({
el:'#app',
data:{
text:'hello'
}
});
script>
3.1.2 v-once
在前端界面不允许进行更改数据<div id="app">
<div v-text="text">div>
<div>{{text}}div>
<hr>
<div v-once>{{msg}}div>
div>
<script>
var app=new Vue({
el:'#app',
data:{
text:'hello',
msg:'Vue is very good'
}
});
script>

在界面修改值之后:

3.1.3 v-html
能够编译html语言<div id="app">
<div v-text="text">div>
<div>{{text}}div>
<hr>
<div v-once>{{msg}}div>
<hr>
{{tpl}}
<div v-html="tpl">div>
div>
<script>
//文本渲染
//v-text:显示文本,响应式(默认),简写{{}}
//v-once:只绑定一次,下次数据变化DOM不更新
//v-html:可以显示html标签
var app=new Vue({
el:'#app',
data:{
text:'hello',
msg:'Vue is very good',
tpl:'hello world
'
}
});
script>

3.2 属性绑定(v-bind 或者 : )
title进行绑定,当鼠标移到hello world上时会显示msg<div id="app">
<div v-bind:title="msg">hello worlddiv>
<div :title="msg">hello worlddiv>
<hr>
<a :href='website'><img :src='img'>vuea>
div>
<script>
//属性绑定
//1.v-bind
//2.:
var app=new Vue({
el:'#app',
data:{
msg:'Vue is very good',
img:'https://cn.vuejs.org/images/logo.png',
website:'https://cn.vuejs.org/'
}
});
script>
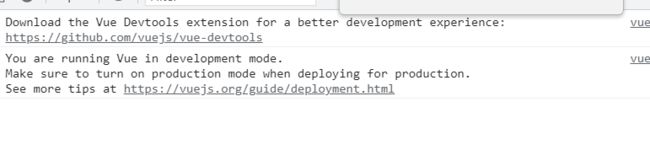
vue
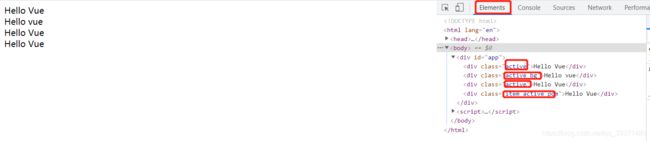
3.2 class绑定
<div id="app">
<div v-bind:class="{'active':true,'bg':false}">Hello Vuediv>
<div :class="{'active':true,'bg':true}">Hello vuediv>
<div :class="classObj">Hello Vuediv>
<div :class="classList">Hello Vuediv>
div>
<script>
//class绑定
//classObject和classList之间的区别
//obj的形式可以控制类的添加和删除
//list的形式只是添加样式不是删除
var app=new Vue({
el:'#app',
data:{
classObj:{'active':true,'bg':false},
classList:['item','active','pom']
}
});
script>
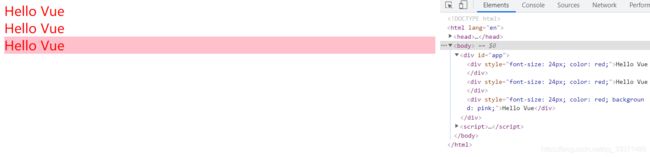
3.3 style绑定
<div id="app">
<div :style="{'font-size':'24px','color':'red'}">Hello Vuediv>
<div :style="styleObj">Hello Vuediv>
<div :style="[styleObj,styleObj2]">Hello Vuediv>
div>
<script>
//style绑定:绑定形式跟class一致
var app=new Vue({
el:'#app',
data:{
styleObj:{'font-size':'24px','color':'red'},
styleObj2:{'background':'pink'}
}
});
script>
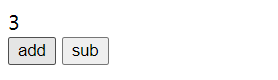
3.4 事件绑定
v-on:click进行事件绑定,可以简化成@click<div id="app">
<div>{{count}}div>
<button @click="add()">addbutton>
<button v-on:click="sub()">subbutton>
div>
<script>
//事件绑定
//v-on 使用方式:v-on:click
//v-on 简化成 @click
//methods定义组件方法
var app=new Vue({
el:'#app',
data:{
count:0
},
methods:{
add:function(){
this.count++;
},
sub:function(){
this.count--;
}
}
});
script>
3.5 vue实例表单校验
v-model的作用:不仅可以给input赋值还可以获取input中的数据,而且数据的获取是实时的。
@input 一般用于监听事件:只要输入的值变化了就会触发inputDOCTYPE html>
<html lang="en">
<head>
<meta charset="UTF-8">
<meta http-equiv="X-UA-Compatible" content="IE=edge">
<meta name="viewport" content="width=device-width, initial-scale=1.0">
<title>Documenttitle>
<script src="./lib/vue.min.js">script>
<style>
.success{
color:green
}
.error{
color:red
}
style>
head>
<body>
<div id="form">
<div>
<input type="text" v-model="username" @input="valid()">
<span :class="ValidClass">{{validText}}span>
div>
div>
<script>
//校验输入长度必须大于6
var app=new Vue({
el:'#form',
data:{
username:'',
ValidClass:{
success:false,
error:false
},
validText:''
},
methods:{
valid:function(){
if(this.username.length>6){
//校验成功
this.ValidClass.success=true;
this.ValidClass.error=false;
this.validText='校验成功';
}else{
//校验失败
this.ValidClass.success=false;
this.ValidClass.error=true;
this.validText='校验失败';
}
}
}
});
script>
body>
html>
![]()

3.6 $event
$event:获取内置的事件对象<body>
<div id="form">
<button @click="show($event)">btnbutton>
div>
<script>
var app=new Vue({
el:'#form',
data:{
},
methods:{
show:function(e){
console.log('============');
console.log(e);
//target:就是指向事件触发的dom
console.log(e.target);
console.log('============');
}
}
});
script>
body>

3.6 事件修饰符
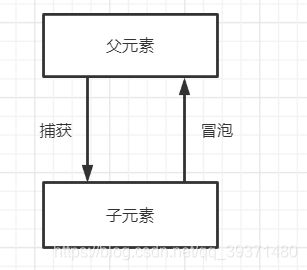
下面的程序解释子元素到父元素的冒泡关系:<body>
<div id="form">
<div class="father" @click="father()">
<h3>父元素h3>
<button @click="child()">btn-childbutton>
div>
div>
<script>
var app=new Vue({
el:'#form',
data:{
},
methods:{
father:function(){
console.log('father....');
},
child:function(){
console.log('child....');
}
}
});
script>
body>

3.6.1 stop修饰符
stop:阻止event冒泡,等效于event.stopPropagation()<div class="father" @click="father()">
<h3>父元素h3>
<button @click.stop="child()">btn-childbutton>
div>

3.6.2 prevent修饰符
prevent:阻止event默认事件,等效于event.preventDefault()
先添加一个默认事件,点击跳转到vue官网<div class="father" @click.prevent="father()">
<h3>父元素h3>
<button @click.stop="child()">btn-childbutton>
<br>
<a href="https://cn.vuejs.org/">Vuea>
div>
@click.prevent将这个默认事件拦截了,不让它触发
capture:事件捕获阶段触发。先输出father(),,再输出child()<div class="father" @click.capture="father()">
<h3>父元素h3>
<button @click.capture="child()">btn-childbutton>
div>

3.6.4 self修饰符
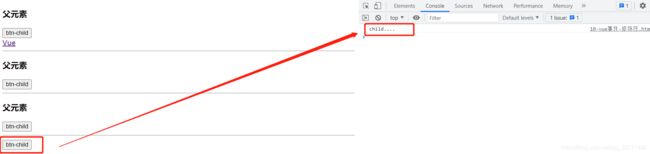
self:自身元素触发而不是子元素触发<div class="father" @click.self="father()">
<h3>父元素h3>
<button @click="child()">btn-childbutton>
div>
btn-child时只显示子元素child...,当点击标签父元素时不显示,只有点击空白元素的div是才会显示父元素father...

3.6.5 once修饰符
once:只触发一次<button @click.once="child()">btn-childbutton>
3.7 键值修饰符
只有按着enter键才能触发事件<body>
<div id="form">
<button @keyup.enter="show()">enterbutton>
div>
<script>
var app=new Vue({
el:'#form',
data:{
},
methods:{
show:function(){
console.log('enter....');
}
}
});
script>
body>
![]()
3.7.2 空格(space)修饰符<button @keyup.space="space()">spacebutton>
<script>
var app=new Vue({
el:'#form',
data:{
},
},
space:function(){
console.log('space....');
}
}
});
script>

3.7.3 回车提交输入<form>
<input type="text" @keyup.enter="submit()">
<input type="button" @keyup.enter="submit()" value="提交">
form>
<script>
var app=new Vue({
el:'#form',
data:{
},
methods:{
submit:function(){
console.log('输入');
}
}
});
script>
3.8 条件渲染
<body>
<div id="form">
<div v-if="code==12">
code:12
div>
<div v-else-if="code==13">
code:13
div>
<div v-else>
code 不是 12 和 13
div>
div>
<script>
/* 条件渲染*/
// v-if, v-else , v-else-if
var app=new Vue({
el:'#form',
data:{
code:13
}
});
script>
body>

3.8.2 条件渲染(2)—v-show<h3 v-show="flag">helloh3>
<script>
var app=new Vue({
el:'#form',
data:{
flag:false
}
});
script>

当flag改为true时

3.8.2 v-show和v-if的区别

3.9 列表渲染
<body>
<div id="form">
<ul>
<li v-for="item in items ">{{item.name}}li>
ul>
div>
<script>
/* 列表渲染*/
// 1.v-for:item in items
var app=new Vue({
el:'#form',
data:{
items:[
{name:'西瓜'},
{name:'苹果'},
{name:'菠萝'}
]
}
});
script>
body>

3.9.2 遍历对象<li v-for="(key,value,index) in person">{{key}}=={{value}}=={{index}}li>
person:{
name:'张三',
age:12,
city:'杭州'
}

3.9.3 key属性
用v-for正在更新已渲染过的元素列表时,它默认用“就地复用”策略。如果数据项的顺序被改变,Vue 将不会移动 DOM 元素来匹配数据项的顺序, 而是简单复用此处每个元素,并且确保它在特定索引下显示已被渲染过的每个元素。
<li v-for="(item,index) in items" :key="item.id">{{item.name}}=={{index}}li>
items:[
{id:1,name:'西瓜'},
{id:2,name:'苹果'},
{id:3,name:'菠萝'}
],
<ul>
<li v-for="i in 5">第{{i}}次li>
ul>

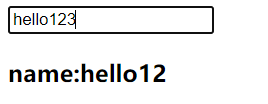
3.10 双向绑定–v-model
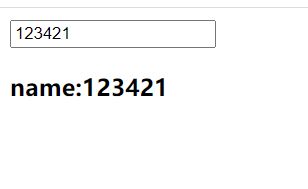
下面name属性被双向绑定,属性值随着输入改变:<body>
<div id="form">
<input type="text" v-model="name">
<h3>name:{{name}}h3>
div>
<script>
var app=new Vue({
el:'#form',
data:{
name:''
}
});
script>
body>
3.10.2 复选框checkbox选中可以直接输出true,不选中输出false,不需要进过额外的判断,vue直接完成,下面是单选功能的实现:<body>
<div id="form">
<input type="checkbox" v-model="checked">
<p>是否被选中:{{checked}}p>
div>
<script>
var app=new Vue({
el:'#form',
data:{
name:'hello',
checked:'',
lesson:[]
}
});
script>
body>


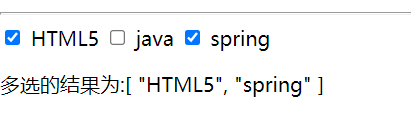
多选功能的实现:<input type="checkbox" value="HTML5" v-model="lesson">
<label>HTML5label>
<input type="checkbox" value="java" v-model="lesson">
<label>javalabel>
<input type="checkbox" value="spring" v-model="lesson">
<label>springlabel>
<p>多选的结果为:{{lesson}}p>
<script>
var app=new Vue({
el:'#form',
data:{
name:'hello',
checked:'',
lesson:[]
}
});
script>
3.10.3 单选框
input中type选择radio
<input type="radio" value="yes" v-model="love">
<label>喜欢label>
<input type="radio" value="no" v-model="love">
<label>不喜欢label>
<p>是否喜欢:{{love}}p>
<script>
var app=new Vue({
el:'#form',
data:{
name:'hello',
checked:'',
lesson:[],
love:''
}
});
script>

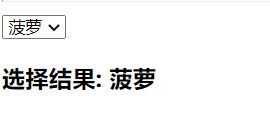
3.10.4 选择列表(select)
<select v-model="selected">
<option>苹果option>
<option>香蕉option>
<option>菠萝option>
select>
<h3>选择结果: {{selected}}h3>
<script>
var app=new Vue({
el:'#form',
data:{
name:'hello',
checked:'',
lesson:[],
love:'',
selected:''
}
});
script>
在平时开发中的运用,需要用到的数据放在一个list集合中,在选择列表中通过遍历list集合获取数据,并且可以设置默认值:<body>
<div id="form">
<select v-model="selected">
<option v-for="item in list" :value="item.value">{{item.text}}option>
select>
<h4>下拉的值为:{{selected}}h4>
div>
<script>
var app=new Vue({
el:'#form',
data:{
selected:'2', //设置默认值
list:[
{value:'1',text:'西瓜'},
{value:'2',text:'菠萝'},
{value:'3',text:'香蕉'}
]
}
});
script>
body>

3.10.5 修饰符
<div id="form">
<input type="text" v-model.lazy="name">
<h3>name:{{name}}h3>
div>
<script>
//lazy:绑定数据默认为实时更新,lazy可以再onChange中触发,懒加载
//number:返回为数字类型的值,转换不成返回nan
//trim:去除数据的前后格
var app=new Vue({
el:'#form',
data:{
name:'hello'
}
});
script>
我们定义输入框的类型为text时,输入的值为string类型:<input type="text" v-model="num" >
<button @click="submit()">显示值button>
<script>
var app=new Vue({
el:'#form',
data:{
name:'hello',
num:''
},
methods:{
submit:function(){
console.log(typeof this.num);
}
}
});
script>

加入number修饰符之后:

4.组件
4.1 自定义组件
Vue.component(tagName, options),其中tagName 为组件名,options 为配置选项。注册后,我们可以使用以下方式来调用组件:
4.1.1 全局注册 <div id="form">
<my-hello>my-hello>
<my-hello>my-hello>
<my-hello>my-hello>
div>
<script>
Vue.component('my-hello',{
template:'hello
'
});
var app=new Vue({
el:'#form'
});
script>
组件只能在当前实例中使用,即在下面程序div=form的实例中使用<body>
<div id="form">
<inner-hello>inner-hello>
div>
<script>
var app=new Vue({
el:'#form',
//定义局部注册组件
components:{
'inner-hello':{
template:'inner hello
'
}
}
});
script>
body>
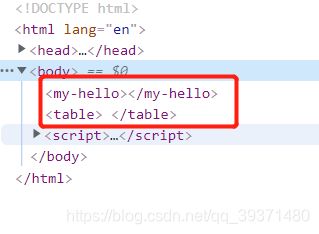
4.2 is属性
table的下一级必须是tr或者th,ul的下一级必须是li,等等。如果是要在这些里面自定义组件会造成组件失效,可以通过is属性来解决。
未加is属性:<body >
<table id="root">
<my-hello>my-hello>
table>
<script>
/* is 属性*/
Vue.component('my-hello',{
template:'hello
'
});
var app=new Vue({
el:'#root'
});
script>
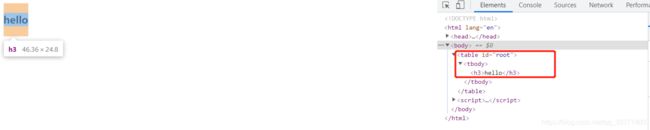
加is属性:<body >
<table id="root">
<tr is="my-hello">tr>
table>
<script>
/* is 属性*/
Vue.component('my-hello',{
template:'hello
'
});
var app=new Vue({
el:'#root'
});
script>
body>
4.2 模板
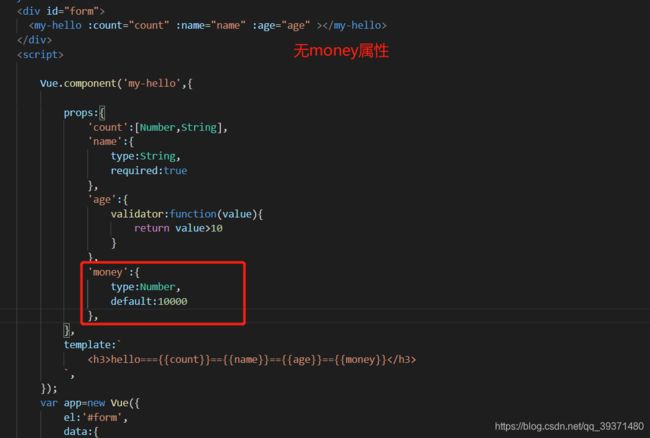
能够在浏览器反映出错误的信息。在修饰符props中定义数组不支持校验。
(1).下面定义count的属性校验为Number类型:
<body>
<div id="form">
<my-hello :count="count">my-hello>
div>
<script>
Vue.component('my-hello',{
props:{
'count':Number
},
template:`
hello==={{count}}
`,
});
var app=new Vue({
el:'#form',
data:{
count:'str'
}
});
script>
body>

(2).更改props中的count属性:props:{
'count':[Number,String]
},
(3).required的运用,是否是必传属性:<body>
<div id="form">
<my-hello :count="count" >my-hello>
div>
<script>
Vue.component('my-hello',{
props:{
'count':[Number,String],
'name':{
type:String,
required:true
}
},
template:`
hello==={{count}}
`,
});
var app=new Vue({
el:'#form',
data:{
count:'str',
name:'zhangsan'
}
});
script>
body>

将name进行绑定
(4).自定义验证函数,使用validator:function():'age':{
validator:function(value){
return value>10
}
}

(5).设置默认值
当不传money属性时,子组件可以设置默认的属性值
输出:

当传name时

可以发现是父组件设置的值4.6 非props属性
<body>
<div id="form">
<my-hello class="bg" style="color: red;">my-hello>
div>
<script>
/*非props*/
//引用子组件:非定义的props属性,自动合并到子组件上,class和style也会自动合并
Vue.component('my-hello',{
template:`
hello
`,
});
var app=new Vue({
el:'#form',
});
script>
body>

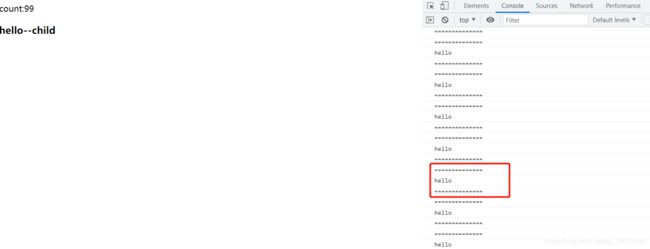
4.7 自定义事件
eventName不能驼峰标识不然监听不到<body>
<div id="form">
count:{{count}}
<my-hello @my-count="add">my-hello>
div>
<script>
/*自定义事件*/
Vue.component('my-hello',{
template:`
hello--child
`,
methods:{
childCount:function(){
//主动触发自定义事件
//内置属性和方法,都是$开头,$emit
this.$emit('my-count');
}
}
});
var app=new Vue({
el:'#form',
data:{
count:0
},
methods:{
add:function(){
this.count++;
}
}
});
script>

4.7.1 负载payload<body>
<div id="form">
count:{{count}}
<my-hello @my-count="add">my-hello>
div>
<script>
/*自定义事件*/
Vue.component('my-hello',{
template:`
hello--child
`,
methods:{
childCount:function(){
//主动触发自定义事件
//内置属性和方法,都是$开头,$emit
//负载:payload(传参)
this.$emit('my-count','hello');
}
}
});
var app=new Vue({
el:'#form',
data:{
count:0
},
methods:{
add:function(data){
console.log('==============');
console.log(data);
console.log('==============');
this.count++;
}
}
});
script>
4.7.1 主动挂载//主动挂载
app.$on('update-count',function(data){
this.count=88;
console.log('========');
console.log(data);
console.log('========');
});
//主动触发
pp.$emit('update-count','hello2');

5.slot插槽
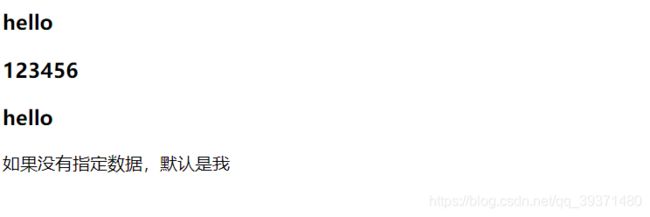
5.1 插槽的运用


slot可以指定默认值:<body>
<div id="form">
<my-hello>
<h3>123456h3>
my-hello>
<my-hello>my-hello>
div>
<template id="tpl">
<div>
<h3>helloh3>
<slot>如果没有指定数据,默认是我slot>
div>
template>
<script>
Vue.component('my-hello',{
template:'#tpl'
})
var app=new Vue({
el:'#form',
});
script>
body>
5.2 具名插槽
<body>
<div id="form">
<my-hello>
<h4 slot="header">头部h4>
<h5 slot="footer">底部h5>
my-hello>
div>
<template id="tpl">
<div>
<slot name='header'>slot>
<h3>helloh3>
<slot name='footer'>slot>
div>
template>
<script>
//具名插槽
//通过name属性,可以将插槽插入在指定的位置
Vue.component('my-hello',{
template:'#tpl'
})
var app=new Vue({
el:'#form',
});
script>
body>

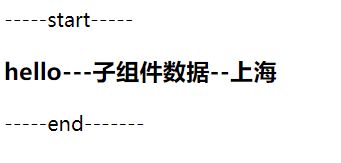
5.3 插槽作用域
slot-scope可以获取slot标签中指定的数据,在2.5版本以前需要卸载template标签之中:<body>
<div id="form">
<my-hello>
<template slot-scope="a">
<h3>hello---{{a.text}}h3>
template>
my-hello>
div>
<template id="tpl">
<div>
-----start-----
<slot text="子组件数据">slot>
-----end-------
div>
template>
<script>
//slot-scope
Vue.component('my-hello',{
template:'#tpl'
})
var app=new Vue({
el:'#form',
});
script>
body>

2.5版本之后可以不用写在template中,可以简化:
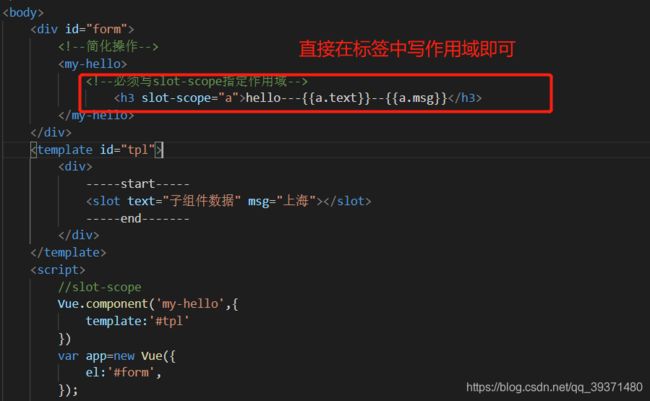
使用结构组合也可以实现该功能

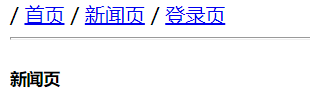
6.动态组件
6.1使用方式
:is属性:属于什么,进行组件输出<body>
<div id="form">
/
<a href="#" @click.prevent="page='index'">首页a>
/
<a href="#" @click.prevent="page='news'">新闻页a>
/
<a href="#" @click.prevent="page='login'">登录页a>
<hr>
<component :is="page">component>
div>
<template id="tpl1">
<h5>首页h5>
template>
<template id="tpl2">
<h5>新闻页h5>
template>
<template id="tpl3">
<h5>登录页h5>
template>
<script>
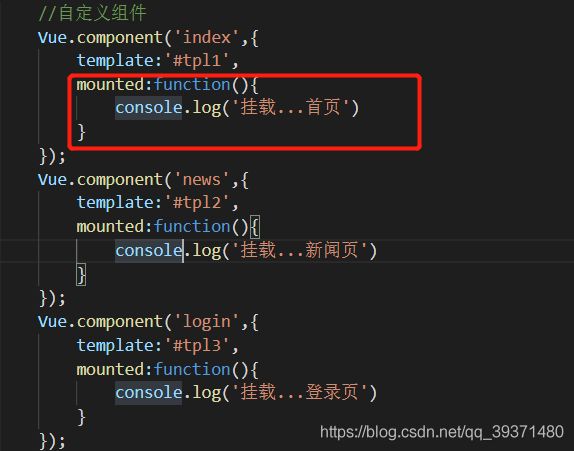
//自定义组件
Vue.component('index',{
template:'#tpl1'
});
Vue.component('news',{
template:'#tpl2'
});
Vue.component('login',{
template:'#tpl3'
});
var app=new Vue({
el:'#form',
data:{
page:'index'
}
});
script>
body>
但是用is属性性能不太好,每次操作都要进行创建组件。这里运用mounted进行展示。
mounted:mounted是vue中的一个钩子函数,一般在初始化页面完成后,再对dom节点进行相关操作。

6.2 keep-alive解决is缺点
keep-alive对所有组件只加载一次,不会删除,后续操作只是组件之间的切换,保留状态避免重新渲染。<keep-alive>
<component :is="page">component>
keep-alive>

6.3 refs
ref分别对子组件进行命名:<body>
<div id="form">
<child ref="child1">child>
<child ref="child2">child>
div>
<template id="tpl">
<button>{{count}}button>
template>
<script>
Vue.component('child',{
template:'#tpl',
data:function(){
return {
count:0
}
}
});
var app=new Vue({
el:'#form'
});
script>
body>
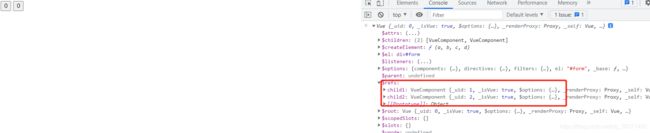
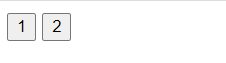
获取子组件child1中的count数据:
![]()
更改两个子组件中的count数据:app.$refs.child1.count=1;
app.$refs.child2.count=2;
7.动画
7.1 过渡动画的初识
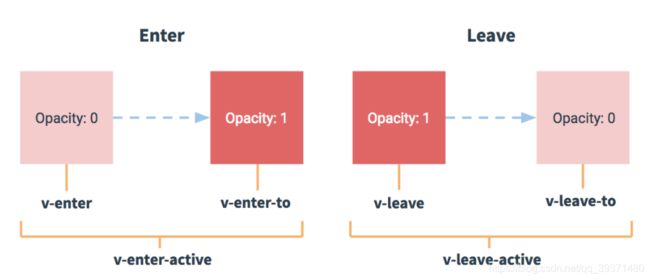
过渡其实就是一个淡入淡出的效果。Vue在元素显示与隐藏的过渡中,提供了 6 个 class 来切换,其中v表示取的别名,运用组件
下面一个实例通过按钮来控制的文字的渐入渐出<head>
<meta charset="UTF-8">
<meta http-equiv="X-UA-Compatible" content="IE=edge">
<meta name="viewport" content="width=device-width, initial-scale=1.0">
<title>Documenttitle>
<script src="./lib/vue.js">script>
<style>
.fade-enter-active, .fade-leave-active{
transition: all 1s;
}
.fade-enter, .fade-leave-to{
transform: translateX(10px);
opacity: 0;
}
style>
head>
<body>
<div id="form">
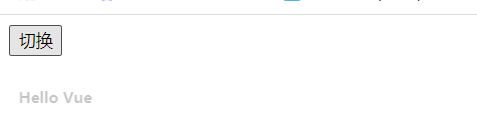
<button @click="show=!show">切换button>
<transition name="fade">
<h6 v-show="show">{{greenText}}h6>
transition>
div>
<script>
var app=new Vue({
el:'#form',
data:{
show:true,
greenText:'Hello Vue'
}
});
script>
body>
v-show 指令通过改变元素的 css 属性**(display)**来决定元素是显示还是隐藏,通过true和false进行判断。
通过按键切换来控制show的属性是false还是true
实现文本的渐入渐出
7.2 引入animate.min.css动画
animate.min.css动画将之前的style进行替换:<link rel="stylesheet" href="./lib/animate.min.css">
enter-active-class和leave-active-class: <transition appear
enter-active-class="animated fadeInDown"
leave-active-class="animated flipOutY"
>
<h6 v-show="show">{{greenText}}h6>
transition>
7.3 out-in和in-out
mode来指定组件的执行顺序:out-in,in-out
<style>
.fade-enter-active, .fade-leave-active{
transition: all .5s;
position: absolute;
}
.fade-enter{
transform: translateX(43px);
opacity: 0;
}
.fade-leave-to{
transform: translateX(-43px);
opacity: 0;
}
style>
head>
<body>
<div id="form">
<button @click="show=!show">切换button>
<br><br>
<transition appear name="fade" mode="in-out">
<button :key="show">{{show ? '登录' : '注册'}}button>
transition>
div>
<script>
var app=new Vue({
el:'#form',
data:{
show:true
}
});
script>
body>
position的属性,来确定组件的位置。absolute:生成绝对定位的元素,相对于 static 定位以外的第一个父元素进行定位。enter属性是从右边进入,leave-to属性是左边移出。
再看transition中的内部属性,appear是为了保证浏览器再刷新的时候也能够保证动画的实现,mode属性设置新旧元素的进出方式。
最后看按钮中的属性,:key要对按钮进行绑定,不然在动画实现的过程中认为是同一个按钮,就不会产生动画效果。
下面的动画效果就是登录按钮渐入:

7.4 列表过渡
DOCTYPE html>
<html lang="en">
<head>
<meta charset="UTF-8">
<meta http-equiv="X-UA-Compatible" content="IE=edge">
<meta name="viewport" content="width=device-width, initial-scale=1.0">
<title>Documenttitle>
<script src="./lib/vue.min.js">script>
<style>
.item{
margin-right: 10px;
/* 必须是块元素才行 */
display: inline-block;
}
.fade-enter-active, .fade-leave-active{
transition: all 1s;
}
.fade-enter, .fade-leave-to{
transform: translateY(30px);
opacity: 0;
}
style>
head>
<body>
<div id="form">
<button @click="add">添加button>
<button @click="remove">删除button>
<transition-group tag="div" name="fade" mode="out-in">
<span class="item" v-for="i in list" :key="i">{{i}}span>
transition-group>
div>
<script>
// 列表过渡
var app=new Vue({
el:'#form',
data:{
list:[1,2,3,4,5,6,7]
},
methods:{
randomIndex:function(){
return parseInt(Math.random()*this.list.length);
},
add:function(){
// 生成随机数
var num= parseInt(Math.random()*100);
//获取随机插入地址
var index=this.randomIndex();
this.list.splice(index,0,num);
},
remove:function(){
var index=this.randomIndex();
this.list.splice(index,1);
}
}
});
script>
body>
html>
8.数据处理
8.1事件监听–watch
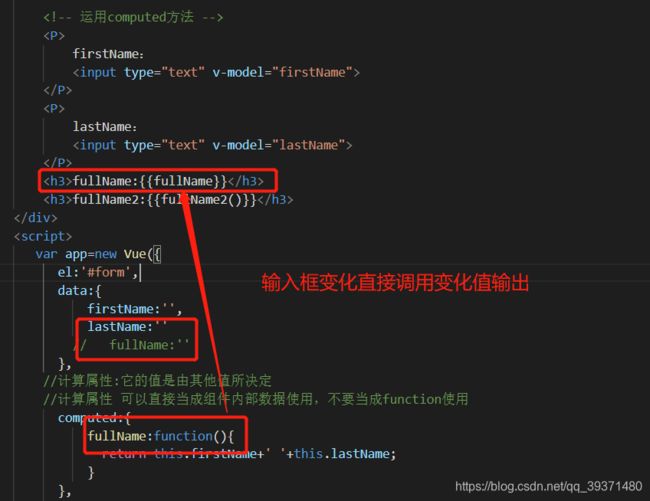
firstName和lastName,实时的控制变化着fullName的输出

8.1.1 之前的方法通过键盘输入事件控制<body>
<div id="form">
<P>
firstName:
<input type="text" :value="firstName" @keyup="changeFirstName">
P>
<P>
lastName:
<input type="text" :value="lastName" @keyup="changeLastName">
P>
<h3>fullName:{{fullName}}h3>
div>
<script>
var app=new Vue({
el:'#form',
data:{
firstName:'',
lastName:'',
fullName:''
},
methods:{
changeFirstName:function(e){
var firstName=e.target.value;
this.firstName=firstName;
this.fullName=firstName+' '+this.lastName;
},
changeLastName:function(e){
var lastName=e.target.value;
this.lastName=lastName;
this.fullName=this.firstName+' '+lastName;
}
},
})
script>
body>
8.1.2 运用监听watch解决
这里省略部分共性代码<P>
firstName:
<input type="text" v-model="firstName">
P>
<P>
lastName:
<input type="text" v-model="lastName">
P>
<h3>fullName:{{fullName}}h3>
watch:{
firstName:function(newValue,oldValue){
this.fullName=newValue+' '+this.lastName;
},
lastName:function(newValue,lastName){
this.fullName=this.firstName+' '+newValue;
}
},
v-model进行双向绑定,来监听输入框的数值变化,取出数值进行重组。

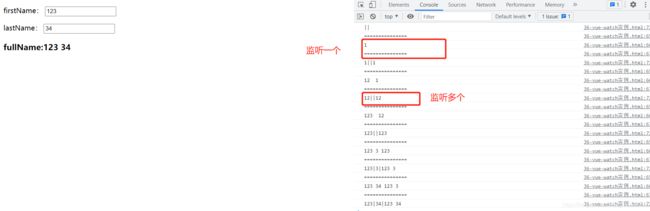
8.1.3 $watch$watch可以看出用$进行修饰,说明它是一个内置方法,在外部进行调用。//使用$watch
app.$watch('fullName',function(newValue,oldValue){
console.log('===============');
console.log(newValue,oldValue);
console.log('===============');
});
//监听多个
app.$watch(function(){
console.log(this.firstName+'|'+this.lastName+'|'+this.fullName);
})
8.2 事件计算-computed
computed和methods之间的区别
8.3 getter和setter
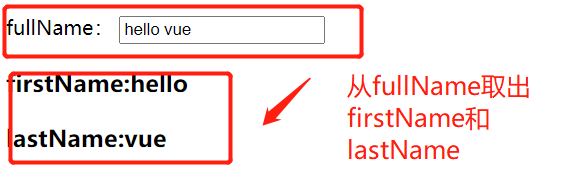
<body>
<div id="form">
<P>
fullName:
<input type="text" v-model="fullName">
P>
<h3>firstName:{{firstName}}h3>
<h3>lastName:{{lastName}}h3>
div>
<script>
var app=new Vue({
el:'#form',
data:{
firstName:'hello',
lastName:'vue'
},
computed:{
fullName:{
get:function(){
console.log('正在获取值...');
return this.firstName+' '+this.lastName;
},
set:function(newValue){//通过形参拿到新值
console.log('正在设置值....');
var arr=newValue.split(' ');
this.firstName=arr[0];
this.lastName=arr[1];
}
}
}
});
script>
body>

9.生命周期
<body>
<div id="root">
{{name}}
div>
<script>
var app=new Vue({
el:'#root',
data:{
name:'hello'
},
created:function(){
console.log('创建实例');
},
mounted:function(){
console.log('挂载实例');
},
beforeUpdate:function(){
console.log('实例将要更新');
},
updated:function(){
console.log('实例已更新');
},
destroyed:function(){
console.log('实例卸载');
}
});
script>
body>
10.自定义指令
10.1 全局指令

输入框中没有光标,然后设置指令v-focus,使输入框成为一个焦点:<body>
<div id="root">
<input type="text" v-focus>
div>
<script>
//自定义指令
//使用时调用:v-focus
Vue.directive('focus',{
//当所在指令被创建时触发
inserted:function(el){
console.log(el);
el.focus();//当前元素获取焦点
}
});
var app=new Vue({
el:'#root',
});
script>
body>
directive:设置全局指令;inserted:绑定元素插入到 DOM 中el: 指令所绑定的元素,可以用来直接操作 DOM

10.2 局部指令
directives:<body>
<div id="app">
<input v-focus>
div>
<script>
// 创建根实例
new Vue({
el: '#app',
directives: {
// 注册一个局部的自定义指令 v-focus
focus: {
// 指令的定义
inserted: function (el) {
// 聚焦元素
el.focus()
}
}
}
})
script>
body>
10.3 指令定义中钩子函数
钩子函数
解释
bind
只调用一次,指令第一次绑定到元素时调用,用这个钩子函数可以定义一个在绑定时执行一次的初始化动作
inserted
被绑定元素插入父节点时调用(父节点存在即可调用,不必存在于 document 中)
update
被绑定元素所在的模板更新时调用,而不论绑定值是否变化。通过比较更新前后的绑定值,可以忽略不必要的模板更新
componentUpdated
被绑定元素所在模板完成一次更新周期时调用
unbind
只调用一次, 指令与元素解绑时调用
参数
解释
el
指令所绑定的元素,可以用来直接操作 DOM
binding
一个对象
vnode
vue 编译生成的虚拟节点
oldVnode
上一个虚拟节点,仅在 update 和 componentUpdated 钩子中可用
“1 + 1”。
的值是 { foo: true, bar: true }。<body>
<div id="root">
<input type="text" v-demo:arg.a.b="1+1">
div>
<script>
Vue.directive('demo',{
bind:function(el,binding){
console.log(el);
console.log(binding);
}
});
var app=new Vue({
el:'#root',
});
script>
body>

10.4 图片懒加载
<style>
.item,
.item img{
width: 200px;
height: 120px;
float: left;
}
style>
<body>
<div id="root">
<div v-img="item.url" v-for="item in imgs" class="item">div>
div>
<script>
Vue.directive('img',{
bind:function(el,binding){
//生成随机颜色
var color=parseInt(Math.random()*0xFFFFFF).toString(16);
//设置当前元素的背景,提前进行占位等待图片加载
el.style.background='#' +color;
//setTimeout模拟图片加载的延时情况
setTimeout( function(){
//创建图片对象
var img=new Image();
//通过binding对象获取真实的图片url
img.src=binding.value;
//将图片插入到DOM结构
el.appendChild(img);
//随机延时Math.random()*3000+500
},Math.random()*3000+500);
}
});
var app=new Vue({
el:'#root',
data:{
//图片位置
imgs:[
{url:'img/1.png'},
{url:'img/2.png'},
{url:'img/3.png'},
]
}
});
script>
body>
11.过滤器
|表示,定义方法用filters:
{mesage|filter}}<body>
<div id="root">
{{text | upperCase}}---{{date | dataFormat}}
<br>
{{text | upperCase | length | arrow("!!!!","~~~~")}}
div>
<script>
//模拟数据
var app = new Vue({
el: '#root',
data: {
text: 'ab',
date: new Date()
},
//过滤器
filters: {
upperCase: function (value) {
return value.toUpperCase();
},
dataFormat: function (value) {
return value.toLocaleString();
},
length: function (value) {
return value+'|'+value.length;
},
arrow:function(value,begin,end){
console.log(value,begin,end)
return begin+value+end;
}
}
});
script>
body>

12.路由
优点:
12.1 vue-router
vue-router的包:<script src="./lib/vue-router.js">script>
<body>
<div id="root">
<h3>Hello VueRouterh3>
<p>
<router-link to="/index">to indexrouter-link>
<router-link to="/login">to loginrouter-link>
p>
<router-view>router-view>
div>
<script>
//1.定义组件
const index = { template: `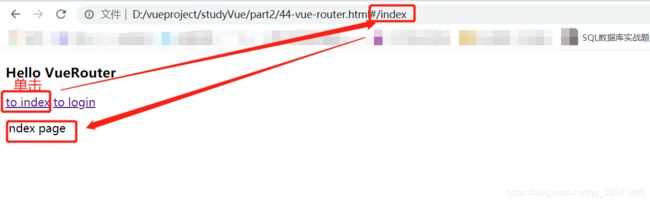
12.2 参数路由
$route.params:获取路由参数:/user/a$route.query:获取查询参数:/user/1?s=2<body>
<div id="root">
<router-link to="/user/1?s=2">user 1router-link>
<router-view>router-view>
div>
<script>
/*
通过路由可以传递参数,在使用时用:参数名的形式定义路由参数,通过
$route.params获取路由参数:/user/1
$route.query获取查询参数:/user/1?s=2
*/
//1.定义组件
const user={
template:':id表示路由参数

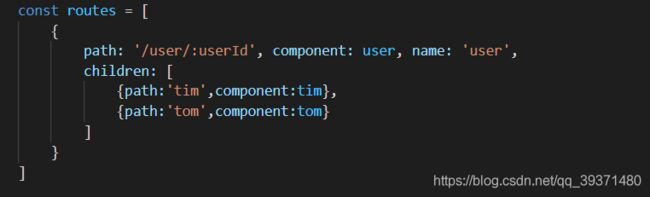
12.3 嵌套路由
<body>
<div id="root">
<router-link to="/user">userrouter-link>
<router-view>router-view>
div>
<script>
const user = {
template: `Tim
`
}
const tom = {
template: `tom
`
}
const def = {
template: `default
`
}
const routes = [
{
path: '/user', component: user,
//配置子路由、
children: [
{ path: 'tim', component: tim },
{ path: 'tom', component: tom },
{ path: '', component: def }
]
}
]
const router = new VueRouter({
routes
})
var app = new Vue({
el:'#root',
router
})
script>
body>


12.3 编程式路由
beforeRouteUpdate()
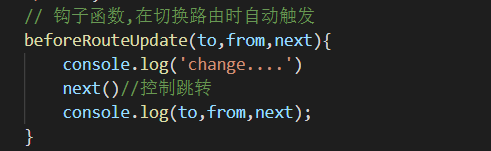
当去掉next()的时候在切换页面不会发生跳转
路由映射代码块:
根据这一块内容可以使用一些函数,通过js进行跳转
router.push('user') :相当于访问/userrouter.push({path:'user'}):相当于访问/userrouter.push({name:'user',params:{userId:1}}) :相当于访问/user/1router.push({path:'/user/1',query:{s:24}}) :相当于访问/user/1/24

12.3.1 replace()router.replace({path:'/user/456'})
router.push 很像,唯一的不同就是,它不会向 history 添加新记录,而是跟它的方法名一样 —— 替换掉当前的 history 记录。
12.3.1 go()
12.4 命名路由
![]()
12.5 命名视图
router-view 没有设置名字,那么默认为 default<router-view class="view one">router-view>
<router-view class="view two" name="a">router-view>
<router-view class="view three" name="b">router-view>
const router = new VueRouter({
routes: [
{
path: '/',
components: {
default: Foo,
a: Bar,
b: Baz
}
}
]
})
12.6 重定向和别名
redirect:'/tim':直接写urlredirect:{name:'myTim'}:通过name属性redirect:()=>'/tom'alias{path:'/tim',component:tim,name:'myTim',alias:'b'},
12.7 props
$route 会使之与其对应路由形成高度耦合,从而使组件只能在某些特定的 URL 上使用,限制了其灵活性。使用 props 将组件和路由解耦,一共有三种方式:<body>
<div id="root">
<h3>Hello Vueh3>
<router-link to="/user/12">Userrouter-link>
|
<router-link to="/tom">Tomrouter-link>
|
<router-link to="/tim?q=456">Timrouter-link>
<router-view>router-view>
div>
<script>
const user={
props:['id'],
template: `Tom {{id}} {{s}}
`
}
//简化形式
const tim={
props:['q'],
template:`Tim {{q}}
`
}
const routes=[
{path:'/user/:id',component:user,props:true},
{path:'/tom',component:tom,props:{id:2,s:123}},
{path:'/tim',component:tim,props:(route)=>({q:route.query.q})}
]
const router=new VueRouter({
routes
})
var app=new Vue({
el:'#root',
router
})
script>
body>

通过props可以用来实现多视图的显示:

13.Vuex
Vuex 是一个专为 Vue.js 应用程序开发的状态管理模式,必须要理解Flux,Redux, The Elm Architecture的概念。如果您不打算开发大型单页应用,使用 Vuex 可能是繁琐冗余的。
每一个 Vuex 应用的核心就是 store(仓库)。“store”基本上就是一个容器,它包含着你的应用中大部分的状态 (state),改变 store 中的状态的唯一途径就是显式地提交 (commit) mutation

13.1 state
<body>
<div id="root">
<p>{{count}}p>
div>
<script>
//使用vuex
const store=new Vuex.Store({
state:{
count:0
}
});
//使用state
//1.在全局组件中使用
new Vue({
el:'#root',
store,
computed:{
count:function(){
return store.state.count;
}
}
});
script>
body>
store.state.count 变化的时候, 都会重新求取计算属性,并且触发更新相关联的 DOM。<body>
<div id="root">
<counter>counter>
div>
<script>
//使用vuex
const store=new Vuex.Store({
state:{
count:0
}
});
//2.在子组件中使用
const Counter={
template:`this.$store.state.count
当一个组件需要获取多个状态的时候,将这些状态都声明为计算属性会有些重复和冗余。为了解决这个问题,我们可以使用 mapState 辅助函数帮助我们生成计算属性,让你少按几次键:<body>
<div id="root">
<Counter>Counter>
div>
<script>
const store=new Vuex.Store({
state:{
count:0,
age:12
}
})
//子组件
const Counter={
// computed:Vuex.mapState({
// //使用箭头函数使代码更简练
// count:state=>state.count
// }),
//简写
computed:Vuex.mapState(['count','age']),
template:`13.2 getter
store 中派生出一些状态,可以通过getter进行设置<body>
<div id="root">
<Counter>Counter>
div>
<script>
//使用Vuex创建store
const store = new Vuex.Store({
state: {
count: 0,
list: [
{ name: 'Tim', done: true },
{ name: 'Tom', done: true },
{ name: 'Jack', done: false }
]
},
//派生数据由基础数据衍生出来的数据
getters: {
listLength: state => state.list.length,
listToDo: state => state.list.filter(item => item.done),
listTodoLength: (state, getters) => getters.listToDo.length
}
})
//子组件
const Counter = {
computed: {
count() {
return this.$store.state.count;
},
listLength() {
return this.$store.getters.listLength;
},
listToDo() {
return this.$store.getters.listToDo;
},
listTodoLength() {
return this.$store.getters.listTodoLength;
}
},
template: `Counter: {{count}}----{{listLength}}----{{listTodoLength}}

过于繁琐,可以简化:computed:Vuex.mapGetters(['listLength','listToDo','listTodoLength']),
13.3 mutations
store 中的状态的唯一方法是提交 mutation。Vuex 中的 mutation 非常类似于事件:每个 mutation 都有一个字符串的 事件类型 (type) 和 一个 回调函数 (handler)。这个回调函数就是我们实际进行状态更改的地方,并且它会接受 state 作为第一个参数:mutations:{//只能是同步操作
up(state){
state.count++;
}
}
add(state,num){
state.count+=num;
},
commitmethods:{
//用法:commit('类型')
up(){
this.$store.commit('up');
},
down(){
this.$store.commit('down');
},
add(){
this.$store.commit('add',5);
}
}
mapMutations:methods:Vuex.mapMutations(['up','down','add'])
13.4 action
actions:{
upByAct(context){
console.log(context);
context.commit('up');
},
upByActAsync(context){
setTimeout(() => {
context.commit('up');
}, 2000);
}
}
upByAct方法是一种同步方法,调用mutations中的up方法;upByActAsync是异步方法。methods:{
up(){
this.$store.dispatch('upByAct');
},
upByAsync(){
this.$store.dispatch('upByActAsync');
}
}
dispatch,简便方法:methods:Vuex.mapActions(['upByAct','upByActAsync'])
13.5 module
store 分割成模块(module)。每个模块拥有自己的 state、mutation、action、getter、甚至是嵌套子模块——从上至下进行同样方式的分割:

注:在使用修改局部状态的时候要注意使用命名空间,要不然方法与全局状态中的方法一样,先修改的全局状态
![]()
同时也可以使用动态模块注入registerModule:<body>
<div id="root">
div>
<script>
//定义模块A
const moduleA={
namespaced:true, //添加命名空间
state:{
count:1
},
mutations:{
add(state){
state.count++;
}
}
}
//定义模块B
const moduleB={
namespaced:true,
state:{
count:2
},
mutations:{
add(state){
state.count++;
}
}
}
//使用Vuex创建store
const store = new Vuex.Store({});
//注册模块
store.registerModule('a',moduleA);//'a'
store.commit('a/add');
console.log(store.state.a.count);
store.registerModule(['a','b'],moduleA);//'a/b'
store.commit('a/b/add');
console.log(store.state.a.b.count);
script>
body>