Apollo的搭建
Apollo的搭建
1.环境准备
jdk : 1.8+ mysql 5.6.5+
2.下载
两种方式:
a.下载源码自己编译(需要修改源码的可以选择)
源码:https://github.com/ctripcorp/apoll
b.编译好的直接使用
地址:Releases · apolloconfig/apollo · GitHub
3.将apollo-adminservice 、apollo-configservice和apollo-portal上传至服务器并解压
4.编辑配置文件
a.修改apollo-adminservice和apollo-configservice文件config/application-github.properties
# DataSource
spring.datasource.url = jdbc:mysql://sh-cdb-2h0hokg2.sql.tencentcdb.com:61540/kxg_apollo_config_db_dev?characterEncoding=utf8
spring.datasource.username = kxg_apollo
spring.datasource.password = QmFzZTY05piv572R57uc5LiK5pyA5bi46KeB55
b.修改apollo-portal文件config/application-github.properties
# DataSource
spring.datasource.url = jdbc:mysql://sh-cdb-2h0hokg2.sql.tencentcdb.com:61540/kxg_apollo_portal_db_dev?characterEncoding=utf8
spring.datasource.username = kxg_apollo
spring.datasource.password = QmFzZTY05piv572R57uc5LiK5pyA5bi46KeB55
c.修改apollo-portal文件config/apollo-env.properties
#local.meta=http://localhost:8080
dev.meta=http://localhost:8080 8899 和configservice中的端口一样,改成外置eureka另说
pro.meta=http://localhost:8080

5.公网使用


修改apollo-adminservice和apollo-configservice文件scrips/start.sh
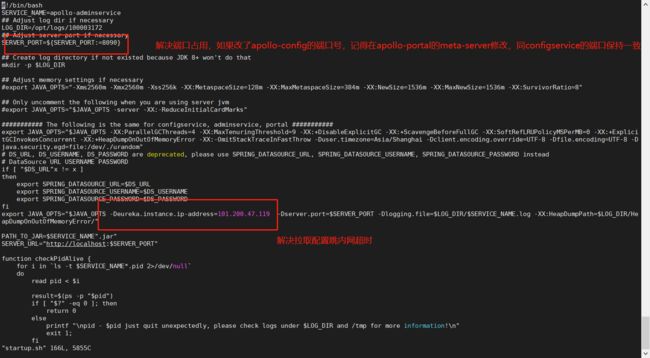
PS -: 注意端口占用
Apollo的使用
导入maven依赖
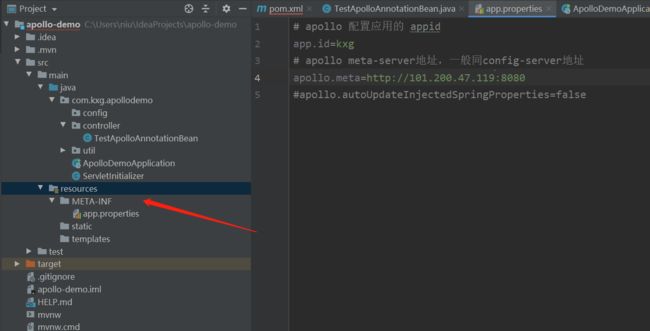
在recourse的目录下配置
写一个java类
import com.ctrip.framework.apollo.Config;
import com.ctrip.framework.apollo.model.ConfigChange;
import com.ctrip.framework.apollo.model.ConfigChangeEvent;
import com.ctrip.framework.apollo.spring.annotation.ApolloConfig;
import com.ctrip.framework.apollo.spring.annotation.ApolloConfigChangeListener;
import org.springframework.beans.factory.annotation.Value;
/**
* @Author: Niu Lilu
* @Date: 2020/8/9 9:49
* @Description:牛立露你写点注释吧!
*/
public class TestJavaConfigBean {
@ApolloConfig("application")
private Config config; //inject config for namespace application
@Value("${batch:400}")//如果配置中心没有值,默认key为test的value值为test
private String name;
//config change listener for namespace application
@ApolloConfigChangeListener("application")
private void anotherOnChange(ConfigChangeEvent changeEvent) {
ConfigChange change = changeEvent.getChange("batch");
System.out.println(String.format("Found change - key: %s, oldValue: %s,"
+ " newValue: %s, changeType: %s", change.getPropertyName(), change.getOldValue(), change.getNewValue(), change.getChangeType()));
}
}
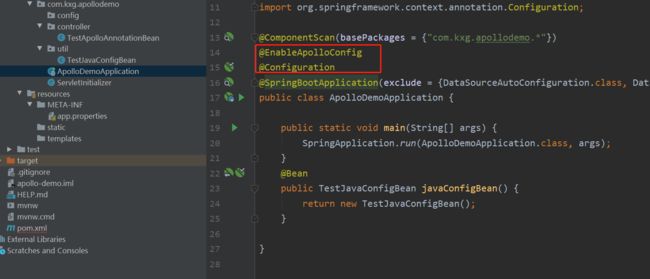
启动类注解
使用
@RestController
public class TestApolloAnnotationBean {
@ApolloConfig
private Config config; //inject config for namespace application
@Value("${batch:100}")
private int batch;
//config change listener for namespace application
@ApolloConfigChangeListener
private void someOnChange(ConfigChangeEvent changeEvent) {
//update injected value of batch if it is changed in Apollo
if (changeEvent.isChanged("batch")) {
batch = config.getIntProperty("batch", 100);
}
}
//config change listener for namespace application
@ApolloConfigChangeListener("application")
private void anotherOnChange(ConfigChangeEvent changeEvent) {
if (changeEvent.isChanged("batch")) {
batch = config.getIntProperty("batch", 100);
}
}
//example of getting config from injected value
//the program needs to update the injected value when batch is changed in Apollo using @ApolloConfigChangeListener shown above
public int getBatch() {
return this.batch;
}
@GetMapping("/")
public String get(){
return getBatch()+"";
}
}