uniapp(uncloud) 使用生态开发接口详情4(wangeditor 富文本, 云对象, postman 网络请求)
wangeditor 官网: https://www.wangeditor.com/v4/pages/01-%E5%BC%80%E5%A7%8B%E4%BD%BF%E7%94%A8/01-%E5%9F%BA%E6%9C%AC%E4%BD%BF%E7%94%A8.html
这里用vue2版本,用wangeditor 4
终端命令: npm i wangeditor --save
- 开始使用
在项目pages => sy_news => add.vue 页面中
<template>
//...
	<uni-forms-item name="content" label="文章内容" required>
		<div id="div1"></div>
	</uni-forms-item>
// ...
</template>
<script>
import E from 'wangeditor'
let editor = null
// ...
onReady() {
	this.onWangEdit()
},
methods:{
	onWangEdit() {
		editor = new E("#div1")
		editor.config.zIndex = 0
		// 失焦时触发的回调函数
		editor.config.onblur = (newHtml) => {

			this.formData.content = newHtml
		}
		// 将图片保存本地服务器
		editor.config.customUploadImg = function(resultFiles, insertImgFn) {
			resultFiles.forEach(item => {
				let path = URL.createObjectURL(item)
				let name = item.name
				uniCloud.uploadFile({
					filePath: path,
					cloudPath: name
				}).then(res => {
					console.log("res", res);
					insertImgFn(res.fileID)
				})
			})
		}
		editor.create()
	},
	// 提交表格
	submitForm(value) {
		// 修复(鼠标在富文本内,直接提交)
		value.content = editor.txt.html();
		//...
	}
	// ...
	}
	// ...
</script>
- 运行项目,浏览器中刷新页面,新增页面, 内容变成我们需要的富文本了,
- 修改(edit)界面同样的代码, 不过不同是
<uni-forms-item name="content" label="文章内容" required>
	<div id="div1">
		<div v-html="formData.content"></div>
	</div>
</uni-forms-item>
- 上面都是添加数据,接下来进入写接口了,
项目 => uniCloud-aliyun => 新建函数或者云对象

// index.obj.js
const db = uniCloud.database()
module.exports = {
	_before: function() { // 通用预处理器

	},

	async getList() {
		const res = await db.collection("sy_news").get()
		let result = {
			errCode: 0,
			errMsg: "查询成功",
			data: res.data
		}
		return result
	},

}
4.1 点击demoObj 目录, 右键, 运行本地云对象, 目录下面多一个demoObj.param.js 文件,
getList()
4.2 保存一下, 点击demoObj 目录, 右键, 运行本地云对象, 终端打印的
![]()
5. 如果带参数怎么弄?
// index.obj.js
const db = uniCloud.database()
module.exports = {
	_before: function() { // 通用预处理器
		this.params = this.getParams()[0]
		this.startTime = Date.now()
	},
	async getList() {
		const res = await db.collection("sy_news").get()
		let result = {
			errCode: 0,
			errMsg: "查询成功",
			data: res.data
		}
		return result
	},

	async get() {
		console.log('this.params', this.params);
		let {
			num
		} = this.params
		const res = await db.collection("sy_product_nav").limit(num).get()
		let result = {
			errCode: 0,
			errMsg: "查询成功",
			data: res.data
		}
		return result
	},

	_after(error, result) {
		if (error) {
			throw error
		}
		result.timeCode = Date.now() - this.startTime

		return result
	}

}
// demoObj.param.js
get({
	num: 2
})
在运行ok, 这都是本地运行的,
6. 接下来将 demoObj 右键 , 上传部署, 用postman请求数据
6.1 打开 uniCloud Web 控制台
6.2 云函数/云对象 => 函数/对象列表 (找到demoObj, 点击详情)
6.3 点击编辑, 输入 /demoObj

6.4 确定, 在点击(复制路径),到postman里面,改为post请求,
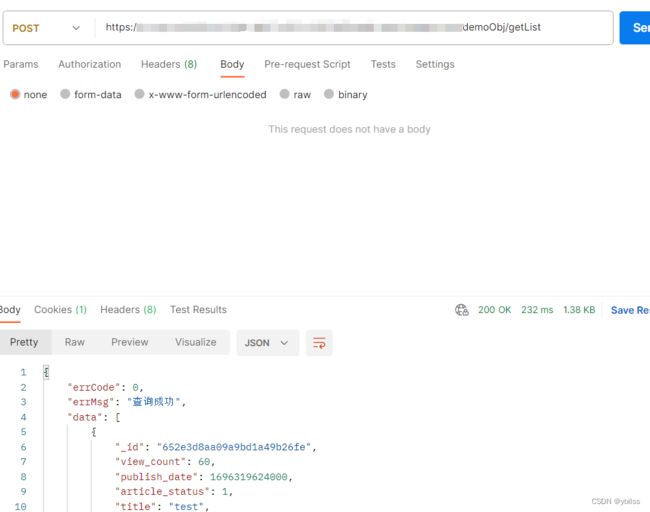
7. 如在postman 里面带参数, uniCloud 中 云对象 一个 getHttpInfo 的API
const db = uniCloud.database()
module.exports = {
	_before: function() { // 通用预处理器
		this.params = JSON.parse(this.getHttpInfo().body)
		// this.httpInfo = JSON.parse(this.getHttpInfo().body)
		this.startTime = Date.now()
	},

	async getList() {
		const res = await db.collection("sy_news").get()
		let result = {
			errCode: 0,
			errMsg: "查询成功",
			data: res.data
		}
		return result
	},


	async get() {

		let {
			num
		} = this.params
		const res = await db.collection("sy_product_nav").limit(num).get()
		let result = {
			errCode: 0,
			errMsg: "查询成功",
			data: res.data
		}
		return result
	},

	_after(error, result) {
		if (error) {
			throw error
		}
		result.timeCode = Date.now() - this.startTime

		return result
	}

}
