【活体检测】“深度学习驱动的人脸反欺诈检测系统:性能提升与多模型支持“
微调小视科技开源静默活体检测模型加载方式,性能提升8倍
I. 引言
在当今数字化时代,人脸反欺诈检测在各种应用中发挥着重要作用,从人脸识别到金融欺诈检测。为了满足不断增长的需求,深度学习技术已成为关键工具,但性能和效率仍然是关键挑战。本文探讨了如何通过代码优化和多模型支持来提高人脸反欺诈检测系统的性能和适应性。
小视科技github源码
Silent-Face-Anti-Spoofing
在上一篇文章中,我们了解了如何使用Python和各种库来实现面部检测和姿势识别。我们看到了眨眼、张嘴和头部旋转等动作如何触发应用程序的不同功能。
[OpenCV-dlib]人脸识别功能拓展-通过随机要求头部动作实现活体检测
通过随机要求头部动作实现活体检测安全性较差,接下来我会尝试学习活体模型训练算法,向大家分享我的学习历程。
文章目录
- 微调小视科技开源静默活体检测模型加载方式,性能提升8倍
-
- I. 引言
-
- 1.1 问题背景
- 小视科技图片检测版本核心代码
- anti_spoof_predict.py
- test.py
- 1.2 代码版本比较
- II. 视频检测第一版核心代码(原始版本)
-
- anti_spoof_predict.py
- test_v1.py
- 2.1 结构和功能
- 2.2 模型加载和预测方式
- III. 视频检测第二版核心代码(优化版)
-
- anti_spoof_predict_pro.py
- test_v2.py
- 3.1 结构和功能
- 3.2 模型方面的改进
-
- 3.2.1 多模型支持
- 3.2.2 批量预测
- 3.2.3 灵活的配置
- IV. 性能提升的原因
-
- 4.1 多模型支持
- 4.2 批量预测
- 4.3 灵活的配置
- V. 与人脸识别项目二合一
-
- test_con.py
- VI. 总结
- VII. 下一步计划
1.1 问题背景
在许多应用中,包括人脸识别、反欺诈系统和实时视频处理中,深度学习模型起到了关键作用。然而,性能和效率是这些应用的重要指标,尤其是当需要处理大规模数据或实时流数据时。本文关注了如何通过代码优化来提高模型的性能。
小视科技图片检测版本核心代码
anti_spoof_predict.py
# -*- coding: utf-8 -*-
# @Time : 20-6-9 上午10:20
# @Author : zhuying
# @Company : Minivision
# @File : anti_spoof_predict.py
# @Software : PyCharm

import os
import cv2
import math
import torch
import numpy as np
import torch.nn.functional as F


from src.model_lib.MiniFASNet import MiniFASNetV1, MiniFASNetV2,MiniFASNetV1SE,MiniFASNetV2SE
from src.data_io import transform as trans
from src.utility import get_kernel, parse_model_name

MODEL_MAPPING = {
    'MiniFASNetV1': MiniFASNetV1,
    'MiniFASNetV2': MiniFASNetV2,
    'MiniFASNetV1SE':MiniFASNetV1SE,
    'MiniFASNetV2SE':MiniFASNetV2SE
}


class Detection:
    def __init__(self):
        caffemodel = "./resources/detection_model/Widerface-RetinaFace.caffemodel"
        deploy = "./resources/detection_model/deploy.prototxt"
        self.detector = cv2.dnn.readNetFromCaffe(deploy, caffemodel)
        self.detector_confidence = 0.6

    def get_bbox(self, img):
        height, width = img.shape[0], img.shape[1]
        aspect_ratio = width / height
        if img.shape[1] * img.shape[0] >= 192 * 192:
            img = cv2.resize(img,
                             (int(192 * math.sqrt(aspect_ratio)),
                              int(192 / math.sqrt(aspect_ratio))), interpolation=cv2.INTER_LINEAR)

        blob = cv2.dnn.blobFromImage(img, 1, mean=(104, 117, 123))
        self.detector.setInput(blob, 'data')
        out = self.detector.forward('detection_out').squeeze()
        max_conf_index = np.argmax(out[:, 2])
        left, top, right, bottom = out[max_conf_index, 3]*width, out[max_conf_index, 4]*height, \
                                   out[max_conf_index, 5]*width, out[max_conf_index, 6]*height
        bbox = [int(left), int(top), int(right-left+1), int(bottom-top+1)]
        return bbox


class AntiSpoofPredict(Detection):
    def __init__(self, device_id):
        super(AntiSpoofPredict, self).__init__()
        self.device = torch.device("cuda:{}".format(device_id)
                                   if torch.cuda.is_available() else "cpu")

    def _load_model(self, model_path):
        # define model
        model_name = os.path.basename(model_path)
        h_input, w_input, model_type, _ = parse_model_name(model_name)
        self.kernel_size = get_kernel(h_input, w_input,)
        self.model = MODEL_MAPPING[model_type](conv6_kernel=self.kernel_size).to(self.device)

        # load model weight
        state_dict = torch.load(model_path, map_location=self.device)
        keys = iter(state_dict)
        first_layer_name = keys.__next__()
        if first_layer_name.find('module.') >= 0:
            from collections import OrderedDict
            new_state_dict = OrderedDict()
            for key, value in state_dict.items():
                name_key = key[7:]
                new_state_dict[name_key] = value
            self.model.load_state_dict(new_state_dict)
        else:
            self.model.load_state_dict(state_dict)
        return None

    def predict(self, img, model_path):
        test_transform = trans.Compose([
            trans.ToTensor(),
        ])
        img = test_transform(img)
        img = img.unsqueeze(0).to(self.device)
        self._load_model(model_path)
        self.model.eval()
        with torch.no_grad():
            result = self.model.forward(img)
            result = F.softmax(result).cpu().numpy()
        return result
test.py
# -*- coding: utf-8 -*-
# @Time : 20-6-9 下午3:06
# @Author : zhuying
# @Company : Minivision
# @File : test.py
# @Software : PyCharm

import os
import cv2
import numpy as np
import argparse
import warnings
import time

from src.anti_spoof_predict import AntiSpoofPredict
from src.generate_patches import CropImage
from src.utility import parse_model_name
warnings.filterwarnings('ignore')


SAMPLE_IMAGE_PATH = "./images/sample/"


# 因为安卓端APK获取的视频流宽高比为3:4,为了与之一致,所以将宽高比限制为3:4
def check_image(image):
    height, width, channel = image.shape
    if width/height != 3/4:
        print("Image is not appropriate!!!\nHeight/Width should be 4/3.")
        return False
    else:
        return True


def test(image_name, model_dir, device_id):
    model_test = AntiSpoofPredict(device_id)
    image_cropper = CropImage()
    image = cv2.imread(SAMPLE_IMAGE_PATH + image_name)
    result = check_image(image)
    if result is False:
        return
    image_bbox = model_test.get_bbox(image)
    prediction = np.zeros((1, 3))
    test_speed = 0
    # sum the prediction from single model's result
    for model_name in os.listdir(model_dir):
        h_input, w_input, model_type, scale = parse_model_name(model_name)
        param = {
            "org_img": image,
            "bbox": image_bbox,
            "scale": scale,
            "out_w": w_input,
            "out_h": h_input,
            "crop": True,
        }
        if scale is None:
            param["crop"] = False
        img = image_cropper.crop(**param)
        start = time.time()
        prediction += model_test.predict(img, os.path.join(model_dir, model_name))
        test_speed += time.time()-start

    # draw result of prediction
    label = np.argmax(prediction)
    value = prediction[0][label]/2
    if label == 1:
        print("Image '{}' is Real Face. Score: {:.2f}.".format(image_name, value))
        result_text = "RealFace Score: {:.2f}".format(value)
        color = (255, 0, 0)
    else:
        print("Image '{}' is Fake Face. Score: {:.2f}.".format(image_name, value))
        result_text = "FakeFace Score: {:.2f}".format(value)
        color = (0, 0, 255)
    print("Prediction cost {:.2f} s".format(test_speed))
    cv2.rectangle(
        image,
        (image_bbox[0], image_bbox[1]),
        (image_bbox[0] + image_bbox[2], image_bbox[1] + image_bbox[3]),
        color, 2)
    cv2.putText(
        image,
        result_text,
        (image_bbox[0], image_bbox[1] - 5),
        cv2.FONT_HERSHEY_COMPLEX, 0.5*image.shape[0]/1024, color)

    format_ = os.path.splitext(image_name)[-1]
    result_image_name = image_name.replace(format_, "_result" + format_)
    cv2.imwrite(SAMPLE_IMAGE_PATH + result_image_name, image)


if __name__ == "__main__":
    desc = "test"
    parser = argparse.ArgumentParser(description=desc)
    parser.add_argument(
        "--device_id",
        type=int,
        default=0,
        help="which gpu id, [0/1/2/3]")
    parser.add_argument(
        "--model_dir",
        type=str,
        default="./resources/anti_spoof_models",
        help="model_lib used to test")
    parser.add_argument(
        "--image_name",
        type=str,
        default="image_F1.jpg",
        help="image used to test")
    args = parser.parse_args()
    test(args.image_name, args.model_dir, args.device_id)

1.2 代码版本比较
本文将比较两个代码版本,分别是第一版和第二版。这两个版本旨在执行相同的任务,即反欺诈预测,但第二版代码经过了优化,以提高模型的性能和效率。
II. 视频检测第一版核心代码(原始版本)
anti_spoof_predict.py
import os  # 导入操作系统相关的模块
import cv2  # 导入OpenCV库
import math  # 导入数学函数库
import torch  # 导入PyTorch库
import numpy as np  # 导入NumPy库
import torch.nn.functional as F  # 导入PyTorch的函数模块

from src.model_lib.MiniFASNet import MiniFASNetV1, MiniFASNetV2, MiniFASNetV1SE, MiniFASNetV2SE  # 导入自定义模型类
from src.data_io import transform as trans  # 导入数据处理模块中的transform函数
from src.utility import get_kernel, parse_model_name  # 导入自定义的工具函数

MODEL_MAPPING = {
    'MiniFASNetV1': MiniFASNetV1,  # 模型映射字典
    'MiniFASNetV2': MiniFASNetV2,
    'MiniFASNetV1SE': MiniFASNetV1SE,
    'MiniFASNetV2SE': MiniFASNetV2SE
}


class Detection:
    def __init__(self):
        caffemodel = "./resources/detection_model/Widerface-RetinaFace.caffemodel"  # 定义Caffe模型文件路径
        deploy = "./resources/detection_model/deploy.prototxt"  # 定义Caffe模型配置文件路径
        self.detector = cv2.dnn.readNetFromCaffe(deploy, caffemodel)  # 使用OpenCV加载Caffe模型
        self.detector_confidence = 0.6  # 设定检测置信度阈值

    def get_bbox(self, img):
        height, width = img.shape[0], img.shape[1]  # 获取图像的高度和宽度
        aspect_ratio = width / height  # 计算图像宽高比
        if img.shape[1] * img.shape[0] >= 192 * 192:
            # 如果图像像素总数大于等于192*192,就将图像按比例缩放
            img = cv2.resize(img,
                             (int(192 * math.sqrt(aspect_ratio)),
                              int(192 / math.sqrt(aspect_ratio))), interpolation=cv2.INTER_LINEAR)

        blob = cv2.dnn.blobFromImage(img, 1, mean=(104, 117, 123))  # 从图像创建Caffe blob
        self.detector.setInput(blob, 'data')  # 将blob输入到Caffe模型中
        out = self.detector.forward('detection_out').squeeze()  # 获取检测结果
        max_conf_index = np.argmax(out[:, 2])  # 找到置信度最高的检测框
        left, top, right, bottom = out[max_conf_index, 3] * width, out[max_conf_index, 4] * height, \
                                   out[max_conf_index, 5] * width, out[max_conf_index, 6] * height
        bbox = [int(left), int(top), int(right - left + 1), int(bottom - top + 1)]  # 获取边界框坐标
        return bbox  # 返回边界框

class AntiSpoofPredict(Detection):
    def __init__(self, device_id):
        super(AntiSpoofPredict, self).__init__()  # 调用父类的初始化方法
        self.device = torch.device("cuda:{}".format(device_id)  # 检查是否有可用的GPU,如果有,就使用GPU,否则使用CPU

    def _load_model(self, model_path):
        # 定义模型加载方法
        model_name = os.path.basename(model_path)  # 获取模型文件名
        h_input, w_input, model_type, _ = parse_model_name(model_name)  # 解析模型文件名
        self.kernel_size = get_kernel(h_input, w_input)  # 获取卷积核大小
        self.model = MODEL_MAPPING[model_type](conv6_kernel=self.kernel_size).to(self.device)  # 创建模型实例并移至GPU或CPU

        # 加载模型权重
        state_dict = torch.load(model_path, map_location=self.device)  # 加载模型权重
        keys = iter(state_dict)
        first_layer_name = keys.__next__()
        if first_layer_name.find('module.') >= 0:
            from collections import OrderedDict
            new_state_dict = OrderedDict()
            for key, value in state_dict.items():
                name_key = key[7:]
                new_state_dict[name_key] = value
            self.model.load_state_dict(new_state_dict)
        else:
            self.model.load_state_dict(state_dict)
        return None  # 返回空值

    def predict(self, img, model_path):
        test_transform = trans.Compose([trans.ToTensor()])  # 定义图像预处理方法
        img = test_transform(img)  # 对图像进行预处理
        img = img.unsqueeze(0).to(self.device)  # 添加批处理维度并移至GPU或CPU
        self._load_model(model_path)  # 加载模型
        self.model.eval()  # 将模型设置为评估模式
        with torch.no_grad():  # 禁用梯度计算
            result = self.model.forward(img)  # 对图像进行前向传播
            result = F.softmax(result).cpu().numpy()  # 对模型输出进行softmax归一化并转换为NumPy数组
        return result  # 返回模型的输出结果
test_v1.py
import os  # 导入操作系统相关的模块
import cv2  # 导入OpenCV库
import numpy as np  # 导入NumPy库
import argparse  # 导入参数解析模块
import warnings  # 导入警告模块
import time  # 导入时间模块

from src.anti_spoof_predict0 import AntiSpoofPredict  # 导入活体检测模块
from src.generate_patches import CropImage  # 导入图像裁剪模块
from src.utility import parse_model_name  # 导入自定义的工具函数
warnings.filterwarnings('ignore')  # 忽略警告信息

def check_image(image):
    height, width, channel = image.shape  # 获取图像的高度、宽度和通道数
    if width/height != 3/4:  # 判断图像的宽高比是否为3:4
        print("Image is not appropriate!!!\nHeight/Width should be 4/3.")
        return False
    else:
        return True

def test(model_dir, device_id):
    model_test = AntiSpoofPredict(device_id)  # 创建活体检测模型实例
    image_cropper = CropImage()  # 创建图像裁剪实例
    cap = cv2.VideoCapture(0)  # 使用电脑摄像头获取实时视频流

    while True:
        ret, frame = cap.read()  # 读取一帧
        if not ret:
            break

        height, width, _ = frame.shape  # 获取帧的高度和宽度
        if width/height > 3/4:
            new_width = int(height * 3/4)
            start = (width - new_width) // 2
            frame = frame[:, start:start+new_width]
        elif width/height < 3/4:
            new_height = int(width * 4/3)
            start = (height - new_height) // 2
            frame = frame[start:start+new_height, :]

        image_bbox = model_test.get_bbox(frame)  # 获取人脸边界框
        prediction = np.zeros((1, 3))  # 初始化预测结果数组
        test_speed = 0

        for model_name in os.listdir(model_dir):
            h_input, w_input, model_type, scale = parse_model_name(model_name)  # 解析模型文件名
            param = {
                "org_img": frame,
                "bbox": image_bbox,
                "scale": scale,
                "out_w": w_input,
                "out_h": h_input,
                "crop": True,
            }
            if scale is None:
                param["crop"] = False
            img = image_cropper.crop(**param)  # 裁剪图像
            start = time.time()
            prediction += model_test.predict(img, os.path.join(model_dir, model_name))  # 进行活体检测
            test_speed += time.time()-start

        label = np.argmax(prediction)  # 获取最高概率对应的类别
        value = prediction[0][label]/2  # 获取概率值
        if label == 1:
            result_text = "RealFace Score: {:.2f}".format(value)
            color = (255, 0, 0)  # 红色
        else:
            result_text = "FakeFace Score: {:.2f}".format(value)
            color = (0, 0, 255)  # 蓝色
        print("Prediction cost {:.2f} s".format(test_speed))  # 打印活体检测耗时
        cv2.rectangle(
            frame,
            (image_bbox[0], image_bbox[1]),
            (image_bbox[0] + image_bbox[2], image_bbox[1] + image_bbox[3]),
            color, 2)  # 在图像上绘制边界框
        cv2.putText(
            frame,
            result_text,
            (image_bbox[0], image_bbox[1] - 5),
            cv2.FONT_HERSHEY_COMPLEX, 0.5*frame.shape[0]/1024, color)  # 在图像上添加文本标签

        cv2.imshow('frame', frame)  # 显示结果
        if cv2.waitKey(1) & 0xFF == ord('q'):  # 按q键退出
            break

    cap.release()  # 释放摄像头
    cv2.destroyAllWindows()  # 关闭OpenCV窗口

if __name__ == "__main__":
    desc = "test"
    parser = argparse.ArgumentParser(description=desc)  # 创建参数解析器
    parser.add_argument(
        "--device_id",
        type=int,
        default=0,
        help="which gpu id, [0/1/2/3]")  # 添加GPU设备ID参数
    parser.add_argument(
        "--model_dir",
        type=str,
        default="./resources/anti_spoof_models",
        help="model_lib used to test")  # 添加模型目录参数
    args = parser.parse_args()  # 解析命令行参数
    test(args.model_dir, args.device_id)  # 调用测试函数,传入模型目录和设备ID
2.1 结构和功能
第一版代码用于实时反欺诈预测,其主要功能包括:
-
实时视频流输入:使用计算机摄像头捕获实时视频流作为输入。
-
人脸检测:借助人脸检测模型,检测输入图像中的人脸。确保有人脸存在是鉴别真人和假人的前提。
-
模型预测:一旦检测到人脸,加载预训练的深度学习模型,对人脸进行预测。预测结果通常以分数的形式呈现,指示输入图像是真人还是假人。
2.2 模型加载和预测方式
第一版代码中的模型加载和预测方式的特点包括:
-
单一模型加载:只能加载和运行一个预训练的深度学习模型。这限制了模型的选择和配置。
-
逐个预测:在预测时,逐个处理输入图像。每张图像都需要经过模型,进行单独的预测,可能导致性能瓶颈。
-
有限的配置:在创建
AntiSpoofPredict对象时,只需传递device_id参数来选择GPU设备。配置选项相对较少,不够灵活,难以支持多模型加载和管理。
在下一部分,我们将介绍第二版代码中的模型方面的改进,以解释为什么它们有助于提高性能。
III. 视频检测第二版核心代码(优化版)
第二版代码是经过优化的版本,以提高模型的性能和效率。以下是第二版代码的结构和模型方面的改进。
anti_spoof_predict_pro.py
import os  # 导入操作系统相关的模块
import cv2  # 导入OpenCV库
import math  # 导入数学库
import torch  # 导入PyTorch库
import numpy as np  # 导入NumPy库
import torch.nn.functional as F  # 导入PyTorch的函数模块

# 导入自定义模型类,这些模型用于活体检测
from src.model_lib.MiniFASNet import MiniFASNetV1, MiniFASNetV2, MiniFASNetV1SE, MiniFASNetV2SE

# 导入数据预处理和工具函数
from src.data_io import transform as trans
from src.utility import get_kernel, parse_model_name

# 模型类型的映射字典,将模型类型名称映射到相应的模型类
MODEL_MAPPING = {
    'MiniFASNetV1': MiniFASNetV1,
    'MiniFASNetV2': MiniFASNetV2,
    'MiniFASNetV1SE': MiniFASNetV1SE,
    'MiniFASNetV2SE': MiniFASNetV2SE
}

# 人脸检测类,用于检测图像中的人脸
class Detection:
    def __init__(self):
        caffemodel = "./resources/detection_model/Widerface-RetinaFace.caffemodel"  # Caffe模型文件路径
        deploy = "./resources/detection_model/deploy.prototxt"  # Caffe模型配置文件路径
        self.detector = cv2.dnn.readNetFromCaffe(deploy, caffemodel)  # 使用OpenCV加载Caffe模型
        self.detector_confidence = 0.6  # 设置检测置信度阈值

    # 获取图像中人脸的边界框
    def get_bbox(self, img):
        height, width = img.shape[0], img.shape[1]  # 获取图像的高度和宽度
        aspect_ratio = width / height  # 计算图像的宽高比

        if img.shape[1] * img.shape[0] >= 192 * 192:
            # 如果图像像素总数大于等于192*192,就按比例缩放图像
            img = cv2.resize(img,
                             (int(192 * math.sqrt(aspect_ratio)),
                              int(192 / math.sqrt(aspect_ratio))), interpolation=cv2.INTER_LINEAR)

        blob = cv2.dnn.blobFromImage(img, 1, mean=(104, 117, 123))  # 从图像创建Caffe blob
        self.detector.setInput(blob, 'data')  # 将blob输入到Caffe模型
        out = self.detector.forward('detection_out').squeeze()  # 获取检测结果
        max_conf_index = np.argmax(out[:, 2])  # 找到置信度最高的检测框
        left, top, right, bottom = out[max_conf_index, 3] * width, out[max_conf_index, 4] * height, \
                                   out[max_conf_index, 5] * width, out[max_conf_index, 6] * height
        bbox = [int(left), int(top), int(right - left + 1), int(bottom - top + 1)]  # 获取边界框坐标
        return bbox

# 活体检测类,继承自人脸检测类
class AntiSpoofPredict(Detection):
    def __init__(self, device_id, model_dir):
        super(AntiSpoofPredict, self).__init__()  # 调用父类的初始化方法
        self.device = torch.device("cuda:{}".format(device_id)
                                   if torch.cuda.is_available() else "cpu")  # 检查是否有可用的GPU,如果有,就使用GPU,否则使用CPU
        self.models = self.load_models(model_dir)  # 加载活体检测模型

    # 加载活体检测模型
    def load_models(self, model_dir):
        models = {}
        for model_name in os.listdir(model_dir):
            model_path = os.path.join(model_dir, model_name)
            h_input, w_input, model_type, _ = parse_model_name(model_name)  # 解析模型文件名
            kernel_size = get_kernel(h_input, w_input)  # 获取卷积核大小
            model = MODEL_MAPPING[model_type](conv6_kernel=kernel_size).to(self.device)  # 创建模型实例并移至GPU或CPU
            state_dict = torch.load(model_path, map_location=self.device)  # 加载模型权重
            keys = iter(state_dict)
            first_layer_name = keys.__next__()
            if first_layer_name.find('module.') >= 0:
                from collections import OrderedDict
                new_state_dict = OrderedDict()
                for key, value in state_dict.items():
                    name_key = key[7:]
                    new_state_dict[name_key] = value
                model.load_state_dict(new_state_dict)
            else:
                model.load_state_dict(state_dict)
            models[model_name] = model
        return models

    # 批量进行活体检测
    def predict_batch(self, imgs):
        test_transform = trans.Compose([trans.ToTensor()])  # 定义图像预处理方法
        img_batch = torch.stack([test_transform(img) for img in imgs]).to(self.device)  # 添加批处理维度并移至GPU或CPU
        result_batch = {}  # 存储批量结果的字典

        for model_name, model in self.models.items():
            model.eval()  # 将模型设置为评估模式
            with torch.no_grad():  # 禁用梯度计算
                result = model.forward(img_batch)  # 对图像进行前向传播
                result = F.softmax(result, dim=1).cpu().numpy()  # 对模型输出进行softmax归一化并转换为NumPy数组
                result_batch[model_name] = result

        return result_batch  # 返回批量结果
test_v2.py
import os  # 导入操作系统相关的模块
import cv2  # 导入 OpenCV 库
import imutils  # 导入图像处理库
import numpy as np  # 导入 NumPy 库
import argparse  # 导入参数解析模块
import warnings  # 导入警告模块
import time  # 导入时间模块

from imutils.video import VideoStream  # 导入 imutils 中的 VideoStream 类

from src.anti_spoof_predict import AntiSpoofPredict  # 导入活体检测模块
from src.generate_patches import CropImage  # 导入图像裁剪模块
from src.utility import parse_model_name  # 导入自定义的工具函数

warnings.filterwarnings('ignore')  # 忽略警告信息

def check_image(image):
    height, width, channel = image.shape  # 获取图像的高度、宽度和通道数
    if width/height != 3/4:  # 判断图像的宽高比是否为3:4
        print("Image is not appropriate!!!\nHeight/Width should be 4/3.")
        return False
    else:
        return True

def test(model_dir, device_id):
    model_test = AntiSpoofPredict(device_id, model_dir)  # 创建活体检测模型实例
    image_cropper = CropImage()  # 创建图像裁剪实例
    cap = cv2.VideoCapture(0)  # 使用电脑摄像头获取实时视频流

    time.sleep(2)  # 等待2秒,确保摄像头准备就绪

    while True:
        ret, frame = cap.read()  # 读取一帧
        if not ret:
            break
        image_bbox = model_test.get_bbox(frame)  # 获取人脸边界框
        prediction = np.zeros((1, 3))  # 初始化预测结果数组
        test_speed = 0

        for model_name in os.listdir(model_dir):
            h_input, w_input, model_type, scale = parse_model_name(model_name)  # 解析模型文件名
            param = {
                "org_img": frame,
                "bbox": image_bbox,
                "scale": scale,
                "out_w": w_input,
                "out_h": h_input,
                "crop": True,
            }
            if scale is None:
                param["crop"] = False
            img = image_cropper.crop(**param)  # 裁剪图像
            start = time.time()  # 记录预测开始时间

            # 使用模型进行批量预测
            predictions = model_test.predict_batch([img])

            # 将当前模型的预测结果添加到总预测中
            prediction += predictions[model_name]
            test_speed += time.time() - start  # 计算预测所花时间

        label = np.argmax(prediction)  # 获取最高概率对应的类别
        value = prediction[0][label] / 2  # 获取概率值
        if label == 1:
            result_text = "RealFace Score: {:.2f}".format(value)
            color = (255, 0, 0)  # 红色
        else:
            result_text = "FakeFace Score: {:.2f}".format(value)
            color = (0, 0, 255)  # 蓝色
        print("Prediction cost {:.2f} s".format(test_speed))  # 打印预测所花时间

        cv2.rectangle(
            frame,
            (image_bbox[0], image_bbox[1]),
            (image_bbox[0] + image_bbox[2], image_bbox[1] + image_bbox[3]),
            color, 2)  # 在图像上绘制边界框
        cv2.putText(
            frame,
            result_text,
            (image_bbox[0], image_bbox[1] - 5),
            cv2.FONT_HERSHEY_COMPLEX, 0.5 * frame.shape[0] / 1024, color)  # 在图像上添加文本标签

        cv2.imshow('frame', frame)  # 显示结果
        if cv2.waitKey(1) & 0xFF == ord('q'):  # 按q键退出
            break

    cap.release()  # 释放摄像头
    cv2.destroyAllWindows()  # 关闭 OpenCV 窗口

if __name__ == "__main__":
    desc = "test"
    parser = argparse.ArgumentParser(description=desc)  # 创建参数解析器
    parser.add_argument(
        "--device_id",
        type=int,
        default=0,
        help="which gpu id, [0/1/2/3]")  # 添加 GPU 设备 ID 参数
    parser.add_argument(
        "--model_dir",
        type=str,
        default="./resources/anti_spoof_models",
        help="model_lib used to test")  # 添加模型目录参数
    args = parser.parse_args()  # 解析命令行参数
    test(args.model_dir, args.device_id)  # 调用测试函数,传入模型目录和设备 ID
3.1 结构和功能
第二版代码执行与第一版相同的任务,即实时反欺诈预测,但它包含以下改进:
-
实时视频流输入:继续使用计算机摄像头捕获实时视频流作为输入。
-
人脸检测:仍然使用人脸检测模型来检测输入图像中的人脸,以确保有人脸存在。
-
模型预测:与第一版不同,第二版代码引入了多模型支持、批量预测和更灵活的配置,以提高模型的性能。
3.2 模型方面的改进
第二版代码中的模型方面的改进具体包括以下几点:
3.2.1 多模型支持
-
多个不同模型:第二版代码可以同时加载和管理多个不同的预训练深度学习模型。这些模型可以具有不同的结构和性能。
-
更多选择:用户可以根据应用需求选择不同的模型,而不仅仅限于一个模型。这增加了灵活性和选择性。
3.2.2 批量预测
-
批量处理:第二版代码引入了批量预测的方式,可以一次性处理多个图像。这利用了GPU的并行性能,提高了预测速度。
-
减少计算时间:相较于逐个预测,批量预测能够显著减少总体计算时间,特别是在处理大量数据时。
3.2.3 灵活的配置
-
双参数传递:在创建
AntiSpoofPredict对象时,用户需要传递两个参数,device_id和model_dir。这允许用户更具体地配置代码的运行环境。 -
选择GPU设备:
device_id参数用于选择所使用的GPU设备,允许用户在多GPU系统上进行选择。 -
模型目录:
model_dir参数指定了模型文件的目录,从而允许用户加载和管理多个不同的模型。
通过这些模型方面的改进,第二版代码变得更加灵活和高效,特别是在处理多个模型和大量数据时。这些改进可能会在性能方面带来显著的提升,特别是在适当的硬件和环境配置下。在下一部分,我们将探讨这些改进如何带来性能提升的原因。
继续填充大纲,下面我们将深入探讨为什么第二版代码中的模型方面的改进能够带来性能提升。
IV. 性能提升的原因
在本部分,我们将详细分析第二版代码中的模型方面的改进,以解释为什么它们有助于提高性能和效率。
4.1 多模型支持
-
模型多样性:第二版代码允许加载多个不同性能和准确性的模型。用户可以根据应用需求选择合适的模型。
-
集成多模型结果:多模型支持允许整合多个模型的结果,以提高准确性。这种集成技术可以通过投票、加权平均等方式实现。
4.2 批量预测
-
GPU并行性:批量预测允许一次性处理多个图像,充分利用GPU的并行计算能力。这可以显著减少总体计算时间。
-
更高的吞吐量:相较于逐个预测,批量预测在单位时间内能够处理更多的数据,从而提高了性能和吞吐量。
4.3 灵活的配置
-
多GPU支持:通过选择
device_id参数,用户可以将代码运行在不同的GPU设备上。这有助于利用多GPU系统的性能优势。 -
模型选择和配置:用户可以通过
model_dir参数加载和管理多个不同模型,以满足不同的应用需求。这使得代码更加灵活和通用。
通过上述改进,第二版代码在模型方面变得更加高效和适应性强,能够更好地应对不同应用场景和需求。在下一部分,我们将介绍如何对性能进行分析和测试,以验证这些改进的效果。
V. 与人脸识别项目二合一
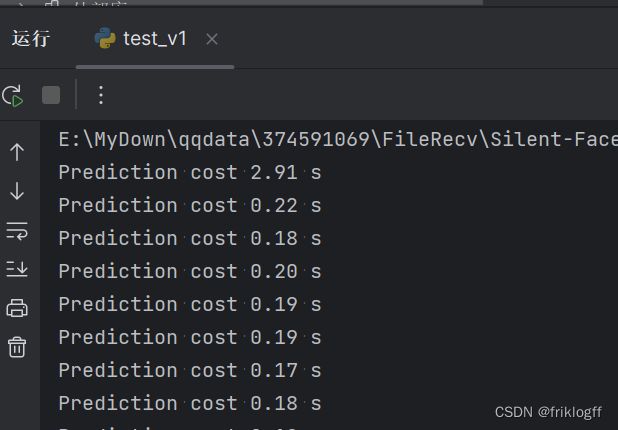
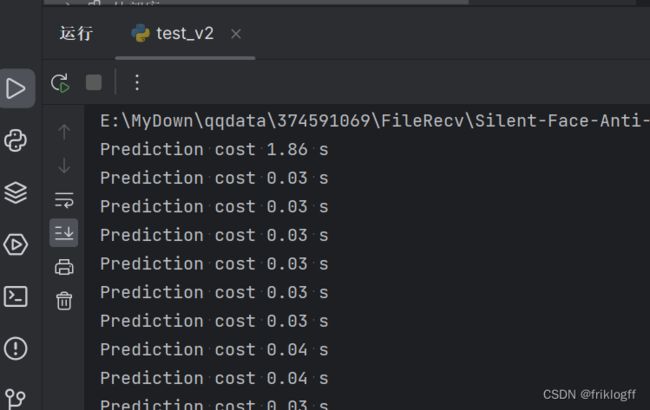
- 我们发现,当读取视频流时,第一帧处理时间和第二帧差距较大,第二帧后就趋于稳定,可维持在约0.03秒,识别速度相差60多倍
- 于是我们通过 load(args.model_dir, args.device_id)配合全局变量在开启摄像头前先加载一遍模型存在全局变量中,达成了快速活体检测的目的,这里处理的十分粗糙,你也可以通过重写函数解决这个问题
- 整体逻辑就是:
- 预加载模型
- 打开摄像头
- 利用OpenCV自带分类器检测到人脸自动拍照
- 照片传递给活体检测模型处理
- 结果为真人则继续将照片传递给人脸比对模型
- 结果为非真人则不往后传递
test_con.py
import os
import cv2
import imutils
import numpy as np
import argparse
import warnings
import time

from imutils.video import VideoStream
predictions = None

from retinaface import Retinaface
from src.anti_spoof_predict import AntiSpoofPredict
from src.generate_patches import CropImage
from src.utility import parse_model_name

warnings.filterwarnings('ignore')


def check_image(image):
    height, width, channel = image.shape
    if width / height != 3 / 4:
        print("Image is not appropriate!!!\nHeight/Width should be 4/3.")
        return False
    else:
        return True


def detect_image(img, temp_img_path):
    retinaface = Retinaface()

    image = cv2.imread(img)
    if image is None:
        print('Open Error! Try again!')
        return
    else:
        image = cv2.cvtColor(image, cv2.COLOR_BGR2RGB)
        r_image,name = retinaface.detect_image(image)
        r_image = cv2.cvtColor(r_image, cv2.COLOR_RGB2BGR)
        cv2.imshow("Processed Image", r_image)
        cv2.waitKey(0)
        if temp_img_path != "":
            cv2.imwrite(temp_img_path, r_image)
            print("Save processed img to the path: " + temp_img_path)
            print(name)
            return temp_img_path


def load(model_dir, device_id, image_path = 'captured_photo.jpg'):
    global prediction
    model_test = AntiSpoofPredict(device_id, model_dir)
    image_cropper = CropImage()
    frame = cv2.imread(image_path)  # 从拍摄的照片文件中读取图像
    image_bbox = model_test.get_bbox(frame)
    prediction = np.zeros((1, 3))
    test_speed = 0
    for model_name in os.listdir(model_dir):
        h_input, w_input, model_type, scale = parse_model_name(model_name)
        param = {
            "org_img": frame,
            "bbox": image_bbox,
            "scale": scale,
            "out_w": w_input,
            "out_h": h_input,
            "crop": True,
        }
        if scale is None:
            param["crop"] = False
        img = image_cropper.crop(**param)
        start = time.time()  # 记录预测开始时间
        # 使用模型进行预测
        predictions = model_test.predict_batch([img])
        # 将当前模型的预测结果添加到总预测中
        prediction += predictions[model_name]
        test_speed += time.time() - start  # 计算预测所花时间
        break


def test_and_detect(model_dir, device_id, image_path):
    global prediction
    model_test = AntiSpoofPredict(device_id, model_dir)
    image_cropper = CropImage()

    frame = cv2.imread(image_path)  # 从拍摄的照片文件中读取图像

    image_bbox = model_test.get_bbox(frame)
    prediction = np.zeros((1, 3))
    test_speed = 0
    for model_name in os.listdir(model_dir):
        h_input, w_input, model_type, scale = parse_model_name(model_name)
        param = {
            "org_img": frame,
            "bbox": image_bbox,
            "scale": scale,
            "out_w": w_input,
            "out_h": h_input,
            "crop": True,
        }
        if scale is None:
            param["crop"] = False
        img = image_cropper.crop(**param)
        start = time.time()  # 记录预测开始时间

        # 使用模型进行预测
        predictions = model_test.predict_batch([img])

        # 将当前模型的预测结果添加到总预测中
        prediction += predictions[model_name]
        test_speed += time.time() - start  # 计算预测所花时间

    label = np.argmax(prediction)
    value = prediction[0][label] / 2
    if label == 1:
        result_text = "RealFace Score: {:.2f}".format(value)
        color = (255, 0, 0)
    else:
        result_text = "FakeFace Score: {:.2f}".format(value)
        color = (0, 0, 255)
    print("Prediction cost {:.2f} s".format(test_speed))  # 打印预测所花时间

    cv2.rectangle(
        frame,
        (image_bbox[0], image_bbox[1]),
        (image_bbox[0] + image_bbox[2], image_bbox[1] + image_bbox[3]),
        color, 2)
    cv2.putText(
        frame,
        result_text,
        (image_bbox[0], image_bbox[1] - 5),
        cv2.FONT_HERSHEY_COMPLEX, 0.5 * frame.shape[0] / 1024, color)

    cv2.imshow('frame', frame)
    if cv2.waitKey(0) & 0xFF == ord('q'):
        cv2.destroyAllWindows()

    # 调用detect_image函数处理拍摄的照片
    temp_img_path = "processed_photo.jpg"
    detect_image(image_path, temp_img_path)


def take_photo(camera_index=0, temp_img_path="temp.jpg"):
    # 打开摄像头
    cap = cv2.VideoCapture(camera_index)

    if not cap.isOpened():
        print("无法打开摄像头")
        return

    while True:
        ret, frame = cap.read()

        if not ret:
            print("无法获取图像帧")
            break

        cv2.imshow("拍照", frame)

        key = cv2.waitKey(1)
        if key == 32:  # 按下空格键退出
            break

        gray = cv2.cvtColor(frame, cv2.COLOR_BGR2GRAY)
        face_detector = cv2.CascadeClassifier('haarcascade_frontalface_default.xml')

        face = face_detector.detectMultiScale(gray, 1.1, 5, cv2.CASCADE_SCALE_IMAGE, (100, 100), (300, 300))
        if len(face) > 0:  # 检查是否检测到人脸
            # 检测到人脸,立即拍照
            cv2.imwrite(temp_img_path, frame)
            print("已拍照并保存为:" + temp_img_path)
            break

    # 释放摄像头和关闭窗口
    cap.release()
    cv2.destroyAllWindows()


if __name__ == "__main__":
    desc = "test"
    parser = argparse.ArgumentParser(description=desc)
    parser.add_argument(
        "--device_id",
        type=int,
        default=0,
        help="which gpu id, [0/1/2/3]")
    parser.add_argument(
        "--model_dir",
        type=str,
        default="./resources/anti_spoof_models",
        help="model_lib used to test")
    args = parser.parse_args()
    load(args.model_dir, args.device_id)
    # 调用拍照函数并传递给test_and_detect
    temp_img_path = "captured_photo.jpg"
    take_photo(temp_img_path=temp_img_path)
    test_and_detect(args.model_dir, args.device_id, temp_img_path)
VI. 总结
深度学习驱动的人脸反欺诈检测系统已取得显著的性能提升,多模型支持和批量预测等改进使其更加灵活和高效。这将使系统更容易适应不同的应用需求,并在大规模数据处理中发挥关键作用。在未来,我们将继续改进系统,以满足不断发展的需求,提高反欺诈检测的精度和速度。这一技术将继续推动数字安全和人脸识别领域的创新。
VII. 下一步计划
以上代码还较为粗糙,仅仅记录了我的功能测试过程,并没有实现完整的人脸识别流程,下一篇文章,我将使用pyqt5,tkinter,gradio,wxpython给出四种界面设计,完整实现两种活体检测+人脸识别功能