uniapp uview2 使用笔记
创建项目安装组件
npm install uview-ui
配置
引入uView主JS库
在项目src目录中的main.js中,引入并使用uView的JS库,注意这两行要放在import Vue之后。
// main.js
import uView from "uview-ui";
Vue.use(uView);
在引入uView的全局SCSS主题文件
在项目src目录的uni.scss中引入此文件。
/* uni.scss */
@import 'uview-ui/theme.scss';
引入uView基础样式
<style lang="scss">
	/*每个页面公共css */
	/* 注意要写在第一行,同时给style标签加入lang="scss"属性 */
	/*每个页面公共css */
	@import "@/uni_modules/uview-ui/index.scss";
	@import "common/demo.scss";
		page {
			width: 100vw;
			// height: calc(100% - var(--status-bar-height));
			height: 100vh;
			display: flex;
			flex-direction: column;
			box-sizing: border-box;
			color: #333333;
			font-size: 28rpx;
			line-height: 40rpx;
			image {
				display: block;
			}
		}
		::v-deep .uni-toast .uni-toast__content{
			text-align: center!important;
		}

		view {
			box-sizing: border-box;
		}

		uni-page-body {
			width: 100vw;
			height: 100vh;
		}

	}
配置easycom组件模式
此配置需要在项目src目录的pages.json中进行。
// pages.json
{
	"easycom": {
		"^u-(.*)": "uview-ui/components/u-$1/u-$1.vue"
	},

	// 此为本身已有的内容
	"pages": [
		// ......
	]
}
Cli模式额外配置
如果您是vue-cli模式的项目,还需要在项目根目录的vue.config.js文件中进行如下配置
// vue.config.js,如没有此文件则手动创建
module.exports = {
    transpileDependencies: ['uview-ui']
}
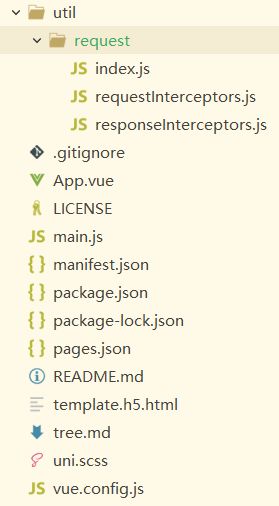
项目目录配置
.
├── common					#演示需要的一些文件
│   ├── api.js
│   ├── config.js
│   ├── demo.scss
│   ├── mixin.js
│   └── props.js
├── components					#演示项目封装的组件
│   └── page-nav
│       └── page-nav.vue
├── pages					#页面
│   ├── componentsA				#分包A
│   │   ├── ...
│   │   ├── ...
│   ├── componentsB				#分包B
│   │   ├── ...
│   │   ├── ...
│   ├── componentsC				#分包C
│   │   ├── ...
│   │   ├── ...
│   └── example					#演示项目首页
│       ├── components.config.js		#演示页面数据
│       └── components.nvue			#主演示页面
├── static					#演示项目需要的一些文件
│   ├── app-plus
│   │   └── mp-html
│   ├── common
│   │   └── js
│   └── uview
│       ├── common
│       └── example
├── store
│   └── index.js
├── uni_modules
│   └── uview-ui				#uView2.0主包
│       ├── LICENSE
│       ├── README.md
│       ├── changelog.md
│       ├── components				#所有的组件
│       ├── index.js
│       ├── index.scss
│       ├── libs
│       ├── package.json
│       └── theme.scss
├── unpackage
│   └── res
│       └── icons
├── util
│   └── request
│       ├── index.js
│       ├── requestInterceptors.js
│       └── responseInterceptors.js
├── App.vue
├── LICENSE
├── main.js
├── manifest.json
├── package-lock.json
├── pages.json					#页面配置
├── package.json
├── README.md
├── template.h5.html				#h5模板
├── tree.md
├── uni.scss
└── vue.config.js


created by beiqiao.
Api集中管理在/config/api.js中编写请求接口:
const { http } = uni.$u

// post请求,获取菜单
export const postMenu = (params, config = {}) => http.post('/ebapi/public_api/index', params, config)

// get请求,获取菜单,注意:get请求的配置等,都在第二个参数中,详见前面解释
export const getMenu = (data) => http.get('/ebapi/public_api/index', data)
发送请求
import { postMenu, getMenu } from '/config/api.js';

// 发出post,假设需要带上token
postMenu({ custom: { auth: true }}).then(() => {

}).catch(() =>{

})

// await等待,注意与async结合使用
await postMenu({ custom: { auth: true }})

// 假设不需要在响应拦截器中自动弹出的toast,以及不想写catch(如果promise中进行reject,但是却没有catch的话会报错)
postMenu({ custom: { auth: true, toast: false, catch: false }}).then(() => {

})

// get请求
getMenu({ custom: { auth: true }}).then(() => {

}).catch(() =>{

})

// 也可以直接通过uni.$u.post发出请求,注意此处需要写上接口地址
uni.$u.http.post('/common/menu', { custom: { auth: true }}).then(() => {

}).catch(() =>{

})
uni.$u.http.post('/common/menu', { custom: { auth: true }},{header:{'content-type': 'application/x-www-form-urlencoded'}
			}).then(() => {}).catch(() =>{})
基本使用
uni.$u.http.middleware(config)
uni.$u.http.request(config)
uni.$u.http.get(url[, config])
uni.$u.http.upload(url[, config])
uni.$u.http.delete(url[, data[, config]])
uni.$u.http.head(url[, data[, config]])
uni.$u.http.post(url[, data[, config]])
uni.$u.http.put(url[, data[, config]])
uni.$u.http.connect(url[, data[, config]])
uni.$u.http.options(url[, data[, config]])
uni.$u.http.trace(url[, data[, config]])
config目录(公共配置目录)
config.js
//根域名
module.exports = {
	// #ifdef H5
	baseUrl: '/host', // 解决跨域 代理 本地服务器
	// #endif
	baseUrl: 'http://*/fmis-api';
}
request.js
// 此vm参数为页面的实例,可以通过它引用vuex中的变量
module.exports = (vm) => {
    // 初始化请求配置
    uni.$u.http.setConfig((config) => {
        /* config 为默认全局配置*/
        config.baseURL = 'https://www.example.com'; /* 根域名 */
        return config
    })

	// 请求拦截
	uni.$u.http.interceptors.request.use((config) => { // 可使用async await 做异步操作
	    // 初始化请求拦截器时,会执行此方法,此时data为undefined,赋予默认{}
	    config.data = config.data || {}
		// 根据custom参数中配置的是否需要token,添加对应的请求头
		if(config?.custom?.auth) {
			// 可以在此通过vm引用vuex中的变量,具体值在vm.$store.state中
			config.header.token = vm.$store.state.userInfo.token
		}
	    return config
	}, config => { // 可使用async await 做异步操作
	    return Promise.reject(config)
	})

	// 响应拦截
	uni.$u.http.interceptors.response.use((response) => { /* 对响应成功做点什么 可使用async await 做异步操作*/
		const data = response.data

		// 自定义参数
		const custom = response.config?.custom
		if (data.code !== 200) {
			// 如果没有显式定义custom的toast参数为false的话,默认对报错进行toast弹出提示
			if (custom.toast !== false) {
				uni.$u.toast(data.message)
			}

			// 如果需要catch返回,则进行reject
			if (custom?.catch) {
				return Promise.reject(data)
			} else {
				// 否则返回一个pending中的promise,请求不会进入catch中
				return new Promise(() => { })
			}
		}
		return data.data === undefined ? {} : data.data
	}, (response) => {
		// 对响应错误做点什么 (statusCode !== 200)
		return Promise.reject(response)
	})
}
main.js
import Vue from 'vue'
import App from './App'

// vuex
import store from '@/store'

// 引入全局uView
import uView from '@/uni_modules/uview-ui'

import mixin from './common/mixin'

Vue.prototype.$store = store

Vue.config.productionTip = false

App.mpType = 'app'
Vue.use(uView)

// #ifdef MP
// 引入uView对小程序分享的mixin封装
const mpShare = require('@/uni_modules/uview-ui/libs/mixin/mpShare.js')
Vue.mixin(mpShare)
// #endif

Vue.mixin(mixin)

// 引入uView提供的对vuex的简写法文件
let vuexStore = require('@/store/$u.mixin.js')
Vue.mixin(vuexStore)

//获取上一页
const prePage = () => {
	let pages = getCurrentPages();
	let prePage = pages[pages.length - 2];
	// #ifdef H5
	return prePage;
	// #endif
	return prePage.$vm;
}

Vue.prototype.$api = {
	prePage
};

// H5端 微信 分享
import weixin from './common/weixin.js' //微信操作js
if (weixin.isWechat()) {
  Vue.prototype.$weixin = weixin;
}


const app = new Vue({
    store,
    ...App
})

// 引入请求封装
require('./util/request/index')(app)

app.$mount()
配置代理 vue.config.js
module.exports = {
	// 配置路径别名
	configureWebpack: {
		devServer: {
			// 调试时允许内网穿透,让外网的人访问到本地调试的H5页面
			disableHostCheck: true,
			// port: '9011', //端口号
			proxy: {
				'/host': { // 接口请求中 从 /host 这里 进行代理
					target: 'http://XXX.XXX.XXX.XX:9011', //这里后台的地址模拟的;应该填写你们真实的后台接口
					changeOrigin: true, // 允许跨域
					pathRewrite: {
						'^/host': '' // 重定向 为空
					}
				}
			}
		}
	}
	// productionSourceMap: false,
}
全局状态管理使用
this.$u.vuex('$userinfo', res.result)
import store from '@/store/index.js';
import { mapState } from 'vuex';
computed: {...mapState(['$userinfo', '$hasLogin','$partnership_loading'])},
常用API
格式化时间
timeFormat | date(timestamp, format = "yyyy-mm-dd")
注意:
1.7.9之前的版本只能传入秒或毫秒时间戳,date和timeFormat为同功能不同名函数,无论用哪个方法名,都是一样的。
该函数必须传入第一个参数,第二个参数是可选的,函数返回一个格式化好的时间。
- time 任何合法的时间格式、秒或毫秒的时间戳
- format 时间格式,可选。默认为yyyy-mm-dd,年为"yyyy",月为"mm",日为"dd",时为"hh",分为"MM",秒为"ss",格式可以自由搭配,如: yyyy:mm:dd,yyyy-mm-dd,yyyy年mm月dd日,yyyy年mm月dd日 hh时MM分ss秒,yyyy/mm/dd/,MM:ss等组合
<template>
	<view>
		<view>
			时间为:{{$u.timeFormat(timestamp, 'yyyy年mm月dd日')}}
		view>
		<view>
			时间为:{{time}}
		view>
	view>
template>

<script>
	export default{
		data() {
			return {
				time: null,
				timestamp: '1581170184'
			}
		},
		onLoad() {
			this.time = uni.$u.timeFormat(this.timestamp, 'yyyy-mm-dd');
		}
	}
script>
route 路由跳转
此为一个路由跳转方法,内部是对uni多个路由跳转api的封装,更方便使用
注: 为了方便简写和调用,可以直接传递一个url地址替代Object,它只能执行uni.navigateTo类型的地址,
不支持跳转到Tabbar页面, 如果有参数需要携带,以对象形式写到方法的第二个参数中。
// 无参数
uni.$u.route('/pages/components/empty/index');


// 带参数
uni.$u.route('/pages/components/empty/index', {
	name: 'lisa',
	age: 20
});
export default{
	onLoad() {
		setTimeout(() => {
			uni.$u.route({
				url: 'pages/components/empty/index',
				params: {
					name: 'lisa'
				}
			})
		}, 2000)
	}
}
test 规则校验
uView内置了一些校验规则,如是否手机号,邮箱号,URL等
这些规则方法,挂载在$u.test下面,如验证是否手机号:$u.test.mobile('13888889999'),如果验证通过,返回true,否则返回false
是否验证码
console.log(uni.$u.test.code('4567', 4));
是否数组
console.log(uni.$u.test.array([1, 2, 3]));
是否Json字符串
console.log(uni.$u.test.jsonString('{"a": 1}'));
是否对象
console.log(uni.$u.test.object({a: 1}));
是否邮箱号
console.log(uni.$u.test.email('[email protected]'));
是否手机号
console.log(uni.$u.test.mobile('13845678900'));
是否URL
console.log(uni.$u.test.url('http://www.uviewui.com'));
isEmpty(value)
校验值是否为空,返回true或者false。
console.log(uni.$u.test.isEmpty(false));
是否普通日期
console.log(uni.$u.test.date('2020-02-10 08:32:10'));
是否十进制数值
console.log(uni.$u.test.number('2020'));
是否整数
console.log(uni.$u.test.digits('2020'));
是否身份证号
console.log(uni.$u.test.idCard('110101199003070134'));
是否车牌号
console.log(uni.$u.test.carNo('京A88888'));
是否金额
console.log(uni.$u.test.amount('3,233.08'));
是否汉字
console.log(uni.$u.test.chinese('更上一层楼'));
是否字母
console.log(uni.$u.test.letter('uView'));
是否字母或者数字
console.log(uni.$u.test.enOrNum('uView'));
是否包含某个值
console.log(uni.$u.test.contains('uView', 'View'));
数值是否在某个范围内
console.log(uni.$u.test.range(35, [30, 34]));
字符串长度是否在某个范围内
console.log(uni.$u.test.rangeLength('abc', [3, 10]));


