源码包部署zabbix平台
源码包ZABBIX平台部署
- 1、ZABBIX简介
-
- 1-1、官方网址
- 1-2、定义
- 1-3、特点
- 1-4、功能
- 1-5、运行机制
- 2、安装环境检查
-
- 2-1、LNMP底层架构
- 2-2、底层架构检查
-
- 2-2-1、PHP检查
- 2-2-2、NGINX检查
- 2-2-3、MYSQL检查
- 2-3、源码包编译依赖包
- 2-3、下载zabbix平台源码包
- 3、ZABBIX部署
-
- 3-1、创建zabbix数据库
- 3-2、解压zabbix源码包
- 3-3、导入数据库
- 3-4、安装zabbix平台
-
- 3-4-1、创建zabbix专用用户
- 3-4-2、编译zabbix
- 3-4-3、MAKE安装
- 4、修改默认配置参数
-
- 4-1、修改zabbix-server配置
- 4-2、修改zabbix-agent配置
- 5、运行zabbix平台
-
- 5-1、启动zabbix服务
- 5-2、启动zabbix-agent服务
-
- 5-2-1、设置zabbix-server开机自启
- 5-2-2、设置zabbix-agent开机自启
- 5-3、检查监听端口
- 6、配置web网页
-
- 6-1、复制zabbix平台目录到nginx默认家目录
- 6-2 添加index.php
- 6-3、重启服务
- 6-4、开放网络端口
- 7、使用浏览器登陆zabbix平台
- 8、安装引导排除
-
- 8-1、PHP配置修改
- 8-2、安装PHP LDAP模块
-
- 8-2-1、配置openldap环境
- 8-2-2、生成configure文件
- 8-2-3、指定配置文件
- 8-2-4、生成二进制安装包并安装
- 8-2-5、修改php配置文件
- 8-3、重启php-fpm
- 8-4、重新进入页面问题解决
- 9、引导安装
-
- 9-1、初始化配置
- 9-2、解决中文乱码
- 10、添加监控主机
-
- 10-1、在另外一台服务器上安装agent
- 10-1-1、安装zabbix源
- 10-1-2、修改agent配置
- 10-1-3、启动agent并加入开机启动
- 10-1-4、开放10050端口
- 10-2、zabbix平台添加主机
1、ZABBIX简介
1-1、官方网址
zabbix官网:
https://www.zabbix.com/cn/
1-2、定义
zabbix 是一个基于 WEB 界面的提供分布式系统监控以及网络监控功能的企业级的开源解决方案。zabbix 能监视各种网络参数,保证服务器系统的安全运营,并提供灵活的通知机制以让系统管理员快速定位解决存在的各种问题。
1-3、特点
安装配置简单、学习成本低、支持多语言(包括中文)、免费开源、自动发现问题、分布式监控、web集中管理、无agent监控、用户安全认证、可进行授权、可通过web设置和查看监控结果、email通知。
1-4、功能
监控cpu负载、内存使用、磁盘使用、网络状态、端口监视、日志监控、插件开发自定义等。
1-5、运行机制
zabbix开源解决方案包括zabbix server 和 zabbix agent。
zabbix server 通过SNMP、Zabbix agent、ping、端口监控等方法提供对远程服务器或者网络状态的监控,以及数据收集功能。可以运行在windows、linux等多个平台上。
zabbix agent安装在被监控的主机上,主要完成对硬件信息和操作系统有关的内存、cpu等信息的收集。然后把收集到的数据发送给server(主动模式)或者是server主动来拿取数据(被动模式)。最后server将数据存放到zabbix数据库,用作web展示监控信息。

①zabbix支持多种网络方式下的监控,可以通过分布式的部署和安装监控代理zabbix,通过C/S模式采集数据,通过B/S模式展示数据。默认agent监控端口是10050。
②服务端要安装zabbix_server和zabbix_agent两个服务,而客户端只需安装zabbix_agent一个服务。
2、安装环境检查
2-1、LNMP底层架构
要部署zabbix平台之前需要具有LNMP底层架构既(LINUX+NGINX+MYSQL+PHP)。这里我提前部署好了。如需参考请参照之前学的博客 →LNMP架构搭建←
2-2、底层架构检查
2-2-1、PHP检查
[root@localhost ~]# curl -I http://192.168.8.80/index.php
HTTP/1.1 200 OK
Server: nginx/1.14.1
Date: Thu, 09 Jul 2020 13:04:24 GMT
Content-Type: text/html; charset=UTF-8
Connection: keep-alive
X-Powered-By: PHP/7.1.24
2-2-2、NGINX检查
[root@localhost ~]# netstat -antup | grep nginx
tcp        0      0 0.0.0.0:80              0.0.0.0:*               LISTEN      9440/nginx: master
2-2-3、MYSQL检查
[root@localhost ~]# netstat -antup | grep mysql
tcp6       0      0 :::3306                 :::*                    LISTEN      9664/mysqld
2-3、源码包编译依赖包
解决软件yum依赖包
[root@localhost ~]# yum install -y net-snmp-devel libevent libevent-devel
2-3、下载zabbix平台源码包
可以到官网下载,也可以到下面百度盘下载
链接:https://pan.baidu.com/s/1OFJWG8d9Fi3BDZmryGWHwA
提取码:9t9j
下载完后丢到/usr/local/src/目录下
3、ZABBIX部署
3-1、创建zabbix数据库
新建zabbix数据库,zabbix用户,并授予all的权限。
[root@localhost ~]# mysql
Welcome to the MySQL monitor.  Commands end with ; or \g.
Your MySQL connection id is 3
Server version: 5.7.19 Source distribution

Copyright (c) 2000, 2017, Oracle and/or its affiliates. All rights reserved.

Oracle is a registered trademark of Oracle Corporation and/or its
affiliates. Other names may be trademarks of their respective
owners.

Type 'help;' or '\h' for help. Type '\c' to clear the current input statement.

mysql> create database zabbix character set utf8 collate utf8_bin;  		//需要指定为utf-8格式,不使用utf8格式的话后期遇到中文会报错。
Query OK, 1 row affected (0.07 sec)

mysql> grant all on zabbix.* to zabbix@localhost identified by "zabbix";		//新建用户后报错、这里提示之前设置了无密码本地登录。
ERROR 1290 (HY000): The MySQL server is running with the --skip-grant-tables option so it cannot execute this statement

mysql> flush privileges;		//生成权限
Query OK, 0 rows affected (0.09 sec)

mysql> grant all on zabbix.* to zabbix@localhost identified by "zabbix";		//成功
Query OK, 0 rows affected, 1 warning (0.00 sec)

mysql> exit
Bye
3-2、解压zabbix源码包
解压到当前目录
[root@localhost ~]# cd /usr/local/src/
[root@localhost src]# ls
boost_1_59_0          libmcrypt-2.5.8.tar.gz  mysql-5.7.19         nginx-1.14.1.tar.gz  php-7.1.24
boost_1_59_0.tar.gz   mcrypt-2.6.8.tar.gz     mysql-5.7.19.tar.gz  pcre-8.41            php-7.1.24.tar.gz
libiconv-1.14.tar.gz  mhash-0.9.9.9.tar.gz    nginx-1.14.1         pcre-8.41.tar.gz     zabbix-3.4.3.tar.gz

[root@localhost src]# tar xzvf zabbix-3.4.3.tar.gz
[root@localhost src]# cd zabbix-3.4.3/database/mysql/
[root@localhost mysql]# ll
total 4860
-rw-r--r--. 1 root1 root1 2861223 Oct 17  2017 data.sql
-rw-r--r--. 1 root1 root1 1978341 Oct 17  2017 images.sql
-rw-r--r--. 1 root1 root1  134738 Oct 17  2017 schema.sql
3-3、导入数据库
按顺序导入数据库:schema.sql images.sql data.sql
[root@localhost mysql]# mysql -uzabbix -pzabbix zabbix < schema.sql		//提示输入明文密码不安全   可以-p后面不加密码
mysql: [Warning] Using a password on the command line interface can be insecure.
[root@localhost mysql]# mysql -uzabbix -pzabbix zabbix < images.sql
[root@localhost mysql]# mysql -uzabbix -pzabbix zabbix < data.sql
3-4、安装zabbix平台
3-4-1、创建zabbix专用用户
[root@localhost mysql]# groupadd zabbix		//创建用户组
[root@localhost mysql]# useradd -s /sbin/nologin -g zabbix zabbix		//创建用户指定bin目录和用户组
3-4-2、编译zabbix
编译并指定配置参数
[root@localhost mysql]# cd /usr/local/src/zabbix-3.4.3/
[root@localhost zabbix-3.4.3]# ./configure --prefix=/usr/local/zabbix --enable-server --enable-agent --with-mysql=/var/lib/mysql/bin/mysql_config --with-net-snmp --with-libcurl
指定配置参数解析如下
# --prefix=   #指定路径
# --enable-server   #Server 支持
# --enable-agent    #支持Zabbix 客户端
# --with-mysql      #指定MySql库可以选择自定路径mysql_config,mysql_config 是命令,用于编译 mysql 客户端程序
# --with-net-snmp   #支持snmp协议,需要安装net-snmp-devel包
# --with-libcurl    #支持CURL功能,libcurl主要功能就是用不同的协议连接不同的服务器
# --libcurl    #当前支持的协议有http、https、ftp、gopher、telent、dict、file和ldap 协议
3-4-3、MAKE安装
zabbix编译完成后无需make生成二进制安装包直接make install安装
[root@localhost zabbix-3.4.3]# make install
4、修改默认配置参数
4-1、修改zabbix-server配置
配置zabbix_server.conf文件
日志文件LogFile=/tmp/zabbix_server.log
只需要修改以下几项就可以了
[root@localhost zabbix-3.4.3]# vim /usr/local/zabbix/etc/zabbix_server.conf
85 DBHost=localhost  #主机名
95 DBName=zabbix  #授权数据库
111 DBUser=zabbix   #授权数据库用户
119 DBPassword=zabbix   #授权数据库用户的密码
4-2、修改zabbix-agent配置
监控zabbix服务器
日志文件LogFile=/tmp/zabbix_agentd.log
只需要修改以下几项就可以了
[root@localhost zabbix-3.4.3]# vim /usr/local/zabbix/etc/zabbix_agentd.conf
93 Server=127.0.0.1   # 服务器IP(被动:客户端允许服务端获取数据)
134 ServerActive=127.0.0.1   # 服务器IP(主动:客户端主动发送数据给服务端)
145 Hostname=Zabbix server   # 监控主机名
280 UnsafeUserParameters=1    #支持自定义脚本
5、运行zabbix平台
5-1、启动zabbix服务
提示报错无法打开共享文件
[root@localhost zabbix-3.4.3]# /usr/local/zabbix/sbin/zabbix_server
/usr/local/zabbix/sbin/zabbix_server: error while loading shared libraries: libmysqlclient.so.20: cannot open shared object file: No such file or directory


# 添加库文件搜索路径
[root@master ~]# vim /etc/ld.so.conf
/var/lib/mysql/lib/
[root@master ~]# ll /var/lib/mysql/lib/
总用量 557116
-rw-r--r--. 1 root root  20434288 6月  20 17:38 libmysqlclient.a
lrwxrwxrwx. 1 root root        20 6月  20 17:49 libmysqlclient.so -> libmysqlclient.so.20
lrwxrwxrwx. 1 root root        24 6月  20 17:49 libmysqlclient.so.20 -> libmysqlclient.so.20.3.6
-rwxr-xr-x. 1 root root   9500456 6月  20 17:48 libmysqlclient.so.20.3.6
-rw-r--r--. 1 root root 540501692 6月  20 17:46 libmysqld.a
-rw-r--r--. 1 root root     40838 6月  20 17:26 libmysqlservices.a
drwxr-xr-x. 2 root root        28 6月  20 17:49 pkgconfig
drwxr-xr-x. 3 root root      4096 6月  20 17:49 plugin
# 让库文件搜索路径立即生效
[root@master ~]# ldconfig
# 再次启动
[root@master ~]# /usr/local/zabbix/sbin/zabbix_server
# 查看服务的监听情况
[root@master ~]# netstat -antup | grep zabbix
[root@master ~]# netstat -antup | grep zabbix
tcp        0      0 0.0.0.0:10051           0.0.0.0:*               LISTEN      20497/zabbix_server
# 如果zabbix服务还是没起来,那就查看下日志进行排错。
5-2、启动zabbix-agent服务
[root@localhost zabbix-3.4.3]# /usr/local/zabbix/sbin/zabbix_agentd
5-2-1、设置zabbix-server开机自启
/usr/local/src/zabbix-3.4.3/misc/init.d/tru64/目录下存放zabbix-server、zabbix-agent启动脚本
[root@localhost ~]# ls /usr/local/src/zabbix-3.4.3/misc/init.d/tru64/
zabbix_agentd  zabbix_server
[root@localhost ~]# cp /usr/local/src/zabbix-3.4.3/misc/init.d/tru64/zabbix_* /etc/init.d/
[root@localhost ~]# vim /etc/init.d/zabbix_server
#!/bin/sh
#chkconfig:345 95 95
#description:zabbix Server
23 SERVICE="Zabbix server"
24 DAEMON=/usr/local/zabbix/sbin/zabbix_server
25 PIDFILE=/tmp/zabbix_server.pid
[root@localhost ~]# chmod a+x /etc/init.d/zabbix_server
[root@localhost ~]# chkconfig --add zabbix_server
5-2-2、设置zabbix-agent开机自启
[root@localhost ~]# vim /etc/init.d/zabbix_agentd
#!/bin/sh
#chkconfig:345 95 95
#description:zabbix Agent
 25 SERVICE="Zabbix agent"
 26 DAEMON=/usr/local/zabbix/sbin/zabbix_agentd
 27 PIDFILE=/tmp/zabbix_agentd.pid
[root@localhost ~]# chmod a+x /etc/init.d/zabbix_agentd
[root@localhost ~]# chkconfig --add zabbix_agentd

[root@localhost init.d]# chkconfig --list

Note: This output shows SysV services only and does not include native
      systemd services. SysV configuration data might be overridden by native
      systemd configuration.

      If you want to list systemd services use 'systemctl list-unit-files'.
      To see services enabled on particular target use
      'systemctl list-dependencies [target]'.

mysqld         	0:off	1:off	2:on	3:on	4:on	5:on	6:off
netconsole     	0:off	1:off	2:off	3:off	4:off	5:off	6:off
network        	0:off	1:off	2:on	3:on	4:on	5:on	6:off
nginx          	0:off	1:off	2:on	3:on	4:on	5:on	6:off
php-fpm        	0:off	1:off	2:on	3:on	4:on	5:on	6:off
zabbix_agentd  	0:off	1:off	2:off	3:on	4:on	5:on	6:off
zabbix_server  	0:off	1:off	2:off	3:on	4:on	5:on	6:off
5-3、检查监听端口
zabbix-server默认监听10051端口
zabbix-agent默认监听10050端口
[root@localhost zabbix-3.4.3]# netstat -antup | grep  zabbix
tcp        0      0 0.0.0.0:10050           0.0.0.0:*               LISTEN      25984/zabbix_agentd
tcp        0      0 0.0.0.0:10051           0.0.0.0:*               LISTEN      25883/zabbix_server
6、配置web网页
6-1、复制zabbix平台目录到nginx默认家目录
[root@localhost zabbix-3.4.3]# rm -f /usr/local/nginx/html/*
[root@localhost zabbix-3.4.3]# cp -r /usr/local/src/zabbix-3.4.3/frontends/php/* /usr/local/nginx/html/
6-2 添加index.php
修改nginx配置文件让nginx支持index.php
[root@localhost zabbix-3.4.3]# vim /usr/local/nginx/conf/nginx.conf
43         location / {
44             root   html;
45             index  index.php index.html index.htm;
46         }
6-3、重启服务
重启nginx服务、zabbix_server服务、php-fpm服务
[root@localhost zabbix-3.4.3]# /usr/local/nginx/sbin/nginx -s reload
[root@localhost zabbix-3.4.3]# /usr/local/zabbix/sbin/zabbix_server
[root@localhost zabbix-3.4.3]# /etc/init.d/php-fpm restart
Gracefully shutting down php-fpm . done
Starting php-fpm  done
6-4、开放网络端口
开放10050、10051网络端口
[root@localhost zabbix-3.4.3]# firewall-cmd --permanent --add-port=10050/tcp
success
[root@localhost zabbix-3.4.3]# firewall-cmd --permanent --add-port=10051/tcp
success
[root@localhost zabbix-3.4.3]# firewall-cmd --reload
success
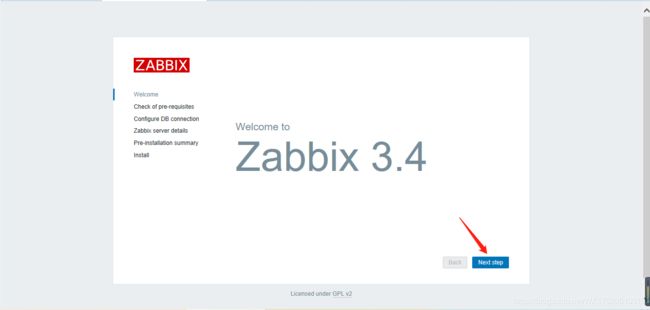
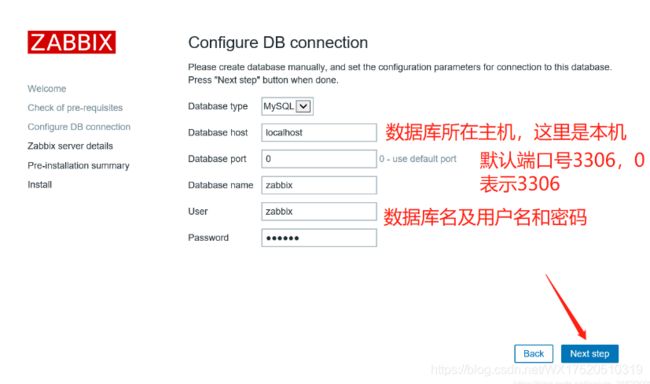
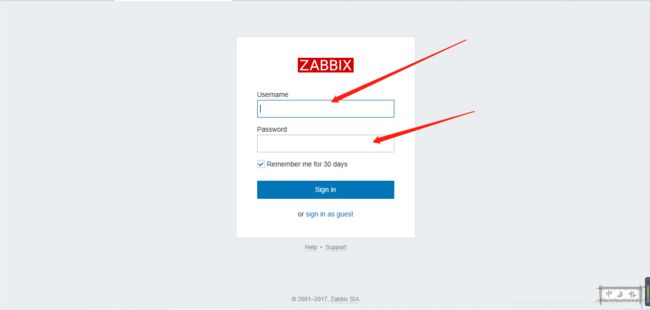
7、使用浏览器登陆zabbix平台
在浏览器地址栏输入IP+setup.php进入安装页面
![]()
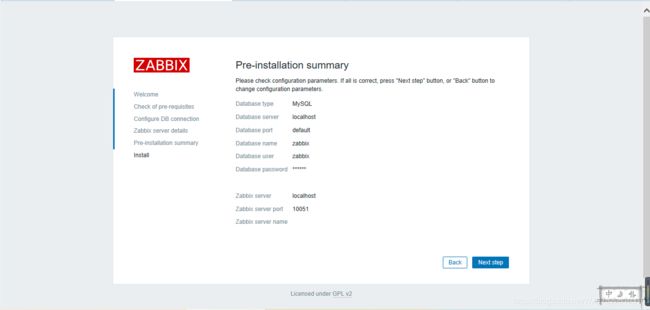
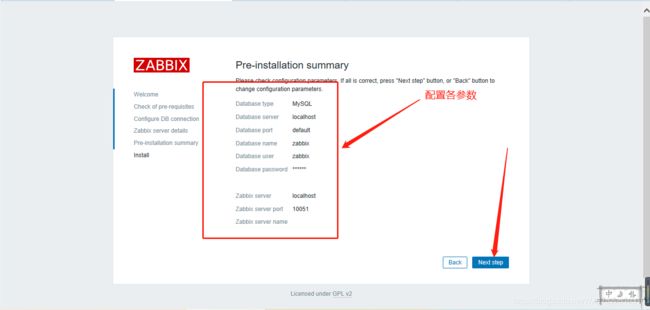
点击下一步
8、安装引导排除
8-1、PHP配置修改
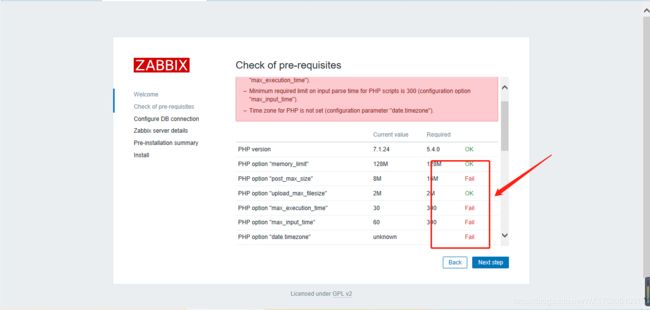
提示PHP配置问题
# 查看下mysql的sock文件所在为位置,方便php配置文件的1170行填写信息
[root@localhost ~]# ll /var/lib/mysql/mysql.sock
srwxrwxrwx 1 mysql mysql 0 6月  24 07:24 /var/lib/mysql/mysql.sock
[root@localhost ~]# vim /usr/local/php/php.ini
 671 post_max_size = 16M
 383 max_execution_time = 300
 393 max_input_time = 300
 939 date.timezone =Asia/shanghai
 1170 mysqli.default_socket = /var/lib/mysql/mysql.sock
重启php-fpm使其配置生效
[root@localhost zabbix-3.4.3]#  /etc/init.d/php-fpm restart
Gracefully shutting down php-fpm . done
Starting php-fpm  done
8-2、安装PHP LDAP模块
报错提示未安装PHP LDAP模块
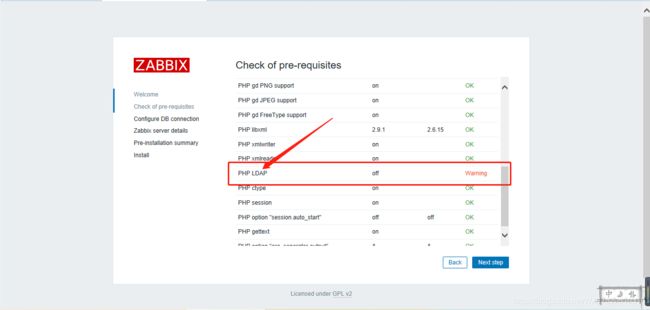
8-2-1、配置openldap环境
配置openldap环境,不然编译前准备会报错
[root@localhost zabbix-3.4.3]# yum install -y openldap-devel openldap
[root@localhost ~]# ln -s /usr/lib64/libldap* /usr/lib/
8-2-2、生成configure文件
进入到php源码包的扩展模块的ldap目录下、执行脚本phpize,生成configure文件
[root@localhost ~]# cd /usr/local/src/php-7.1.24/ext/ldap/
[root@master ldap]# /usr/local/php/bin/phpize
Configuring for:
PHP Api Version:         20160303
Zend Module Api No:      20160303
Zend Extension Api No:   320160303
8-2-3、指定配置文件
[root@localhost ldap]# ./configure --with-php-config=/usr/local/php/bin/php-config --with-ldap
8-2-4、生成二进制安装包并安装
[root@localhost ldap]# make && make install
8-2-5、修改php配置文件
编辑php配置文件,最后加入ldap.so即可
[root@localhost ~]# vim /usr/local/php/php.ini
extension = ldap.so
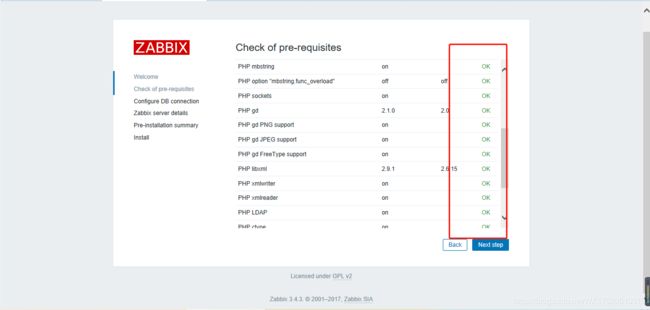
8-3、重启php-fpm
重启php-fpm服务使修改配置生效
[root@localhost ~]# /etc/init.d/php-fpm restart
Gracefully shutting down php-fpm . done
Starting php-fpm  done
8-4、重新进入页面问题解决
9、引导安装
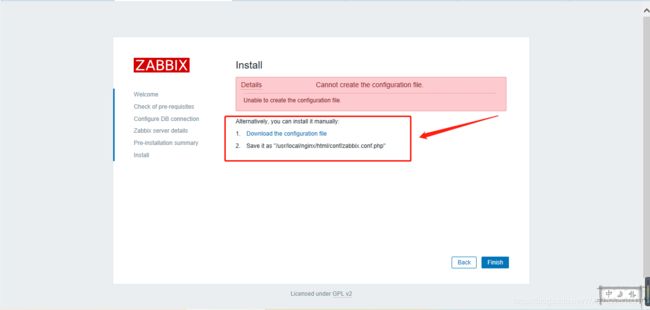
9-1、初始化配置

下载该文件保存到提示的文件夹
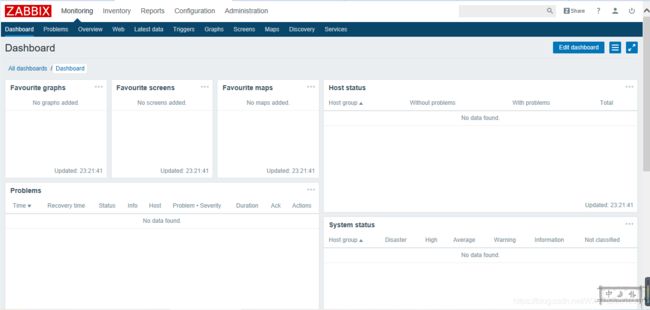
输入账号密码登录 默认用户名和密码是Admin和zabbix。刚登录是看到以下界面
调整中文

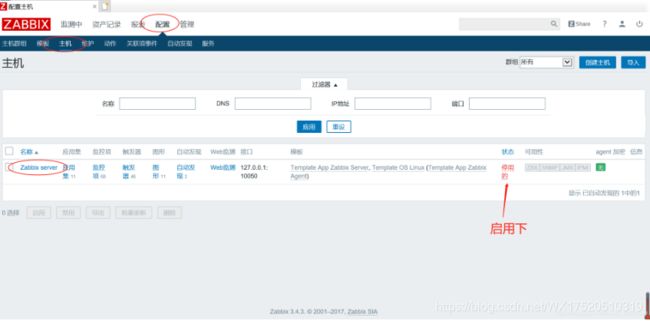
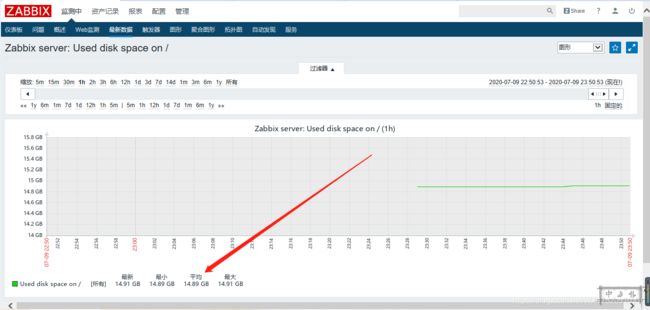
配置监控zabbix服务器自身:
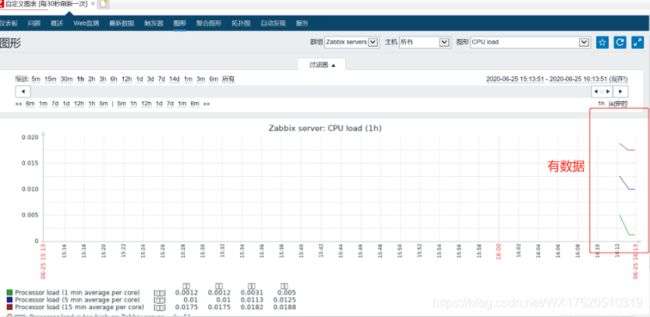
查看监控数据:
9-2、解决中文乱码
①找到window下的字体文件,一般在目录C:\Windows\Fonts下
②找到微软雅黑,右键复制到桌面 之后把MSYH.TTC复制到nginx关于html的字体目录下。


[root@localhost ~]# cd /usr/local/nginx/html/fonts/
[root@localhost fonts]# ls
DejaVuSans.ttf
# 备份原来的ttf文件,将从windows复制过来的字体文件改为默认ttf名称。
# 这里选择黑体 常规
[root@localhost fonts]# ls
DejaVuSans.ttf  MSYH.TTC
[root@localhost fonts]# mv DejaVuSans.ttf DejaVuSans.ttf.bak
[root@localhost fonts]# mv MSYH.TTC DejaVuSans.ttf
[root@localhost fonts]# ls
DejaVuSans.ttf  DejaVuSans.ttf.bak
# 再刷新下web,可以看到显示已经正常了。
问题解决
10、添加监控主机
10-1、在另外一台服务器上安装agent
这里用了一台192.168.8.73的虚拟机
[root@localhost ~]# ifconfig
ens32: flags=4163<UP,BROADCAST,RUNNING,MULTICAST>  mtu 1500
        inet 192.168.8.73  netmask 255.255.255.0  broadcast 192.168.8.255
        inet6 fe80::dcef:5eca:ddab:c42d  prefixlen 64  scopeid 0x20<link>
        inet6 fdf4:8aad:a590:0:446c:2e10:b4e0:9c98  prefixlen 64  scopeid 0x0<global>
        inet6 fdf4:8aad:a590::1bf  prefixlen 128  scopeid 0x0<global>
        ether 00:0c:29:c3:9d:af  txqueuelen 1000  (Ethernet)
        RX packets 1996  bytes 1510833 (1.4 MiB)
        RX errors 0  dropped 0  overruns 0  frame 0
        TX packets 1790  bytes 206152 (201.3 KiB)
        TX errors 0  dropped 0 overruns 0  carrier 0  collisions 0
10-1-1、安装zabbix源
[root@localhost ~]# wget https://mirrors.tuna.tsinghua.edu.cn/zabbix/zabbix/3.4/rhel/7/x86_64/zabbix-agent-3.4.14-1.el7.x86_64.rpm
[root@localhost ~]# rpm -ivh zabbix-agent-3.4.14-1.el7.x86_64.rpm
10-1-2、修改agent配置
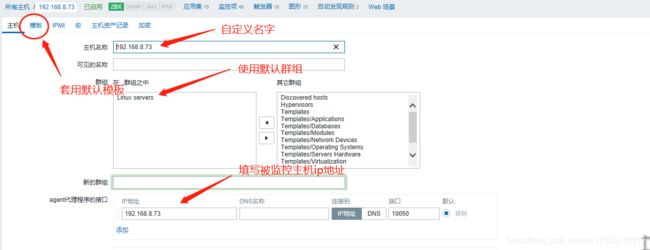
修改zabbix-agent默认参数修改为zabbix-server主机的ip
[root@localhost ~]# vim /etc/zabbix/zabbix_agentd.conf
98 Server=192.168.8.80
139 ServerActive=192.168.8.80
10-1-3、启动agent并加入开机启动
[root@localhost ~]# systemctl start zabbix-agent.service
[root@localhost ~]# systemctl enable zabbix-agent.service
Created symlink from /etc/systemd/system/multi-user.target.wants/zabbix-agent.service to /usr/lib/systemd/system/zabbix-agent.service.

[root@localhost ~]# netstat -antup | grep zabbix
tcp        0      0 0.0.0.0:10050           0.0.0.0:*               LISTEN      11905/zabbix_agentd
tcp6       0      0 :::10050                :::*                    LISTEN      11905/zabbix_agentd
10-1-4、开放10050端口
[root@localhost ~]# firewall-cmd --permanent --add-port=10050/tcp
success
[root@localhost ~]# firewall-cmd --reload
success
10-2、zabbix平台添加主机
进入平台点击添加主机
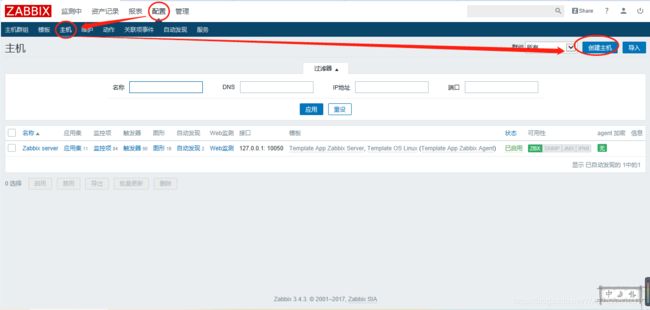


大功告成!!!