Spring Boot是由Pivotal团队提供的全新框架,其设计目的用来简化新Spring应用初始化搭建以及开发过程,该框架使用了我写的方式进行配置,从而开发人员不再需要定义样板化的配置,通过这种方式,Spring Boot将致力于在蓬勃发展的快速应用开发领域(Rapid Application Developoment)成为领导者。
创建独立的Spring 应用程序。
嵌入的Tomcat ,无须部署WAR文件。
简化Maven配置
提供生产就绪型功能,如指标,健康检查和外部配置。
绝对没有代码生成,以及对XML没有配置要求。
当然,这样的介绍似乎太过于官方化,好像没有什么帮助我们理解 Spring Boot 到底做了什么,我们不妨通过一个小小的例子来快速的了解Spring Boot .
    4.0.0

        org.springframework.boot
        spring-boot-starter-parent
        2.4.5


    com.example
    spring-boot-study
    0.0.1-SNAPSHOT
    spring-boot-study
    Demo project for Spring Boot

        1.8


            org.springframework.boot
            spring-boot-starter-web


            org.springframework.boot
            spring-boot-starter-test
            test


                org.springframework.boot
                spring-boot-maven-plugin
然后我们创建一个Controller类
@RestController
public class TestController {

    @RequestMapping("/home")
    public String home(){
        return "hello world";
    }
}
@SpringBootApplication
public class SpringBootStudyApplication {
public static void main(String[] args) {
SpringApplication .run(SpringBootStudyApplication.class, args);
}
}
以上就是我们要准备的示例的所有内容,最后我们尝试启动main函数并在浏览器中输入localhost:8080 ,发现浏览器显示如下图所示:
测试结果:
这一切都似乎完全超出我们的预料,按照之前的经验,如果要构建这样一套MVC体系,似乎是非常麻烦的,至少要引入一大堆的pom依赖,同时,最为神奇的是整个过程是我们似乎根本没有启动过Tomcat,但是当我们运行函数的时候Tomcat居然自动起起来了,而且还能通过浏览器访问,这一切都是那样的顺其自然,这里留下悬念,后面我们再来探索。
可以认为 它是当前独立业务开发模块对外暴露可以直接调用的接口。
public interface HelloService {

    String sayHello();
}
我们对这个接口做一个简单的实现,返回hello 字符串。
@Service
public class HelloServiceImpl implements HelloService {
    @Override
    public String sayHello() {
        return "hello !!";
    }
}
以上的实现为了尽量屏蔽Spring Boot基础理论以外的东西,把演示设计处尽量简单,如果是真实业务,这个接口以及接口实现可能会非常复杂,甚至还会间接的依赖于非常多的其他bean,它基本上就是一个独立的业务模块,当然这个模块并不是自己部署的,而是运行在依赖它的主函数中,如果我们开发到这种程度,想要主函数感知的话,也并不是不可以,但是至少要让主工程知道当前业务的bean路径并加入到scan列表中,否则在Spring启动的过程中没有办法反cLient中所有的bean载入Spring容器,逻辑也就没法生效了,但是,随着业务的增长,模块也会越来越多,越来越分散,大量的配置在主函数中维护,这会造成主函数非常的臃肿及冲突严重,而且根据职责划分原则,以上的例子中主模块只关心自己是否使用外部依赖的模块以及对应的接口就好了,再让主模块感知对应的路径等细节信息显然是不合适的,于是,在Spring出来之前我们会尝试把Scan等配置项写入到XML里面。然后让主函数直接引用配置项,这样,主函数知道的事情就进一步减少了,但是还有没有有更好的解决方式呢?或者,还有没有更好的办法能让主函数做更少的事情呢?Spring Boot 做到这一点,继续追加代码,添加自动配置项。
探索SpringApplication启动Spring
我们找到主函数入口SpringBootDemoApplication,发现这个入口的启动还是比较奇怪的,这也是Spring Boot启动的必要做法,那么,这也可以作为我们分析Spring Boot 的入口。
@SpringBootApplication
public class SpringBootStudyApplication {
public static void main(String[] args) {
SpringApplication .run(SpringBootStudyApplication.class, args);
}
}
当顺着SpringApplication.run方法进入的时候我们己经找到了SpringApplication的一个看似核心逻辑的方法。
public ConfigurableApplicationContext run(String... args) {
StopWatch stopWatch = new StopWatch();
stopWatch.start();
DefaultBootstrapContext bootstrapContext = createBootstrapContext();
ConfigurableApplicationContext context = null;
configureHeadlessProperty();
SpringApplicationRunListeners listeners = getRunListeners(args);
listeners.starting(bootstrapContext, this.mainApplicationClass);
try {
ApplicationArguments applicationArguments = new DefaultApplicationArguments(args);
//为Spring boot项目准备环境 //Spring boot启动banner打印 context = createApplicationContext();
context.setApplicationStartup(this.applicationStartup);
prepareContext(bootstrapContext, context, environment, listeners, applicationArguments, printedBanner);
refreshContext(context);
afterRefresh(context, applicationArguments);
stopWatch.stop();
if (this.logStartupInfo) {
new StartupInfoLogger(this.mainApplicationClass).logStarted(getApplicationLog(), stopWatch);
}
listeners.started(context);
callRunners(context, applicationArguments);
}
catch (Throwable ex) {
handleRunFailure(context, ex, listeners);
throw new IllegalStateException(ex);
}
try {
listeners.running(context);
}
catch (Throwable ex) {
handleRunFailure(context, ex, null);
throw new IllegalStateException(ex);
}
return context;
}
首先我们来看看环境配置这一块。
private ConfigurableEnvironment prepareEnvironment(
SpringApplicationRunListeners listeners,
ApplicationArguments applicationArguments) {
//获取或者创建环境变量,如果没有则创建,有则获取 //配制环境变量 //这一行代码很重要,我们的application.yml就是在这行代码中解析的
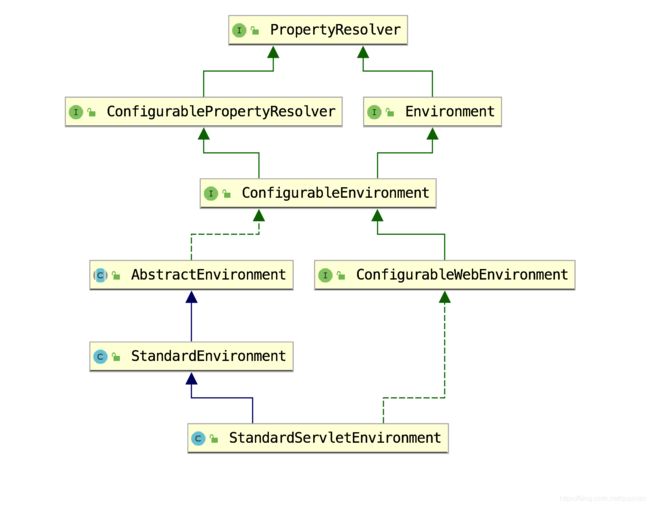
准备环境这一块,我们先来看最简单的方法getOrCreateEnvironment。
private ConfigurableEnvironment getOrCreateEnvironment() {
//如果环境存在,则直接返回,不存在则创建 //如果是web环境,就创建StandardServletEnvironment,否则创建普通的StandardEnvironment webEnvironment ) {
return new StandardServletEnvironment();
}
return new StandardEnvironment();
}
那什么环境下是web环境呢?我们来看看源码。在SpringApplication类中有一个initialize()方法,方法中有一行代码this.webEnvironment = deduceWebEnvironment();,对webEnvironment赋值。
private boolean deduceWebEnvironment() {
for (String className : " { "javax.servlet.Servlet",
"org.springframework.web.context.ConfigurableWebApplicationContext " }") {
if (!ClassUtils.isPresent(className, null)) {
return false;
}
}
return true;
}
最终得出结论。如果存在ConfigurableWebApplicationContext类,则使用StandardServletEnvironment环境,如果不存在,则使用StandardEnvironment环境。显然在web应用中肯定存在ConfigurableWebApplicationContext类,所以使用StandardServletEnvironment环境,其实在以前的博客中分析Spring 源码时也分析过StandardServletEnvironment这个类,但是为了大家不要那么麻烦,这里就再来分析一遍。我们进入StandardServletEnvironment类。
public class StandardServletEnvironment extends StandardEnvironment implements ConfigurableWebEnvironment {
@Override
protected void customizePropertySources(MutablePropertySources propertySources) {
propertySources.addLast(new StubPropertySource("servletConfigInitParams "));
propertySources.addLast(new StubPropertySource("servletContextInitParams "));
if (JndiLocatorDelegate.isDefaultJndiEnvironmentAvailable()) {
propertySources.addLast(new JndiPropertySource("jndiProperties "));
}
super.customizePropertySources(propertySources);
}
@Override
public void initPropertySources(ServletContext servletContext, ServletConfig servletConfig) {
WebApplicationContextUtils.initServletPropertySources(getPropertySources(), servletContext, servletConfig);
}
}
好像有点可惜,因为new StandardServletEnvironment()好像没有做任何事情嘛?真的吗?那先来看一下类结构。
public class StandardEnvironment extends AbstractEnvironment {
@Override
protected void customizePropertySources(MutablePropertySources propertySources) {
propertySources.addLast(new MapPropertySource("systemProperties ", getSystemProperties()));
propertySources.addLast(new SystemEnvironmentPropertySource("systemEnvironment ", getSystemEnvironment()));
}
}
好像也没有什么发现,也就是标准环境参数中设置了系统环境属性及变量,不到黄河心不死,我们继续看父类。
public abstract class AbstractEnvironment implements ConfigurableEnvironment {
private final MutablePropertySources propertySources = new MutablePropertySources(this.logger);
public AbstractEnvironment() {
customizePropertySources (this.propertySources);
if (logger.isDebugEnabled()) {
logger.debug("Initialized " + getClass().getSimpleName() + " with PropertySources " + this.propertySources);
}
}
省略...
}
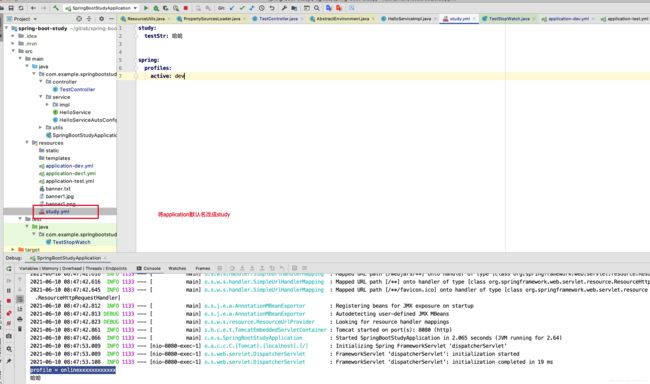
终于功夫不负有心人,我们找到我们想要看到的结果了,在构造函数中,调用了customizePropertySources方法。也就是说StandardServletEnvironment在new的时候会调用其customizePropertySources方法。在这个方法中会初始化servletConfigInitParams及servletContextInitParams,以及System.getProperties()及 System.getenv()加入到环境中,那这有什么应用场景呢?有一定开发经验的小伙伴肯定知道,线上的配置文件和开发测试的配置文件肯定不是一样的,我们在服务器上一般使用【nohup /usr/local/jdk1.8.0_74/bin/java -jar -Dspring.profiles.active=test api-web.jar >/dev/null 2>&1 & 】命令来启动Spring boot项目,其中spring.profiles.active参数就是来区分不同的环境(dev 为开发环境,test为测试环境,online为线上环境),而spring.profiles.active参数的获取就是在System.getProperties()方法中。先来举个例子,在idea 中配置环境变量test。test ,那么Spring boot会使用哪个active呢?疑问先留在这里,我们继续来跟进源码。
protected void configureEnvironment(ConfigurableEnvironment environment,
String[] args) {
configurePropertySources(environment, args);
//设置active文件
configurePropertySources上述两个方法,第一个方法主要是将SpringApplication中配置的默认defaultProperties加入到环境中,同时将args也加入到环境中。代码如下
protected void configurePropertySources(ConfigurableEnvironment environment,
String[] args) {
MutablePropertySources sources = environment.getPropertySources();
//如果配置了defaultProperties //默认的配置添加到sources的最后,起到兜底r的作用,因为getProperty方法获取属性,
//先遍历sources,取到了,则直接返回了,当最终都没有找到属性,就只能到默认的defaultProperties中获取属性了 defaultProperties ", this.defaultProperties));
}
if (this.addCommandLineProperties && args.length > 0) {
String name = "commandLineArgs ";
if (sources.contains(name)) {
//如果环境中己经存在名字为commandLineArgs的对象,则创建一个新的包装类CompositePropertySource,
//替换掉原来的SimpleCommandLinePropertySource对象
//而CompositePropertySource中propertySources属性中存储多个SimpleCommandLinePropertySource对象 //如果环境中没有commandLineArgs,则创建SimpleCommandLinePropertySource对象存储到环境中
//命令行配置的参数放到sources第一位,在获取属性时优先被获取到
SimpleCommandLinePropertySource也是一个数据源PropertySource ;但是它主要是存放命令行属性;例如启动参数Args;中的属性就会保存在这个对象中; 并且SimpleCommandLinePropertySource会被放入到Environment中; 所以也就可以通过{@link Environment#getProperty(String)}来获取命令行的值了
可能有人感觉上面的代码commandLineArgs这一块难以理解。那我们继续跟进代码。
public SimpleCommandLinePropertySource(String... args) {
super(new SimpleCommandLineArgsParser().parse (args));
}
看到了parse()方法,我们进入这个方法看看
class SimpleCommandLineArgsParser {
//创建CommandLineArgs对象 parse (String... args) {
CommandLineArgs commandLineArgs = new CommandLineArgs();
for (String arg : args) {
//进循环,判断是否以--开头 //如果是就截取,截取长度是参数长度,如果命令是--spring,那么就从s开始截取,包括s //如果匹配到了=号,截取=号左边做optionName,右边做optionValue //如果没有=号,optionName 直接就是截取的optionText //这里将解析的参数添加到上面创建的CommandLineArgs对象中,该对象中有一个Map来存放 //不是--开头就是直接添加到非选项参数 //最后返回对象
那我们来看看网上怎么说,Spring对应用程序运行的命令行参数进行了抽象,这个抽象是类CommandLineArgs。
option 参数
以 --开头
可以认为是name/value对参数
例子 : --foo, --foo=bar
非 option 参数
不以 --开头
可以认为是只提供了value的参数(具体怎么理解这个值,看业务逻辑的需求)
从代码中得知,以–开头的参数设置到了CommandLineArgs对象的optionArgs参数中,将不以–开头的参数添加到CommandLineArgs的nonOptionArgs参数中。说了这么多,我们先来看一个例子,假如我们要在项目启动时设置分页默认参数,默认为第一页,每页10行。
编写业务测试类
@RequestMapping("/query")
public String home(Integer pageNum, Integer pageSize) {
    if (pageNum == null) {
        ApplicationContext applicationContext = SpringContextUtils.getApplicationContext();
        Environment environment = applicationContext.getEnvironment();
        pageNum = Integer.parseInt(environment.getProperty("pageNum"));
        pageSize = Integer.parseInt(environment.getProperty("pageSize"));
        System.out.println("前端没有设置pageNum,pageSize ,使用系统默认的配置参数");
    }
    System.out.println("====pageNum==" + pageNum + ", pageSize = " + pageSize);
    return "SUCESS";

}
设置兜底参数
@SpringBootApplication
public class SpringBootStudyApplication {
public static void main(String[] args) {
SpringApplication springApplication = new SpringApplication(SpringBootStudyApplication.class);
Map defaultProperties = new HashMap<>();
defaultProperties.put("pageNum",1);
defaultProperties.put("pageSize",20);
//设置兜底参数 defaultProperties );
springApplication.setBannerMode(Banner.Mode.CONSOLE);
springApplication.run(args);
//SpringApplication.run(SpringBootStudyApplication.class, args);
}
}
测试1: 运维设置了pageNum=1和pageSize=18,但是前端没有传pageNum和pageSize
protected T getProperty(String key, Class targetValueType, boolean resolveNestedPlaceholders) {
if (this.propertySources != null) {
//遍历所有的propertySources //调用每个propertySource的Property方法 //如果value不为空,转化为泛型类型
从上述代码中可以看到,越在前的propertySource,优先获取到,因此defaultProperties只有做为兜底参数。
protected void configureProfiles(ConfigurableEnvironment environment, String[] args) {
	environment.getActiveProfiles();
	Set profiles = new LinkedHashSet(this.additionalProfiles);
	profiles.addAll(Arrays.asList(environment.getActiveProfiles()));
	environment.setActiveProfiles(profiles.toArray(new String[profiles.size()]));
}
在这一行代码中environment.getActiveProfiles();确保了spring.profiles.active的存在。那是如何确保的呢?我们来看代码。
public String[] getActiveProfiles() {
return StringUtils.toStringArray(doGetActiveProfiles ());
}
protected Set doGetActiveProfiles () {
synchronized (this.activeProfiles) {
if (this.activeProfiles.isEmpty()) {
String profiles = getProperty("spring.profiles.active ");
if (StringUtils.hasText(profiles)) {
//profiles以逗号隔开
我们一般情况下指定一个配置文件,但是有个时候,我们需要每个环境指定多个配置文件,不同的配置文件中配制相关的业务。先来举个例子吧。在开发环境中配置两个配置文件application-dev.yml,application-dev1.yml,需要同时使用两个配置文件中的内容。
//test1.profile配置在application-dev1.yml并且配置了yyy //test.profile配置在application-dev.yml并且配置了xxx
public void load() {
this.propertiesLoader = new PropertySourcesLoader();
this.activatedProfiles = false;
this.profiles = Collections.asLifoQueue(new LinkedList());
this.processedProfiles = new LinkedList();
//通过profile标识不同的环境,可以通过设置spring.profile.active和spring.profiles.default,
//如果设置了active,default就失去了作用,如果这两个设置都没有,那么带profiles的bean都不会生成 initialActiveProfiles = initializeActiveProfiles();
this.profiles.addAll(getUnprocessedActiveProfiles(initialActiveProfiles));
if (this.profiles.isEmpty()) {
for (String defaultProfileName : this.environment.getDefaultProfiles()) {
Profile defaultProfile = new Profile(defaultProfileName, true);
if (!this.profiles.contains(defaultProfile)) {
this.profiles.add(defaultProfile);
}
}
}
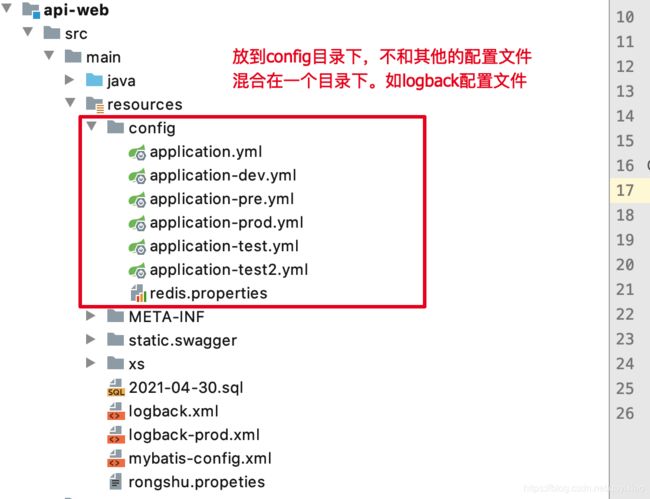
//支持不添加任何profile注解的bean的加载 //Spring Boot默认从4个位置查的application.properties文件就是从getSearchLocations()
//方法中返回的,
//1.当前目录下的/config
//2.当前目录
//3.类路径下的/config目录
//4.类路径的根目录 //如果目录不以/结尾,则表示路径本身就是一个文件,如路径为/Users/quyixiao/Desktop,
//则Spring boot 就会去解析Desktop文件,而不会到/Users/quyixiao/Desktop/目录下寻找了。
//如果路径为/Users/quyixiao/Desktop/,则会到目录下寻找相应的文件 //如果没有配置则默认从application.properties中加载,约定大于配置
我们之前不是愁怎样找到application文件吗?看到getSearchLocations()方法后,我们就知道了在哪个路径下找文件了。我们进入getSearchLocations方法。
private Set getSearchLocations() {
//项目启动时是否配置了spring.config.location参数,如果配置该参数,则到该目录下寻找 locations = new LinkedHashSet();
if (this.environment.containsProperty("spring.config.location ")) {
for (String path : asResolvedSet(
this.environment.getProperty("spring.config.location "), null)) {
if (!path.contains("$")) {
path = StringUtils.cleanPath(path);
if (!ResourceUtils.isUrl(path)) {
path = "file: "+ path;
}
}
locations.add(path);
}
}
//默认到classpath:/,classpath:/config/,file:./,file:./config/下寻找 classpath:/,classpath:/config/,file:./,file:./config/ "));
return locations;
}
getSearchLocations()方法的原理也很简单,看环境中是否配置了spring.config.location参数,如果配置了,则到spring.config.location下寻找配置文件,如果没有配置,则默认到classpath:/,classpath:/config/,file:./,file:./config/目录下寻找配置文件,
private Set getSearchNames() {
if (this.environment.containsProperty("spring.config.name ")) {
return asResolvedSet(this.environment.getProperty("spring.config.name "),
null);
}
return asResolvedSet(ConfigFileApplicationListener.this.names, "application ");
}
getSearchNames()方法和getSearchLocations()原理一样,如果环境中配置了spring.config.name属性,则找spring.config.name文件名作解析,如果没有则,使用系统默认的文件名application。spring.config.location=/home/admin/web/ spring.config.name=application api-web.jar >/dev/null 2>&1 &
在idea中模似线上环境
修改config-name
在我的桌面添加线上配置文件
在配置文件中添加配置
创建测试方法,并测试
那我们找到了配置文件的路径和文件名,那我们怎样来解析yml或properties文件呢?我们接着之前的代码继续分析。
private void load(String location, String name, Profile profile) {
String group = "profile=" + (profile == null ? "" : profile);
if (!StringUtils.hasText(name)) {
//如果配置的路径没有后缀 / 的情况 //遍历所有的PropertySourceLoader 文件后缀名
//PropertiesPropertySourceLoader支持properties和xml的解析
//YamlPropertySourceLoader支持"yml", "yaml"的解析 //对application-dev.yml文件解析 //对application.yml配置文件解析
从配置文件的解析顺序,我们得出一个结论,如果相同的配置,application-dev.yml中也配置了,application.yml中也配置了,如启动端口,则以application-dev.yml中的配置为准。因为其先被解析。而getProperty的逻辑是,遍历propertySources,越早被解析的配置文件,配置的属性优先被使用。举个例子,在application-dev.yml中配置了server.port=8888,在application中配置了server.port=8502,那最终项目启动占用的端口是8888。
private PropertySource loadIntoGroup(String identifier, String location,
		Profile profile) {
	try {
		return doLoadIntoGroup(identifier, location, profile);
	}
	catch (Exception ex) {
		throw new IllegalStateException(
				"Failed to load property source from location '" + location + "'",
				ex);
	}
}


private PropertySource doLoadIntoGroup(String identifier, String location,
		Profile profile) throws IOException {
	Resource resource = this.resourceLoader.getResource(location);
	PropertySource propertySource = null;
	StringBuilder msg = new StringBuilder();
	if (resource != null && resource.exists()) {
		String name = "applicationConfig: [" + location + "]";
		String group = "applicationConfig: [" + identifier + "]";
		propertySource = this.propertiesLoader.load(resource, group, name,
				(profile == null ? null : profile.getName()));
		if (propertySource != null) {
			msg.append("Loaded ");
			handleProfileProperties(propertySource);
		}
		else {
			msg.append("Skipped (empty) ");
		}
	}
	else {
		msg.append("Skipped ");
	}
	msg.append("config file ");
	msg.append(getResourceDescription(location, resource));
	if (profile != null) {
		msg.append(" for profile ").append(profile);
	}
	if (resource == null || !resource.exists()) {
		msg.append(" resource not found");
		this.logger.trace(msg);
	}
	else {
		this.logger.debug(msg);
	}
	return propertySource;
}
上述方法中最重要的就是load方法了。我们继续跟进load方法。
public PropertySource load(Resource resource, String group, String name,
String profile) throws IOException {
if (isFile(resource)) {
String sourceName = generatePropertySourceName(name, profile);
for (PropertySourceLoader loader : this.loaders) {
if (canLoadFileExtension (loader, resource)) {
PropertySource specific = loader.load(sourceName, resource,
profile);
addPropertySource(group, specific, profile);
return specific;
}
}
}
return null;
}
上述代码选资源加载器PropertySourceLoader就像我们人一样,老板拿了一个活过来,问大家,谁有能力去做这个事情,每个人都问一遍,始终有人会做,就让这个会做的人,将结果给老板即可。
public PropertySource load(String name, Resource resource, String profile)
		throws IOException {
	if (ClassUtils.isPresent("org.yaml.snakeyaml.Yaml", null)) {
		Processor processor = new Processor(resource, profile);
		Map source = processor.process();
		if (!source.isEmpty()) {
			return new MapPropertySource(name, source);
		}
	}
	return null;
}
上述需要注意的是,当前类环境下必需有org.yaml.snakeyaml.Yaml类,才能解析yml文件,解析结果得到一个map。为了方便理解,我们自己来手写一个yml文件用例看看。
public class YmlTest {

    public static void main(String[] args)  throws Exception{
        ResourceLoader resourceLoader = new DefaultResourceLoader();
        Resource resource = resourceLoader.getResource("application.yml");
        Processor processor = new Processor(resource, null);
        Map source = processor.process();
        System.out.println(source);

    }

    private static class Processor extends YamlProcessor {
        Processor(Resource resource, String profile) {
            if (profile == null) {
                setMatchDefault(true);
                setDocumentMatchers(new SpringProfileDocumentMatcher());
            }
            else {
                setMatchDefault(false);
                setDocumentMatchers(new SpringProfileDocumentMatcher(profile));
            }
            setResources(resource);
        }

        @Override
        protected Yaml createYaml() {
            return new Yaml(new StrictMapAppenderConstructor(), new Representer(),
                    new DumperOptions(), new Resolver() {
                @Override
                public void addImplicitResolver(Tag tag, Pattern regexp,
                                                String first) {
                    if (tag == Tag.TIMESTAMP) {
                        return;
                    }
                    super.addImplicitResolver(tag, regexp, first);
                }
            });
        }
        public Map process() {
            final Map result = new LinkedHashMap();
            process(new MatchCallback() {
                @Override
                public void process(Properties properties, Map map) {
                    result.putAll(getFlattenedMap(map));
                }
            });
            return result;
        }
    }
}
【测试结果】
这里面涉及我们经常使用的profile机制的实现,profile机制是Spring提供的一个用来标明当前运行环境的注解,我们正常开发过程中经常遇到这样的问题,开发环境是一套环境,QA测试是一套环境,线上部署又是另外一套环境,从开发到测试再到部署,会对程序中的配置修改多次,特别是QA到上线这个环节,经过QA测试的也不敢保证改了哪个配置后能不能在线上运行。
我们花了大量的篇幅来分析Spring Boot环境变量这一块,下面来看看源码中的小技巧。
public void logStarted(Log log, StopWatch stopWatch) {
if (log.isInfoEnabled()) {
log.info(getStartedMessage (stopWatch));
}
}
private StringBuilder getStartedMessage(StopWatch stopWatch) {
StringBuilder message = new StringBuilder();
message.append("Started ");
message.append(getApplicationName());
message.append(" in ");
message.append(stopWatch.getTotalTimeSeconds ());
try {
double uptime = ManagementFactory.getRuntimeMXBean().getUptime() / 1000.0;
message.append(" seconds (JVM running for " + uptime + ")");
}
catch (Throwable ex) {
}
return message;
}
当看到getTotalTimeSeconds()方法,我相信读者恍然大悟。原来是统计Spring启动的时间的,是否是我们猜想的那样呢?那我们来看一个例子吧。
public static void main(String[] args) throws Exception{
    StopWatch stopWatch = new StopWatch();
    stopWatch.start();

    Thread.sleep(2300);

    stopWatch.stop();
    double time = stopWatch.getTotalTimeSeconds();
    System.out.println(time);
}
【测试结果】
private Banner printBanner(ConfigurableEnvironment environment) {
//如果banner的模式是 Banner.Mode.OFF,则不打印banner //bannerMode是Mode.LOG则会在服务器上打印banner,
//如果不是,则只有在本地开发时打印,在服务器上不会打印 //默认情况下bannerMode是Banner.Mode.CONSOLE,因此只有在本地打印启动banner,服务器上不打印banner
从上述方法中,我们可以看到,banner是否打印,以及打印方式和bannerMode有关系,那bannerMode又该如何设置呢?在代码中寻寻觅觅,没有找到合适的地方进行设置,没有办法,只能以不太优雅的操作来修改banner的打印方式。如下:
public static void main(String[] args) {
SpringApplication springApplication = new SpringApplication(SpringBootStudyApplication.class);
//当设置bannerMode为Banner.Mode.OFF,关闭banner打印,设置bannerMode为Banner.Mode.LOG,则服务器上也能打印banner //SpringApplication.run(SpringBootStudyApplication.class, args);
接下来,我们继续来看,既然能修改打印方式,那打印的内容是否能修改呢?想想Spring的灵活性,不可能不给我们考虑到,因此肯定能修改,那该怎样修改呢?我们继续跟进源码。
public Banner print(Environment environment, Class sourceClass, PrintStream out) {
Banner banner = getBanner (environment, this.fallbackBanner);
banner.printBanner(environment, sourceClass, out);
return new PrintedBanner(banner, sourceClass);
}
private Banner getBanner(Environment environment, Banner definedBanner) {
Banners banners = new Banners();
banners.addIfNotNull(getImageBanner(environment));
banners.addIfNotNull(getTextBanner(environment));
if (banners.hasAtLeastOneBanner()) {
return banners;
}
if (this.fallbackBanner != null) {
return this.fallbackBanner;
}
return new SpringBootBanner();
}
private Banner getImageBanner(Environment environment) {
//如果环境变量中配置了banner.image.location,
//则取该位置的图片做为打印的banner banner.image.location ");
if (StringUtils.hasLength(location)) {
Resource resource = this.resourceLoader.getResource(location);
return (resource.exists() ? new ImageBanner(resource) : null);
}
// 如果当前resource下有banner.gif或banner.jpg,或banner.png,则作为打印的banner //如果环境中配置了banner.location,则取之文本作为banner打印,
//如果没有则取当前resource下的banner.txt作为默认的banner banner.location ",
"banner.txt ");
Resource resource = this.resourceLoader.getResource(location);
if (resource.exists()) {
return new ResourceBanner(resource);
}
return null;
}
既然源码都写得这么清楚了,那就按源码的意思测试一把。
在resources下添加banner.txt
我们将banner.txt换成banner.jpg试试,那我就用我的女神刘亦菲来测试一把
我还是用1.5.12.RELEASE来做源码分析,越高版本的代码,可能封装程度越高,但是对于阅读源码者来说,不一定是好事,反而早期的代码原理理解起来更加方便一点。
在这里,我们发现其他几个关键的字眼。context = createApplicationContext(); refreshContext(context);
SpringContext创建
ApplicationContextFactory DEFAULT = (webApplicationType) -> {
    try {
        switch (webApplicationType) {
        case SERVLET:
            return new AnnotationConfigServletWebServerApplicationContext();
        case REACTIVE:
            return new AnnotationConfigReactiveWebServerApplicationContext();
        default:
            return new AnnotationConfigApplicationContext();
        }
    }
    catch (Exception ex) {
        throw new IllegalStateException("Unable create a default ApplicationContext instance, "
                + "you may need a custom ApplicationContextFactory", ex);
    }
};
这个函数似乎没有什么特别的地方,无非就是实例化一个ApplicationContext,因为ApplicationContext昌Spring存在的基础,而对应的SpringContext候选类如下;
private void prepareContext(DefaultBootstrapContext bootstrapContext, ConfigurableApplicationContext context,
ConfigurableEnvironment environment, SpringApplicationRunListeners listeners,
ApplicationArguments applicationArguments, Banner printedBanner) {
context.setEnvironment(environment);
postProcessApplicationContext(context);
applyInitializers(context);
listeners.contextPrepared(context);
bootstrapContext.close(context);
if (this.logStartupInfo) {
logStartupInfo(context.getParent() == null);
logStartupProfileInfo(context);
}
// Add boot specific singleton beans
ConfigurableListableBeanFactory beanFactory = context.getBeanFactory();
beanFactory.registerSingleton("springApplicationArguments ", applicationArguments);
if (printedBanner != null) {
beanFactory.registerSingleton("springBootBanner ", printedBanner);
}
if (beanFactory instanceof DefaultListableBeanFactory) {
((DefaultListableBeanFactory) beanFactory)
.setAllowBeanDefinitionOverriding(this.allowBeanDefinitionOverriding);
}
if (this.lazyInitialization) {
context.addBeanFactoryPostProcessor(new LazyInitializationBeanFactoryPostProcessor());
}
// Load the sources
Set sources = getAllSources();
Assert.notEmpty(sources, "Sources must not be empty");
load(context, sources.toArray(new Object[0]));
listeners.contextLoaded(context);
}
这里面的load函数是我们比较感兴趣的,代码如下:
protected void load(ApplicationContext context, Object[] sources) {
if (logger.isDebugEnabled()) {
logger.debug("Loading source " + StringUtils.arrayToCommaDelimitedString(sources));
}
BeanDefinitionLoader loader = createBeanDefinitionLoader(getBeanDefinitionRegistry(context), sources);
if (this.beanNameGenerator != null) {
loader.setBeanNameGenerator(this.beanNameGenerator);
}
if (this.resourceLoader != null) {
loader.setResourceLoader(this.resourceLoader);
}
if (this.environment != null) {
loader.setEnvironment(this.environment);
}
loader.load();
}
相信读者看到BeanDefinitionLoader这个类的时候,基本上己经知道后续的逻辑了,bean的加载作为本书的最核心的部分在之前就己经分析过了。虽然己经解析过了,但是还是要看一下。
public int load() {
int count = 0;
for (Object source : this.sources) {
count += load(source);
}
return count;
}
private int load(Object source) {
Assert.notNull(source, "Source must not be null");
//source是class类型 //source是xml类型 load ((Resource) source);
}
//source是包类型 load ((Package) source);
}
if (source instanceof CharSequence) {
return load ((CharSequence) source);
}
throw new IllegalArgumentException("Invalid source type " + source.getClass());
}
之前有很多的博客都是围绕着xml及类的解析,xml我们都知道,通过loadBeanDefinitions将xml中所有的bean配置都解析成BeanDefinition,而类的解析就是对类的配置的注解解析,解析成beanDefinition。而在Spring Boot中,主要是类的解析,很少再用xml,因此,在这里,我们跟进类的解析。
private int load(Class source) {
if (isGroovyPresent()) {
if (GroovyBeanDefinitionSource.class.isAssignableFrom(source)) {
GroovyBeanDefinitionSource loader = BeanUtils.instantiateClass(source,
GroovyBeanDefinitionSource.class);
load(loader);
}
}
if (isComponent(source)) {
this.annotatedReader.register(source);
return 1;
}
return 0;
}
public void register(Class... annotatedClasses) {
for (Class annotatedClass : annotatedClasses) {
registerBean(annotatedClass);
}
}
public void registerBean(Class annotatedClass) {
registerBean(annotatedClass, null, (Class[]) null);
}
public void registerBean(Class annotatedClass, String name, Class... qualifiers) {
AnnotatedGenericBeanDefinition abd = new AnnotatedGenericBeanDefinition(annotatedClass);
if (this.conditionEvaluator.shouldSkip(abd.getMetadata())) {
return;
}
ScopeMetadata scopeMetadata = this.scopeMetadataResolver.resolveScopeMetadata (abd);
abd.setScope(scopeMetadata.getScopeName());
String beanName = (name != null ? name : this.beanNameGenerator.generateBeanName(abd, this.registry));
AnnotationConfigUtils.processCommonDefinitionAnnotations(abd);
if (qualifiers != null) {
for (Class qualifier : qualifiers) {
if (Primary .class == qualifier) {
abd.setPrimary(true);
}
else if (Lazy .class == qualifier) {
abd.setLazyInit(true);
}
else {
abd.addQualifier(new AutowireCandidateQualifier(qualifier));
}
}
}
}
看到上面的代码,我相信如果读者看过我之前的博客的小伙伴,肯定很熟悉了,这不就是使用ASM技术将Class的注解解析成BeanDefinition吗?博客如下https://blog.csdn.net/quyixiao/article/details/108929190
Spring 扩展属性的加载
protected void refresh(ApplicationContext applicationContext) {
Assert.isInstanceOf(ConfigurableApplicationContext.class, applicationContext);
refresh((ConfigurableApplicationContext) applicationContext);
}
对于Spring的扩展属性的加载则更加简单,因为这些都是Spring本身原有的东西,Spring Boot仅仅是使用refresh激活下而已,如果读者想回顾refresh的详细逻辑,可以看之前的博客。
总结 :
分析下来,Spring Boot的启动并不是我们想像的那样神秘,按照约定大于配置的原则,内置了Spring原有启动类,并在启动的时候及刷新 ,仅此而已。
Starter自动化配置原理
我们己经知道了Spring Boot如何启动Spring的,但上目前为止我们并没有揭开Spring Boot的面纱,究竟Starter是如何生效的呢?这些逻辑现在看来只能体现在注解上SpringBootApplication本身了。
@Target(ElementType.TYPE)
@Retention(RetentionPolicy.RUNTIME)
@Documented
@Inherited
@SpringBootConfiguration
@EnableAutoConfiguration
@ComponentScan(excludeFilters = { @Filter(type = FilterType.CUSTOM, classes = TypeExcludeFilter.class),
@Filter(type = FilterType.CUSTOM, classes = AutoConfigurationExcludeFilter.class) })
public @interface SpringBootApplication {
...
}
这其中我们更加关注SpringBootApplication上的注解内容,因为注解具有传递性,EnableAutoConfiguration是个非常特别的注解,它是Spring Boot的开关,如果把这个注解去掉,则一切Starter都会失效,这就是约定大于配置的潜规则了,那么Spring Boot的核心很可能就藏在这个注解里面;
@Target(ElementType.TYPE)
@Retention(RetentionPolicy.RUNTIME)
@Documented
@Inherited
@AutoConfigurationPackage
@Import(AutoConfigurationImportSelector.class)
public @interface EnableAutoConfiguration {
String ENABLED_OVERRIDE_PROPERTY = "spring.boot.enableautoconfiguration";
Class[] exclude() default {};
String[] excludeName() default {};
}
AutoConfigurationImportSelector作为Starter自动化导入关键选项终于浮现出来,那么Spring是怎样识别这个注解起作用的呢?我们来看这个类中只有一个办法,那么只要看一看到底是哪个方法调用它,就可以顺藤摸瓜找到最终调用的地方。
public class AutoConfigurationImportSelector implements DeferredImportSelector, BeanClassLoaderAware,
ResourceLoaderAware, BeanFactoryAware, EnvironmentAware, Ordered {
protected boolean isEnabled (AnnotationMetadata metadata) {
if (getClass() == AutoConfigurationImportSelector.class) {
return getEnvironment().getProperty(EnableAutoConfiguration.ENABLED_OVERRIDE_PROPERTY, Boolean.class, true);
}
return true;
}
}
spring.factories 的加载
顺着思路反向查找,看一看空间谁在那里调用了isEnabled函数,强大的编译器很容器帮我们定位到AutoConfigurationImportSelector类的方法:
public String[] selectImports (AnnotationMetadata annotationMetadata) {
if (!isEnabled (annotationMetadata)) {
return NO_IMPORTS;
}
AutoConfigurationEntry autoConfigurationEntry = getAutoConfigurationEntry(annotationMetadata);
return StringUtils.toStringArray(autoConfigurationEntry.getConfigurations());
}
protected AutoConfigurationEntry getAutoConfigurationEntry(AnnotationMetadata annotationMetadata) {
if (!isEnabled(annotationMetadata)) {
return EMPTY_ENTRY;
}
AnnotationAttributes attributes = getAttributes(annotationMetadata);
List configurations = getCandidateConfigurations (annotationMetadata, attributes);
configurations = removeDuplicates(configurations);
Set exclusions = getExclusions(annotationMetadata, attributes);
checkExcludedClasses(configurations, exclusions);
configurations.removeAll(exclusions);
configurations = getConfigurationClassFilter().filter(configurations);
fireAutoConfigurationImportEvents(configurations, exclusions);
return new AutoConfigurationEntry(configurations, exclusions);
}
它是一个非常核心的函数,可以帮我们解释很多的问题,在上面的函数中,有一个是我们比较关注的getCandidateConfigurations的函数。
protected List getCandidateConfigurations(AnnotationMetadata metadata, AnnotationAttributes attributes) {
List configurations = SpringFactoriesLoader.loadFactoryNames(getSpringFactoriesLoaderFactoryClass(),
getBeanClassLoader());
Assert.notEmpty(configurations, "No auto configuration classes found in META-INF/spring.factories . If you "
+ "are using a custom packaging, make sure that file is correct.");
return configurations;
}
从上面的函数中我们可以看到META-INF/spring.factories,在我们之前演示的环节,按照约定大于配置的原则,Starter如果要生效则必需在META-INF文件下建立spring.factories文件,并把相关的配置类声明在里面,虽然这仅仅是一个报错异常提示,但是其实我们己经可以推断出来这一定就是逻辑的处理之处,继续进入SpringFactoriesLoader类。
public static List loadFactoryNames(Class factoryType, @Nullable ClassLoader classLoader) {
ClassLoader classLoaderToUse = classLoader;
if (classLoaderToUse == null) {
classLoaderToUse = SpringFactoriesLoader.class.getClassLoader();
}
String factoryTypeName = factoryType.getName();
return loadSpringFactories(classLoaderToUse).getOrDefault(factoryTypeName, Collections.emptyList());
}
private static Map> loadSpringFactories(ClassLoader classLoader) {
Map> result = cache.get(classLoader);
if (result != null) {
return result;
}
result = new HashMap<>();
try {
Enumeration urls = classLoader.getResources("META-INF/spring.factories ");
while (urls.hasMoreElements()) {
URL url = urls.nextElement();
UrlResource resource = new UrlResource(url);
Properties properties = PropertiesLoaderUtils.loadProperties(resource);
for (Map.Entry entry : properties.entrySet()) {
String factoryTypeName = ((String) entry.getKey()).trim();
String[] factoryImplementationNames =
StringUtils.commaDelimitedListToStringArray((String) entry.getValue());
for (String factoryImplementationName : factoryImplementationNames) {
result.computeIfAbsent(factoryTypeName, key -> new ArrayList<>())
.add(factoryImplementationName.trim());
}
}
}
// Replace all lists with unmodifiable lists containing unique elements
result.replaceAll((factoryType, implementations) -> implementations.stream().distinct()
.collect(Collectors.collectingAndThen(Collectors.toList(), Collections::unmodifiableList)));
cache.put(classLoader, result);
}
catch (IOException ex) {
throw new IllegalArgumentException("Unable to load factories from location [" +
"META-INF/spring.factories " + "]", ex);
}
return result;
}
至此,我们终于明白了为什么Starter的生效必需要依赖于配置META-INF/spring.factories文件,因为在启动的过程中有一个硬编码的逻辑就是会扫描各个包的对应文件,并把配置捞取出来,但是捞取出来后又是怎样Spring整合的呢?或者说AutoConfigurationImportSelector.selectImport方法后把加载的类委托给谁来处理的呢?
factories调用时序图
META-INF/spring.factories中的配置文件是如何与Spring整合的呢?其路径还是比较深的,这里就不大段的话代码了,可以通过一个图去理解逻辑。
配置类的解析
截止到目前为止我们知道了Starter为什么要默认自身入口配置写在META-INF文件中的spring.factorries文件中,以及AutoConfigurationImportSelector的上下方调用链路,但是通过AutoConfiguuurationImportSelector.selectImports方法返回后的配置类又是如何进一步处理的呢?对照ConfigurationClassParser的processDeferredImportSelectors方法代码查看:
private static final Comparator DEFERRED_IMPORT_COMPARATOR =
new Comparator() {
@Override
public int compare(DeferredImportSelectorHolder o1, DeferredImportSelectorHolder o2) {
return AnnotationAwareOrderComparator.INSTANCE.compare(o1.getImportSelector(), o2.getImportSelector());
}
};
private void processDeferredImportSelectors() {
List deferredImports = this.deferredImportSelectors;
this.deferredImportSelectors = null;
Collections.sort(deferredImports, DEFERRED_IMPORT_COMPARATOR );
for (DeferredImportSelectorHolder deferredImport : deferredImports) {
ConfigurationClass configClass = deferredImport.getConfigurationClass();
try {
String[] imports = deferredImport.getImportSelector().selectImports(configClass.getMetadata());
processImports(configClass, asSourceClass(configClass), asSourceClasses(imports), false);
}
catch (BeanDefinitionStoreException ex) {
throw ex;
}
catch (Throwable ex) {
throw new BeanDefinitionStoreException(
"Failed to process import candidates for configuration class [" +
configClass.getMetadata().getClassName() + "]", ex);
}
}
}
其中
ConfigurationClassPostProcessor作为Spring扩展点是Spring Boot 一系列的功能基础入口。
ConfigurationClassParser 作为解析职责的基本处理类,包含了各种解析处理的逻辑,如@Import,@Bean,@ImportResource,@PropertySource,@ComponentScan等注解都是在这个注解类中完成的,而这个类对外开放的函数入口就是Parse方法,对应时序图中的步骤3。
在完成步骤3后,所有的解析结果己经通过3.2.2步骤放在了parse的configurationClasses属性中,这个时候对这个属性进行统一的Spring Bean硬编码注册,注册逻辑统一委托给ConfigurationClassBeanDefinitionReader,对外的接口是loadBeanDefinitions,对应步骤4 。
当然,在parse中的处理最复杂的是,parse中首先会处理自己本身的扫描的bean注册逻辑,然后才会处理Spring.factories定义的配置,处理spring.factores定义的配置首先就是要加载配置类,这个时候,EnableAutoConfigurationImportSelector提供的selectImports就被派上用场了,它返回的配置类需要进一步的解析,因为这些配置类中可能对应不同的类型,如@import,@Bean,@importResource,@PropertySource,@ComponentScan,而这些类又有不同的处理逻辑,例如ComponentScan,我们就能猜到这里面除了解析外一定还会有递归的解析处理逻辑,因为很有可能通过ComponentScan又扫描出了另一个ComponentScan配置。
Componentscan的切入点
这里重点讲解一下doProcessConfigurationClass函数,我们熟悉了很多注解逻辑实现都在这里。
protected final SourceClass doProcessConfigurationClass(ConfigurationClass configClass, SourceClass sourceClass)
throws IOException {
processMemberClasses(configClass, sourceClass);
for (AnnotationAttributes propertySource : AnnotationConfigUtils.attributesForRepeatable(
sourceClass.getMetadata(), PropertySources.class,
org.springframework.context.annotation.PropertySource.class)) {
if (this.environment instanceof ConfigurableEnvironment) {
processPropertySource(propertySource);
}
else {
logger.warn("Ignoring @PropertySource annotation on [" + sourceClass.getMetadata().getClassName() +
"]. Reason: Environment must implement ConfigurableEnvironment");
}
}
Set componentScans = AnnotationConfigUtils.attributesForRepeatable(
sourceClass.getMetadata(), ComponentScans.class, ComponentScan.class);
if (!componentScans.isEmpty() &&
!this.conditionEvaluator.shouldSkip(sourceClass.getMetadata(), ConfigurationPhase.REGISTER_BEAN)) {
for (AnnotationAttributes componentScan : componentScans) {
Set scannedBeanDefinitions =
this.componentScanParser.parse(componentScan, sourceClass.getMetadata().getClassName());
for (BeanDefinitionHolder holder : scannedBeanDefinitions) {
//对扫描出来的类进行过滤 //将所有扫描出来的类委托到parse方法中递归处理 parse(holder.getBeanDefinition().getBeanClassName(), holder.getBeanName());
}
}
}
}
processImports(configClass, sourceClass, getImports(sourceClass), true);
if (sourceClass.getMetadata().isAnnotated(ImportResource.class.getName())) {
AnnotationAttributes importResource =
AnnotationConfigUtils.attributesFor(sourceClass.getMetadata(), ImportResource.class);
String[] resources = importResource.getStringArray("locations");
Class readerClass = importResource.getClass("reader");
for (String resource : resources) {
String resolvedResource = this.environment.resolveRequiredPlaceholders(resource);
configClass.addImportedResource(resolvedResource, readerClass);
}
}
Set beanMethods = retrieveBeanMethodMetadata(sourceClass);
for (MethodMetadata methodMetadata : beanMethods) {
configClass.addBeanMethod(new BeanMethod(methodMetadata, configClass));
}
processInterfaces(configClass, sourceClass);
if (sourceClass.getMetadata().hasSuperClass()) {
String superclass = sourceClass.getMetadata().getSuperClassName();
if (!superclass.startsWith("java") && !this.knownSuperclasses.containsKey(superclass)) {
this.knownSuperclasses.put(superclass, configClass);
return sourceClass.getSuperClass();
}
}
return null;
}
而以上的数据中传递过来的参数ConfiurationClass configClass就是spring.factories中定义的配置类,这里我们重点关注一下ComponentScan注解的实现逻辑,首先通过代码。 componnetScans = AnnotationConfigUtils.attributesForRepeatable(sourceClass.getMetadata(),ComponentScans.class,ComponentScan.class);
public Set parse(AnnotationAttributes componentScan, final String declaringClass) {
Assert.state(this.environment != null, "Environment must not be null");
Assert.state(this.resourceLoader != null, "ResourceLoader must not be null");
ClassPathBeanDefinitionScanner scanner = new ClassPathBeanDefinitionScanner(this.registry,
componentScan.getBoolean("useDefaultFilters"), this.environment, this.resourceLoader);
Class generatorClass = componentScan.getClass("nameGenerator");
boolean useInheritedGenerator = (BeanNameGenerator.class == generatorClass);
scanner.setBeanNameGenerator(useInheritedGenerator ? this.beanNameGenerator :
BeanUtils.instantiateClass(generatorClass));
//scopeProxy属性构造 //resourcePattern 属性构造 //excludeFilters 属性设置 basePackages = new LinkedHashSet();
String[] basePackagesArray = componentScan.getStringArray("basePackages");
for (String pkg : basePackagesArray) {
String[] tokenized = StringUtils.tokenizeToStringArray(this.environment.resolvePlaceholders(pkg),
ConfigurableApplicationContext.CONFIG_LOCATION_DELIMITERS);
basePackages.addAll(Arrays.asList(tokenized));
}
for (Class clazz : componentScan.getClassArray("basePackageClasses")) {
basePackages.add(ClassUtils.getPackageName(clazz));
}
if (basePackages.isEmpty()) {
basePackages.add(ClassUtils.getPackageName(declaringClass));
}
scanner.addExcludeFilter(new AbstractTypeHierarchyTraversingFilter(false, false) {
@Override
protected boolean matchClassName(String className) {
return declaringClass.equals(className);
}
});
return scanner.doScan(StringUtils.toStringArray(basePackages));
}
而上面提到的最为核心的工具类ClassPathBeanDefinitionScanner就是Spring原生的解析类,这里Spring核心解析类,它通过字节码扫描的方式,效率要比通常我们用的反射机制效率要高得多,如果读者日常工作中有扫描路径下类的需求,哪怕脱离了Spring环境也可以直接使用这个工具类,不知道读者是否还清楚,在介绍整个MyBatis的博客中动态扫描就是封装类似的类,有兴趣回头看看。
Spring提供了一个更能用的基于条件的bean的创建,使用@Conditional注解,@Conditional根据满足的某一个特定的bean,当某一个JAR包在一个类路径下的时候,会自动配置一个或多个bean,或者只有某个Bean被创建后才会创建另外一个bean,总的来说,就是根据特定的条件来控制bean的创建行为,这样我们就可以利用这个特性进行一些自动配置,当然,Conditional注解有非常多的使用方式,我们仅仅通过ConditionOrProperty来深入探讨它的运行机制,我们通过下面的一个示例来详细了解。
@Configuration
@ComponentScan({"com.example.springbootstudy"})
@ConditionalOnProperty(prefix = "study",name="enable",havingValue = "true")
public class HelloServiceAutoConfiguration {
}
上面的声明想要的逻辑是如果配置性中显示的声明study.enable=true,则当前整套体系才生效,我们可以进行验证。
Conditional原理
好,了解了ConditionalOnProperty的使用后,我们继教深入探索它的内部实现机制,继续按照之前的思路,如果想反推ConditionalOnProperty的实现机制,那么代码中必然会存在ConditionalOnProperty.class的调用,于是我们搜索ConditionalOnProperty.class,如下图所示
public ConditionOutcome getMatchOutcome(ConditionContext context,
AnnotatedTypeMetadata metadata) {
List allAnnotationAttributes = annotationAttributesFromMultiValueMap(
metadata.getAllAnnotationAttributes(
ConditionalOnProperty.class.getName()));
List noMatch = new ArrayList();
List match = new ArrayList();
for (AnnotationAttributes annotationAttributes : allAnnotationAttributes) {
ConditionOutcome outcome = determineOutcome(annotationAttributes,
context.getEnvironment());
(outcome.isMatch() ? match : noMatch).add(outcome.getConditionMessage());
}
if (!noMatch.isEmpty()) {
return ConditionOutcome.noMatch(ConditionMessage.of(noMatch));
}
return ConditionOutcome.match(ConditionMessage.of(match));
}
按照通常的设计,这里应该返回的是否配置了boolean值,但是现在返回了ConditionOutcome这样一个对象,这是什么道理呢?我们看一下这个数据结构 。
public class ConditionOutcome {
private final boolean match;
private final ConditionMessage message;
...
}
这里面除了大量的方法外还有一个比较重要的属性字段,就是这个类型为boolean的match字段,根据直觉,大致可以断定这个属性很重要,再来看。
public static ConditionOutcome noMatch(ConditionMessage message) {
return new ConditionOutcome(false , message);
}
以及
public static ConditionOutcome match(ConditionMessage message) {
return new ConditionOutcome(true, message);
}
差别仅仅是这个属性的初始化值,那么根据这个信息可以断定 ,getMatchOutcome方法中noMatch这个属性的逻辑一定是整个逻辑的核心。
List allAnnotationAttributes = annotationAttributesFromMultiValueMap(
metadata.getAllAnnotationAttributes(
ConditionalOnProperty.class.getName()));
这句代码要扫描出ConditionalOnProperty的注解信息,例如我们刚才配置的。
private ConditionOutcome determineOutcome(AnnotationAttributes annotationAttributes,
PropertyResolver resolver) {
Spec spec = new Spec(annotationAttributes);
List missingProperties = new ArrayList();
List nonMatchingProperties = new ArrayList();
spec.collectProperties(resolver, missingProperties, nonMatchingProperties);
if (!missingProperties.isEmpty()) {
return ConditionOutcome.noMatch(
ConditionMessage.forCondition(ConditionalOnProperty.class, spec)
.didNotFind("property", "properties")
.items(Style.QUOTE, missingProperties));
}
if (!nonMatchingProperties.isEmpty() ) {
return ConditionOutcome.noMatch(
ConditionMessage.forCondition(ConditionalOnProperty.class, spec)
.found("different value in property",
"different value in properties")
.items(Style.QUOTE, nonMatchingProperties));
}
return ConditionOutcome.match(ConditionMessage
.forCondition(ConditionalOnProperty.class, spec).because("matched"));
}
这个逻辑表明,不匹配有两种情况,missingProperties对应的属性缺失的情况,missingProperties对应的属性缺失的情况,nonMatchingProperties对应不匹配的情况,而这两个属性的初始化都在spec.collectProperties(resolver,missingProperties,nonMatchingProperties)中,于是进入这个函数。
private void collectProperties(PropertyResolver resolver, List missing,
List nonMatching) {
if (this.relaxedNames) {
resolver = new RelaxedPropertyResolver(resolver, this.prefix);
}
for (String name : this.names) {
String key = (this.relaxedNames ? name : this.prefix + name);
if (resolver.containsProperty(key)) {
if (!isMatch(resolver.getProperty(key), this.havingValue)) {
nonMatching.add(name);
}
}
else {
if (!this.matchIfMissing) {
missing.add(name);
}
}
}
}
终于,我们找到了对应的逻辑,这个函数尝试使用PropertyResolver来验证对应的属性是否存在,如果不存在则验证不通过,因为PropertyResolver中包含了所有的配置属性信息,而PropertyResolver的初始化以及相关的属性加载我们在下后面介绍 。
调用切入点
那么现在的问题是,OnPropertyCondition.getMatchOutcome方法是谁去调用呢?或者说这个类是如何与Spring整合在一起的呢?它又是怎样影响bean的加载逻辑的呢?我们再从全局的角度来梳理一下Conditional的实现逻辑,读者可以继续看图14-8中的bean的parse解析链路,processConfigurationClass步骤中主要的逻辑是对即将解析的注解做预处理,如下图所示
很清晰展示了Spring整个配置类解析及加载的全部过程,那么通过分析代码定位到原来整个判断逻辑切入点在processConfigurationClass中,代码如下。
protected void processConfigurationClass(ConfigurationClass configClass) throws IOException {
if (this.conditionEvaluator.shouldSkip(configClass.getMetadata(), ConfigurationPhase.PARSE_CONFIGURATION)) {
return;
}
ConfigurationClass existingClass = this.configurationClasses.get(configClass);
if (existingClass != null) {
if (configClass.isImported()) {
if (existingClass.isImported()) {
existingClass.mergeImportedBy(configClass);
}
// Otherwise ignore new imported config class; existing non-imported class overrides it.
return;
}
else {
// Explicit bean definition found, probably replacing an import.
// Let's remove the old one and go with the new one.
this.configurationClasses.remove(configClass);
for (Iterator it = this.knownSuperclasses.values().iterator(); it.hasNext(); ) {
if (configClass.equals(it.next())) {
it.remove();
}
}
}
}
// Recursively process the configuration class and its superclass hierarchy.
SourceClass sourceClass = asSourceClass(configClass);
do {
sourceClass = doProcessConfigurationClass(configClass, sourceClass);
}
while (sourceClass != null);
this.configurationClasses.put(configClass, configClass);
}
代码的第一行就是整个Conditional逻辑生效的切入点,如果验证不通过则会直接忽略掉后面的逻辑,那么这个类属性以及componentScan之类的配置也自然不会得到解析了,这个方法会拉取所有的condition属性,onConditionProperty就是在这里拉取的。
public boolean shouldSkip(AnnotatedTypeMetadata metadata, ConfigurationPhase phase) {
if (metadata == null || !metadata.isAnnotated(Conditional.class.getName())) {
return false;
}
if (phase == null) {
if (metadata instanceof AnnotationMetadata &&
ConfigurationClassUtils.isConfigurationCandidate((AnnotationMetadata) metadata)) {
return shouldSkip(metadata, ConfigurationPhase.PARSE_CONFIGURATION);
}
return shouldSkip(metadata, ConfigurationPhase.REGISTER_BEAN);
}
List conditions = new ArrayList();
for (String[] conditionClasses : getConditionClasses (metadata)) {
for (String conditionClass : conditionClasses) {
Condition condition = getCondition(conditionClass, this.context.getClassLoader());
conditions.add(condition);
}
}
AnnotationAwareOrderComparator.sort(conditions);
for (Condition condition : conditions) {
ConfigurationPhase requiredPhase = null;
if (condition instanceof ConfigurationCondition) {
requiredPhase = ((ConfigurationCondition) condition).getConfigurationPhase();
}
if (requiredPhase == null || requiredPhase == phase) {
if (!condition.matches(this.context, metadata) ) {
return true;
}
}
}
return false;
}
这个代码中有几个比较关键的地方。
通过上面的代码getConditionClasses(metadata)调用,因为代码走到这里己经是对某一特定的类解析,metadata中包含了完全的配置类信息,只要通过metadata.getAllAnnotationAttributes(Conditional.class.getName(),true)即可获取,所以这一步的逻辑并不复杂。
通过代码condition.matches(this.context,metadata)调用,因为我们配置为@ConditionalOnProperty(prefix=“study”,name = “enabled”,havingValue=“true”)
属性自动化配置实现
通过上面的介绍,我们来测试一下Spring Boot会读取配置拼装成study.enabled并作为key,然后尝试使用PropertyResolver来验证对应的属性是否存在,如果不存在则验证不通过,自然也就不会继续后面的解析流程,因为PropertyResolver中包含了所有的配置信息。
@ConditionalOnProperty(prefix = “study”,name=“enable”,havingValue = “true”)
原理
同样,要探索它的实现原理,按照之前的思路,我们首先定位关键字然后反推代码逻辑。我们通过搜索Value.class进行反推。
protected Object findValue(Annotation[] annotationsToSearch) {
AnnotationAttributes attr = AnnotatedElementUtils.getMergedAnnotationAttributes(
AnnotatedElementUtils.forAnnotations(annotationsToSearch), this.valueAnnotationType );
if (attr != null) {
return extractValue(attr);
}
return null;
}
然后我们设置断点看一下系统在启动的时候是否在此停留,进而验证我们的判断,如下图所示。
protected Object extractValue(AnnotationAttributes attr) {
Object value = attr.get(AnnotationUtils.VALUE);
if (value == null) {
throw new IllegalStateException("Value annotation must have a value attribute");
}
return value;
}
现在要解决两个疑问。
表达式对应的值是在哪里被替换的。
表达式替换后的值又是如何与原有的bean整合的。
带着这两个疑问,我们顺着调用栈继续找线索,发现当前有获取的Value表达式属性后程序进入DefaultListableBeanFactory类的resolverEmbeddedValue方法,并且在尝试evaluate后发现返回的值正是属性替换后的值,如下图所示;
public String resolveEmbeddedValue(String value) {
if (value == null) {
return null;
}
String result = value;
for (StringValueResolver resolver : this.embeddedValueResolvers) {
result = resolver.resolveStringValue(result);
if (result == null) {
return null;
}
}
return result;
}
通过代码逻辑我们可以看到,对于属性的解析己经委托给StringValueResolver对应的实现类,接下来我们来分析一下这个StringValueResolver是如何初始化的。
1. 初始化MutablePropertySources
首先会通过this.environment来初始化MutablePropertySources,这里面有几点要说明的,environment是Spring属性加载的基础,里面包含了Spring己经加载的各个属性,而这所以使用MutablePropertySources封装,是因为MutablePropertySources还能实现单独加载自定义的额外属性功能。
2.初始化PropertySourcesPropertyResolver
使用PropertySourcesPropertyResolver对MutablePropertySources的操作进行进一步的封装。使得操作多个广播属性对外部不感知,当然PropertySourcesPropertyResolver还提供了一个重要的功能是对变量的解析,例如,它是初始化过程中包含这样的设置:
propertyResolver.setPlaceholderPrefix(this.placeholderPrefix);
propertyResolver.setPlaceholderSuffix(this.placeholderSuffix);
propertyResolver.setValueSeparator(this.valueSeparator);
而对应的变量定义如下:
propertyResolver.setPlaceholderPrefix("${");
propertyResolver.setPlaceholderSuffix("}");
propertyResolver.setValueSeparator(":");
4. StringValueResolver注册
最后将StringValueResolver实例注册到单例ConfigurableListableBeanFactory中,也就是在真正的解析变量时使用StringValueResolver实例。
Tomcat启动
截止到目前,我们己经完成了对Spring Boot基本功能的分析,包括SpringBoot的启动,属性自动化配置,conditional实现以及starter运行模式的原理,那么在之前的理论基础上再来分析Spring Boot是如何集成Tomcat会更加简化。
protected ConfigurableApplicationContext createApplicationContext() {
Class contextClass = this.applicationContextClass;
if (contextClass == null) {
try {
contextClass = Class.forName(this.webEnvironment
? DEFAULT_WEB_CONTEXT_CLASS : DEFAULT_CONTEXT_CLASS );
}
catch (ClassNotFoundException ex) {
throw new IllegalStateException(
"Unable create a default ApplicationContext, "
+ "please specify an ApplicationContextClass",
ex);
}
}
return (ConfigurableApplicationContext) BeanUtils.instantiate(contextClass);
}
其中,下述代码就是默认的配置
这也是Web扩展的关键,在我们曾经花了很大的篇幅讲解AbstractApplicationContext的一个函数refresh(),它是Springcontext扩展的关键,再来回顾一下:
public void refresh() throws BeansException, IllegalStateException {
synchronized (this.startupShutdownMonitor) {
//准备刷新上下文环境 //初始化BeanFactory,并进行XML文件的读取 //对beanFactory进行各个功能填充 //子类覆盖方法做额外的处理 //激活各种BeanFactory处理器 //注册拦截Bean的创建Bean处理器,这里只是注册真正的调用是getBean函数 //为上下文初始化message源,即不同的语言的消息体,国际化处理 //初始化应用消息的广播器,并放入"applicationEventMulticaster"bean中 //留给子类初始化其他的bean //所有注册的bean中查找Listener bean,注册到消息入手 //初始化剩下的单实例(非惰性的) //完成刷新过程,通知生命周期处理器lifecycleProcessor刷新过程,同时发出 //在所有注册的bean中查找Listener bean,注册所有的广播器中 //
protected void onRefresh() {
super.onRefresh();
try {
createEmbeddedServletContainer();
}
catch (Throwable ex) {
throw new ApplicationContextException("Unable to start embedded container",
ex);
}
}
private void createEmbeddedServletContainer() {
EmbeddedServletContainer localContainer = this.embeddedServletContainer;
ServletContext localServletContext = getServletContext();
if (localContainer == null && localServletContext == null) {
EmbeddedServletContainerFactory containerFactory = getEmbeddedServletContainerFactory();
this.embeddedServletContainer = containerFactory
.getEmbeddedServletContainer(getSelfInitializer());
}
else if (localServletContext != null) {
try {
getSelfInitializer().onStartup(localServletContext);
}
catch (ServletException ex) {
throw new ApplicationContextException("Cannot initialize servlet context",
ex);
}
}
initPropertySources();
}
EmbeddedServletContainerFactory是服务器启动上层抽象,无论是tomcat还是Jetty都要通过这个类实现对Spring服务器的注册,现在我们通过断点来看看返回结果:
带着疑问,我们搜索代码,看一看是否会有其他的地方对这个类进行了硬编码的注册呢?
@AutoConfigureOrder(Ordered.HIGHEST_PRECEDENCE)
@Configuration
@ConditionalOnWebApplication
@Import(BeanPostProcessorsRegistrar.class)
public class EmbeddedServletContainerAutoConfiguration {
/**
* Nested configuration if Tomcat is being used.
*/
@Configuration
@ConditionalOnClass({ Servlet.class, Tomcat.class })
@ConditionalOnMissingBean(value = EmbeddedServletContainerFactory.class, search = SearchStrategy.CURRENT)
public static class EmbeddedTomcat {
@Bean
public TomcatEmbeddedServletContainerFactory tomcatEmbeddedServletContainerFactory() {
return new TomcatEmbeddedServletContainerFactory();
}
}
/**
* Nested configuration if Jetty is being used.
*/
@Configuration
@ConditionalOnClass({ Servlet.class, Server.class, Loader.class,
WebAppContext.class })
@ConditionalOnMissingBean(value = EmbeddedServletContainerFactory.class, search = SearchStrategy.CURRENT)
public static class EmbeddedJetty {
@Bean
public JettyEmbeddedServletContainerFactory jettyEmbeddedServletContainerFactory() {
return new JettyEmbeddedServletContainerFactory();
}
}
/**
* Nested configuration if Undertow is being used.
*/
@Configuration
@ConditionalOnClass({ Servlet.class, Undertow.class, SslClientAuthMode.class })
@ConditionalOnMissingBean(value = EmbeddedServletContainerFactory.class, search = SearchStrategy.CURRENT)
public static class EmbeddedUndertow {
@Bean
public UndertowEmbeddedServletContainerFactory undertowEmbeddedServletContainerFactory() {
return new UndertowEmbeddedServletContainerFactory();
}
}
/**
* Registers a {@link EmbeddedServletContainerCustomizerBeanPostProcessor}. Registered
* via {@link ImportBeanDefinitionRegistrar} for early registration.
*/
public static class BeanPostProcessorsRegistrar
implements ImportBeanDefinitionRegistrar, BeanFactoryAware {
private ConfigurableListableBeanFactory beanFactory;
@Override
public void setBeanFactory(BeanFactory beanFactory) throws BeansException {
if (beanFactory instanceof ConfigurableListableBeanFactory) {
this.beanFactory = (ConfigurableListableBeanFactory) beanFactory;
}
}
@Override
public void registerBeanDefinitions(AnnotationMetadata importingClassMetadata,
BeanDefinitionRegistry registry) {
if (this.beanFactory == null) {
return;
}
registerSyntheticBeanIfMissing(registry,
"embeddedServletContainerCustomizerBeanPostProcessor",
EmbeddedServletContainerCustomizerBeanPostProcessor.class);
registerSyntheticBeanIfMissing(registry,
"errorPageRegistrarBeanPostProcessor",
ErrorPageRegistrarBeanPostProcessor.class);
}
private void registerSyntheticBeanIfMissing(BeanDefinitionRegistry registry,
String name, Class beanClass) {
if (ObjectUtils.isEmpty(
this.beanFactory.getBeanNamesForType(beanClass, true, false))) {
RootBeanDefinition beanDefinition = new RootBeanDefinition(beanClass);
beanDefinition.setSynthetic(true);
registry.registerBeanDefinition(name, beanDefinition);
}
}
}
}
这个类中包含了Tomcat,Jetty,Undertow 3 种类型的服务器自动注册逻辑,而选择条件则是通过@ConditionalOnClass注解控制,我们之前讲过ConditionalOnProperty注解的实现逻辑,而@ConditionalOnClass实现逻辑与之相似,对应的classpath目录下存在时,才会去解析对应的配置文件,这也就解释之所以Spring默认会启动Tomcat下是由于在启动的类目录下存在Servlet.class,tomcat.class,而这个依赖是由Spring自己在spring-boot-starter-web中默认引入 ,所示
public EmbeddedServletContainer getEmbeddedServletContainer(
ServletContextInitializer... initializers) {
Tomcat tomcat = new Tomcat();
File baseDir = (this.baseDirectory != null ? this.baseDirectory
: createTempDir("tomcat"));
tomcat.setBaseDir(baseDir.getAbsolutePath());
Connector connector = new Connector(this.protocol);
tomcat.getService().addConnector(connector);
customizeConnector(connector);
tomcat.setConnector(connector);
tomcat.getHost().setAutoDeploy(false);
configureEngine(tomcat.getEngine());
for (Connector additionalConnector : this.additionalTomcatConnectors) {
tomcat.getService().addConnector(additionalConnector);
}
//异步启动tomcat getTomcatEmbeddedServletContainer(tomcat);
}
本文的github地址
参考文章
Spring Boot启动命令参数详解及源码分析
Spring命令行参数封装CommandLineArgs
你可能感兴趣的:(Spring,Boot,系列)
【中国首个AI原生IDE:字节跳动发布AI编程工具Trae,开启智能编程新时代】
Kwan的解忧杂货铺@新空间代码工作室
s2 AIGC AI-native ide AI编程
欢迎来到我的博客,很高兴能够在这里和您见面!希望您在这里可以感受到一份轻松愉快的氛围,不仅可以获得有趣的内容和知识,也可以畅所欲言、分享您的想法和见解。推荐:kwan的首页,持续学习,不断总结,共同进步,活到老学到老导航檀越剑指大厂系列:全面总结java核心技术,jvm,并发编程redis,kafka,Spring,微服务等常用开发工具系列:常用的开发工具,IDEA,Mac,Alfred,Git,
VS 编译器中的 X86 和 X64:架构差异全解析
晚风る
架构
在软件开发的世界里,VisualStudio(VS)作为一款备受青睐的集成开发环境,为开发者提供了诸多便利。而在使用VS进行项目开发时,选择编译目标平台是一个关键步骤,其中X86和X64是最常见的两种选项。它们究竟有何区别呢?本文将带你一探究竟。一、架构基础X86和X64都是基于Intel架构的处理器指令集架构,但它们的发展历程和设计理念有所不同。X86:这个名称源于Intel早期的一系列16位和
目前市场上的人工智能大模型有哪些?
国货崛起
大模型 人工智能 人工智能
截至最后更新时间(2024年3月中旬),以下是国内外部分知名的人工智能大模型,按类别和用途大致分类如下:国外:自然语言处理(NLP)大模型:OpenAIGPT系列:GPT-3:迄今为止最为知名的自然语言处理大模型之一,具备强大的文本生成、理解和对话能力。GPT-4:后续版本,性能和参数量比GPT-3更高,各项指标均有所提升。Google的Transformer系列:BERT(Bidirection
碳实践|CBAM下的企业应对与未来趋势分析
区块链
引言随着全球气候变化的严峻形势日益加剧,各国政府纷纷出台了一系列环境政策以应对这一全球性挑战。其中,碳边境调节机制(CBAM)作为一项重要的国际环境政策,正逐渐成为全球贸易体系中的新常态。CBAM旨在对进口商品中隐含的碳排放进行征税,以激励企业减少温室气体排放,促进全球低碳经济转型。在此背景下,企业如何成功应对CBAM,不仅关系到其自身的生存与发展,更对整个行业的绿色转型具有重要意义。本文将以CB
碳课堂|什么是碳盘查、碳核查?
管理数据库运维微服务安全
随着全国碳市场的启动,一系列碳市场政策文件陆续出台,对于参与碳市场的控排企业以及刚接触碳市场的新人,在接触碳盘查、碳核查的概念时,经常容易混淆。本文将通过对二者的比较,帮助大家对碳盘查、碳核查有更清晰的认识。一、概念区别碳盘查:是以排放企业或组织为单位,计算其在社会生产活动中各个环节直接或间接排放的温室气体,也可称作编制温室气体排放清单。一般来说,企业进行碳盘查时,需要计算的温室气体主要包括《京都
Varjo XR-4 混合现实驾驶仿真解决方案
HYSIM_iVR
虚拟现实 汽车 人机交互
企业级虚拟与混合现实解决方案提供商Varjo今日宣布,其XR-4系列设备已与VI-grade的车辆开发平台VI-WorldSim实现兼容。自2025.1版本起,VI-WorldSim将通过虚幻引擎5的OpenXR接口支持VarjoXR-4系列头显。VI-WorldSim是一个集成式图形环境,可加速车辆离线开发与驾驶模拟器测试。该平台允许车企动态调控交通流量、行人、车辆、动物、光照及天气等参数,创建
TiDB系列之:使用Flink TiDB CDC Connector采集数据
快乐骑行^_^
日常分享专栏 TiDB系列 使用Flink TiDB CDC Connector采集数据
TiDB系列之:使用FlinkTiDBCDCConnector采集数据一、依赖项二、Maven依赖三、SQLClientJAR四、如何创建TiDBCDC表五、连接器选项六、可用元数据七、特征一次性处理启动阅读位置多线程读取DataStreamSource八、数据类型映射TiDBCDC连接器允许从TiDB数据库读取快照数据和增量数据。本文档介绍如何设置TiDBCDC连接器以对TiDB数据库运行SQL
23种设计模式之《访问者模式(Visitor)》在c#中的应用及理解
yuanpan
设计模式 访问者模式 c# 开发语言
程序设计中的主要设计模式通常分为三大类,共23种:1.创建型模式(CreationalPatterns)单例模式(Singleton):确保一个类只有一个实例,并提供全局访问点。工厂方法模式(FactoryMethod):定义创建对象的接口,由子类决定实例化哪个类。抽象工厂模式(AbstractFactory):提供一个创建一系列相关或依赖对象的接口,而无需指定具体类。建造者模式(Builder)
什么?还不懂SpringBoot核心原理:自动配置、事件驱动、Condition,一文带你摆平
老程不秃
Spring Boot Java 程序员 java 开发语言 后端 spring boot 程序人生
前言SpringBoot是Spring的包装,通过自动配置使得SpringBoot可以做到开箱即用,上手成本非常低,但是学习其实现原理的成本大大增加,需要先了解熟悉Spring原理。如果还不清楚Spring原理的,可以先查看博主之前的文章,本篇主要分析SpringBoot的启动、自动配置、Condition、事件驱动原理。启动原理SpringBoot启动非常简单,因其内置了Tomcat,所以只需要
SpringBoot集成Flink-CDC
whiteBrocade
spring flink mysql java-activemq kafka elasticsearch
FlinkCDCCDC相关介绍CDC是什么?CDC是ChangeDataCapture(变更数据获取)的简称。核心思想是,监测并捕获数据库的变动(包括数据或数据表的插入、更新以及删除等),将这些变更按发生的顺序完整记录下来,写入到MQ以供其他服务进行订阅及消费CDC分类CDC主要分为基于查询和基于Binlog基于查询基于Binlog开源产品Sqoop、DataXCanal、Maxwell、Debe
一文读懂Spring Boot启动原理
亭子下的李子
面试 源码 spring boot
概述开发过SpringBoot项目的小伙伴都知道springboot项目搭建简单,一个启动类就能运行起来项目,那么它是如何运行的?通过什么方式去实现自动装配呢,今天就一起看看springboot启动时都做了哪些事情。如果你已经使用SpringBoot很久了,那么你可能知道我们需要在Application类或Main类中注解相当多的注解才能开始使用,比如说@Configuration,启用基于Jav
C# Enumerable类 之 数据(类型)转换
鲤籽鲲
C# c# 开发语言 C# 知识捡漏
总目录前言在C#中,System.Linq.Enumerable类是LINQ(LanguageIntegratedQuery)的核心组成部分,它提供了一系列静态方法,用于操作实现了IEnumerable接口的集合。通过这些方法,我们可以轻松地对集合进行查询、转换、排序和聚合等操作。本文属于C#Enumerable类使用详解中的一个章节,着重介绍C#Enumerable类中数据(类型)转换这部分的内
Java 面试题大集合,2019最新最常见面试题加答案
m0_74824823
面试 学习路线 阿里巴巴 java 开发语言
原文地址:https://blog.csdn.net/zl1zl2zl3/article/details/88048480又到一年跳槽季,课下不准备,面试徒伤悲。本文汇总了常见面试题及面试技巧,让百忙中的程序员,少花精力乱找资料,希望对你有帮助。一、面试题及答案0、2019最新常见Java面试题汇总及答案1、Java面试题阶段汇总2、史上最全69道Spring面试题和答案3、史上最全40道Dubb
STM32F103C8T6主流性能系列,ARM Cortex-M3 MCU,带64k字节闪存
li15817260414
单片机 stm32 嵌入式硬件
STM32F103xx中密度性能系列集成了工作频率为72MHz的高性能ARMCortex-M332位RISC内核、高速嵌入式存储器(最高128字节的闪存和最高20k字节的SRAM),以及连接到两条APB总线的各种增强型I/o和外设。所有器件都提供两个12位ADC、三个通用16位定时器和一个PWM定时器,以及标准和高级通信接口:最多两个I2C和SPI、三个USARTs、一个USB和一个CAN。这些器
STM32F103RBT6 mcu芯片
li15817260414
单片机 stm32 嵌入式硬件
主流性能系列,ARMCortex-M3MCU,带128千字节闪存、72MHzCPU、电机控制、USB和CANSTM32F103xx中密度性能系列集成了工作频率为72MHz的高性能ARMCortex-M332位RISC内核、高速嵌入式存储器(最高128字节的闪存和最高20k字节的SRAM),以及连接到两条APB总线的各种增强型I/o和外设。所有器件都提供两个12位ADC、三个通用16位定时器和一个P
Kubernetes operator(七) kubebuilder 的安装及简单使用 篇
grahamzhu
云原生学习专栏 kubernetes golang kubebuilder operator CRD 云原生 容器
云原生学习路线导航页(持续更新中)本文是Kubernetesoperator学习系列第七篇,对目前编写Operator的常用脚手架kubebuilder进行学习,主要涉及**kubebuilder的安装及简单使用**,kubebuilder的原理会在后续介绍基于kubernetesv1.24.0代码分析Kubernetesoperator学习系列快捷链接Kubernetesoperator(一)c
瑞萨微控制器 R5F100FEAFP#10 适用于各种嵌入式应用 提供样品测试+数据资料 常备现货
li15817260414
云计算 电视盒子 物联网 智能家居
瑞萨电子的R5F100FEAFP#10是一款基于RL78/G13系列的16位微控制器,适用于各种嵌入式应用。其主要参数如下:核心处理器:RL78,16位架构,最高工作频率32MHz。存储器:程序存储器:64KB闪存。数据存储器:4KBRAM。EEPROM:4KB。I/O端口:提供31个通用输入/输出引脚。外设功能:通信接口:支持CSI、I2C、LIN总线、UART/USART等多种通信方式。模数转
Spring Boot与支付宝集成全攻略:一文详解,支付+退款轻松实现
墨瑾轩
一起学学Java【一】 spring boot 数据库 后端
在SpringBoot应用中集成支付宝支付功能,不仅涉及到支付流程的实现,还包括退款处理,是构建在线交易系统的重要组成部分。以下内容将深度解析如何在SpringBoot项目中集成支付宝支付,包括支付和退款功能的实现步骤、代码示例和配置详解。1.环境准备支付宝开发者账户:首先,需要在支付宝开放平台注册开发者账户,并创建应用,获取AppID、私钥和公钥。SDK集成依赖:添加支付宝JavaSDK到项目。
从零开始 CMake 学习笔记 (E)installing
OOOrchid
混合计算 c++ cmake
从零开始CMake学习笔记(E)installing开始前先默念三遍口诀:DeclareatargetDeclaretarget’straitsIt’sallabouttargets本系列主要根据GitHub上的cmake-examples项目进行翻译总结,同时对于不清晰的概念及函数进行查阅理解记录形成。文章目录从零开始CMake学习笔记(E)installing1介绍1.1文件树1.2文件简介2
spring-ioc-bean
周周写不完的代码
spring java 后端
本文重点在于充分应用Spring提供的IoC特性,介绍如何创建一个好用的Bean。基础篇不涉及后置处理器、BeanDefinition以及Spring加载原理相关的知识。引入ioc的起源**接口与实现类的需求变更**:最初的静态工厂模式。**反射机制**:延迟加载,避免编译时依赖。**外部化配置**:将Bean的全限定名存储在配置文件中。**缓存机制**:存储已创建的Bean对象。入门使用Spri
SpringBoot Bug 日志
优雅的造轮狮
JavaEE spring boot bug java
Spring循环依赖问题Bug如下wxMpConfiguration→subscribeHandler→wxMsgServiceImpl→wxMpConfiguration解决方案方案实施方式注意事项接口抽象定义WxMpService接口,通过接口注入最佳设计实践Setter注入对非必要依赖使用setter方法降低耦合度@Lazy注解在循环点添加延迟加载需测试性能影响配置允许循环spring.ma
Spring使用JWT进行登录验证
PXM的算法星球
Java后端 spring java 后端
前情提要:由于这学期课设需要使用SSM技术栈,导致一些好用的登录框架无法适配,所以改用手写JWT进行登录验证JWT简介JSONWebToken(JWT)是一种用于在网络应用环境中进行用户身份验证和信息交换的开放标准。它通过将数据以JSON格式进行编码,使得信息在不同的系统和应用之间得以安全传递。JWT的主要特点是结构简洁且安全性高,广泛应用于单点登录(SSO)、API授权和用户身份认证。JWT由三
Stable Diffusion模型Pony系列模型深度解析
Liudef06
Stable Diffusion 人工智能 人工智能作画 stable diffusion AI作画
StableDiffusion模型Pony系列模型深度解析一、技术架构与核心特性基于SDXL的深度优化Pony系列模型以SDXL为基础框架,通过针对二次元/动漫风格的微调,强化了在该领域的生成能力,同时保留了对写实场景的兼容性。其训练数据特别侧重于人物结构、动态姿势和风格化渲染,尤其在处理复杂肢体动作(如手部细节)方面表现出色。训练策略:采用混合精度训练(fp16/bf16)和分层权重调整技术
Spring 事务(详解)
Bejpse
spring java 后端
4.Spring事务4.1什么是事务?将组操作封装成个执单元,要么全部成功要么全部失败。为什么要事务?如转账分为两个操作:第步操作:A账户-100元,第步操作:B账户+100元。如果没有事务,第步执成功了,第步执失败了,那么A账户平故的100元就“间蒸发”了。如果使事务就可以解决这个问题,让这组操作要么起成功,要么起失败。4.1.1事务特性事务有4特性(ACID):原性(Atomicity,或称不
Spring 集成事务管理详解:银行转账示例
阿绵
后端 spring java 后端 事务管理
1.前言在JavaEE开发中,数据库事务是保证数据一致性的重要机制。Spring提供了强大的事务管理功能,允许开发者通过声明式事务(基于注解)或编程式事务(手动管理)来控制事务。本文介绍如何在原始Spring框架(非SpringBoot)中集成事务管理,包括配置步骤和代码示例本代码示例版本要求:Java17+Spring6+2.事务管理的基本概念2.1什么是事务?事务(Transaction)是一
Spring学习笔记03——Spring Boot的文件结构
Shaoxi Zhang
Java 学习 笔记 spring boot
Springboot常见的文件结构:src/├──main/│├──java/││└──com.example.demo/││├──DemoApplication.java#主入口││├──config/#配置类││├──controller/#控制器││├──service/#业务逻辑││├──mapper/#数据库操作接口││├──entity/#数据库实体类││├──dto/#数据传输对象│
springboot接入emqx的mqtt
renkai721
JAVA spring boot mqtt emqx
需求背景物联网设备需要通过mqtt协议传输,这里记录一下,注意,这篇文章不能接入阿里云的mqtt,本人已经试过,会报错。开发教程1、EMQX安装部署--1安装必要的依赖sudoyuminstall-yyum-utilsdevice-mapper-persistent-datalvm2--2设置repo库sudoyum-config-manager--add-repohttps://repos.em
如何在Spring Boot中读取JAR包内resources目录下文件
嘵奇
提升自己 spring boot jar
精心整理了最新的面试资料和简历模板,有需要的可以自行获取点击前往百度网盘获取点击前往夸克网盘获取以下是如何在SpringBoot中读取JAR包内resources目录下文件的教程,分为多种方法及详细说明:方法1:使用ClassPathResource(Spring框架推荐)适用于Spring环境,能自动处理类路径资源。importorg.springframework.core.io.ClassP
基于SpringBoot大学生创新创业训练项目管理系统的设计与实现
四金学长
spring boot 后端 java 大学生创新创业训练项目管理系统
1.引言在当今的软件开发领域,企业级应用的开发和部署速度直接影响着业务的竞争力。SpringBoot以其轻量级、快速启动和强大的集成能力,成为构建现代企业级应用的首选框架。本文将带您深入了解SpringBoot框架的核心特性,并展示如何利用它构建一个高效、可扩展的系统。2.开发环境开发语言:Java框架:springbootJD版本:JDK1.8服务器:tomcat7数据库:mysql5.7(一定
OLMo 7B:推动自然语言处理领域的技术革新
单皎娥
OLMo7B:推动自然语言处理领域的技术革新OLMo-7B项目地址:https://gitcode.com/hf_mirrors/ai-gitcode/OLMo-7B引言随着人工智能技术的飞速发展,自然语言处理(NLP)领域取得了显著的进步。然而,在实际应用中,NLP技术仍然面临着诸多挑战,如语境理解、信息抽取、情感分析等。为了解决这些问题,艾伦人工智能研究所(AI2)推出了OLMo系列模型,其中
矩阵求逆(JAVA)利用伴随矩阵
qiuwanchi
利用伴随矩阵求逆矩阵
package gaodai.matrix;
import gaodai.determinant.DeterminantCalculation;
import java.util.ArrayList;
import java.util.List;
import java.util.Scanner;
/**
* 矩阵求逆(利用伴随矩阵)
* @author 邱万迟
单例(Singleton)模式
aoyouzi
单例 模式 Singleton
3.1 概述 如果要保证系统里一个类最多只能存在一个实例时,我们就需要单例模式。这种情况在我们应用中经常碰到,例如缓存池,数据库连接池,线程池,一些应用服务实例等。在多线程环境中,为了保证实例的唯一性其实并不简单,这章将和读者一起探讨如何实现单例模式。 3.2
[开源与自主研发]就算可以轻易获得外部技术支持,自己也必须研发
comsci
开源
现在国内有大量的信息技术产品,都是通过盗版,免费下载,开源,附送等方式从国外的开发者那里获得的。。。。。。
虽然这种情况带来了国内信息产业的短暂繁荣,也促进了电子商务和互联网产业的快速发展,但是实际上,我们应该清醒的看到,这些产业的核心力量是被国外的
页面有两个frame,怎样点击一个的链接改变另一个的内容
Array_06
UI XHTML
<a src="地址" targets="这里写你要操作的Frame的名字" />搜索
然后你点击连接以后你的新页面就会显示在你设置的Frame名字的框那里
targerts="",就是你要填写目标的显示页面位置
=====================
例如:
<frame src=&
Struts2实现单个/多个文件上传和下载
oloz
文件上传 struts
struts2单文件上传:
步骤01:jsp页面
<!--在进行文件上传时,表单提交方式一定要是post的方式,因为文件上传时二进制文件可能会很大,还有就是enctype属性,这个属性一定要写成multipart/form-data,不然就会以二进制文本上传到服务器端-->
<form action="fileUplo
推荐10个在线logo设计网站
362217990
logo
在线设计Logo网站。
1、http://flickr.nosv.org(这个太简单)
2、http://www.logomaker.com/?source=1.5770.1
3、http://www.simwebsol.com/ImageTool
4、http://www.logogenerator.com/logo.php?nal=1&tpl_catlist[]=2
5、ht
jsp上传文件
香水浓
jsp fileupload
1. jsp上传
Notice:
1. form表单 method 属性必须设置为 POST 方法 ,不能使用 GET 方法
2. form表单 enctype 属性需要设置为 multipart/form-data
3. form表单 action 属性需要设置为提交到后台处理文件上传的jsp文件地址或者servlet地址。例如 uploadFile.jsp 程序文件用来处理上传的文
我的架构经验系列文章 - 前端架构
agevs
JavaScript Web 框架 UI jQuer
框架层面:近几年前端发展很快,前端之所以叫前端因为前端是已经可以独立成为一种职业了,js也不再是十年前的玩具了,以前富客户端RIA的应用可能会用flash/flex或是silverlight,现在可以使用js来完成大部分的功能,因此js作为一门前端的支撑语言也不仅仅是进行的简单的编码,越来越多框架性的东西出现了。越来越多的开发模式转变为后端只是吐json的数据源,而前端做所有UI的事情。MVCMV
android ksoap2 中把XML(DataSet) 当做参数传递
aijuans
android
我的android app中需要发送webservice ,于是我使用了 ksop2 进行发送,在测试过程中不是很顺利,不能正常工作.我的web service 请求格式如下
[html]
view plain
copy
<Envelope xmlns="http://schemas.
使用Spring进行统一日志管理 + 统一异常管理
baalwolf
spring
统一日志和异常管理配置好后,SSH项目中,代码以往散落的log.info() 和 try..catch..finally 再也不见踪影!
统一日志异常实现类:
[java]
view plain
copy
package com.pilelot.web.util;
impor
Android SDK 国内镜像
BigBird2012
android sdk
一、镜像地址:
1、东软信息学院的 Android SDK 镜像,比配置代理下载快多了。
配置地址, http://mirrors.neusoft.edu.cn/configurations.we#android
2、北京化工大学的:
IPV4:ubuntu.buct.edu.cn
IPV4:ubuntu.buct.cn
IPV6:ubuntu.buct6.edu.cn
HTML无害化和Sanitize模块
bijian1013
JavaScript AngularJS Linky Sanitize
一.ng-bind-html、ng-bind-html-unsafe
AngularJS非常注重安全方面的问题,它会尽一切可能把大多数攻击手段最小化。其中一个攻击手段是向你的web页面里注入不安全的HTML,然后利用它触发跨站攻击或者注入攻击。
考虑这样一个例子,假设我们有一个变量存
[Maven学习笔记二]Maven命令
bit1129
maven
mvn compile
compile编译命令将src/main/java和src/main/resources中的代码和配置文件编译到target/classes中,不会对src/test/java中的测试类进行编译
MVN编译使用
maven-resources-plugin:2.6:resources
maven-compiler-plugin:2.5.1:compile
&nbs
【Java命令二】jhat
bit1129
Java命令
jhat用于分析使用jmap dump的文件,,可以将堆中的对象以html的形式显示出来,包括对象的数量,大小等等,并支持对象查询语言。 jhat默认开启监听端口7000的HTTP服务,jhat是Java Heap Analysis Tool的缩写
1. 用法:
[hadoop@hadoop bin]$ jhat -help
Usage: jhat [-stack <bool&g
JBoss 5.1.0 GA:Error installing to Instantiated: name=AttachmentStore state=Desc
ronin47
进到类似目录 server/default/conf/bootstrap,打开文件 profile.xml找到: Xml代码<bean
name="AttachmentStore"
class="org.jboss.system.server.profileservice.repository.AbstractAtta
写给初学者的6条网页设计安全配色指南
brotherlamp
UI ui自学 ui视频 ui教程 ui资料
网页设计中最基本的原则之一是,不管你花多长时间创造一个华丽的设计,其最终的角色都是这场秀中真正的明星——内容的衬托
我仍然清楚地记得我最早的一次美术课,那时我还是一个小小的、对凡事都充满渴望的孩子,我摆放出一大堆漂亮的彩色颜料。我仍然记得当我第一次看到原色与另一种颜色混合变成第二种颜色时的那种兴奋,并且我想,既然两种颜色能创造出一种全新的美丽色彩,那所有颜色
有一个数组,每次从中间随机取一个,然后放回去,当所有的元素都被取过,返回总共的取的次数。写一个函数实现。复杂度是什么。
bylijinnan
java 算法 面试
import java.util.Random;
import java.util.Set;
import java.util.TreeSet;
/**
* http://weibo.com/1915548291/z7HtOF4sx
* #面试题#有一个数组,每次从中间随机取一个,然后放回去,当所有的元素都被取过,返回总共的取的次数。
* 写一个函数实现。复杂度是什么
struts2获得request、session、application方式
chiangfai
application
1、与Servlet API解耦的访问方式。
a.Struts2对HttpServletRequest、HttpSession、ServletContext进行了封装,构造了三个Map对象来替代这三种对象要获取这三个Map对象,使用ActionContext类。
----->
package pro.action;
import java.util.Map;
imp
改变python的默认语言设置
chenchao051
python
import sys
sys.getdefaultencoding()
可以测试出默认语言,要改变的话,需要在python lib的site-packages文件夹下新建:
sitecustomize.py, 这个文件比较特殊,会在python启动时来加载,所以就可以在里面写上:
import sys
sys.setdefaultencoding('utf-8')
&n
mysql导入数据load data infile用法
daizj
mysql 导入数据
我们常常导入数据!mysql有一个高效导入方法,那就是load data infile 下面来看案例说明
基本语法:
load data [low_priority] [local] infile 'file_name txt' [replace | ignore]
into table tbl_name
[fields
[terminated by't']
[OPTI
phpexcel导入excel表到数据库简单入门示例
dcj3sjt126com
PHP Excel
跟导出相对应的,同一个数据表,也是将phpexcel类放在class目录下,将Excel表格中的内容读取出来放到数据库中
<?php
error_reporting(E_ALL);
set_time_limit(0);
?>
<html>
<head>
<meta http-equiv="Content-Type"
22岁到72岁的男人对女人的要求
dcj3sjt126com
22岁男人对女人的要求是:一,美丽,二,性感,三,有份具品味的职业,四,极有耐性,善解人意,五,该聪明的时候聪明,六,作小鸟依人状时尽量自然,七,怎样穿都好看,八,懂得适当地撒娇,九,虽作惊喜反应,但看起来自然,十,上了床就是个无条件荡妇。 32岁的男人对女人的要求,略作修定,是:一,入得厨房,进得睡房,二,不必服侍皇太后,三,不介意浪漫蜡烛配盒饭,四,听多过说,五,不再傻笑,六,懂得独
Spring和HIbernate对DDM设计的支持
e200702084
DAO 设计模式 spring Hibernate 领域模型
A:数据访问对象
DAO和资源库在领域驱动设计中都很重要。DAO是关系型数据库和应用之间的契约。它封装了Web应用中的数据库CRUD操作细节。另一方面,资源库是一个独立的抽象,它与DAO进行交互,并提供到领域模型的“业务接口”。
资源库使用领域的通用语言,处理所有必要的DAO,并使用领域理解的语言提供对领域模型的数据访问服务。
NoSql 数据库的特性比较
geeksun
NoSQL
Redis 是一个开源的使用ANSI C语言编写、支持网络、可基于内存亦可持久化的日志型、Key-Value数据库,并提供多种语言的API。目前由VMware主持开发工作。
1. 数据模型
作为Key-value型数据库,Redis也提供了键(Key)和值(Value)的映射关系。除了常规的数值或字符串,Redis的键值还可以是以下形式之一:
Lists (列表)
Sets
使用 Nginx Upload Module 实现上传文件功能
hongtoushizi
nginx
转载自: http://www.tuicool.com/wx/aUrAzm
普通网站在实现文件上传功能的时候,一般是使用Python,Java等后端程序实现,比较麻烦。Nginx有一个Upload模块,可以非常简单的实现文件上传功能。此模块的原理是先把用户上传的文件保存到临时文件,然后在交由后台页面处理,并且把文件的原名,上传后的名称,文件类型,文件大小set到页面。下
spring-boot-web-ui及thymeleaf基本使用
jishiweili
spring thymeleaf
视图控制层代码demo如下:
@Controller
@RequestMapping("/")
public class MessageController {
private final MessageRepository messageRepository;
@Autowired
public MessageController(Mes
数据源架构模式之活动记录
home198979
PHP 架构 活动记录 数据映射
hello!架构
一、概念
活动记录(Active Record):一个对象,它包装数据库表或视图中某一行,封装数据库访问,并在这些数据上增加了领域逻辑。
对象既有数据又有行为。活动记录使用直截了当的方法,把数据访问逻辑置于领域对象中。
二、实现简单活动记录
活动记录在php许多框架中都有应用,如cakephp。
<?php
/**
* 行数据入口类
*
Linux Shell脚本之自动修改IP
pda158
linux centos Debian 脚本
作为一名
Linux SA,日常运维中很多地方都会用到脚本,而服务器的ip一般采用静态ip或者MAC绑定,当然后者比较操作起来相对繁琐,而前者我们可以设置主机名、ip信息、网关等配置。修改成特定的主机名在维护和管理方面也比较方便。如下脚本用途为:修改ip和主机名等相关信息,可以根据实际需求修改,举一反三!
#!/bin/sh
#auto Change ip netmask ga
开发环境搭建
独浮云
eclipse jdk tomcat
最近在开发过程中,经常出现MyEclipse内存溢出等错误,需要重启的情况,好麻烦。对于一般的JAVA+TOMCAT项目开发,其实没有必要使用重量级的MyEclipse,使用eclipse就足够了。尤其是开发机器硬件配置一般的人。
&n
操作日期和时间的工具类
vipbooks
工具类
大家好啊,好久没有来这里发文章了,今天来逛逛,分享一篇刚写不久的操作日期和时间的工具类,希望对大家有所帮助。
/*
* @(#)DataFormatUtils.java 2010-10-10
*
* Copyright 2010 BianJing,All rights reserved.
*/
package test;
impor