Nginx架构二之安装实战
阅读目录
-
- Nginx安装
-
- 使用wget命令下载:
- Nginx服务器启停命令
-
- -v命令打印版本号信息并退出
- -V命令
- -t命令
- -T命令
- -q命令
- -s命令
- Nginx目录结构分析
Nginx安装
搭建nginx服务请参考以下步骤:
1. 下载Nginx
要在您的计算机上安装Nginx,请访问以下链接并下载最新版本的Nginx, https://nginx.org/en/download.html。
到目前为止,最新版本的nginx是nginx-1.21.6(nginx-1.21.6.tar.gz)。
使用wget命令下载:
快速安装brew
yangyanping@ZBMac-WP2HJYDWY nginx % /usr/bin/ruby -e "$(curl -fsSL https://cdn.jsdelivr.net/gh/ineo6/homebrew-install/install)"
yangyanping@ZBMac-WP2HJYDWY nginx % echo 'eval "$(/opt/homebrew/bin/brew shellenv)"' >> /Users/yangyanping/.zprofile
yangyanping@ZBMac-WP2HJYDWY nginx % eval "$(/opt/homebrew/bin/brew shellenv)"
安装wget
brew install wget
下载nginx
wget http://nginx.org/download/nginx-1.21.6.tar.gz
Mac安装pcre
下载pcre 。https://github.com/PCRE2Project/pcre2/releases
cd /usr/local/src
tar pcre2-10.32.tar
cd pcre2-10.32
./configure --prefix=/usr/local make sudo make install
2. 解压tar文件
使用以下命令提取tar文件
$ tar -zxf nginx-1.21.6.tar.gz
$ mv nginx-1.21.6 nginx
$ ./configure --prefix=./ --without-http_rewrite_module
$ make
$ make install
3. 查询80端口的使用情况
使用命令 sudo lsof -n -P | grep *:80 或 sudo lsof -i:80 查询80端口的使用情况。
$ sudo lsof -n -P | grep *:80

java      19309        yangyanping   67u     IPv6 0x2ede7ba1a58bd161         0t0      TCP *:8098 (LISTEN)
nginx     56307               root    6u     IPv4 0x2ede7ba1b51de689         0t0      TCP *:80 (LISTEN)
nginx     56308             nobody    6u     IPv4 0x2ede7ba1b51de689         0t0      TCP *:80 (LISTEN)
4. kill 命令
使用命令sudo kill 端口,杀掉占有80端口的进程。
sudo kill 56307
5. 使用命令检查配置
当配置完nginx.conf之后,关闭文件,执行命令检查配置的文件是否有问题,如果如下所示则说明没有问题,否则需要检查配置是否出现问题
sudo sbin/nginx -t

nginx: the configuration file .//conf/nginx.conf syntax is ok
nginx: configuration file .//conf/nginx.conf test is successful
6. 启动 Nginx
sudo sbin/nginx -c conf/nginx.conf
7. 验证Nginx是否启动成功
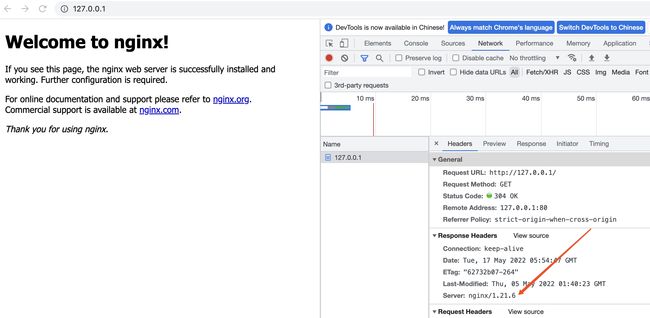
浏览器访问如 http://127.0.01:80 。如果能正常显示Nginx首页,则表示安装成功
8. 重新加载配置文件
sudo sbin/nginx -s reload -c conf/nginx.conf
9. 快速关闭
sudo sbin/nginx -s stop
Nginx服务器启停命令
前面在提到Nginx的高性能,其实也和它的架构模式有关。Nginx默认采 用的是多进程的方式来工作的,当将Nginx启动后,我们通过 ps -ef | grep nginx命令可以查看到如下内容:

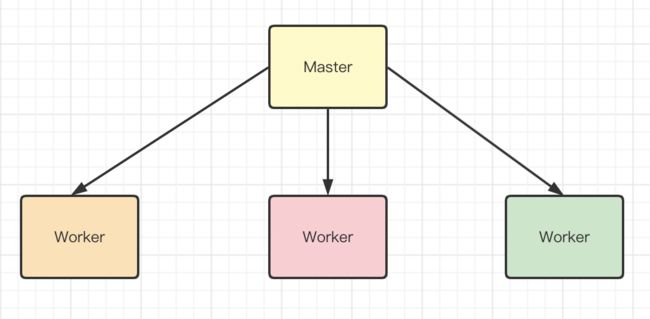
从上图中可以看到,Nginx后台进程中包含一个master进程和多个worker 进程,master进程主要用来管理worker进程,包含接收外界的信息,并 将接收到的信号发送给各个worker进程,监控worker进程的状态,当 worker进程出现异常退出后,会自动重新启动新的worker进程。而 worker进程则是专门用来处理用户请求的,各个worker进程之间是平等 的并且相互独立,处理请求的机会也是一样的。
通过Nginx安装目录下的sbin下的可执行文件nginx来进行 Nginx状态的控制,我们可以通过nginx -h来查看都有哪些参数可以 用:
yangyanping@ZBMac-WP2HJYDWY nginx % ./sbin/nginx -h
nginx version: nginx/1.21.6
Usage: nginx [-?hvVtTq] [-s signal] [-p prefix]
             [-e filename] [-c filename] [-g directives]

Options:
  -?,-h         : this help
  -v            : show version and exit
  -V            : show version and configure options then exit
  -t            : test configuration and exit
  -T            : test configuration, dump it and exit
  -q            : suppress non-error messages during configuration testing
  -s signal     : send signal to a master process: stop, quit, reopen, reload
  -p prefix     : set prefix path (default: /usr/local/nginx/)
  -e filename   : set error log file (default: logs/error.log)
  -c filename   : set configuration file (default: conf/nginx.conf)
  -g directives : set global directives out of configuration file
-v命令打印版本号信息并退出
yangyanping@ZBMac-WP2HJYDWY nginx % ./sbin/nginx -v
nginx version: nginx/1.21.6
-V命令
打印版本号信息和配置信息并退出
yangyanping@ZBMac-WP2HJYDWY nginx % ./sbin/nginx -V
nginx version: nginx/1.21.6
built by clang 13.0.0 (clang-1300.0.27.3)
configure arguments:
-t命令
测试nginx的配置文件语法是否正确并退出
yangyanping@ZBMac-WP2HJYDWY nginx % sudo ./sbin/nginx -t
Password:
nginx: the configuration file /usr/local/nginx/conf/nginx.conf syntax is ok
nginx: configuration file /usr/local/nginx/conf/nginx.conf test is successful
-T命令
测试nginx的配置文件语法是否正确并列出用到的配置文件信息然后 退出
yangyanping@ZBMac-WP2HJYDWY nginx % sudo ./sbin/nginx -T
nginx: the configuration file /usr/local/nginx/conf/nginx.conf syntax is ok
nginx: configuration file /usr/local/nginx/conf/nginx.conf test is successful
# configuration file /usr/local/nginx/conf/nginx.conf:

#user  nobody;
worker_processes  1;

#error_log  logs/error.log;
#error_log  logs/error.log  notice;
#error_log  logs/error.log  info;

#pid        logs/nginx.pid;


events {
    worker_connections  1024;
}
.................
-q命令
在配置测试期间禁止显示非错误消息
yangyanping@ZBMac-WP2HJYDWY nginx % sudo ./sbin/nginx -q
-s命令
signal信号
yangyanping@ZBMac-WP2HJYDWY nginx % sudo ./sbin/nginx -s stop
Nginx目录结构分析
在使用Nginx之前,我们先对安装好的Nginx目录文件进行一个分析,在 这块给大家介绍一个工具tree,通过tree我们可以很方便的去查看 centos系统上的文件目录结构,当然,如果想使用tree工具,就得先通 过brew install tree来进行安装,安装成功后,可以通过执行
brew install tree
目录树形结构:
yangyanping@ZBMac-WP2HJYDWY nginx % tree
.
├── client_body_temp  [error opening dir]
├── conf
│   ├── fastcgi.conf
│   ├── fastcgi.conf.default
│   ├── fastcgi_params
│   ├── fastcgi_params.default
│   ├── koi-utf
│   ├── koi-win
│   ├── mime.types
│   ├── mime.types.default
│   ├── nginx.conf
│   ├── nginx.conf.bak
│   ├── nginx.conf.default
│   ├── nginx.conf.dj
│   ├── scgi_params
│   ├── scgi_params.default
│   ├── uwsgi_params
│   ├── uwsgi_params.default
│   └── win-utf
├── fastcgi_temp  [error opening dir]
├── html
│   ├── 50x.html
│   ├── index.html
│   └── web
│       └── js
├── index.html
├── js
│   └── jquery.min.js
├── logs
│   ├── access.log
│   ├── error.log
│   └── nginx.pid
├── proxy_temp  [error opening dir]
├── sbin
│   ├── nginx
│   └── nginx.old
├── scgi_temp  [error opening dir]
├── uwsgi_temp  [error opening dir]
| 路径 | 描述 |
|---|---|
| /conf | nginx所有配置文件目录 |
| /conf/nginx.conf | 这个是Nginx的核心配置文件,这个文件非常重要,也是我们即将要学习的重点 |
| /conf/nginx.conf.default | nginx.conf的备份文件 |
| /sbin | 是存放执行程序文件nginx |
| /sbin/nginx | 是用来控制Nginx的启动和停止等相关的命令 |
| /logs | 记录日志的文件,当nginx服务器启动后,这里面会有 access.log error.log 和nginx.pid三个文件出现 |
| /logs/access.log | 用户的访问日志 |
| /logs/error.log | 错误日志 |
| /logs/nginx.pid | nginx的进程ID |