Spring基础
01 Spring简介
1.1 、 Spring家族
-
官网:https://spring.io,从官网我们可以大概了解到:
- Spring能做什么:用以开发web、微服务以及分布式系统等,光这三块就已经占了JavaEE开发
的九成多。 - Spring并不是单一的一个技术,而是一个大家族,可以从官网的Projects中查看其包含的所
有技术。
- Spring能做什么:用以开发web、微服务以及分布式系统等,光这三块就已经占了JavaEE开发
-
Spring发展到今天已经形成了一种开发的生态圈,Spring提供了若干个项目,每个项目用于完成
特定的功能 -
Spring已形成了完整的生态圈,也就是说我们可以完全使用Spring技术完成整个项目的构
建、设计与开发 -
Spring Framework:Spring框架,是Spring中最早最核心的技术,也是所有其他技术的
基础。 -
SpringBoot:Spring是来简化开发,而SpringBoot是来帮助Spring在简化的基础上能
更快速进行开发 -
SpringCloud:这个是用来做分布式之微服务架构的相关开发。
-
除了上面的这三个技术外,还有很多其他的技术,也比较流行,如
SpringData,SpringSecurity等,这些都可以被应用在我们的项目中。我们今天所学习的
Spring其实指的是Spring Framework
1.2 、了解Spring发展史
接下来我们介绍下Spring Framework这个技术是如何来的呢?
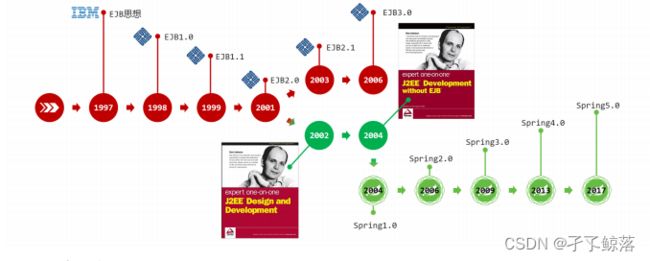
Spring发展史
- IBM(IT公司-国际商业机器公司)在1997年提出了EJB思想,早期的JAVAEE开发大都基于该思想
- Rod Johnson(Java和J2EE开发领域的专家)在2002年出版的Expert One-on-One J2EE Design and Development ,书中有阐述在开发中使用EJB该如何做。
- Rod Johnson在2004年出版的Expert One-on-One J2EE Development without EJB ,书中提出了比EJB思想更高效的实现方案,并且在同年将方案进行了具体的落地实现,这个实现就是
Spring1.0。 - 随着时间推移,版本不断更新维护,目前最新的是Spring5

本节介绍了Spring家族与Spring的发展史,需要大家重点掌握的是:
- 今天所学的Spring其实是Spring家族中的Spring Framework
- Spring Framework是Spring家族中其他框架的底层基础,学好Spring可以为其他Spring框架的学习打好基础
02 Spring系统架构
前面我们说spring指的是Spring Framework,那么它其中都包含哪些内容以及我们该如何学习这个\框架?
针对这些问题,我们将从系统架构图和课程学习路线来进行说明:
- Spring Framework是Spring生态圈中最基础的项目,是其他项目的根基。
- Spring Framework的发展也经历了很多版本的变更,每个版本都有相应的调整
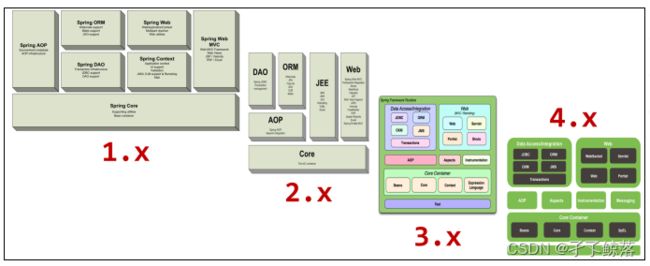
- Spring Framework的5版本目前没有最新的架构图,而最新的是4版本,所以接下来主要研究的
是4的架构图
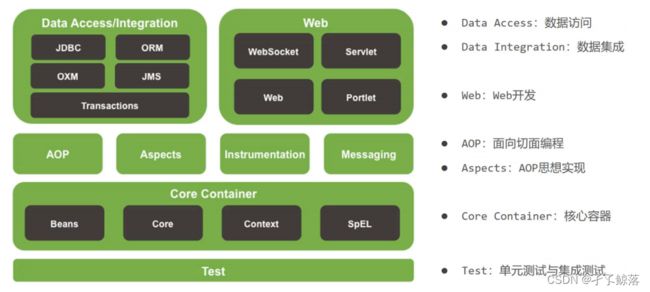
(1)核心层 - Core Container:核心容器,这个模块是Spring最核心的模块,其他的都需要依赖该模块
(2)AOP层
- AOP:面向切面编程,它依赖核心层容器,目的是在
不改变原有代码的前提下对其进行功能增强 - Aspects:AOP是思想,Aspects是对AOP思想的具体实现
(3)数据层 - Data Access:数据访问,Spring全家桶中有对数据访问的具体实现技术
- Data Integration:数据集成,Spring支持整合其他的数据层解决方案,比如Mybatis
- Transactions:事务,Spring中事务管理是Spring AOP的一个具体实现,也是后期学习的重点内容
(4)Web层 - 这一层的内容将在SpringMVC框架具体学习
(5)Test层 - Spring主要整合了Junit来完成单元测试和集成测试
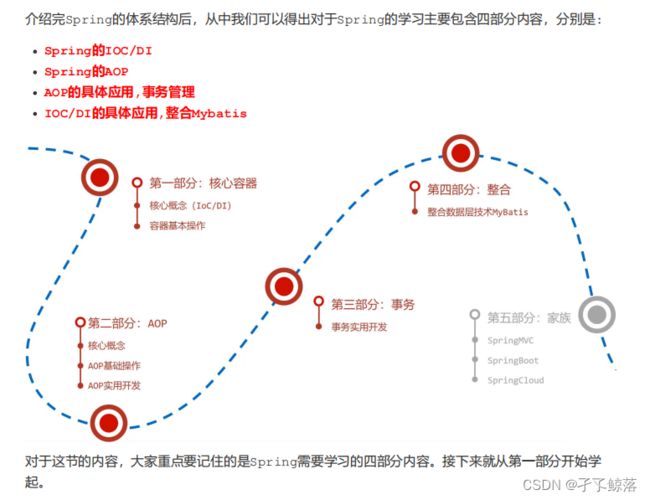
03 课程学习路线
04 Spring核心概念
- 在Spring核心概念这部分内容中主要包含IOC/DI、IOC容器和Bean ,那么问题就来了,这些都是什么呢?
4.1 目前项目中的问题
要想解答这个问题,就需要先分析下目前咱们代码在编写过程中遇到的问题:

(1)业务层需要调用数据层的方法,就需要在业务层new数据层的对象
(2)如果数据层的实现类发生变化,那么业务层的代码也需要跟着改变,发生变更后,都需要进行编译
打包和重部署
(3)所以,现在代码在编写的过程中存在的问题是:耦合度偏高
针对这个问题,该如何解决呢?

我们就想,如果能把框中的内容给去掉,不就可以降低依赖了么,但是又会引入新的问题,去掉以后
程序能运行么?
答案肯定是不行,因为bookDao没有赋值为Null,强行运行就会出空指针异常。
所以现在的问题就是,业务层不想new对象,运行的时候又需要这个对象,该咋办呢?
针对这个问题,Spring就提出了一个解决方案:
使用对象时,在程序中不要主动使用new产生对象,转换为由外部提供对象这种实现思就是Spring的一个核心概念
4.2 IOC、IOC容器、Bean、DI
-
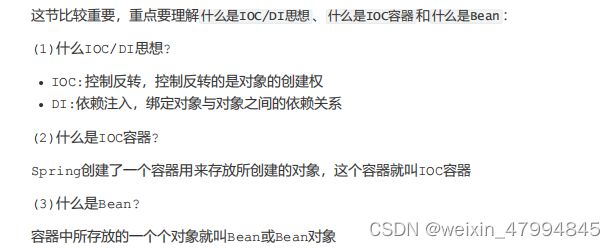
IOC(Inversion of Control)控制反转
(1)什么是控制反转呢?-
使用对象时,由主动new产生对象转换为由外部提供对象,此过程中对象创建控制权由程序转移到外部,此思想称为控制反转
- 业务层要用数据层的类对象,以前是自己new的
- 现在自己不new了,交给别人[外部]来创建对象
- 别人[外部]就反转控制了数据层对象的创建权
- 这种思想就是控制反转
- 别人[外部]指定是什么呢?
(2) Spring和IOC之间的关系是什么呢?
- Spring技术对IOC思想进行了实现
- Spring提供了一个容器,称为IOC容器,用来充当IOC思想中的"外部"
- IOC思想中的别人[外部]指的就是Spring的IOC容器
-
05,入门案例
介绍完Spring的核心概念后,接下来我们得思考一个问题就是,Spring到底是如何来实现IOC和DI的,那接下来就通过一些简单的入门案例,来演示下具体实现过程:
5.1 IOC入门案例
对于入门案例,我们得先分析思路然后再代码实现,
5.1.1 入门案例思路分析
(1)Spring是使用容器来管理bean对象的,那么管什么?
- 主要管理项目中所使用到的类对象,比如(Service和Dao)
(2)如何将被管理的对象告知IOC容器?
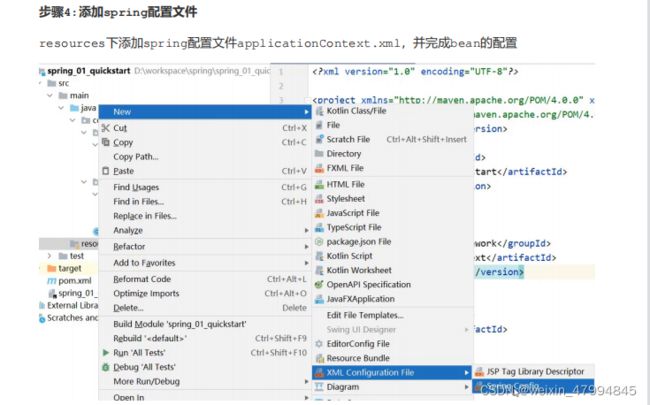
- 使用配置文件
(3)被管理的对象交给IOC容器,要想从容器中获取对象,就先得思考如何获取到IOC容器?
- Spring框架提供相应的接口
(4)IOC容器得到后,如何从容器中获取bean?
- 调用Spring框架提供对应接口中的方法
(5)使用Spring导入哪些坐标?
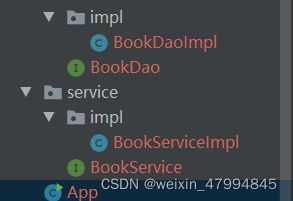
public class BookDaoImpl implements BookDao {
    public void save() {
        System.out.println("book dao save ...");
    }
}
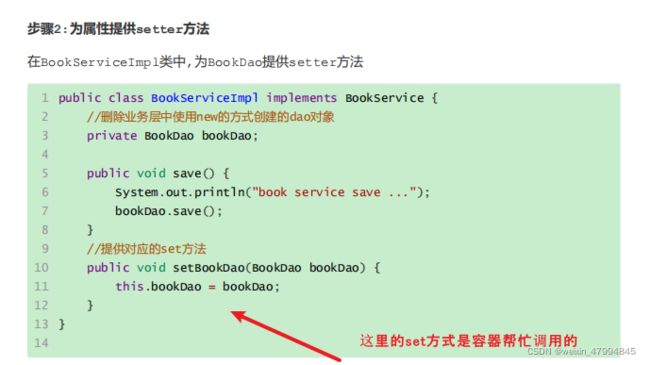
public class BookServiceImpl implements BookService {
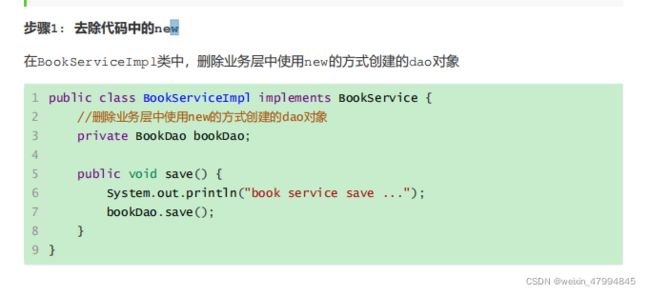
    //5.删除业务层中使用new的方式创建的dao对象
    private BookDao bookDao = new BookDaoImpl();

    public void save() {
        System.out.println("book service save ...");
        bookDao.save();
    }
public class App {
    public static void main(String[] args) {
        BookService bookService = new BookServiceImpl();
        bookService.save();
    }
}

使用spring
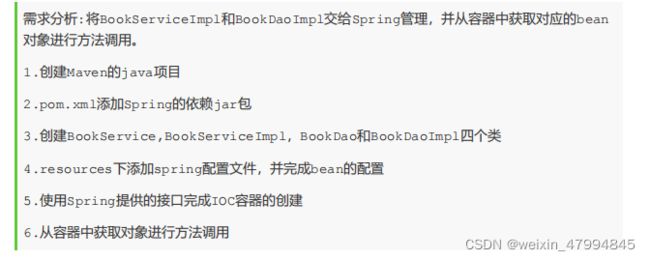
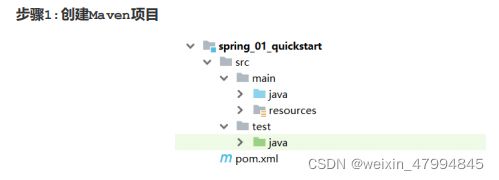
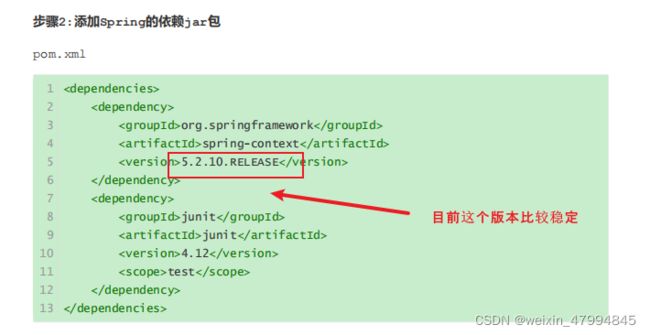
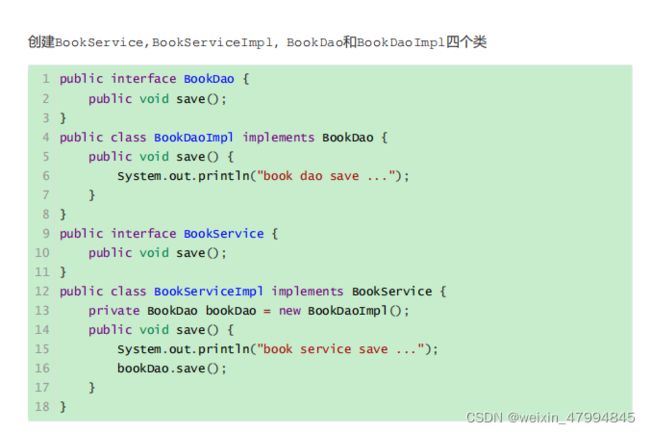
这里为了方便看,写成了下面这样,四个写在了一个文件里面,其实是在四个文件中的
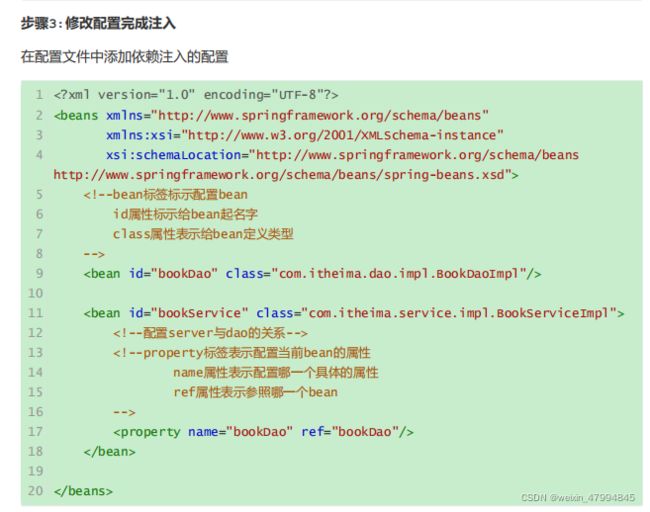
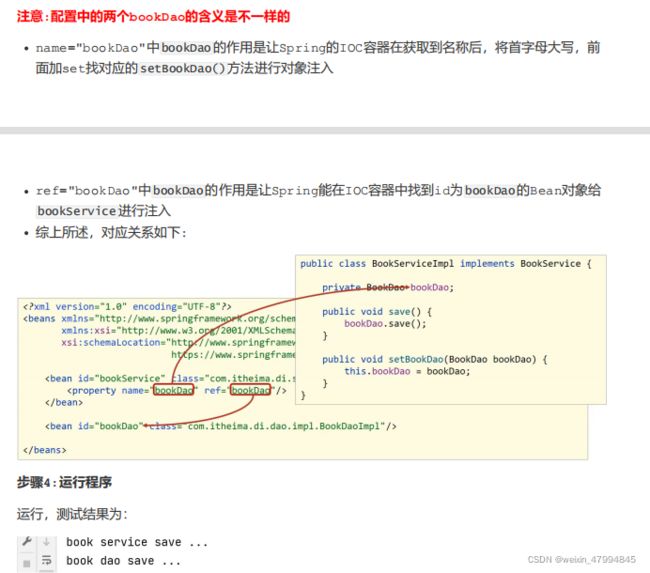
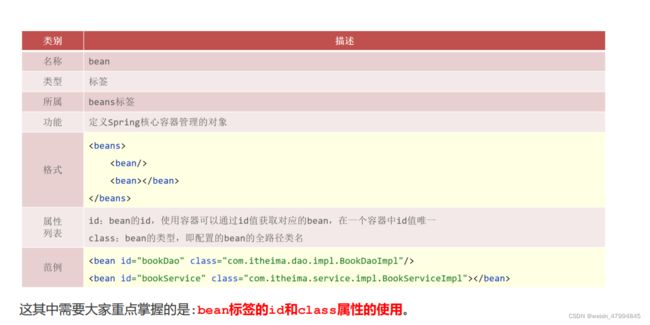
    <bean id="bookDao" class="com.itheima.dao.impl.BookDaoImpl"/>

    <bean id="bookService" class="com.itheima.service.impl.BookServiceImpl"/>
注意事项:bean定义时id属性在同一个上下文中(配置文件)不能重复

Spring的IOC入门案例已经完成,但是在BookServiceImpl的类中依然存在BookDaoImpl对象的new操作,它们之间的耦合度还是比较高,这块该如何解决,就需要用到下面的DI:依赖注入。
5.2 DI入门案例
对于DI的入门案例,我们依然先分析思路然后再代码实现,
入门案例思路分析
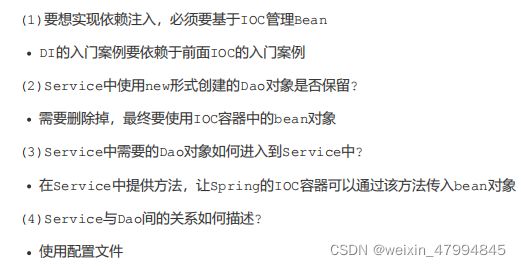
** 入门案例代码实现**
![]()
06,IOC相关内容
通过前面两个案例,我们已经学习了bean如何定义配置,DI如何定义配置以及容器对象如何获取的内容,接下来主要是把这三块内容展开进行详细的讲解,深入的学习下这三部分的内容,首先是bean基
础配置。
6.1 bean基础配置
对于bean的配置中,主要会讲解bean基础配置, bean的别名配置, bean的作用范围配置(重点),这三部
分内容:
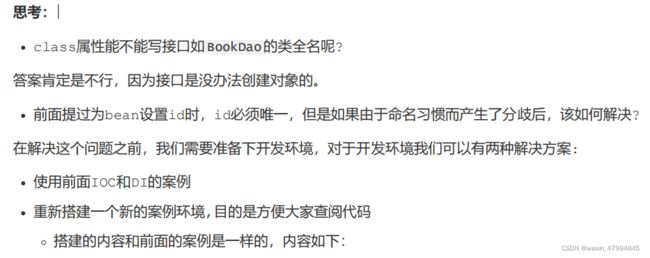
6.2 bean基础配置(id与class)
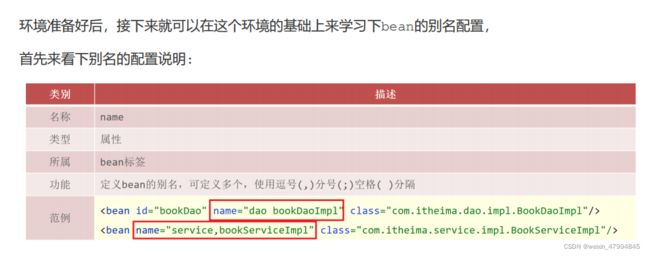
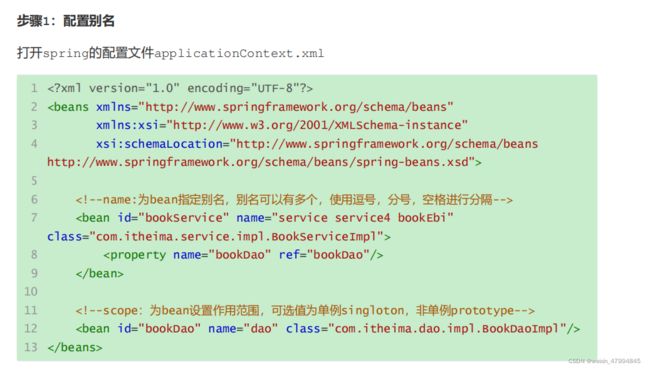
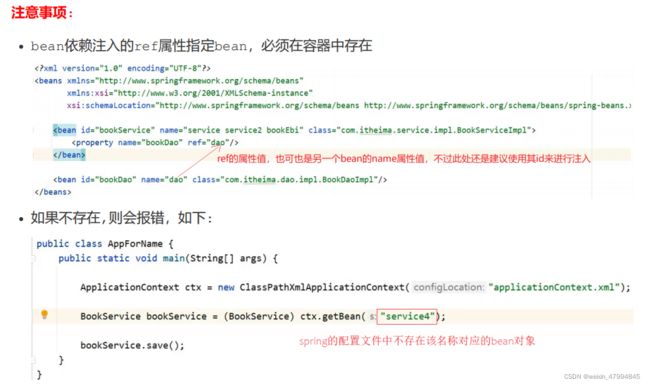
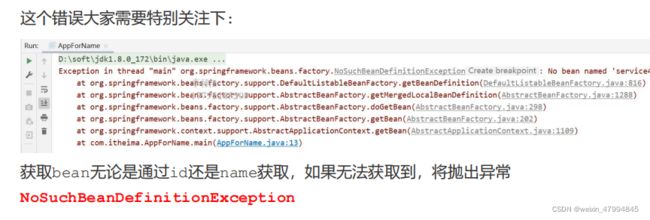
6.3 bean的name属性
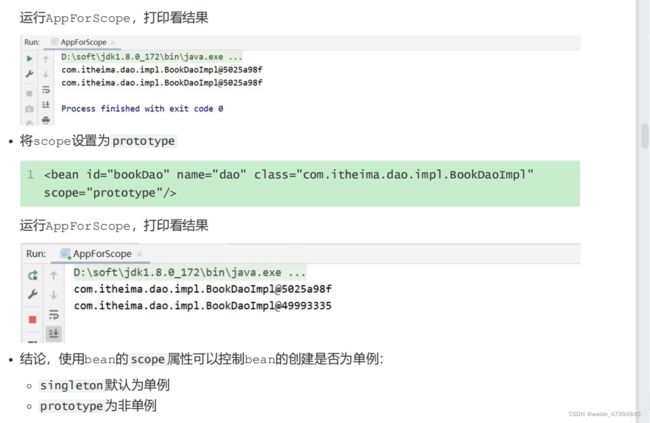
6.4 bean作用范围scope配置
6.5 bean基础配置小结
6.6 bean实例化(有三种方式)
1 构造方法(常用)
2 静态工厂(了解)
3 实例工厂(了解)与FactoryBean(实用)-p11
6.7 bean的生命周期
07 依赖注入的方式
7.1 setter注入
7.2 构造器注入
7.3 自动装配
day02-(22:00)
注解开发
spring整合mybatis
spring整合JUnit
整合Junit与整合Druid和MyBatis差异比较大,为什么呢?Junit是一个搞单元测试用的工具,它
不是我们程序的主体,也不会参加最终程序的运行,从作用上来说就和之前的东西不一样,它不是做
功能的,看做是一个辅助工具就可以了。
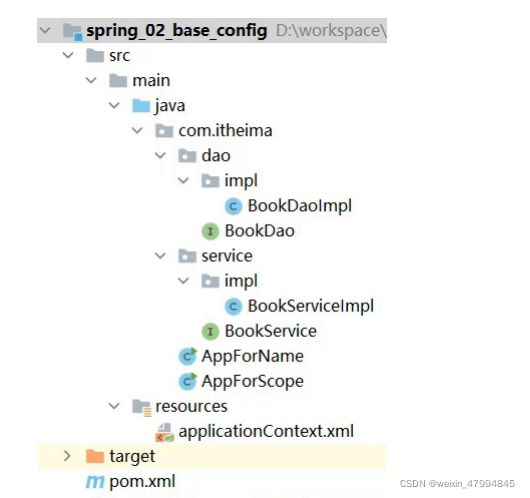
环境准备
这块环境,大家可以直接使用Spring与Mybatis整合的环境即可。当然也可以重新创建一个,因为内
容是一模一样,所以我们直接来看下项目结构即可
整合Junit步骤
步骤1:引入依赖
pom.xml
 <dependency>
      <groupId>junitgroupId>
      <artifactId>junitartifactId>
      <version>4.12version>
      <scope>testscope>
    dependency>

    <dependency>
      <groupId>org.springframeworkgroupId>
      <artifactId>spring-testartifactId>
      <version>5.2.10.RELEASEversion>
    dependency>
步骤2:编写测试类
在test\java下创建一个AccountServiceTest,这个名字任意
package com.itheima.service;

import com.itheima.config.SpringConfig;
import org.junit.Test;
import org.junit.runner.RunWith;
import org.springframework.beans.factory.annotation.Autowired;
import org.springframework.test.context.ContextConfiguration;
import org.springframework.test.context.junit4.SpringJUnit4ClassRunner;
// 下面的两行代码基本这辈子都不会改变了
//设置类运行器
@RunWith(SpringJUnit4ClassRunner.class)
//设置Spring环境对应的配置类
@ContextConfiguration(classes = SpringConfig.class)
public class AccountServiceTest {
    //支持自动装配注入bean
    @Autowired
    private AccountService accountService;

    @Test
    public void testFindById(){
        System.out.println(accountService.findById(1));

    }

    @Test
    public void testFindAll(){
        System.out.println(accountService.findAll());
    }


}
day03
Aop
1、AOP简介
前面我们在介绍Spring的时候说过,Spring有两个核心的概念,一个是IOC/DI,一个是AOP。
前面已经对IOC/DI进行了系统的学习,接下来要学习它的另一个核心内容,就是AOP。
对于AOP,我们前面提过一句话是:AOP是在不改原有代码的前提下对其进行增强。
对于下面的内容,我们主要就是围绕着这一句话进行展开学习,主要学习两方面内容AOP核心概 念, AOP作用:
1.1 什么是AOP?
- AOP(Aspect Oriented Programming)面向切面编程,一种编程范式,指导开发者如何组织程
序结构- OOP(Object Oriented Programming)面向对象编程
我们都知道OOP是一种编程思想,那么AOP也是一种编程思想,编程思想主要的内容就是指导程序员该
如何编写程序,所以它们两个是不同的编程范式。
- OOP(Object Oriented Programming)面向对象编程
1.2 AOP作用
- 作用:在不惊动原始设计的基础上为其进行功能增强,前面咱们有技术就可以实现这样的功能即代
理模式
前面咱们有技术就可以实现这样的功能即代理模式。
1.3 AOP核心概念
为了能更好的理解AOP的相关概念,我们准备了一个环境,整个环境的内容我们暂时可以不用关注,最
主要的类为: BookDaoImpl
package com.itheima.dao.impl;

import com.itheima.dao.BookDao;
import org.springframework.beans.factory.annotation.Value;
import org.springframework.stereotype.Repository;

@Repository
public class BookDaoImpl implements BookDao {

    public void save() {
        //记录程序当前执行执行(开始时间)
        Long startTime = System.currentTimeMillis();
        //业务执行万次
        for (int i = 0;i<10000;i++) {
            System.out.println("book dao save ...");
        }
        //记录程序当前执行时间(结束时间)
        Long endTime = System.currentTimeMillis();
        //计算时间差
        Long totalTime = endTime-startTime;
        //输出信息
        System.out.println("执行万次消耗时间:" + totalTime + "ms");
    }

    public void update(){
        System.out.println("book dao update ...");
    }

    public void delete(){
        System.out.println("book dao delete ...");
    }

    public void select(){
        System.out.println("book dao select ...");
    }
}
代码的内容相信大家都能够读懂,对于save方法中有计算万次执行消耗的时间。
当在App类中从容器中获取bookDao对象后,分别执行其save , delete , update和select方法后会
有如下的打印结果:

这个时候,我们就应该有些疑问?
- 对于计算万次执行消耗的时间只有save方法有,为什么delete和update方法也会有呢?
- delete和update方法有,那什么select方法为什么又没有呢?
这个案例中其实就使用了Spring的AOP,在不惊动(改动)原有设计(代码)的前提下,想给谁添加功能
就给谁添加。这个也就是Spring的理念: - 无入侵式/无侵入式
说了这么多,Spring到底是如何实现的呢?
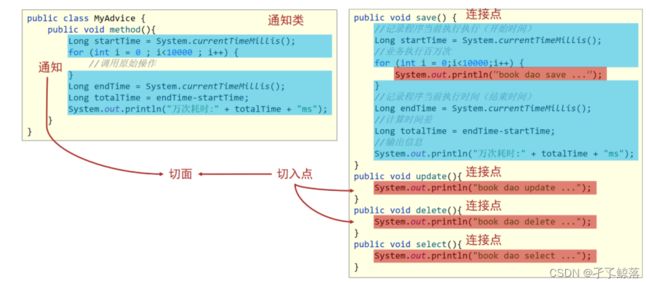
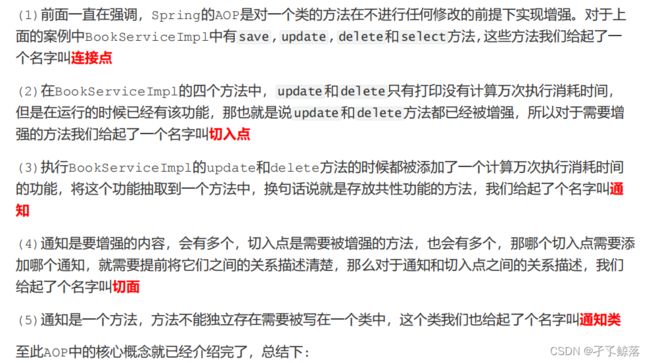

2,AOP入门案例
2.1 需求分析
2.2 思路分析
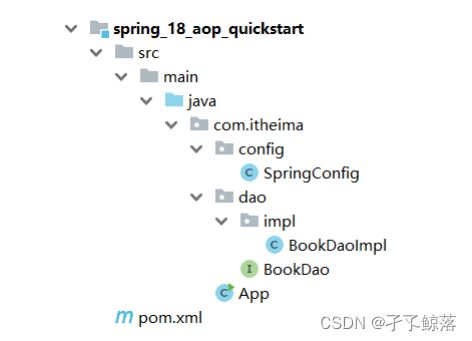
2.3 环境准备
- 创建一个Maven项目
- pom.xml添加Spring依赖
   <dependency>
      <groupId>org.springframeworkgroupId>
      <artifactId>spring-contextartifactId>
      <version>5.2.10.RELEASEversion>
    dependency>
- 添加BookDao和BookDaoImpl类
package com.itheima.dao.impl;

import com.itheima.dao.BookDao;
import org.springframework.beans.factory.annotation.Value;
import org.springframework.stereotype.Repository;

@Repository
public class BookDaoImpl implements BookDao {

    public void save() {
        System.out.println(System.currentTimeMillis());
        System.out.println("book dao save ...");
    }

    public void update(){
        System.out.println("book dao update ...");
    }
}
- 创建Spring的配置类
package com.itheima.config;

import org.springframework.context.annotation.ComponentScan;
import org.springframework.context.annotation.Configuration;
import org.springframework.context.annotation.EnableAspectJAutoProxy;

//这个是告诉spring来加载我
@Configuration
@ComponentScan("com.itheima")
public class SpringConfig {

}
- 编写App运行类
package com.itheima;

import com.itheima.config.SpringConfig;
import com.itheima.dao.BookDao;
import org.springframework.context.ApplicationContext;
import org.springframework.context.annotation.AnnotationConfigApplicationContext;

public class App {
    public static void main(String[] args) {
        ApplicationContext ctx = new AnnotationConfigApplicationContext(SpringConfig.class);
        BookDao bookDao = ctx.getBean(BookDao.class);
        bookDao.update();
    }
}
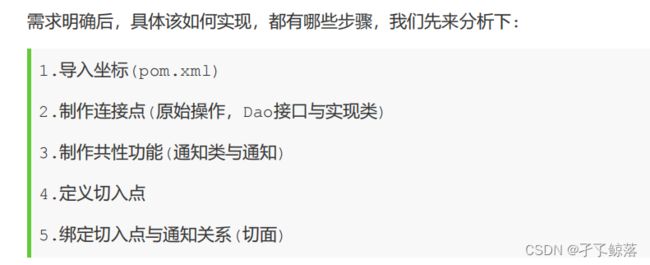
2.4 AOP实现步骤
pom.xml
 <dependency>
      <groupId>org.aspectjgroupId>
      <artifactId>aspectjweaverartifactId>
      <version>1.9.4version>
    dependency>
步骤2:定义接口与实现类
环境准备的时候,BookDaoImpl已经准备好,不需要做任何修改
步骤3:定义通知类和通知
通知就是将共性功能抽取出来后形成的方法,共性功能指的就是当前系统时间的打印。
public class MyAdvice {
    public void method(){
        System.out.println(System.currentTimeMillis());
    }

}
类名和方法名没有要求,可以任意。
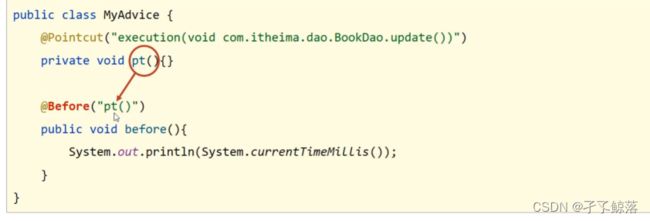
步骤4:定义切入点
BookDaoImpl中有两个方法,分别是save和update,我们要增强的是update方法,该如何定义呢?
public class MyAdvice {

    @Pointcut("execution(void com.itheima.dao.BookDao.update())")
    private void pt(){}

    @Before("pt()")
    public void method(){
        System.out.println(System.currentTimeMillis());
    }

}

步骤5:制作切面
切面是用来描述通知和切入点之间的关系,如何进行关系的绑定?
public class MyAdvice {

    @Pointcut("execution(void com.itheima.dao.BookDao.update())")
    private void pt(){}

    @Before("pt()")
    public void method(){
        System.out.println(System.currentTimeMillis());
    }

}
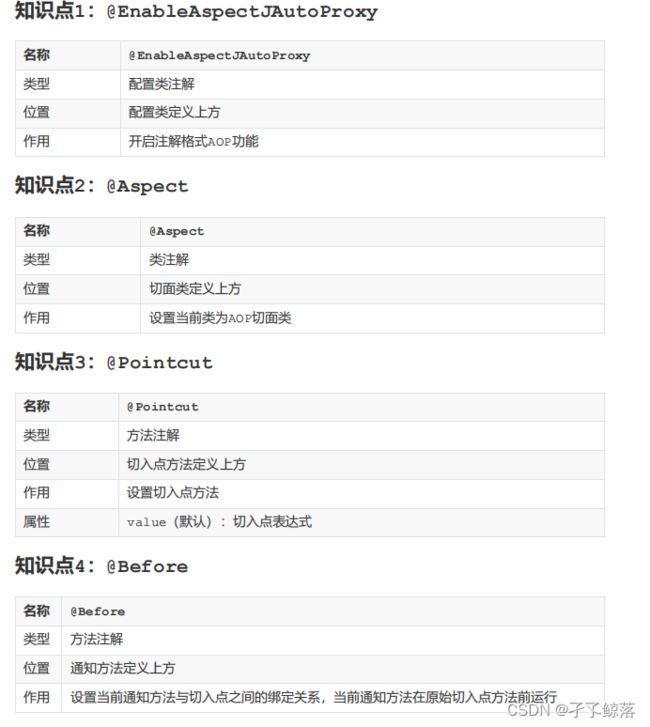
@Component
// 告诉spring我是aop
@Aspect
public class MyAdvice {

    @Pointcut("execution(void com.itheima.dao.BookDao.update())")
    private void pt(){}

    @Before("pt()")
    public void method(){
        System.out.println(System.currentTimeMillis());
    }

}
步骤7:开启注解格式AOP功能
//这个是告诉spring来加载我
@Configuration
@ComponentScan("com.itheima")
//开启注解开发AOP功能这个对应的是前面的@Aspect这个
@EnableAspectJAutoProxy
public class SpringConfig {

}
步骤8:运行程序
public class App {
    public static void main(String[] args) {
        ApplicationContext ctx = new AnnotationConfigApplicationContext(SpringConfig.class);
        BookDao bookDao = ctx.getBean(BookDao.class);
        bookDao.update();
    }
}
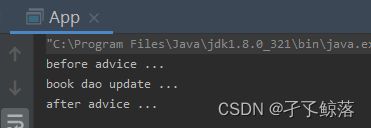
看到在执行update方法之前打印了系统时间戳,说明对原始方法进行了增强,AOP编程成功。

3,AOP工作流程
4,AOP配置管理
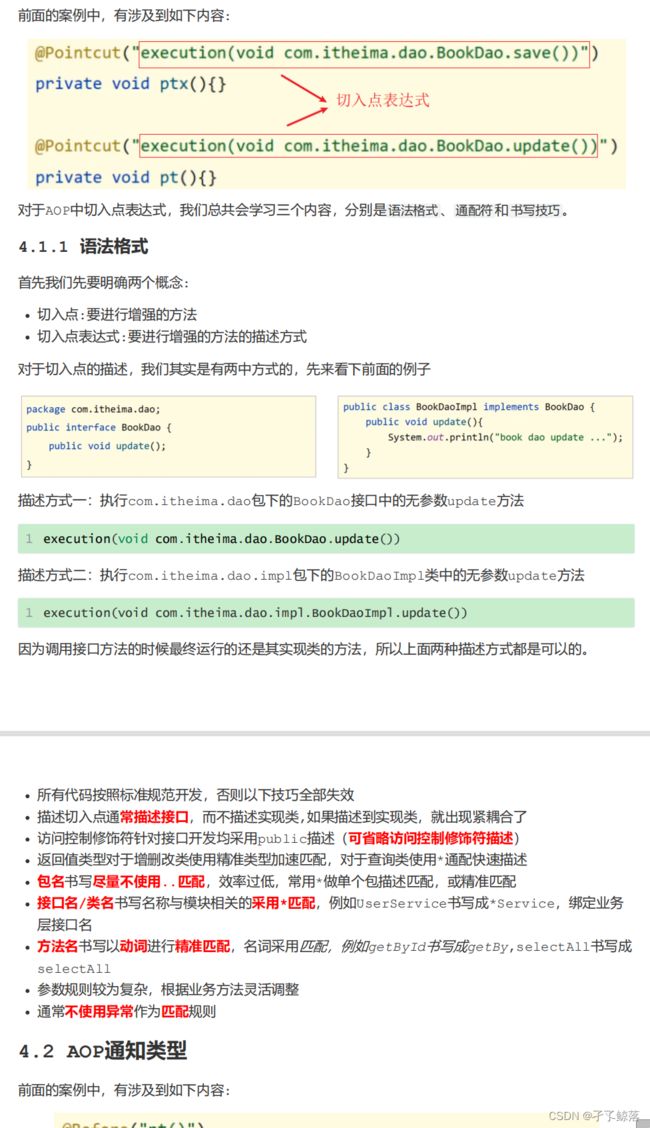
4.1 AOP切入点表达式
在学的过程中慢慢的熟练,不要死记硬背
4.2 AOP通知类型(p35)
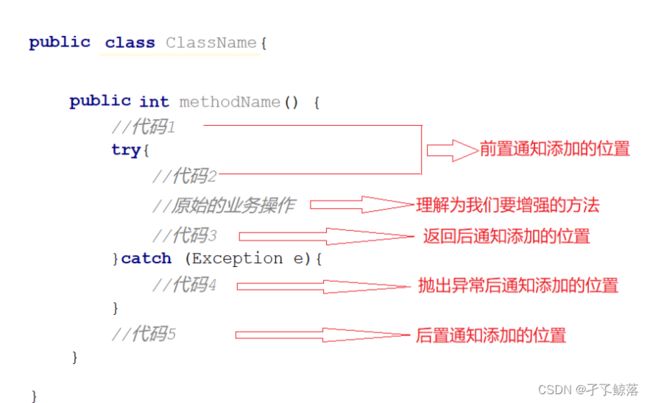
4.2.1 类型介绍
4.2.2 环境准备
  <dependencies>
    <dependency>
      <groupId>org.springframeworkgroupId>
      <artifactId>spring-coreartifactId>
      <version>5.2.10.RELEASEversion>
    dependency>
    <dependency>
      <groupId>org.aspectjgroupId>
      <artifactId>aspectjweaverartifactId>
      <version>1.9.4version>
    dependency>
  dependencies>
- 添加BookDao和BookDaoImpl类
public interface BookDao {
    public void update();
    public int select();
}

@Repository
public class BookDaoImpl implements BookDao {

    public void update() {
        System.out.println("book dao update ...");
    }

    public int select() {
        System.out.println("book dao select is running ...");
        return 100;
    }
}
- 创建Srin的配置类
@Configuration
@ComponentScan("com.itheima")
@EnableAspectJAutoProxy
public class SpringConfig {

}
- 创建通知类
@Component
@Aspect
public class MyAdvice {

    @Pointcut("execution(void com.itheima.dao.BookDao.update())")
    private void pt() {
    }

    @Before("pt()")
    //此处也可以写成 @Before("MyAdvice.pt()"),不建议
    public void before() {
        System.out.println("before advice ...");
    }

    @After("pt()")
    public void after() {
        System.out.println("after advice ...");
    }

    public void around() {
        System.out.println("around before advice ...");
        System.out.println("around after advice ...");
    }

    public void afterReturning() {
        System.out.println("afterReturning advice ...");
    }

    public void afterThrowing() {
        System.out.println("afterThrowing advice ...");
    }

}
- 编写App运行类
public class App {
    public static void main(String[] args) {
        ApplicationContext ctx = new AnnotationConfigApplicationContext(SpringConfig.class);
        BookDao bookDao = ctx.getBean(BookDao.class);
        bookDao.update();
    }
}
环绕通知(最重要)
 @Pointcut("execution(void com.itheima.dao.BookDao.update())")
    private void pt1() {}

    @Around("pt1()")
    public void around() {
        System.out.println("around before advice ...");
        System.out.println("around after advice ...");
    }

运行结果中,通知的内容打印出来,但是原始方法的内容却没有被执行。
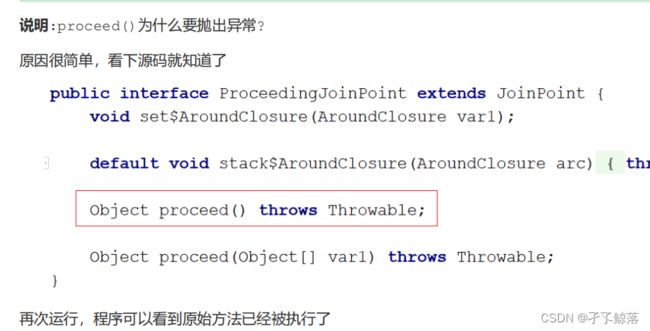
因为环绕通知需要在原始方法的前后进行增强,所以环绕通知就必须要能对原始操作进行调用,具体
如何实现?
 @Around("pt1()")
    public void around(ProceedingJoinPoint pjp) throws Throwable {
        System.out.println("around before advice ...");
        //表示对原始操作的调用
        pjp.proceed();
        System.out.println("around after advice ...");
    }

注意事项
(1)原始方法有返回值的处理
修改MyAdvice,对BookDao中的select方法添加环绕通知,
4.3 业务层接口执行效率(p36)
喜欢就是的方式的方式的方式的方式不明白的方式不明白的方式
4.4 AOP通知获取数据(p37)
4.5 百度网盘密码数据兼容处理(p38)
5,AOP总结
6,AOP事务管理(p32左右)
6.1 Spring事务简介
6.1.1 相关概念介绍

Spring为了管理事务,提供了一个平台事务管理器PlatformTransactionManager


参考资料
参考视频

