仿写el-upload组件,彻底搞懂文件上传
用了那么久的Upload组件,你知道是怎么实现的么,今天就来仿写一个饿了么el-upload vue组件,彻底搞懂前端的文件上传相关知识!
要实现的props
| 参数 | 说明 |
|---|---|
| action | 必选参数,上传的地址 |
| headers | 设置上传的请求头部 |
| multiple | 是否支持多选文件 |
| data | 上传时附带的额外参数 |
| name | 上传的文件字段名 |
| with-credentials | 支持发送 cookie 凭证信息 |
| show-file-list | 是否显示已上传文件列表 |
| drag | 是否启用拖拽上传 |
| accept | 接受上传的文件类型 |
| on-preview | 点击文件列表中已上传的文件时的钩子 |
| on-remove | 文件列表移除文件时的钩子 |
| on-success | 文件上传成功时的钩子 |
| on-error | 文件上传失败时的钩子 |
| on-progress | 文件上传时的钩子 |
| on-change | 添加文件时被调用 |
| before-upload | 上传文件之前的钩子,参数为上传的文件,若返回 false 或者返回 Promise 且被 reject,则停止上传。 |
| before-remove | 删除文件之前的钩子,参数为上传的文件和文件列表,若返回 false 或者返回 Promise 且被 reject,则停止删除。 |
| list-type | 文件列表的类型 |
| auto-upload | 是否在选取文件后立即进行上传 |
| file-list | 上传的文件列表, 例如: [{name: ‘food.jpg’, url: ‘https://xxx.cdn.com/xxx.jpg’}] |
| limit | 最大允许上传个数 |
| on-exceed | 文件超出个数限制时的钩子 |
参考:https://element.eleme.cn/#/zh-CN/component/upload
这里面有几个重要的点:
- input file 的美化
- 多选
- 拖拽
一个个实现
创建upload组件文件
src/components/upload/index.vue
<template>template>
<script setup>
  // 属性太多,把props单独放一个文件引入进来
  import property from './props'
  const props = defineProps(property)
script>
<style>style>
./props.js
export default {
  action: {
    type: String
  },
  headers: {
    type: Object,
    default: {}
  },
  multiple: {
    type: Boolean,
    default: false
  },
  data: {
    type: Object,
    default: {}
  },
  name: {
    type: String,
    default: 'file'
  },
  'with-credentials': {
    type: Boolean,
    default: false
  },
  'show-file-list': {
    type: Boolean,
    default: true,
  },
  drag: {
    type: Boolean,
    default: false
  },
  accept: {
    type: String,
    default: ''
  },
  'list-type': {
    type: String,
    default: 'text' // text、picture、picture-card
  },
  'auto-upload': {
    type: Boolean,
    default: true
  },
  'file-list': {
    type: Array,
    default: []
  },
  disabled: {
    type: Boolean,
    default: false
  },
  limit: {
    type: Number,
    default: Infinity
  },
  'before-upload': {
    type: Function,
    default: () => {
      return true
    }
  },
  'before-remove': {
    type: Function,
    default: () => {
      return true
    }
  }
具体的编写upload组件代码
1. 文件上传按钮的样式
我们都知道,的默认样式是这样的:

很丑,并且无法改变其样式。
解决办法:可以把input隐藏,重新写个按钮点击来触发input的文件选择。
<template>
<input
type="file"
id="file"
@change="handleChange"
>
<button
class="upload-btn"
@click="choose"
>
点击上传
button>
template>
<script setup>
// 触发选择文件
const choose = () => {
document.querySelector('#file').click()
}
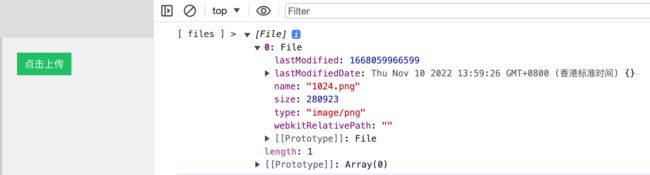
// input选择文件回调
const handleChange = (event) => {
files = Array.from(event.target.files)
console.log('[ files ] >', files)
}
script>
<style scoped>
#file {
display: none;
}
.upload-btn {
border: none;
background-color: #07c160;
color: #fff;
padding: 6px 10px;
cursor: pointer;
}
style>
效果:

这样也是可以调起文件选择框,并触发input的onchange事件。
2. 多选
直接在input上加一个Booelan属性multiple,根据props中的值动态设置
顺便把accept属性也加上
<template>
  <input
     type="file"
     id="file"
     :multiple="multiple"
     :accept="accept"
     @change="handleChange"
  >
template>
3. 拖拽
准备一个接收拖拽文件的区域,props传drag=true就用拖拽,否则就使用input上传。
<template>
  <input
    type="file"
    id="file"
    :multiple="multiple"
    :accept="accept"
    @change="handleChange"
  >
  <button
     class="upload-btn"
     v-if="!drag"
     @click="choose"
  >
    点击上传
  button>
  <div
    v-else
    class="drag-box"
    @dragover="handleDragOver"
    @dragleave="handleDragLeave"
    @drop="handleDrop"
    @click="choose"
    :class="{'dragging': isDragging}"
  >
    将文件拖到此处,或<span>点击上传span>
  div>
template>
dragging用来拖拽鼠标进入时改变样式
<script setup>
  const isDragging = ref(false)
  // 拖放进入目标区域
  const handleDragOver = (event) => {
    event.preventDefault()
    isDragging.value = true
  }
  const handleDragLeave = (event) => {
    isDragging.value = false
  }
  let files = []
  // 拖拽放置
  const handleDrop = (event) => {
    event.preventDefault()
    isDragging.value = false
    files = Array.from(event.dataTransfer.files);
    console.log(files);
  }
</script>
.drag-box {
    width: 240px;
    height: 150px;
    line-height: 150px;
    text-align: center;
    border: 1px dashed #ddd;
    cursor: pointer;
    border-radius: 8px;
  }
  .drag-box:hover {
    border-color: cornflowerblue;
  }
  .drag-box.dragging {
    background-color: rgb(131, 161, 216, .2);
    border-color: cornflowerblue;
  }
  .drag-box span {
    color: cornflowerblue;
  }

跟使用input上传效果一样

4. 上传到服务器
并实现on-xxx钩子函数
  const emit = defineEmits()
  const fileList = ref([])
  let files = []

  // 拖拽放置
  const handleDrop = (event) => {
    event.preventDefault()
    isDragging.value = false
    files = Array.from(event.dataTransfer.files);
    console.log('[ files ] >', files)
    handleBeforeUpload(files)
  }

  // input选择文件回调
  const handleChange = (event) => {
    files = Array.from(event.target.files)
    console.log('[ files ] >', files)
    handleBeforeUpload(files)
  }

  const handleBeforeUpload = (files) => {
    if (files.length > props.limit - fileList.value.length) {
      console.error(`当前限制选择 ${props.limit} 个文件,本次选择了 ${files.length} 个文件,共选择了 ${files.length + fileList.value.length} 个文件`)
      emit('on-exceed', files, toRaw(fileList.value))
      return
    }
    // 可以把锁哥文件放到一个formData中一起上传,
    // 遍历文件一个个上传,这里一个个上传是为了实现钩子函数回调时返回对应的file对象。
    files.forEach(async file => {
      emit('on-change', file, files)
      if (!props.beforeUpload()) {
        return
      }
      if (props.autoUpload) {
        uploadRequest(file, files)
      }
    })
  }

  // 手动上传已选择的文件
  const submit = () => {
    files.forEach(async file => {
      uploadRequest(file, files)
    })
  }

  // 保存xhr对象,用于后面取消上传
  let xhrs = []
  const uploadRequest = async (file, files) => {
    let xhr = new XMLHttpRequest();
    // 调用open函数,指定请求类型与url地址。请求类型必须为POST
    xhr.open('POST', props.action);
    // 设置自定义请求头
    Object.keys(props.headers).forEach(k => {
      xhr.setRequestHeader(k, props.headers[k])
    })
    // 额外参数
    const formData = new FormData()
    formData.append('file', file);
    Object.keys(props.data).forEach(k => {
      formData.append(k, props.data[k]);
    })
    // 携带cookie
    xhr.withCredentials = props.withCredentials
    xhr.upload.onprogress = (e) => {
      emit('on-progress', e, file, files)
    }
    // 监听状态
    xhr.onreadystatechange = () => {
      if (xhr.readyState === 4) {
        const res = JSON.parse(xhr.response)
        const fileObj = {
          name: file.name,
          percentage: 100,
          raw: file,
          response: res,
          status: 'success',
          size: file.size,
          uid: file.uid,
        }
        fileList.value.push(fileObj)
        if (xhr.status === 200 || xhr.status === 201) {
          emit('on-success', res, fileObj, toRaw(fileList.value))
        } else {
          emit('on-error', res, fileObj, toRaw(fileList.value))
        }
      }
    }
    // 发起请求
    xhr.send(formData);
    xhrs.push({
      xhr,
      file
    })
  }

  const preview = (file) => {
    emit('on-preview', file)
  }

  const remove = (file, index) => {
    if (!props.beforeRemove()) {
      return
    }
    fileList.value.splice(index, 1)
    emit('on-remove', file, fileList.value)
  }

  // 取消上传
  const abort = (file) => {
    // 通过file对象找到对应的xhr对象,然后调用abort
    // xhr.abort()
  }

  defineExpose({
    abort,
    submit
  })
全部代码
<template>
  <input
    type="file"
    id="file"
    :multiple="multiple"
    :accept="accept"
    @change="handleChange"
  >
  <button class="upload-btn" v-if="!drag" @click="choose">
    点击上传
  button>
  <div
    v-else
    class="drag-box"
    @dragover="handleDragOver"
    @dragleave="handleDragLeave"
    @drop="handleDrop"
    @click="choose"
    :class="{'dragging': isDragging}"
  >
    将文件拖到此处,或<span>点击上传span>
  div>
  <template v-if="showFileList">
    <template v-if="listType === 'text'">
      <p class="file-item" v-for="(file, index) in fileList" :key="index" @click="preview(file)">
        <span>{{file.name}}span>
        <span class="remove" @click.stop="remove(file, index)">×span>
      p>
    template>
  template>
template>

<script setup>
  import { ref, toRaw, onMounted } from 'vue'
  import property from './props'
  const props = defineProps(property)
  const emit = defineEmits()

  const fileList = ref([])
  const isDragging = ref(false)

  // 触发选择文件
  const choose = () => {
    document.querySelector('#file').click()
  }

  // 拖放进入目标区域
  const handleDragOver = (event) => {
    event.preventDefault()
    isDragging.value = true
  }

  const handleDragLeave = (event) => {
    isDragging.value = false
  }

  let files = []

  // 拖拽放置
  const handleDrop = (event) => {
    event.preventDefault()
    isDragging.value = false
    files = Array.from(event.dataTransfer.files);
    console.log('[ files ] >', files)
    handleBeforeUpload(files)
  }

  // input选择文件回调
  const handleChange = (event) => {
    files = Array.from(event.target.files)
    console.log('[ files ] >', files)
    handleBeforeUpload(files)
  }

  const handleBeforeUpload = (files) => {
    if (files.length > props.limit - fileList.value.length) {
      console.error(`当前限制选择 ${props.limit} 个文件,本次选择了 ${files.length} 个文件,共选择了 ${files.length + fileList.value.length} 个文件`)
      emit('on-exceed', files, toRaw(fileList.value))
      return
    }
    files.forEach(async file => {
      emit('on-change', file, files)
      if (!props.beforeUpload()) {
        return
      }
      if (props.autoUpload) {
        uploadRequest(file, files)
      }
    })
  }

  // 手动上传已选择的文件
  const submit = () => {
    files.forEach(async file => {
      uploadRequest(file, files)
    })
  }

  let xhrs = []
  const uploadRequest = async (file, files) => {
    let xhr = new XMLHttpRequest();
    // 调用open函数,指定请求类型与url地址。请求类型必须为POST
    xhr.open('POST', props.action);
    // 设置自定义请求头
    Object.keys(props.headers).forEach(k => {
      xhr.setRequestHeader(k, props.headers[k])
    })
    // 额外参数
    const formData = new FormData()
    formData.append('file', file);
    Object.keys(props.data).forEach(k => {
      formData.append(k, props.data[k]);
    })
    // 携带cookie
    xhr.withCredentials = props.withCredentials
    xhr.upload.onprogress = (e) => {
      emit('on-progress', e, file, files)
    }
    // 监听状态
    xhr.onreadystatechange = () => {
      if (xhr.readyState === 4) {
        const res = JSON.parse(xhr.response)
        const fileObj = {
          name: file.name,
          percentage: 100,
          raw: file,
          response: res,
          status: 'success',
          size: file.size,
          uid: file.uid,
        }
        fileList.value.push(fileObj)
        if (xhr.status === 200 || xhr.status === 201) {
          emit('on-success', res, fileObj, toRaw(fileList.value))
        } else {
          emit('on-error', res, fileObj, toRaw(fileList.value))
        }
      }
    }
    // 发起请求
    xhr.send(formData);
    xhrs.push({
      xhr,
      file
    })
  }

  const preview = (file) => {
    emit('on-preview', file)
  }

  const remove = (file, index) => {
    if (!props.beforeRemove()) {
      return
    }
    fileList.value.splice(index, 1)
    emit('on-remove', file, fileList.value)
  }

  // 取消上传
  const abort = (file) => {
    // 通过file对象找到对应的xhr对象,然后调用abort
    // xhr.abort()
  }

  defineExpose({
    abort,
    submit
  })
script>

<style scoped>
  #file {
    display: none;
  }
  .upload-btn {
    border: none;
    background-color: #07c160;
    color: #fff;
    padding: 6px 10px;
    cursor: pointer;
  }
  .drag-box {
    width: 240px;
    height: 150px;
    line-height: 150px;
    text-align: center;
    border: 1px dashed #ddd;
    cursor: pointer;
    border-radius: 8px;
  }
  .drag-box:hover {
    border-color: cornflowerblue;
  }
  .drag-box.dragging {
    background-color: rgb(131, 161, 216, .2);
    border-color: cornflowerblue;
  }
  .drag-box span {
    color: cornflowerblue;
  }
  .file-item {
    display: flex;
    justify-content: space-between;
    align-items: center;
    margin-top: 12px;
    padding: 0 8px;
    border-radius: 4px;
    cursor: pointer;
  }
  .file-item:hover {
    background-color: #f5f5f5;
    color: cornflowerblue;
  }
  .file-item .remove {
    font-size: 20px;
  }
style>