Github+Hugo免费搭建博客
文章目录
- 基于Windows的博客搭建教程
-
- 前言
- 安装Git
- 安装Hugo
- 创建并配置站点
-
- 创建站点
- 下载主题
- 配置主题
-
- 添加js特效
- 创建博客文章
- 启动博客的本地预览
- 建立Github pages并部署到线上
-
- 创建Github仓库
- 生成静态文件
- 设置全局用户名和邮箱
- 博客部署
- 后续更新
- 最后
免费搭建一个属于自己的博客!
基于Windows的博客搭建教程
前言
此篇写一下搭建博客的教程以及自己遇到的坑,想搭建自己博客的朋友可以跟着学。
需要的知识:纯小白也可以玩
需要的工具
- Github账户(托管网站)
- Git与Hugo
- LeanCloud账户(评论系统要用到,开始的时候可以先放着,等熟悉了再添加)
- Vs code(写博客十分方便,强力推荐)
以下提供两个下载方式,如果网络不错的话,改了host后,最好在命令行git clone(可以熟悉)。有像我一样移动热点走天下的就去选择下面的百度云下载吧。
安装Git
git的安装十分简单,安装的时候全部选择选默认,在此不再赘述。
Git下载下载对应的windows版本。
百度云下载:提取码:4j8r
安装Hugo
安装hugo可以参照官方教程
Hugo下载:HUGO
1.进去后滑到下面找到对应的windows版本

百度云下载:提取码:np1y
2.下载好后,解压到C盘文件夹下(哪里都行,好记的路径都可以,最好路径全英)
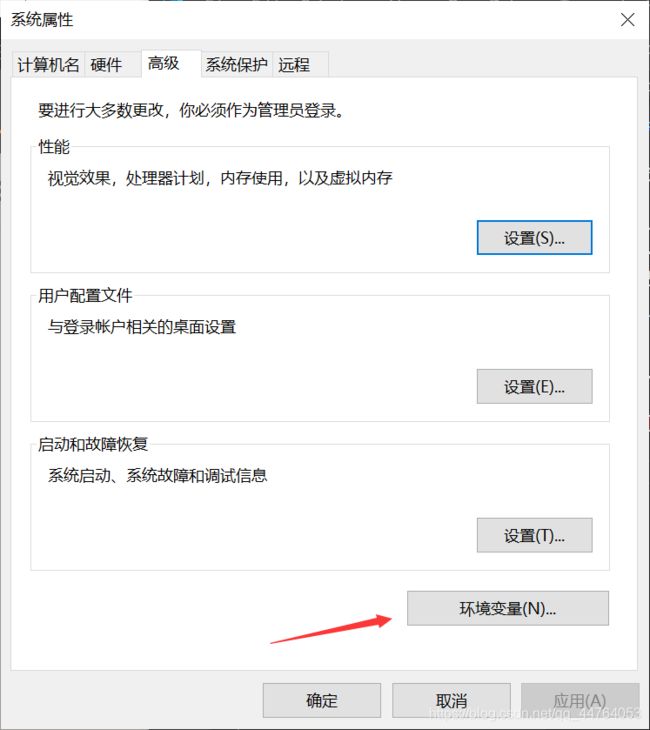
3.添加环境变量:打开windows搜索框输入:系统环境变量
[外链图片转存失败,源站可能有防盗链机制,建议将图片保存下来直接上传(img-XxGs8Dj9-1592097952009)(https://NTaurus.github.io/images/配置环境变量1.png)]
找到下面的系统变量->点击Path->编辑
4.确认是否配置成功,打开系统搜索框,输入CMD后回车。在命令行里敲:
hugo version
如果显示如下则说明配置成功,接下来可以玩转hugo惹。
创建并配置站点
创建站点
windows搜索框输入CMD并打开,选择一个路径存放站点。
cd xxx //选择路径
以我为例选择路径C:\Users\NTaurus
cd Users
cd NTaurus
然后使用以下命令
hugo new site xxx
//xxx是存放站点的文件名(即站点根目录)
//例如:hugo new site mblog
下载主题
首先我们先修改一下host,不改的话在命令行里git clone主题到本地会十分地慢。
在Windows下找到路径C:/Windows/system32/drivers/etc/hosts,用VS code打开hosts文件,在尾部添加以下全部内容。
# Github
185.31.16.184 github.global.ssl.fastly.net
185.31.18.133 avatars0.githubusercontent.com
185.31.19.133 avatars1.githubusercontent.com
199.232.28.133 avatars2.githubusercontent.com
199.232.28.133 avatars3.githubusercontent.com
199.232.28.133 cloud.githubusercontent.com
然后刷新DNS解析缓存
ipconfig /flushdns
接下来,进入hugo主题库选择自己喜欢的主题。以下以tranquilpeak主题作为教程。
在刚刚生成的根目录下:
cd themes
git clone https://github.com/kakawait/hugo-tranquilpeak-theme.git tranquilpeak
//主题名默认很长,clone下来后可以改成tranquilpeak
//等待clone完成
如果刚刚改了host后,git clone 还是特别地慢甚至失败的话,多试两次,如果还不行,别慌!在自己选择的主题页面里找到Download,进去点绿色的按钮 clone or download,然后选择download zip下载到桌面,下载完成后把文件夹复制到刚刚根目录下的themes文件夹(blog/themes)

配置主题
主题下载好后去在根目录下进入themes/tranquilpeak/exampleSite,找到里面的config.toml配置文件,用vs code打开。
# Tranquilpeak
# Version : 0.4.7-BETA
# Author : Thibaud Leprêtre

# I STRONGLY recommend you to use a CDN to speed up loading of pages.
# There is many free CDN like Cloudinary or you can also use indirectly
# by using services like Google Photos.

# If you want to store images yourself, please read this guidelines:
# For users, if you only use this theme, put your images directly in `source/assets/images` folder
# But if you want to add local images, you can put your images directly in `source/assets/images` folder
# For developpers, if you modify this theme, put your images in `source/images` folder and
# use grunt task `build` to synchronize assets

# 这是Github仓库的URL,注意是https://XXXX.github.io XXXX是你仓库的名字
baseURL = "https://NTaurus.github.io"

# 这样就是中文的
languageCode = "en-us"
defaultContentLanguage = "zh-cn"

# blog标题
title = "NTaurus"

# 使用的主题,把刚刚themes里面的主题文件名复制过来
theme = "tranquilpeak"

# 评论系统,我用的leancloud账户
# 初次使用可以先不加,等熟悉后再加上
disqusShortname = "valine"

# 博客每一页显示文章的数量
paginate = 6

# 不知道是啥,先默认
canonifyurls = true

# 时间格式
[permalinks]
post = "/:year/:month/:slug/"

# 这里不用改
[taxonomies]
tag = "tags"
category = "categories"
archive = "archives"

# 以下是博客作者的个人信息,可以依照自己的喜好填
[author]
name = "NTaurus"
bio = "好蠢一男"
job = "学生"
location = "家礼炖"

# 头像,路径是tranquilpeak/static/images
# 以后所有要使用的图片可以放到这里,自己多存一些图片
picture = "/images/touxiang.jpg"


# 侧边框里的一些资料
# 可以按下面的来
[[menu.main]]
weight = 1
identifier = "首页"
name = "首页"
pre = ""
url = "/"
[[menu.main]]
weight = 2
identifier = "类别"
name = "类别"
pre = ""
url = "/categories"
[[menu.main]]
weight = 3
identifier = "标签"
name = "标签"
pre = ""
url = "/tags"
[[menu.main]]
weight = 4
identifier = "归档"
name = "归档"
pre = ""
url = "/archives"
[[menu.main]]
weight = 5
identifier = "关于"
name = "关于"
pre = ""
url = "/#about"

# 下面是GitHub账户的链接,把链接填上,别人可以访问你的GitHub
[[menu.links]]
weight = 1
identifier = "github"
name = "GitHub"
pre = ""
url = "https://github.com/NTaurus"

#[[menu.links]]
#weight = 2
#identifier = "stackoverflow"
#name = "Stack Overflow"
#pre = ""
#url = "https://stackoverflow.com/users/636472/kakawait"

[[menu.misc]]
weight = 1
identifier = "rss"
name = "RSS"
pre = ""
url = "/index.xml"

[params]
# 代码格式,有prism.js跟highlight.js可以选择。
syntaxHighlighter = "prism.js"

# Hide sidebar on all article page to let article take full width to improve reading, and enjoy wide images and cover images. (true: enable, false: disable)
# 阅读文章是,侧边框会缩进去
clearReading = true

# Define categories will create hierarchy between parents: `categories = ["foo", "bar"]` will consider "bar" a sub-category of "foo".
# If false it will flat categories.
# 默认true就可以
hierarchicalCategories = true

# 对博客的描述
description = "NTaurus的乌托邦"

# Customization
# Define the behavior of the sidebar
# 1: Display extra large sidebar on extra large screen, large sidebar on large screen,
#    medium sidebar on medium screen and header bar on small screen and
# extra large sidebar is swiped on extra large screen and large sidebar on all lower screen (default)
# 2: Display large sidebar on large screen, medium sidebar on medium screen and
#    header bar on small screen and large sidebar is swiped
# 3: Display medium sidebar on large and medium screen and header bar on small screen and
#    medium sidebar is swiped
# 4: Display header bar on all screens, extra large sidebar is swiped on extra large screen and
#    large sidebar is swiped on all lower screens
# 5: Display header bar on all screens and large sidebar is swiped on large screen
# 6: Display header bar on all screens and medium sidebar is swiped
# 侧边框的参数,表示宽度,可以自己调成喜欢的大小
sidebarBehavior = 2

# Your blog cover picture. I STRONGLY recommend you to use a CDN to speed up loading of pages.
# There is many free CDN like Cloudinary or you can also use indirectly
# by using services like Google Photos.
# Current image is on AWS S3 and delivered by AWS CloudFront.
# Otherwise put your image, for example `cover.jpg` in folder `static/images/`,
# and use relative url : `images/cover.jpg`
#  博客的封面,图片在刚刚说的跟头像在相同的路径
coverImage = "images/cover.jpg"

# Display an image gallery at the end of a post which have photos variables (false: disabled, true: enabled)
# 照片墙
imageGallery = true

# Display thumbnail image of each post on index pages (false: disabled, true: enabled)
thumbnailImage = true
# Display thumbnail image at the right of title in index pages (`right`, `left` or `bottom`)
# Set this value to `right` if you have old posts to keep the old style on them
# and define `thumbnailImagePosition` on a post to overwrite this setting
# 文章缩略图功能
thumbnailImagePosition = "bottom"


# Automatically select the cover image or the first photo from the gallery of a post if there is no thumbnail image as the thumbnail image
# Set this value to `true` if you have old posts that use the cover image or the first photo as the thumbnail image
# and set `autoThumbnailImage` to `false` on a post to overwrite this setting
# 默认配置
autoThumbnailImage = true

# Your favicon path, default is "/favicon.png"
# 访问博客时,浏览器会显示站点图标,可以自己做一个图标
# favicon = "/favicon.png"

# Header configuration
# The link at the right of the header is customizable
# You can add a link (as an icon) at the right of the header instead of the author's gravatar image or author's picture.
# By default, author's gravatar or author's picture is displayed.
#     url: /#search
#     icon: search
#     class: st-search-show-outputs

# Display `Next` on left side of the pagination, and `Prev` on right side one.
# If you set this value to `true`, these positions swap.
swapPaginator = true

# Custom CSS. Put here your custom CSS files. They are loaded after the theme CSS;
# they have to be referred from static root. Example
# [[params.customCSS]]
#   href = "css/mystyle.css"

# Custom JS. Put here your custom JS files. They are loaded after the theme JS;
# they have to be referred from static root. Example

# 添加JS装饰,代码下面会给出
# 爱心特效
[[params.customJS]]
    src = "js/clicklove.js"
# 雪花飘落特效
[[params.customJS]]
    src = "js/snow.js"


# Sharing options
# 以下是分享的一些功能,暂时不用,先注释掉

# Comment and uncomment to enable or disable sharing options
# If you wanna add a sharing option, read user documentation :
# Tranquilpeak configuration > Theme configuration > sharing-options
#[[params.sharingOptions]]
#  name = "Facebook"
#  icon = "fa-facebook-official"
#  url = "https://www.facebook.com/sharer/sharer.php?u=%s"

#  [[params.sharingOptions]]
#    name = "Twitter"
#    icon = "fa-twitter"
#    url = "https://twitter.com/intent/tweet?text=%s"

#  [[params.sharingOptions]]
#    name = "Google+"
#    icon = "fa-google-plus"
#    url = "https://plus.google.com/share?url=%s"


#点击about,会展示个人信息
[params.header.rightLink]
    class = ""
    icon = ""
    url = "/#about"

# 评论功能,添加评论功能时再加也不迟
# 这里添加Valine的相关参数,xxxx后面会讲怎么填
[params.valine]
    enable = true
    appId = 'xxxxxxxxxx'
    appKey = 'xxxxxxxxx'
    notify = false
    vertify = false
    avatar = 'mp'
    placeholder = '你划一划屏幕,不留一个评论....'
    visitor = true


# Customize link of author avatar in sidebar
# [params.sidebar.profile]
#   url = "/#about"

# Customize copyright value "© 2017 . All Rights Reserved"
# [params.footer]
#   copyright = "kakawait"
添加js特效
在vs code里新建文件,将下面两个代码分别复制到文件内(一个特效一个文件),然后另存为,选择路径:博客根目录下mblog/themes/tranquilpeak/static/js(顺着头像图片存放的路径找就找到js文件夹了)。
爱心特效:
(function(window,document,undefined){
    var hearts = [];

    window.requestAnimationFrame = (function(){
        return window.requestAnimationFrame ||
        window.webkitRequestAnimationFrame ||
        window.mozRequestAnimationFrame ||
        window.oRequestAnimationFrame ||
        window.msRequestAnimationFrame ||
        function (callback){
            setTimeout(callback,1000/60);
        }
    })();

    init();

    function init(){
        css(".heart{width: 10px;height: 10px;position: fixed;background: #f00;transform: rotate(45deg);-webkit-transform: rotate(45deg);-moz-transform: rotate(45deg);}.heart:after,.heart:before{content: '';width: inherit;height: inherit;background: inherit;border-radius: 50%;-webkit-border-radius: 50%;-moz-border-radius: 50%;position: absolute;}.heart:after{top: -5px;}.heart:before{left: -5px;}");
        attachEvent();
        gameloop();
    }

    function gameloop(){
        for(var i=0;i
雪花飘落特效:
(function($){
    $.fn.snow = function(options){
        var $flake = $('').css({'position': 'absolute','z-index':'9999', 'top': '-50px'}).html('❄'),
            documentHeight 	= $(document).height(),
            documentWidth	= $(document).width(),
            defaults = {
                minSize		: 10,
                maxSize		: 20,
                newOn		: 1000,
                flakeColor	: "#FF7F50" /* 此处可以定义雪花颜色,若要白色可以改为#FFFFFF */
            },
            options	= $.extend({}, defaults, options);
        var interval= setInterval( function(){
            var startPositionLeft = Math.random() * documentWidth - 100,
                startOpacity = 0.5 + Math.random(),
                sizeFlake = options.minSize + Math.random() * options.maxSize,
                endPositionTop = documentHeight - 200,
                endPositionLeft = startPositionLeft - 500 + Math.random() * 500,
                durationFall = documentHeight * 10 + Math.random() * 5000;
            $flake.clone().appendTo('body').css({
                left: startPositionLeft,
                opacity: startOpacity,
                'font-size': sizeFlake,
                color: options.flakeColor
            }).animate({
                top: endPositionTop,
                left: endPositionLeft,
                opacity: 0.2
            },durationFall,'linear',function(){
                $(this).remove()
            });
        }, options.newOn);
    };
})(jQuery);
$(function(){
    $.fn.snow({
        minSize: 2, /* 定义雪花最小尺寸 */
        maxSize: 40,/* 定义雪花最大尺寸 */
        newOn: 1000  /* 定义密集程度,数字越小越密集 */
    });
});
创建博客文章
为了方便编辑,先在vs code中打开博客根目录:点击File->open Folder
选择根目录(mblog文件夹)确定后,你就可以看见站点各个文件夹了。
然后转到cmd,在根目录下(/mblog)敲:
hugo new post/xxx.md
//例如hugo new post/我的第一篇博客.md
此时会显示文章创建成功,可以在根目录下的content/post里看到。回到vs code选择刚刚打开的站点文件夹(mblog),进入content/post,选择刚刚创建的文章,默认生成的属性如下:
---
title: "我的第一篇博客"//文章标题
date: 2020-03-05T13:23:24+08:00//创建时间
categories: //分类
- 日志  //可以随便改
- 生活
tags:   //标签
- tag1  //可以随便改
- tag2
keywords:   //关键词,搜索用的
- tech
#thumbnailImage: //example.com/image.jpg    //文章里面的图片封面
---

 //在博客页面不会显示全部内容,可以自己尝试删除后文章是如何显示的
从这里开始写内容
文章模板:
---
title: "Github+hugo搭建博客"
date: 2020-03-04T10:17:11+08:00

thumbnailImage: /images//sundown.jpg    //缩略图
thumbnailImagePosition: left    //缩略图位置
autoThumbnailImage: yes //缩略设置
metaAlignment: center
coverImage: /images/sundown.jpg
coverCaption: "Start,for a better future."  //图片描述
coverMeta: in   //文字布置位置
coverSize: full //full会好看点


---
  //显示文章里面的标题
还有其他设置可以到themes/tranquilpeak/exampleSite/content/post查看样例文章。
启动博客的本地预览
上面的主题配置根创建文章在vs code完成后保持,将原来在themes/tranquilpeak/exampleSite的config.toml文件(就是主题配置文件)复制到根目录下,覆盖到那里的config.toml。
然后回到cmd命令行在根目录下敲:
hugo server -D
生成的网址一般为:
http://localhost:1313/
复制此网址到浏览器中,即可查看博客。
图中我没有放头像上去,所以“作者图片”那里没有显示。
建立Github pages并部署到线上
创建Github仓库
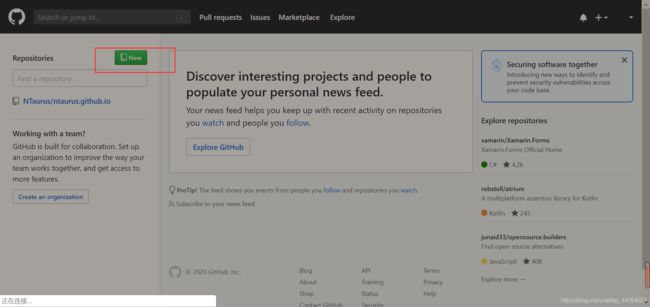
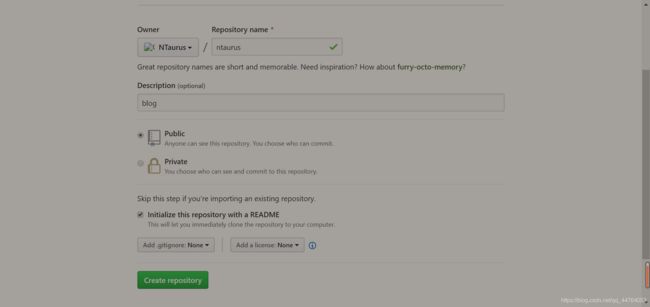
注册Github后,在主界面点击Repository 旁边的绿色按钮 NEW

仓库名字最好全英
生成静态文件
仓库创建好后把主题配置config文件里面的URL填上仓库的地址。
baseUrl=“https://XXXXXXXX.github.io/”
接下来在根目录下敲:
hugo
此时会生成一个public文件,博客部署到Github上,就是将public内的文件push到Github仓库。
设置全局用户名和邮箱
git config --global user.name "xxxxx"
git config --global user.email "[email protected]"
博客部署
在cmd中的根目录下执行以下:
cd public   //进入public文件夹

git init    //初始化

git add .   //添加所有文件

git commit -m "XXXXXXXX"    //提交描述xxx随便写

git remote add origin https://github.com/XXXXX/XXXXX.github.io.git  //链接到远端,把XXXX替换成自己的内容,不要忘了还有后缀.git
//可以在仓库里面找到绿色按钮clone or download,点击出现HTTPS,复制过来即可
git pull origin master
git push -u origin master
第一次push需要输入GitHub账户跟密码,之后就不再需要。如果第一次push失败的话,尝试加 -f即:
git push -u origin master -f
如果填写密码错误的话,去电脑中找到控制面板,用户账户->windows凭证底下有个普通凭证,找到github账户,修改密码,重新push操作即可。
push成功后就可以复制仓库地址到浏览器,就可以访问你的博客了!!
后续更新
创建文章:
hugo new post/xx.md
更新博客:
hugo
cd public
git add .
git commit -m "XXXXXXX"
git pull origin master
git push origin master
最后
看看我的博客鸭(在csdn打不开)
ntaurus.com(复制到浏览器,没有买服务器有点慢)


