16 | SpringBoot + thymeleaf 登录页面的重定向跳转、数据校验和拦截器
为了调试方便,禁用模板引擎的默认缓存机制,即修改页面会实时生效
spring:
  messages:
    basename: i18n.login
#  禁用模板引擎缓存,修改页面会自动更新
  thymeleaf:
    cache: false
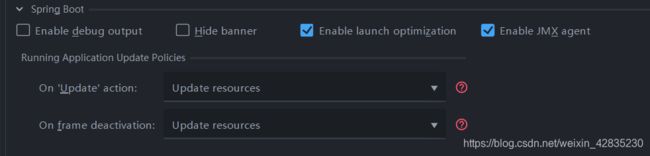
edit configuration下do nothing 改成 update resources
1、登录页面的跳转
(1)首先创建一个controller文件夹下的LoginController类
@Controller
public class LoginController {

    @PostMapping("/user/login")
    public String login(@RequestParam("username") String username,
                        @RequestParam("password") String password,
                        Map<String, Object> map) {
        if (!StringUtils.isEmpty(username) && password.equals("123")) {
            return "dashboard";
        } else {
            map.put("msg", "用户名或密码错误");
            return "login";
        }
    }
}
(2)在login.html修改action和添加name属性
<html lang="en" xmlns:th="http://www.thymeleaf.org">
<head>
    <meta http-equiv="Content-Type" content="text/html; charset=UTF-8">
    <meta name="viewport" content="width=device-width, initial-scale=1, shrink-to-fit=no">
    <meta name="description" content="">
    <meta name="author" content="">
    <title>Signin Template for Bootstraptitle>

    <link href="asserts/css/bootstrap.min.css" th:href="@{/webjars/bootstrap/4.5.0/css/bootstrap.css}" rel="stylesheet">

    <link href="asserts/css/signin.css" th:href="@{/asserts/css/signin.css}" rel="stylesheet">
head>

<body class="text-center">
<form class="form-signin" action="dashboard.html" th:action="@{/user/login}" th:method="post">
    <img class="mb-4" th:src="@{/asserts/img/bootstrap-solid.svg}" src="asserts/img/bootstrap-solid.svg" alt=""
         width="72" height="72">
    <h1 class="h3 mb-3 font-weight-normal" th:text="#{login.tip}">Please sign inh1>
    <label class="sr-only" th:text="#{login.username}">Usernamelabel>
    <input type="text" name="username" class="form-control" placeholder="Username" th:placeholder="#{login.username}"
           required=""
           autofocus="">
    <label class="sr-only" th:text="#{login.password}">Passwordlabel>
    <input type="password" name="password" class="form-control" placeholder="Password"
           th:placeholder="#{login.password}" required="">
    <div class="checkbox mb-3">
        <label>
            <input type="checkbox" value="remember-me"/> [[#{login.remember}]]
        label>
    div>
    <button class="btn btn-lg btn-primary btn-block" type="submit" th:text="#{login.btn}">Sign inbutton>
    <p class="mt-5 mb-3 text-muted">© 2017-2018p>
    <a class="btn btn-sm" th:href="@{/index.html(l='zh_CN')}">中文12a>
    <a class="btn btn-sm" th:href="@{/index.html(l='en_US')}">Englisha>
form>
body>
html>
ok,浏览器输入用户名(随意)和密码(123)后

???????css样式呢???
F5刷新,还有这种提示 ???
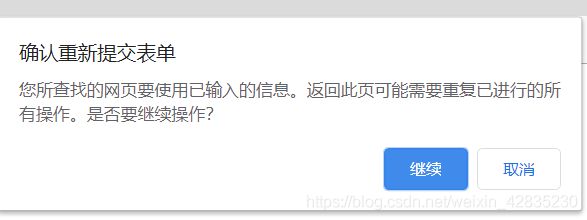
为了刷新不显示重复提交表单的提示,我们可以通过重定向跳转解决这一问题
2、重定向跳转
(1)在MyMvcConfig配置类中再注册一个返回dashboard视图的视图控制
//使用WebMvcConfigurer可以来扩展SpringMVC的功能
//@EnableWebMvc   不要接管SpringMVC
@Configuration
public class MyMvcConfig implements WebMvcConfigurer {
    //所有的WebMvcConfigurer组件都会一起起作用
    @Bean //将组件注册在容器
    public WebMvcConfigurer webMvcConfigurer() {
        WebMvcConfigurer webMvcConfigurer = new WebMvcConfigurer() {
            @Override
            public void addViewControllers(ViewControllerRegistry registry) {
                registry.addViewController("/").setViewName("login");
                registry.addViewController("/index.html").setViewName("login");
                registry.addViewController("/main.html").setViewName("dashboard");
            }
        };
        return webMvcConfigurer;
    }

    @Bean
    public LocaleResolver localeResolver() {
        return new MyLocaleResolver();
    }
}
即这一段
registry.addViewController("/main.html").setViewName("dashboard");
(2)回到LoginController,使用redirect重定向
@Controller
public class LoginController {

    @PostMapping("/user/login")
    public String login(@RequestParam("username") String username,
                        @RequestParam("password") String password,
                        Map<String, Object> map) {
        if (!StringUtils.isEmpty(username) && password.equals("123")) {
            return "redirect:/main.html";
        } else {
            map.put("msg", "用户名或密码错误");
            return "login";
        }
    }
}
ok,再登陆一次,哇草

样式也有了,是不是很神奇,我也觉得!!
3、数据校验
在登陆页面中,如果我们想对用户名和密码进行校验,怎么做呢??
(1)加入一个p标签并写th:if判断
<p style="color: red" th:text="${msg}" th:if="${not #strings.isEmpty(msg)}">p>
4、编写登录拦截器
应该大家都懂为什么要配置登录拦截器,这里不想多说,怎么做呢?
(1)首先我们得通过HttpSession记录正在登录的用户信息
LoginController
@Controller
public class LoginController {

    @PostMapping("/user/login")
    public String login(@RequestParam("username") String username,
                        @RequestParam("password") String password,
                        Map<String, Object> map,
                        HttpSession session) {

        if (!StringUtils.isEmpty(username) && password.equals("123")) {
            session.setAttribute("loginUser", username);
            return "redirect:/main.html";
        } else {
            map.put("msg", "用户名或密码错误");
            return "login";
        }
    }
}
(2)在components文件夹下创建一个登录拦截器实现HandlerInterceptor接口
public class LoginInterceptor implements HandlerInterceptor {
    @Override
    public boolean preHandle(HttpServletRequest request, HttpServletResponse response, Object handler) throws Exception {
        Object user = request.getSession().getAttribute("loginUser");
        if (user == null) {
            //未登陆,返回登陆页面
            request.setAttribute("msg", "没有权限请先登陆");
            request.getRequestDispatcher("/index.html").forward(request, response);
            return false;
        } else {
            //已登陆,放行请求
            return true;
        }
    }

    @Override
    public void postHandle(HttpServletRequest request, HttpServletResponse response, Object handler, ModelAndView modelAndView) throws Exception {

    }

    @Override
    public void afterCompletion(HttpServletRequest request, HttpServletResponse response, Object handler, Exception ex) throws Exception {

    }
}
(3)创建完拦截器后,我们还要在MyMvcConfig类中注册拦截器
           @Override
            public void addInterceptors(InterceptorRegistry registry) {
                registry.addInterceptor(new LoginInterceptor()).addPathPatterns("/**")
                        .excludePathPatterns("/index.html", "/", "/user/login",
                                "/asserts/**", "/webjars/**");
            }
Ok,大功告成