Spring Cloud 链路追踪 Spring Cloud Sleuth
1. 概述
Spring Cloud Sleuth 是由 Spring Cloud 官方推出,为 Spring Cloud 实现分布式链路追踪的功能,它在设计上借鉴了 Dapper、 Zipkin、HTrace。
Spring Cloud Sleuth is a distributed tracing tool for Spring Cloud. It borrows from Dapper, Zipkin, and HTrace.
实际上,我们可以直接把 Spring Cloud Sleuth 理解成对 Zipkin 的封装,方便在 Spring Cloud 使用。艿艿记得之前在 Spring Boot 中直接使用 Zipkin 的时候,真的是贼麻烦,可以后续翻翻《芋道 Spring Boot 链路追踪 Zipkin 入门》文章。
也因此,在开始 Spring Cloud Sleuth 的学习之前,胖友需要先看看《芋道 Zipkin 极简入门》文章,完成原生 Zipkin 的学习与使用。
完成对 Zipkin 的学习之后,我们就真正开始本文 Spring Cloud Sleuth 之旅。我们的重心,会放在如何使用 Spring Cloud Sleuth 在 Spring Cloud 项目中对各种组件的链路追踪。例如说:
- 针对 MySQL、Redis、MongoDB、Elasticsearch 等数据库操作的链路追踪
- 针对 SpringMVC、WebFlux、Gateway 等 Web 请求的链路追踪
- 针对 Dubbo、Feign、Web Client 等远程调用的链路追踪
- 针对 RocketMQ、RabbitMQ、Kafka、ActiveMQ 等消息队列的链路追踪
2. 说明一波
目前主流使用的 Spring Cloud Sleuth 是 2.X 版本,而网上很多文章或者资料是基于 1.X 版本,所以会存在很多跑不通的地方。
① 例如说,使用 @EnableZipkinServer 注解来自定义一个 Zipkin Server,目前已经废弃,在 Spring Cloud Sleuth 的 ISSUE#912 已经有相关说明。如下图所示:
因此,无论是在本小节的示例,还是在生产环境下,直接使用 Zipkin 已经提供好的发布包即可。
② 又例如说,Spring Cloud Sleuth 使用 Spring Cloud Stream 发送链路数据到 Zipkin 中,目前已经废弃,在《Spring Cloud Sleuth 2.0 Migration Guide》文档提到如下:
也就是说,如果我们相使用消息队列来发送链路数据到 Zipkin 中的话,Zipkin 已经内置了 zipkin-collector-kafka 和 zipkin-collector-rabbitmq。
3. SpringMVC 示例
示例代码对应仓库:
labx-13-sc-sleuth-springmvc。
本小节,我们来搭建一个 Spring Cloud Sleuth 对 SpringMVC 的 API 接口的链路追踪。该链路通过如下插件实现收集:
brave-instrumentation-httpbrave-instrumentation-servletbrave-instrumentation-spring-webmvc
友情提示:一般来说,在 Java 应用程序中,我们使用 Brave 库,作为 Zipkin Server 的 Java Tracer 客户端。同时它的 instrumentation 子项目,已经提供了 SpringMVC、MySQL、Dubbo 等等的链路追踪的功能。
本文对 instrumentation 统称为“插件”。
我们来新建一个 labx-13-sc-sleuth-springmvc 项目,最终如下图所示:
3.1 引入依赖
在 pom.xml 文件中,引入相关依赖。
        labx-13
        cn.iocoder.springboot.labs
        1.0-SNAPSHOT

    4.0.0

    labx-13-sc-sleuth-springmvc


        1.8
        1.8
        2.2.4.RELEASE
        Hoxton.SR1


                org.springframework.boot
                spring-boot-starter-parent
                ${spring.boot.version}
                pom
                import


                org.springframework.cloud
                spring-cloud-dependencies
                ${spring.cloud.version}
                pom
                import


            org.springframework.boot
            spring-boot-starter-web


            org.springframework.cloud
            spring-cloud-starter-zipkin
通过引入 spring-cloud-starter-zipkin 依赖,从而引入 Spring Cloud Sleuth + Zipkin 相关依赖,实现对它们的自动配置,从而实现链路追踪的功能。
spring-cloud-starter-zipkin 包括了 spring-cloud-starter-sleuth 和 spring-cloud-sleuth-zipkin。如下图所示:
3.2 配置文件
创建 application.yml 配置文件,添加相应配置项如下:
spring:
  application:
    name: user-service # 服务名

  # Zipkin 配置项,对应 ZipkinProperties 类
  zipkin:
    base-url: http://127.0.0.1:9411 # Zipkin 服务的地址

  # Spring Cloud Sleuth 配置项
  sleuth:
    # Spring Cloud Sleuth 针对 Web 组件的配置项,例如说 SpringMVC
    web:
      enabled: true # 是否开启,默认为 true
① spring.application.name 配置项,为应用(服务)名,稍后在 Zipkin 中也会使用该名字。
② spring.zipkin 配置项,为 Zipkin 的配置项,对应 ZipkinProperties 类。
base-url配置项,Zipkin 服务的地址。
③ spring.sleuth 配置项,为 Spring Cloud Sleuth 配置项。
其中,spring.sleuth 配置项,为 Spring Cloud Sleuth 针对 Web 组件(例如说 SpringMVC)的配置项,对应 SleuthWebProperties 类。
enabled:是否开启,默认为true。如果胖友想关闭对 SpringMVC 的链路追踪,可以设置为false来关闭。- 还有其它配置项,胖友可以在 SleuthWebProperties 类里挖掘下,例如说
additional-skip-pattern配置项可以设置不追踪的 URL。
3.3 UserController
创建 UserController 类,提供示例 API 接口。代码如下:
@RestController
@RequestMapping("/user")
public class UserController {

    @GetMapping("/get")
    public String get(@RequestParam("id") Integer id) {
        return "user:" + id;
    }

}
3.4 UserServiceApplication
创建 UserServiceApplication 类,配置 @SpringBootApplication 注解即可。代码如下:
@SpringBootApplication
public class UserServiceApplication {

    public static void main(String[] args) {
        SpringApplication.run(UserServiceApplication.class, args);
    }

}
3.5 简单测试
执行 SpringMVCApplication,启动该 Spring Cloud 应用。
① 首先,使用 curl http://127.0.0.1:8080/user/get?id=1 命令,请求下 Spring Cloud 应用提供的 API。因为,我们要追踪下该链路。
② 然后,继续使用浏览器,打开 http://127.0.0.1:9411/ 地址,查看链路数据。点击「查找」按钮,便可看到刚才我们调用接口的链路数据。如下图所示:
③ 之后,我们点击该链路数据,可以看到一个 Trace 明细。如下图所示:
④ 再之后,点击第一个 Span,可以看到一个 Span 明细。如下图所示: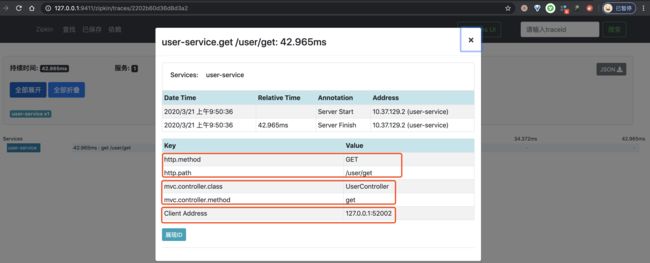
4. Feign 示例
示例代码对应仓库:
- 服务消费者:
labx-13-sc-sleuth-feign- 服务提供者:
labx-13-sc-sleuth-springmvc
本小节,我们来搭建一个 Spring Cloud Sleuth 对 Feign 的远程 HTTP 调用的链路追踪。该链路通过如下插件实现收集:
- Spring Cloud Sleuth 的
instrument/web/client/feign模块提供。
我们来新建一个 labx-13-sc-sleuth-feign 项目作为消费者,使用 Feign 调用「3. SpringMVC 示例」的 labx-13-sc-sleuth-springmvc 的 /user/get 接口。最终如下图所示:
4.1 引入依赖
在 pom.xml 文件中,引入相关依赖。
        labx-13
        cn.iocoder.springboot.labs
        1.0-SNAPSHOT

    4.0.0

    labx-13-sc-sleuth-feign


        1.8
        1.8
        2.2.4.RELEASE
        Hoxton.SR1


                org.springframework.boot
                spring-boot-starter-parent
                ${spring.boot.version}
                pom
                import


                org.springframework.cloud
                spring-cloud-dependencies
                ${spring.cloud.version}
                pom
                import


            org.springframework.boot
            spring-boot-starter-web


            org.springframework.cloud
            spring-cloud-starter-zipkin


            org.springframework.cloud
            spring-cloud-starter-openfeign
4.2 配置文件
创建 application.yml 配置文件,添加相应配置项如下:
server:
  port: 8081

spring:
  application:
    name: feign-service # 服务名

  # Zipkin 配置项,对应 ZipkinProperties 类
  zipkin:
    base-url: http://127.0.0.1:9411 # Zipkin 服务的地址

  # Spring Cloud Sleuth 配置项
  sleuth:
    # Spring Cloud Sleuth 针对 Web 组件的配置项,例如说 SpringMVC
    web:
      enabled: true # 是否开启,默认为 true
    # Spring Cloud Sleuth 针对 Feign 组件的配置项,对应 SleuthFeignProperties 类
    feign:
      enabled: true # 是否开启,默认为 true
spring.sleuth.feign 配置项,为 Spring Cloud Sleuth 针对 Feign 组件的配置项,对应 SleuthFeignProperties 类。
另外,这里修改了 spring.application.name 配置项为 feign-service,保证链路追踪使用不同的名字。
4.3 UserServiceFeignClient
创建 UserServiceFeignClient 接口,调用 user-service 服务的 Feign 客户端,即「3. SpringMVC 示例」的 labx-13-sc-sleuth-springmvc。代码如下:
@FeignClient(name = "user-service", url = "http://127.0.0.1:8080")
public interface UserServiceFeignClient {

    @GetMapping("/user/get")
    String get(@RequestParam("id") Integer id);

}
考虑到方便,我们不引入注册中心,而是通过 @FeignClient 的 url 属性,设置调用的 user-service 服务的地址。
4.4 FeignController
创建 FeignController 类,提供 /feign/get 接口,使用 UserServiceFeignClient 调用 user-service 服务。代码如下:
@RestController
@RequestMapping("/feign")
public class FeignController {

    @Autowired
    private UserServiceFeignClient userServiceFeignClient;

    @GetMapping("/get")
    public String get(@RequestParam("id") Integer id) {
        return userServiceFeignClient.get(id);
    }

}
4.5 FeignApplication
创建 FeignApplication 类,feign-service 服务启动类。代码如下:
@SpringBootApplication
@EnableFeignClients
public class FeignApplication {

    public static void main(String[] args) {
        SpringApplication.run(FeignApplication.class, args);
    }

}
4.6 简单测试
使用 FeignApplication 和 UserServiceApplication 启动两个 Spring Cloud 应用。
① 首先,使用 curl http://127.0.0.1:8081/feign/get?id=1 命令,使用 Feign 调用 user-service 服务。因为,我们要追踪下该链路。
② 然后,继续使用浏览器,打开 http://127.0.0.1:9411/ 地址,查看链路数据。点击「查找」按钮,便可看到刚才我们调用接口的链路数据。如下图所示: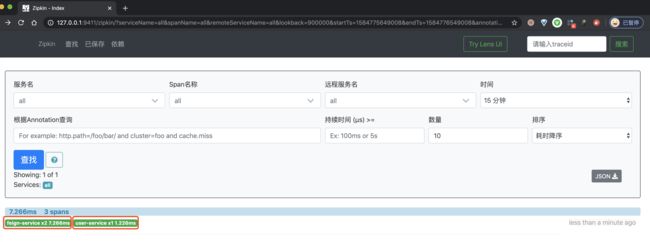
一条链路经过 feign-service 和 user-service 两个服务,一共有三个 Span。
③ 之后,我们点击该链路数据,可以看到一个 Trace 明细。如下图所示:
比较奇怪的是,此时我们两个 Span,少了一个 Span!不晓得是不是 Zipkin UI 的 Bug?此时如果我们点击右上角的「JSON」按钮,查看该链路的原始数据,返回 JSON 如下图所示:
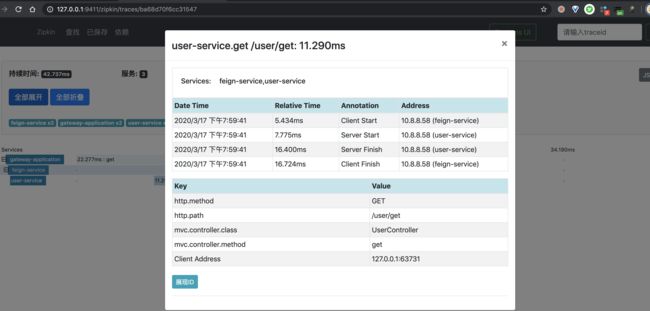
④ 再之后,分别点击个 Span,可以看到两个 Span 明细。如下图所示:
5. Spring Cloud Gateway 示例
示例代码对应仓库:
- API 网关:
labx-13-sc-sleuth-springcloudgateway- 服务消费者:
labx-13-sc-sleuth-feign- 服务提供者:
labx-13-sc-sleuth-springmvc
本小节,我们来搭建一个 Spring Cloud Sleuth 对 Spring Cloud Gateway 的代理请求的链路追踪。该链路通过如下插件实现收集:
- Spring Cloud Sleuth 的
instrument/web模块提供。
友情提示:因为 Spring Cloud Gateway 是基于 WebFlux 实现,而 Spring Cloud Sleuth 的
instrument/web模块提供的插件,实际是针对 WebFlux 框架,所以也适用于 Spring Cloud Gateway。感兴趣的胖友,后续可以看看 TraceWebFilter 的源码。
我们来新建一个 labx-13-sc-sleuth-springcloudgateway 项目作为 API 网关,转发请求到后端服务。最终如下图所示:
考虑到方便,我们直接使用「4. Feign 示例」的 feign-service 和 user-service 两个服务,作为被转发的后端服务。
5.1 引入依赖
在 pom.xml 文件中,引入相关依赖。
        labx-08
        cn.iocoder.springboot.labs
        1.0-SNAPSHOT

    4.0.0

    labx-13-sc-sleuth-springcloudgateway


        2.2.4.RELEASE
        Hoxton.SR1
        2.2.0.RELEASE


                org.springframework.boot
                spring-boot-starter-parent
                ${spring.boot.version}
                pom
                import


                org.springframework.cloud
                spring-cloud-dependencies
                ${spring.cloud.version}
                pom
                import


                com.alibaba.cloud
                spring-cloud-alibaba-dependencies
                ${spring.cloud.alibaba.version}
                pom
                import


            org.springframework.cloud
            spring-cloud-starter-gateway


            org.springframework.cloud
            spring-cloud-starter-zipkin
5.2 配置文件
创建 application.yml 配置文件,添加相应配置项如下:
server:
  port: 8888

spring:
  application:
    name: gateway-application

  # Zipkin 配置项,对应 ZipkinProperties 类
  zipkin:
    base-url: http://127.0.0.1:9411 # Zipkin 服务的地址

  # Spring Cloud Sleuth 配置项
  sleuth:
    # Spring Cloud Sleuth 针对 Web 组件的配置项,例如说 SpringMVC
    web:
      enabled: true # 是否开启,默认为 true

  cloud:
    # Spring Cloud Gateway 配置项,对应 GatewayProperties 类
    gateway:
      # 路由配置项,对应 RouteDefinition 数组
      routes:
        - id: feign-service-route
          uri: http://127.0.0.1:8081
          predicates:
            - Path=/**
① 因为使用的是 instrument/web 模块提供的插件,所以和 SpringMVC 一样,WebFlux 也是使用 spring.sleuth.web 配置项。
② 在 spring.cloud.gateway 配置项中,我们创建了一个编号为 feign-service-route 的路由,转发到「4. Feign 示例」小节的 feign-service 服务。这样整个请求的链路,就是 gateway-application => feign-service => user-service。
5.3 GatewayApplication
创建 GatewayApplication 类,网关启动类。代码如下:
@SpringBootApplication
public class GatewayApplication {

    public static void main(String[] args) {
        SpringApplication.run(GatewayApplication.class, args);
    }

}
5.4 简单测试
使用 FeignApplication、UserServiceApplication、GatewayApplication 启动三个 Spring Cloud 应用。
① 首先,使用 curl http://127.0.0.1:8888/feign/get?id=1 命令,请求 API 网关,从而转发请求到 feign-service 服务。因为,我们要追踪下该链路。
② 然后,继续使用浏览器,打开 http://127.0.0.1:9411/ 地址,查看链路数据。点击「查找」按钮,便可看到刚才我们调用接口的链路数据。如下图所示: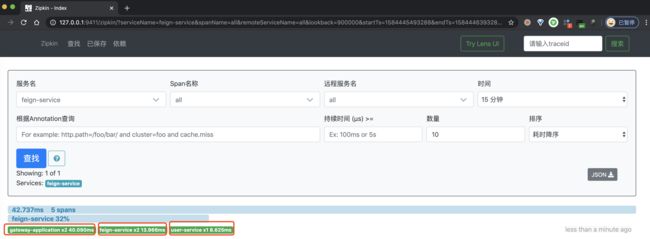
一条链路经过 gateway-application feign-service、user-service 三个服务,一共有五个 Span。
③ 之后,我们点击该链路数据,可以看到一个 Trace 明细。如下图所示:
比较奇怪的是,此时我们五个 Span,少了两个 Span!不晓得是不是 Zipkin UI 的 Bug?此时如果我们点击右上角的「JSON」按钮,查看该链路的原始数据,返回 JSON 如下图所示: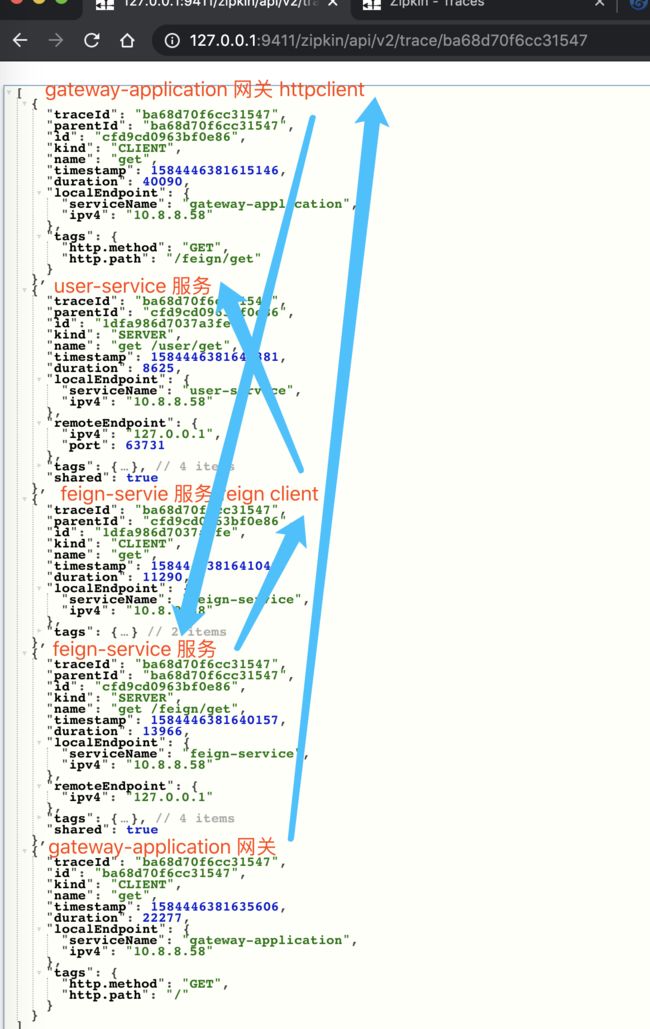
④ 再之后,分别点击个 Span,可以看到三个 Span 明细。如下图所示:
6. Zuul 示例
TODO 后续补充
7. Dubbo 示例
示例代码对应仓库:
- 服务 API 项目:
labx-13-sc-sleuth-dubbo-api- 服务 Provider 项目:
labx-13-sc-sleuth-dubbo-provider- 服务 Consumer 项目:
labx-13-sc-sleuth-dubbo-consumer
本小节,我们来搭建一个 Spring Cloud Sleuth 对 Dubbo 的远程 RPC 调用的链路追踪。该链路通过如下插件实现收集:
brave-instrumentation-dubbo
友情提示:Brave 一共提供了两个插件,其中本文使用的
brave-instrumentation-dubbo适用于 Dubbo 2.7.X 版本,而另外的brave-instrumentation-dubbo-rpc适用于 Dubbo 2.6.X 版本。
我们来新建一个 labx-13-sc-sleuth-dubbo 模块,一共包含三个子项目。最终如下图所示:
另外,考虑到 Spring Cloud Alibaba 主推 Nacos 作为诸注册中心,所以本小节也是使用 Nacos。不了解的胖友,后续可以看看《Nacos 极简入门》文章。
7.1 搭建 API 项目
创建 labx-13-sc-sleuth-dubbo-api 项目,服务接口,定义 Dubbo Service API 接口,提供给消费者使用。
7.1.1 UserService
创建 UserService 接口,定义用户服务 RPC Service 接口。代码如下:
public interface UserService {

    /**
     * 根据指定用户编号,获得用户信息
     *
     * @param id 用户编号
     * @return 用户信息
     */
    String get(Integer id);

}
7.2 搭建服务提供者
创建 labx-13-sc-sleuth-dubbo-provider 项目,服务提供者,实现 labx-13-sc-sleuth-dubbo-api 项目定义的 Dubbo Service API 接口,提供相应的服务。
7.2.1 引入依赖
创建 pom.xml 文件中,引入依赖。
        labx-13-sc-sleuth-dubbo
        cn.iocoder.springboot.labs
        1.0-SNAPSHOT

    4.0.0

    labx-13-sc-sleuth-dubbo-consumer


        1.8
        1.8
        2.2.4.RELEASE
        Hoxton.SR1
        2.2.0.RELEASE


                org.springframework.boot
                spring-boot-starter-parent
                ${spring.boot.version}
                pom
                import


                org.springframework.cloud
                spring-cloud-dependencies
                ${spring.cloud.version}
                pom
                import


                com.alibaba.cloud
                spring-cloud-alibaba-dependencies
                ${spring.cloud.alibaba.version}
                pom
                import


            cn.iocoder.springboot.labs
            labx-13-sc-sleuth-dubbo-api
            1.0-SNAPSHOT


            org.springframework.boot
            spring-boot-starter-web


            com.alibaba.cloud
            spring-cloud-starter-alibaba-nacos-discovery


            com.alibaba.cloud
            spring-cloud-starter-dubbo


            org.springframework.cloud
            spring-cloud-starter-zipkin


            io.zipkin.brave
            brave-instrumentation-dubbo
            5.10.1
重点是引入 brave-instrumentation-dubbo 依赖,实现对 Dubbo 的链路追踪。
7.2.2 配置文件
创建 application.yml 配置文件,添加相应配置项如下:
spring:
  application:
    name: demo-provider
  cloud:
    # Nacos 作为注册中心的配置项
    nacos:
      discovery:
        server-addr: 127.0.0.1:8848 # Nacos 服务器地址

  # Zipkin 配置项,对应 ZipkinProperties 类
  zipkin:
    base-url: http://127.0.0.1:9411 # Zipkin 服务的地址

# Dubbo 配置项,对应 DubboConfigurationProperties 类
dubbo:
  scan:
    base-packages: cn.iocoder.springcloud.labx13.providerdemo.service # 指定 Dubbo 服务实现类的扫描基准包
  # Dubbo 服务暴露的协议配置,对应 ProtocolConfig Map
  protocols:
    dubbo:
      name: dubbo # 协议名称
      port: -1 # 协议端口,-1 表示自增端口,从 20880 开始
  # Dubbo 服务注册中心配置,对应 RegistryConfig 类
  registry:
    address: spring-cloud://127.0.0.1:8848 # 指定 Dubbo 服务注册中心的地址
  # Dubbo 服务提供者的配置,对应 ProviderConfig 类
  provider:
    filter: tracing
  # Spring Cloud Alibaba Dubbo 专属配置项,对应 DubboCloudProperties 类
  cloud:
    subscribed-services: '' # 设置订阅的应用列表,默认为 * 订阅所有应用
重点是设置 dubbo.provider.filter 配置项为 tracing,使用 brave-instrumentation-dubbo 提供的 TracingFilter 过滤器,实现对 Dubbo 的链路追踪。不过实际上,TracingFilter 已经通过 @Activate 注解进行默认激活,所以也是可以不进行配置的。
关于
dubbo配置项,胖友可以后续阅读《Spring Cloud Alibaba 服务调用 Dubbo 入门》文章。
7.2.3 UserServiceImpl
创建 UserServiceImpl 类,实现 UserService 接口,用户服务具体实现类。代码如下:
@org.apache.dubbo.config.annotation.Service(protocol = "dubbo", version = "1.0.0")
public class UserServiceImpl implements UserService {

    @Override
    public String get(Integer id) {
        return "user:" + id;
    }

}
7.2.4 ProviderApplication
创建 ProviderApplication 类,服务提供者的启动类。代码如下:
@SpringBootApplication
public class ProviderApplication {

    public static void main(String[] args) {
        SpringApplication.run(ProviderApplication.class);
    }

}
7.3 搭建服务消费者
创建 labx-13-sc-sleuth-dubbo-consumer 项目,服务消费者,会调用 labx-13-sc-sleuth-dubbo-provider 项目提供的 User Service 服务。
7.3.1 引入依赖
创建 pom.xml 文件中,引入依赖。和「7.2.1 引入依赖」基本是一致的,胖友可以点击 pom.xml 文件查看。
7.3.2 配置文件
创建 application.yml 配置文件,添加相应配置项如下:
spring:
  application:
    name: demo-consumer
  cloud:
    # Nacos 作为注册中心的配置项
    nacos:
      discovery:
        server-addr: 127.0.0.1:8848

  # Zipkin 配置项,对应 ZipkinProperties 类
  zipkin:
    base-url: http://127.0.0.1:9411 # Zipkin 服务的地址

# Dubbo 配置项,对应 DubboConfigurationProperties 类
dubbo:
  # Dubbo 服务注册中心配置,对应 RegistryConfig 类
  registry:
    address: spring-cloud://127.0.0.1:8848 # 指定 Dubbo 服务注册中心的地址
  # Dubbo 服务提供者的配置,对应 ConsumerConfig 类
  consumer:
    filter: tracing
  # Spring Cloud Alibaba Dubbo 专属配置项,对应 DubboCloudProperties 类
  cloud:
    subscribed-services: demo-provider # 设置订阅的应用列表,默认为 * 订阅所有应用。
重点是设置 dubbo.consumer.filter 配置项为 tracing,使用 brave-instrumentation-dubbo 提供的 TracingFilter 过滤器,实现对 Dubbo 的链路追踪。不过实际上,TracingFilter 已经通过 @Activate 注解进行默认激活,所以也是可以不进行配置的。
关于
dubbo配置项,胖友可以后续阅读《Spring Cloud Alibaba 服务调用 Dubbo 入门》文章。
7.3.3 UserController
创建 UserController 类,提供调用 UserService 服务的 HTTP 接口。代码如下:
@RestController
@RequestMapping("/user")
public class UserController {

    @Reference(protocol = "dubbo", version = "1.0.0")
    private UserService userService;

    @GetMapping("/get")
    public String  get(@RequestParam("id") Integer id) {
        return userService.get(id);
    }

}
7.3.4 ConsumerApplication
创建 ConsumerApplication 类,服务消费者的启动类。代码如下:
@SpringBootApplication
public class ConsumerApplication {

    public static void main(String[] args) {
        SpringApplication.run(ConsumerApplication.class);
    }

}
7.4 简单测试
使用 ProviderApplication 启动服务提供者,使用 ConsumerApplication 启动服务消费者。
① 首先,使用 curl http://127.0.0.1:8080/user/get?id=1 命令,使用 Dubbo 调用 user-service 服务。因为,我们要追踪下该链路。
② 然后,继续使用浏览器,打开 http://127.0.0.1:9411/ 地址,查看链路数据。点击「查找」按钮,便可看到刚才我们调用接口的链路数据。如下图所示: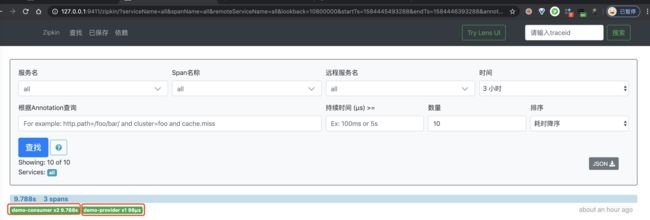
一条链路经过 demo-consumer 和 demo-provider 两个服务,一共有三个 Span。
③ 之后,我们点击该链路数据,可以看到一个 Trace 明细。如下图所示:
比较奇怪的是,此时我们两个 Span,少了一个 Span!不晓得是不是 Zipkin UI 的 Bug?此时如果我们点击右上角的「JSON」按钮,查看该链路的原始数据,返回 JSON 如下图所示:
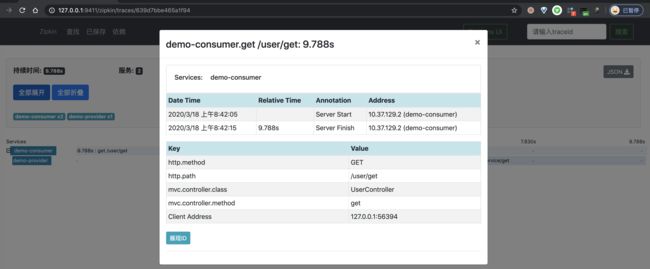
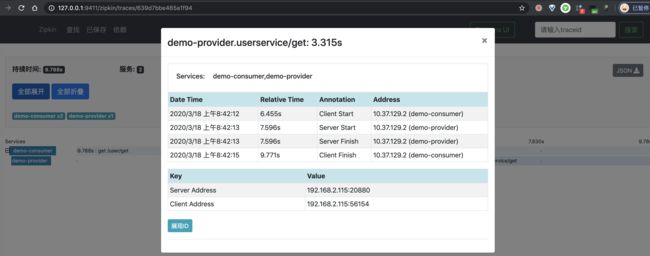
④ 再之后,分别点击个 Span,可以看到两个 Span 明细。如下图所示:
8. MySQL 示例
示例代码对应仓库:
labx-13-sc-sleuth-db-mysql。
本小节,我们来搭建一个 Spring Cloud Sleuth 对 MySQL 操作的链路追踪。该链路通过如下插件实现收集:
brave-instrumentation-mysqlbrave-instrumentation-mysql6brave-instrumentation-mysql8
我们来新建一个 我们来新建一个 labx-13-sc-sleuth-db-mysql 项目,实现简单的 MySQL 数据库操作。最终如下图所示:
另外,我们将使用 Spring JdbcTemplate 进行 MySQL 的操作。对 Spring JdbcTemplate 感兴趣的胖友,可以后续去看看《Spring Boot JdbcTemplate 入门》文章。
8.1 引入依赖
创建 pom.xml 文件中,引入依赖。
        labx-13
        cn.iocoder.springboot.labs
        1.0-SNAPSHOT

    4.0.0

    labx-13-sc-sleuth-db-mysql


        1.8
        1.8
        2.2.4.RELEASE
        Hoxton.SR1


                org.springframework.boot
                spring-boot-starter-parent
                ${spring.boot.version}
                pom
                import


                org.springframework.cloud
                spring-cloud-dependencies
                ${spring.cloud.version}
                pom
                import


            org.springframework.boot
            spring-boot-starter-web


            org.springframework.boot
            spring-boot-starter-jdbc


            mysql
            mysql-connector-java
            5.1.46


            org.springframework.cloud
            spring-cloud-starter-zipkin


            io.zipkin.brave
            brave-instrumentation-mysql
重点是引入 brave-instrumentation-mysql 依赖,实现对 MySQL 的链路追踪。
8.2 配置文件
在 application.yml 中,添加数据库相关配置,如下:
spring:
  application:
    name: user-service # 服务名

  # Zipkin 配置项,对应 ZipkinProperties 类
  zipkin:
    base-url: http://127.0.0.1:9411 # Zipkin 服务的地址

  # Spring Cloud Sleuth 配置项
  sleuth:
    # Spring Cloud Sleuth 针对 Web 组件的配置项,例如说 SpringMVC
    web:
      enabled: true # 是否开启,默认为 true

  # datasource 数据源配置内容
  datasource:
    url: jdbc:mysql://127.0.0.1:3306/lab-39-mysql?useSSL=false&useUnicode=true&characterEncoding=UTF-8&statementInterceptors=brave.mysql.TracingStatementInterceptor&zipkinServiceName=demo-db-mysql
    driver-class-name: com.mysql.jdbc.Driver
    username: root
    password:
① 通过自定义 StatementInterceptorV2 的实现类 TracingStatementInterceptor,达到拦截 SQL 请求,进行 MySQL 的链路追踪。
在 spring.datasource.url 配置项上的 statementInterceptors 和 zipkinServiceName 属性,分别设置拦截器和该 MySQL 在 Zipkin 中展示的服务名。
② 这里,胖友记得在测试的数据库中,创建 t_user 表,并插入一条 id = 1 的记录。SQL 脚本如下:
CREATE TABLE `t_user` (
  `id` int(8) NOT NULL AUTO_INCREMENT COMMENT '主键自增',
  `username` varchar(50) NOT NULL COMMENT '用户名',
  `password` varchar(50) NOT NULL COMMENT '密码',
  PRIMARY KEY (`id`)
) ENGINE=InnoDB AUTO_INCREMENT=1 DEFAULT CHARSET=utf8 COMMENT='用户表';

INSERT INTO `t_user`(`id`, `username`, `password`) VALUES (1, 'yudaoyuanma', 'nicai');
8.3 UserController
创建 UserController 类,提供示例 API 接口。代码如下:
@RestController
@RequestMapping("/user")
public class UserController {

    @Autowired
    private JdbcTemplate template;

    @GetMapping("/get")
    public String get(@RequestParam("id") Integer id) {
        this.selectById(1);
        return "success";
    }

    public Object selectById(Integer id) {
        return template.queryForObject("SELECT id, username, password FROM t_user WHERE id = ?",
                new BeanPropertyRowMapper<>(Object.class), // 结果转换成对应的对象。Object 理论来说是 UserDO.class ,这里偷懒了。
                id);
    }

}
在 /user/get 接口中,会执行一次 MySQL 的查询。
8.4 UserServiceApplication
创建 UserServiceApplication 类,应用启动类。代码如下:
@SpringBootApplication
public class UserServiceApplication {

    public static void main(String[] args) {
        SpringApplication.run(UserServiceApplication.class, args);
    }

}
8.5 简单测试
使用 UserServiceApplication 启动 Spring Cloud 应用。
① 首先,使用 curl http://127.0.0.1:8080/user/get?id=1 命令,从而执行一次 MySQL 查询操作。因为,我们要追踪下该链路。
② 然后,继续使用浏览器,打开 http://127.0.0.1:9411/ 地址,查看链路数据。点击「查找」按钮,便可看到刚才我们调用接口的链路数据。如下图所示: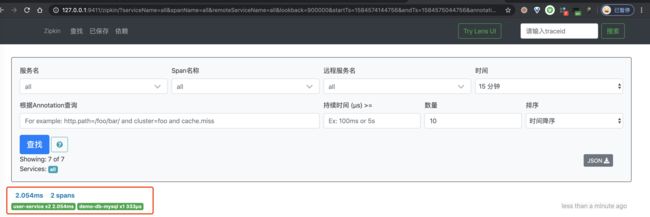
③ 之后,我们点击该链路数据,可以看到一个 Trace 明细。如下图所示:
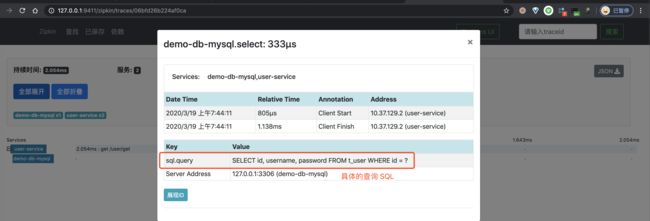
④ 再之后,分别点击个 Span,可以看到两个 Span 明细。如下图所示:
9. Redis 示例
示例代码对应仓库:
labx-13-sc-sleuth-db-redis。
本小节,我们来搭建一个 Zipkin 对 Redis 操作的链路追踪。Brave 并未提供对 Jedis、Lettuce、Redisson 等等 Redis 客户端的支持,所以我们只能另寻途径。
在 opentracing-contrib 项目中,有一个 java-redis-client 子项目,提供了 OpenTracing 针对 Jedis、Lettuce、Redisson 等等客户端的链路追踪。这样,我们搭配上 brave-opentracing 项目,就可以将使用 OpenTracing API 收集的链路数据,发送给 Zipkin Server 中。
brave-opentracing:OpenTracing Java Bridge for Zipkin。
This library is a Java bridge between the Brave/Zipkin Api and OpenTracing. It allows its users to write portable (in the OpenTracing sense) instrumentation that’s translated into Brave instrumentation transparently.
我们来新建一个 labx-13-sc-sleuth-db-redis 项目,实现简单的 Redis 数据库操作。最终如下图所示:
另外,我们将使用 Spring Data Redis + Jedis 进行 Redis 的操作。对 Spring Data Redis 感兴趣的胖友,可以后续去看看《Spring Boot Redis 入门》文章。
友情提示:Lettuce 基于 Brave 实现了 BraveTracing,从而实现对 Redis 操作的链路追踪。并且,Spring Cloud Sleuth 的
instrument/redis模块对它实现了自动配置。因此,如果胖友项目中是使用 Lettuce 作为 Redis 客户端的话,也可以考虑采用这种方式。
9.1 引入依赖
创建 pom.xml 文件中,引入相关依赖。
        labx-13
        cn.iocoder.springboot.labs
        1.0-SNAPSHOT

    4.0.0

    labx-13-sc-sleuth-db-redis


        1.8
        1.8
        2.2.4.RELEASE
        Hoxton.SR1


                org.springframework.boot
                spring-boot-starter-parent
                ${spring.boot.version}
                pom
                import


                org.springframework.cloud
                spring-cloud-dependencies
                ${spring.cloud.version}
                pom
                import


            org.springframework.boot
            spring-boot-starter-web


            org.springframework.boot
            spring-boot-starter-data-redis


                    io.lettuce
                    lettuce-core


            redis.clients
            jedis


            org.springframework.cloud
            spring-cloud-starter-zipkin


            io.opentracing.brave
            brave-opentracing
            0.35.0


            io.opentracing.contrib
            opentracing-redis-jedis3
            0.1.14


            io.opentracing.contrib
            opentracing-redis-spring-data
            0.1.14
① 额外引入 brave-opentracing 依赖,Brave 对 Opentracing 的实现。注意,Opentracing 和 JDBC 一样是一个标准,因此需要有 Brave 对 Opentracing 进行实现,从而将链路数据写入到 Zipkin 中,就好比 JDBC 有 MySQL Driver 实现,将数据写入到 MySQL 中。
② 额外引入 opentracing-redis-spring-data 和 opentracing-redis-jedis3 依赖,实现对 Jedis 来操作 Redis 的链路追踪。
9.2 配置文件
在 application.yml 中,添加数据库相关配置,如下:
spring:
  application:
    name: user-service # 服务名

  # Zipkin 配置项,对应 ZipkinProperties 类
  zipkin:
    base-url: http://127.0.0.1:9411 # Zipkin 服务的地址

  # Spring Cloud Sleuth 配置项
  sleuth:
    # Spring Cloud Sleuth 针对 Web 组件的配置项,例如说 SpringMVC
    web:
      enabled: true # 是否开启,默认为 true

  # 对应 RedisProperties 类
  redis:
    host: 127.0.0.1
    port: 6379
    password: # Redis 服务器密码,默认为空。生产中,一定要设置 Redis 密码!
    database: 0 # Redis 数据库号,默认为 0 。
    timeout: 0 # Redis 连接超时时间,单位:毫秒。
    # 对应 RedisProperties.Jedis 内部类
    jedis:
      pool:
        max-active: 8 # 连接池最大连接数,默认为 8 。使用负数表示没有限制。
        max-idle: 8 # 默认连接数最小空闲的连接数,默认为 8 。使用负数表示没有限制。
        min-idle: 0 # 默认连接池最小空闲的连接数,默认为 0 。允许设置 0 和 正数。
        max-wait: -1 # 连接池最大阻塞等待时间,单位:毫秒。默认为 -1 ,表示不限制。
9.3 SleuthConfiguration
创建 SleuthConfiguration 配置类,创建一个 TracingRedisConnectionFactory Bean 对象。这样,我们就能拦截到 Redis 操作,进行相应的链路追踪。代码如下:
@Configuration
public class SleuthConfiguration {

    // ==================== Redis 相关 ====================
    @Bean
    public RedisConnectionFactory redisConnectionFactory(Tracer tracer, RedisProperties redisProperties) {
        // 创建 JedisConnectionFactory 对象
        RedisConnectionFactory connectionFactory = new JedisConnectionFactory();
        // 创建 TracingConfiguration 对象
        TracingConfiguration tracingConfiguration = new TracingConfiguration.Builder(tracer)
                // 设置拓展 Tag ,设置 Redis 服务器地址。因为默认情况下,不会在操作 Redis 链路的 Span 上记录 Redis 服务器的地址,所以这里需要设置。
                .extensionTag("Server Address", redisProperties.getHost() + ":" + redisProperties.getPort())
                .build();
        // 创建 TracingRedisConnectionFactory 对象
        return new TracingRedisConnectionFactory(connectionFactory, tracingConfiguration);
    }

}
9.4 UserController
创建 UserController 类,提供示例 API 接口。代码如下:
@RestController
@RequestMapping("/user")
public class UserController {

    @Autowired
    private StringRedisTemplate redisTemplate;

    @GetMapping("/get")
    public String get(@RequestParam("id") Integer id) {
        this.get("demo");
        return "success";
    }

    public void get(String key) {
        redisTemplate.opsForValue().get(key);
    }

}
在 /user/get 接口中,会执行一次 Redis 的查询。
9.5 UserServiceApplication
创建 UserServiceApplication 类,应用启动类。代码如下:
@SpringBootApplication
public class UserServiceApplication {

    public static void main(String[] args) {
        SpringApplication.run(UserServiceApplication.class, args);
    }

}
9.6 简单测试
使用 UserServiceApplication 启动 Spring Cloud 应用。
① 首先,使用 curl http://127.0.0.1:8080/user/get?id=1 命令,从而执行一次 Redis 查询操作。因为,我们要追踪下该链路。
② 然后,继续使用浏览器,打开 http://127.0.0.1:9411/ 地址,查看链路数据。点击「查找」按钮,便可看到刚才我们调用接口的链路数据。如下图所示: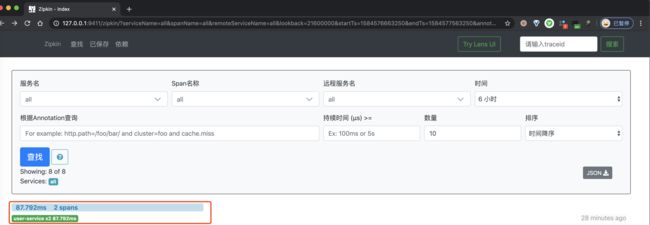
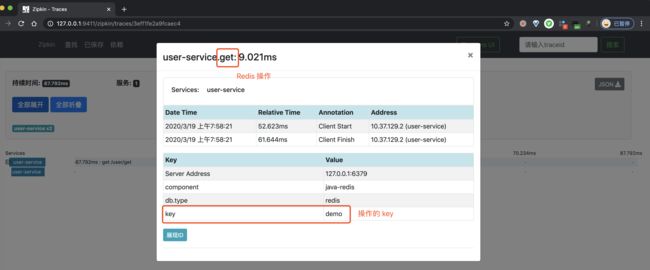
③ 之后,我们点击该链路数据,可以看到一个 Trace 明细。如下图所示:
④ 再之后,分别点击个 Span,可以看到两个 Span 明细。如下图所示:
10. MongoDB 示例
示例代码对应仓库:
labx-13-sc-sleuth-db-mongodb。
和「9. Redis 示例」一样,Brave 并未提供对 对 MongoDB 操作的链路追踪。因此,我们还是使用 opentracing-contrib 的子项目 java-mongo-driver,搭配上 brave-opentracing 项目,实现将使用 OpenTracing API 收集的链路数据,发送给 Zipkin Server 中。
我们来新建一个 labx-13-sc-sleuth-db-mongodb 项目,实现简单的 MongoDB 数据库操作。最终如下图所示: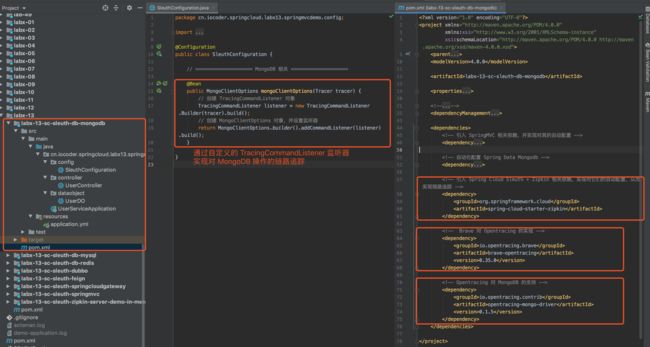
另外,我们将使用 Spring Data MongoDB 进行 MongoDB 的操作。对 Spring Data MongoDB 感兴趣的胖友,可以后续去看看《芋道 Spring Boot MongoDB 入门》文章。
10.1 引入依赖
创建 pom.xml 文件中,引入相关依赖。
        labx-13
        cn.iocoder.springboot.labs
        1.0-SNAPSHOT

    4.0.0

    labx-13-sc-sleuth-db-mongodb


        1.8
        1.8
        2.2.4.RELEASE
        Hoxton.SR1


                org.springframework.boot
                spring-boot-starter-parent
                ${spring.boot.version}
                pom
                import


                org.springframework.cloud
                spring-cloud-dependencies
                ${spring.cloud.version}
                pom
                import


            org.springframework.boot
            spring-boot-starter-web


            org.springframework.boot
            spring-boot-starter-data-mongodb


            org.springframework.cloud
            spring-cloud-starter-zipkin


            io.opentracing.brave
            brave-opentracing
            0.35.0


            io.opentracing.contrib
            opentracing-mongo-driver
            0.1.5
重点是引入 opentracing-mongo-driver 依赖,实现对 MongoDB 操作的链路追踪。
10.2 配置文件
在 application.yml 中,添加数据库相关配置,如下:
spring:
  application:
    name: user-service # 服务名

  # Zipkin 配置项,对应 ZipkinProperties 类
  zipkin:
    base-url: http://127.0.0.1:9411 # Zipkin 服务的地址

  # Spring Cloud Sleuth 配置项
  sleuth:
    # Spring Cloud Sleuth 针对 Web 组件的配置项,例如说 SpringMVC
    web:
      enabled: true # 是否开启,默认为 true

  data:
    # MongoDB 配置项,对应 MongoProperties 类
    mongodb:
      host: 127.0.0.1
      port: 27017
      database: yourdatabase
      username: test01
      password: password01
      # 上述属性,也可以只配置 uri
10.3 SleuthConfiguration
创建 SleuthConfiguration 配置类,创建一个带有 TracingCommandListener 监听器的 MongoClientOptions Bean 对象。这样,我们就能拦截到 MongoDB 操作,进行 MongoDB 的链路追踪。代码如下:
@Configuration
public class SleuthConfiguration {

    // ==================== MongoDB 相关 ====================

    @Bean
    public MongoClientOptions mongoClientOptions(Tracer tracer) {
        // 创建 TracingCommandListener 对象
        TracingCommandListener listener = new TracingCommandListener.Builder(tracer).build();
        // 创建 MongoClientOptions 对象,并设置监听器
        return MongoClientOptions.builder().addCommandListener(listener).build();
    }

}
10.4 UserController
创建 UserController 类,提供示例 API 接口。代码如下:
@RestController
@RequestMapping("/user")
public class UserController {

    @Autowired
    private MongoTemplate mongoTemplate;

    @GetMapping("/get")
    public String get(@RequestParam("id") Integer id) {
        this.findById(1);
        return "success";
    }

    public UserDO findById(Integer id) {
        return mongoTemplate.findOne(new Query(Criteria.where("_id").is(id)), UserDO.class);
    }

}
在 /user/get 接口中,会执行一次 MongoDB 的查询。
另外,UserDO 实体类,直接点击查看。
10.5 UserServiceApplication
创建 UserServiceApplication 类,应用启动类。代码如下:
@SpringBootApplication
public class UserServiceApplication {

    public static void main(String[] args) {
        SpringApplication.run(UserServiceApplication.class, args);
    }

}
10.6 简单测试
使用 UserServiceApplication 启动 Spring Cloud 应用。
① 首先,使用 curl http://127.0.0.1:8080/user/get?id=1 命令,从而执行一次 MongoDB 查询操作。因为,我们要追踪下该链路。
② 然后,继续使用浏览器,打开 http://127.0.0.1:9411/ 地址,查看链路数据。点击「查找」按钮,便可看到刚才我们调用接口的链路数据。如下图所示:
③ 之后,我们点击该链路数据,可以看到一个 Trace 明细。如下图所示:
④ 再之后,分别点击个 Span,可以看到两个 Span 明细。如下图所示:
11. Elasticsearch 示例
示例代码对应仓库:
labx-13-sc-sleuth-db-elasticsearch。
和「4. Redis 示例」一样,Brave 并未提供对 对 Elasticsearch 操作的链路追踪。因此,我们还是使用 opentracing-contrib 的子项目 java-elasticsearch-client,搭配上 brave-opentracing 项目,实现将使用 OpenTracing API 收集的链路数据,发送给 Zipkin Server 中。
我们来新建一个 labx-13-sc-sleuth-db-elasticsearch 项目,实现简单的 MongoDB 数据库操作。最终如下图所示: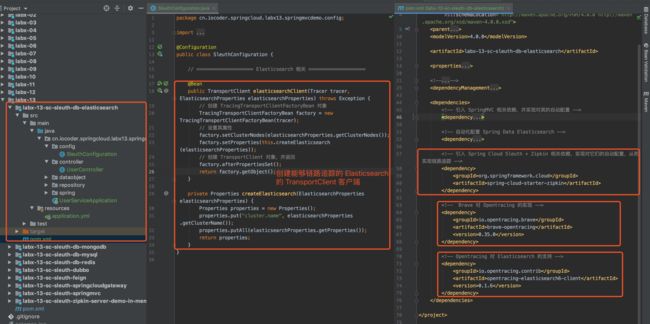
另外,我们将使用 Spring Data Elasticsearch 进行 Elasticsearch 的操作。对 Elasticsearch 感兴趣的胖友,可以后续去看看《Spring Boot Elasticsearch 入门》文章。
11.1 引入依赖
在 pom.xml 文件中,引入相关依赖。
        labx-13
        cn.iocoder.springboot.labs
        1.0-SNAPSHOT

    4.0.0

    labx-13-sc-sleuth-db-elasticsearch


        1.8
        1.8
        2.2.4.RELEASE
        Hoxton.SR1


                org.springframework.boot
                spring-boot-starter-parent
                ${spring.boot.version}
                pom
                import


                org.springframework.cloud
                spring-cloud-dependencies
                ${spring.cloud.version}
                pom
                import


            org.springframework.boot
            spring-boot-starter-web


            org.springframework.boot
            spring-boot-starter-data-elasticsearch


            org.springframework.cloud
            spring-cloud-starter-zipkin


            io.opentracing.brave
            brave-opentracing
            0.35.0


            io.opentracing.contrib
            opentracing-elasticsearch6-client
            0.1.6
重点是引入 opentracing-elasticsearch6-client 依赖,实现对 MongoDB 操作的链路追踪。
11.2 配置文件
在 application.yml 中,添加数据库相关配置,如下:
spring:
  application:
    name: user-service # 服务名

  # Zipkin 配置项,对应 ZipkinProperties 类
  zipkin:
    base-url: http://127.0.0.1:9411 # Zipkin 服务的地址

  # Spring Cloud Sleuth 配置项
  sleuth:
    # Spring Cloud Sleuth 针对 Web 组件的配置项,例如说 SpringMVC
    web:
      enabled: true # 是否开启,默认为 true

  data:
    # Elasticsearch 配置项
    elasticsearch:
      cluster-name: elasticsearch # 集群名
      cluster-nodes: 127.0.0.1:9300 # 集群节点
11.3 SleuthConfiguration
创建 SleuthConfiguration 配置类,创建一个 TracingPreBuiltTransportClient Bean 对象。这样,我们就能拦截到 Elasticsearch 操作,进行相应的链路追踪。代码如下:
@Configuration
public class SleuthConfiguration {

    // ==================== Elasticsearch 相关 ====================

    @Bean
    public TransportClient elasticsearchClient(Tracer tracer, ElasticsearchProperties elasticsearchProperties) throws Exception {
        // 创建 TracingTransportClientFactoryBean 对象
        TracingTransportClientFactoryBean factory = new TracingTransportClientFactoryBean(tracer);
        // 设置其属性
        factory.setClusterNodes(elasticsearchProperties.getClusterNodes());
        factory.setProperties(this.createElasticsearch(elasticsearchProperties));
        // 创建 TransportClient 对象,并返回
        factory.afterPropertiesSet();
        return factory.getObject();
    }

    private Properties createElasticsearch(ElasticsearchProperties elasticsearchProperties) {
        Properties properties = new Properties();
        properties.put("cluster.name", elasticsearchProperties.getClusterName());
        properties.putAll(elasticsearchProperties.getProperties());
        return properties;
    }
}
#elasticsearchClient(...) 方法,先创建一个 TracingTransportClientFactoryBean 对象,之后通过它创建可追踪链路的 TracingPreBuiltTransportClient Bean 对象。这样,我们就能拦截到 Elasticsearch 操作,进行 Elasticsearch 的链路追踪。
不过因为 opentracing-elasticsearch6-client 提供的 TracingPreBuiltTransportClient 类,是直接继承 PreBuiltTransportClient 类,并且并未提供传入 PreBuiltTransportClient 参数的构造方法,导致我们不能通过直接修饰 TransportClient Bean 的方式,而是只能自己定义了一个 TracingTransportClientFactoryBean 类,创建可追踪链路的 TracingPreBuiltTransportClient 对象。
TracingTransportClientFactoryBean 基本复制 TransportClientFactoryBean 的代码,主要重写了 #buildClient() 方法,创建 TracingPreBuiltTransportClient 对象。代码如下:
// TracingTransportClientFactoryBean.java

private Tracer tracer;

protected void buildClient() throws Exception {
    // 创建可追踪的 TracingPreBuiltTransportClient
    client = new TracingPreBuiltTransportClient(tracer, settings());

    // ... 省略其它代码
}
可能这么说略微有点晦涩,胖友先继续往下看,等后面自己动手实践一次,就会很好理解了。
11.4 UserController
创建 UserController 类,提供示例 API 接口。代码如下:
@RestController
@RequestMapping("/user")
public class UserController {

    @Autowired
    private ESUserRepository userRepository;

    @GetMapping("/get")
    public String get(@RequestParam("id") Integer id) {
        this.findById(id);
        return "success";
    }

    public ESUserDO findById(Integer id) {
        return userRepository.findById(id).orElse(null);
    }

}
在 /user/get 接口中,会执行一次 Elasticsearch 的查询。
- ESUserDO 实体类,直接点击查看。
- ESUserRepository ES 数据访问类,直接点击查看。
11.5 UserServiceApplication
创建 UserServiceApplication 类,应用启动类。代码如下:
@SpringBootApplication
public class UserServiceApplication {

    public static void main(String[] args) {
        SpringApplication.run(UserServiceApplication.class, args);
    }

}
11.6 简单测试
使用 UserServiceApplication 启动 Spring Cloud 应用。
① 首先,使用 curl http://127.0.0.1:8080/user/get?id=1 命令,从而执行一次 Redis 查询操作。因为,我们要追踪下该链路。
② 然后,继续使用浏览器,打开 http://127.0.0.1:9411/ 地址,查看链路数据。点击「查找」按钮,便可看到刚才我们调用接口的链路数据。如下图所示: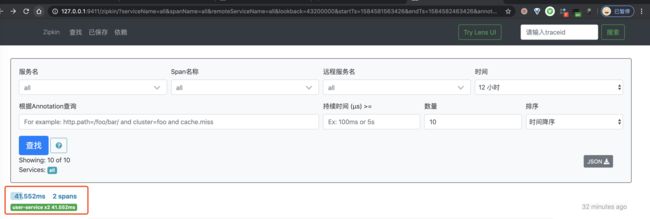
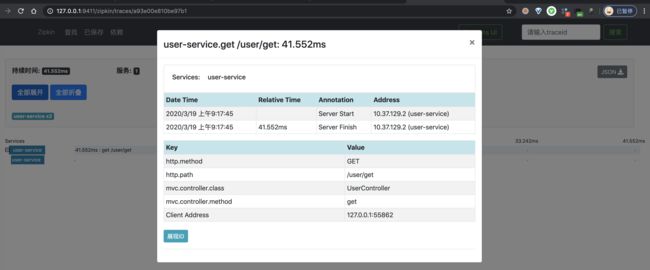
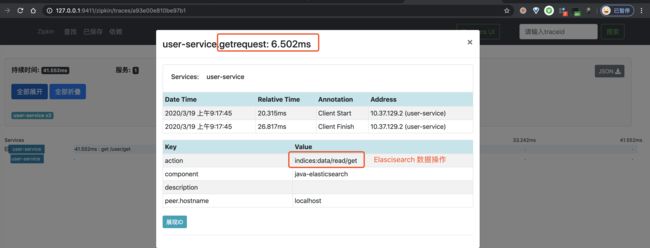
③ 之后,我们点击该链路数据,可以看到一个 Trace 明细。如下图所示:
④ 再之后,分别点击个 Span,可以看到两个 Span 明细。如下图所示:
12. RabbitMQ 示例
示例代码对应仓库:
- 生产者:
labx-13-sc-sleuth-mq-rabbitmq-produce- 消费者:
labx-13-sc-stream-mq-rabbitmq-consumer
本小节,我们来搭建一个 Spring Cloud Sleuth 对 RabbitMQ 消息的发送和消费的链路追踪。该链路通过如下插件实现收集:
brave-instrumentation-messagingbrave-instrumentation-spring-rabbit
我们来新建一个 labx-13-sc-sleuth-mq-rabbitmq 模块,会包括生产者和消费者两个子项目。最终如下图所示:
另外,我们将使用 Spring Cloud Stream RabbitMQ 进行 RabbitMQ 的操作。对 RabbitMQ 感兴趣的胖友,可以后续去看看《芋道 Spring Cloud 消息队列 RabbitMQ 入门》文章。
12.1 搭建生产者
创建 labx-13-sc-sleuth-mq-rabbitmq-produce 项目,作为生产者。
12.1.1 引入依赖
创建 pom.xml 文件中,引入相关依赖。
        labx-13-sc-sleuth-mq-rabbitmq
        cn.iocoder.springboot.labs
        1.0-SNAPSHOT

    4.0.0

    labx-13-sc-sleuth-mq-rabbitmq-producer


        1.8
        1.8
        2.2.4.RELEASE
        Hoxton.SR1


                org.springframework.boot
                spring-boot-starter-parent
                ${spring.boot.version}
                pom
                import


                org.springframework.cloud
                spring-cloud-dependencies
                ${spring.cloud.version}
                pom
                import


            org.springframework.boot
            spring-boot-starter-web


            org.springframework.cloud
            spring-cloud-starter-stream-rabbit


            org.springframework.cloud
            spring-cloud-starter-zipkin
因为 spring-cloud-starter-zipkin 依赖中,已经包含 brave-instrumentation-messaging 和 brave-instrumentation-spring-rabbit 依赖,所以无需手动引入。
12.1.2 配置文件
创建 application.yaml 配置文件,添加相关配置。
spring:
  application:
    name: demo-producer-application
  cloud:
    # Spring Cloud Stream 配置项,对应 BindingServiceProperties 类
    stream:
      # Binder 配置项,对应 BinderProperties Map
      binders:
        rabbit001:
          type: rabbit # 设置 Binder 的类型
          environment: # 设置 Binder 的环境配置
            # 如果是 RabbitMQ 类型的时候,则对应的是 RabbitProperties 类
            spring:
              rabbitmq:
                host: 127.0.0.1 # RabbitMQ 服务的地址
                port: 5672 # RabbitMQ 服务的端口
                username: guest # RabbitMQ 服务的账号
                password: guest # RabbitMQ 服务的密码
      # Binding 配置项,对应 BindingProperties Map
      bindings:
        demo01-output:
          destination: DEMO-TOPIC-01 # 目的地。这里使用 RabbitMQ Exchange
          content-type: application/json # 内容格式。这里使用 JSON
          binder: rabbit001 # 设置使用的 Binder 名字

  # Zipkin 配置项,对应 ZipkinProperties 类
  zipkin:
    base-url: http://127.0.0.1:9411 # Zipkin 服务的地址

  # Spring Cloud Sleuth 配置项
  sleuth:
    messaging:
      # Spring Cloud Sleuth 针对 RabbitMQ 组件的配置项
      rabbit:
        enabled: true # 是否开启
        remote-service-name: rabbitmq # 远程服务名,默认为 rabbitmq

server:
  port: 18080
spring.sleuth.messaging.rabbit 配置项,为 Spring Cloud Sleuth 针对 RabbitMQ 组件的配置项,对应 SleuthMessagingProperties.Rabbit 类。
enabled配置项,是否开启,默认为true。remote-service-name配置项,远程服务名,默认为rabbitmq。
12.1.3 MySource
创建 MySource 接口,声明名字为 Output Binding。代码如下:
public interface MySource {

    @Output("demo01-output")
    MessageChannel demo01Output();

}
12.1.4 Demo01Message
创建 Demo01Message 类,示例 Message 消息。代码如下:
public class Demo01Message {

    /**
     * 编号
     */
    private Integer id;

    // ... 省略 setter/getter/toString 方法

}
12.1.5 Demo01Controller
创建 Demo01Controller 类,提供发送消息的 HTTP 接口。代码如下:
@RestController
@RequestMapping("/demo01")
public class Demo01Controller {

    private Logger logger = LoggerFactory.getLogger(getClass());

    @Autowired
    private MySource mySource;

    @GetMapping("/send")
    public boolean send() {
        // 创建 Message
        Demo01Message message = new Demo01Message()
                .setId(new Random().nextInt());
        // 创建 Spring Message 对象
        Message springMessage = MessageBuilder.withPayload(message)
                .build();
        // 发送消息
        return mySource.demo01Output().send(springMessage);
    }

}
12.1.6 ProducerApplication
创建 ProducerApplication 类,启动生产者的应用。代码如下:
@SpringBootApplication
@EnableBinding(MySource.class)
public class ProducerApplication {

    public static void main(String[] args) {
        SpringApplication.run(ProducerApplication.class, args);
    }

}
12.2 搭建消费者
创建 labx-13-sc-stream-mq-rabbitmq-consumer 项目,作为消费者。
12.2.1 引入依赖
创建 pom.xml 文件中,引入相关依赖。
友情提示:和「12.1 搭建生产者」基本一样,点击 链接 查看。
12.2.2 配置文件
创建 application.yaml 配置文件,添加相关配置。
spring:
  application:
    name: demo-consumer-application
  cloud:
    # Spring Cloud Stream 配置项,对应 BindingServiceProperties 类
    stream:
      # Binder 配置项,对应 BinderProperties Map
      binders:
        rabbit001:
          type: rabbit # 设置 Binder 的类型
          environment: # 设置 Binder 的环境配置
            # 如果是 RabbitMQ 类型的时候,则对应的是 RabbitProperties 类
            spring:
              rabbitmq:
                host: 127.0.0.1 # RabbitMQ 服务的地址
                port: 5672 # RabbitMQ 服务的端口
                username: guest # RabbitMQ 服务的账号
                password: guest # RabbitMQ 服务的密码
      # Binding 配置项,对应 BindingProperties Map
      bindings:
        demo01-input:
          destination: DEMO-TOPIC-01 # 目的地。这里使用 RabbitMQ Exchange
          content-type: application/json # 内容格式。这里使用 JSON
          group: demo01-consumer-group-DEMO-TOPIC-01 # 消费者分组
          binder: rabbit001  # 设置使用的 Binder 名字

  # Zipkin 配置项,对应 ZipkinProperties 类
  zipkin:
    base-url: http://127.0.0.1:9411 # Zipkin 服务的地址

  # Spring Cloud Sleuth 配置项
  sleuth:
    messaging:
      # Spring Cloud Sleuth 针对 RabbitMQ 组件的配置项
      rabbit:
        enabled: true # 是否开启
        remote-service-name: rabbitmq # 远程服务名,默认为 rabbitmq

server:
  port: ${random.int[10000,19999]} # 随机端口,方便启动多个消费者
12.2.3 MySink
创建 MySink 接口,声明名字为 Input Binding。代码如下
public interface MySink {

    String DEMO01_INPUT = "demo01-input";

    @Input(DEMO01_INPUT)
    SubscribableChannel demo01Input();

}
12.2.4 Demo01Message
创建 Demo01Message 类,示例 Message 消息。
友情提示:和「12.1.4 Demo01Message」基本一样,点击 链接 查看。
12.2.5 Demo01Consumer
创建 Demo01Consumer 类,消费消息。代码如下:
@Component
public class Demo01Consumer {

    private Logger logger = LoggerFactory.getLogger(getClass());

    @StreamListener(MySink.DEMO01_INPUT)
    public void onMessage(@Payload Demo01Message message) {
        logger.info("[onMessage][线程编号:{} 消息内容:{}]", Thread.currentThread().getId(), message);
    }

}
12.2.6 ConsumerApplication
创建 ConsumerApplication 类,启动应用。代码如下:
@SpringBootApplication
@EnableBinding(MySink.class)
public class ConsumerApplication {

    public static void main(String[] args) {
        SpringApplication.run(ConsumerApplication.class, args);
    }

}
12.3 简单测试
使用 ProducerApplication 启动生产者,使用 ConsumerApplication 启动消费者。
① 首先,使用 curl http://127.0.0.1:18080/demo01/send 命令,使用 RabbitMQ Producer 发送一条消息,从而触发 RabbitMQ Consumer 消费一条消息。因为,我们要追踪下该链路。
② 然后,继续使用浏览器,打开 http://127.0.0.1:9411/ 地址,查看链路数据。点击「查找」按钮,便可看到刚才我们调用接口的链路数据。如下图所示:
③ 之后,我们点击该链路数据,可以看到一个 Trace 明细。如下图所示:
④、再之后,点击红圈的个 Span,可以看到一个 Producer 的 Span 明细。如下图所示:
⑤、再之后,点击蓝圈的个 Span,可以看到一个 Consumer 的 Span 明细。如下图所示: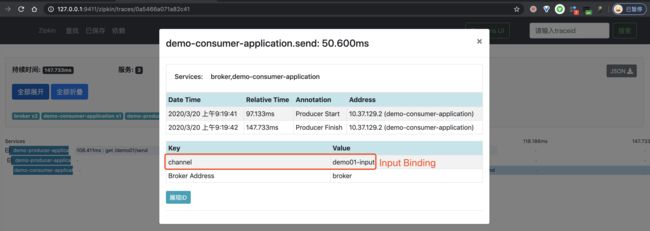
13. Kafka 示例
示例代码对应仓库:
- 生产者:
labx-13-sc-sleuth-mq-kafka-produce- 消费者:
labx-13-sc-stream-mq-kafka-consumer
本小节,我们来搭建一个 Spring Cloud Sleuth 对 Kafka 消息的发送和消费的链路追踪。该链路通过如下插件实现收集:
brave-instrumentation-messagingbrave-instrumentation-kafka-clientsbrave-instrumentation-kafka-streams
我们来新建一个 labx-13-sc-sleuth-mq-kafka 模块,会包括生产者和消费者两个子项目。最终如下图所示: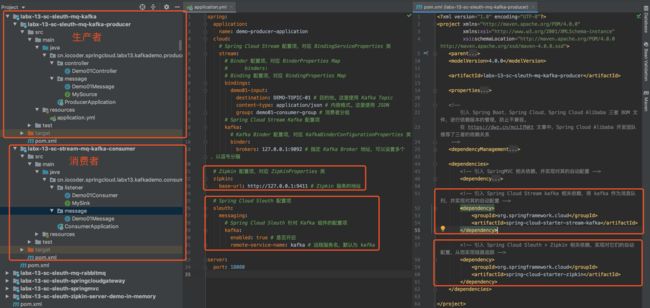
另外,我们将使用 Spring Cloud Stream Kafka 进行 Kafka 的操作。对 Kafka 感兴趣的胖友,可以后续去看看《Spring Cloud 消息队列 Kafka 入门》文章。
13.1 搭建生产者
创建 labx-13-sc-sleuth-mq-kafka-produce 项目,作为生产者。
13.1.1 引入依赖
创建 pom.xml 文件中,引入相关依赖。
        labx-13-sc-sleuth-mq-kafka
        cn.iocoder.springboot.labs
        1.0-SNAPSHOT

    4.0.0

    labx-13-sc-sleuth-mq-kafka-producer


        1.8
        1.8
        2.2.4.RELEASE
        Hoxton.SR1


                org.springframework.boot
                spring-boot-starter-parent
                ${spring.boot.version}
                pom
                import


                org.springframework.cloud
                spring-cloud-dependencies
                ${spring.cloud.version}
                pom
                import


            org.springframework.boot
            spring-boot-starter-web


            org.springframework.cloud
            spring-cloud-starter-stream-kafka


            org.springframework.cloud
            spring-cloud-starter-zipkin
因为 spring-cloud-starter-zipkin 依赖中,已经包含 brave-instrumentation-messaging 和 brave-instrumentation-spring-rabbit 依赖,所以无需手动引入。
13.1.2 配置文件
创建 application.yaml 配置文件,添加相关配置。
spring:
  application:
    name: demo-producer-application
  cloud:
    # Spring Cloud Stream 配置项,对应 BindingServiceProperties 类
    stream:
      # Binder 配置项,对应 BinderProperties Map
      #      binders:
      # Binding 配置项,对应 BindingProperties Map
      bindings:
        demo01-output:
          destination: DEMO-TOPIC-01 # 目的地。这里使用 Kafka Topic
          content-type: application/json # 内容格式。这里使用 JSON
      # Spring Cloud Stream Kafka 配置项
      kafka:
        # Kafka Binder 配置项,对应 KafkaBinderConfigurationProperties 类
        binder:
          brokers: 127.0.0.1:9092 # 指定 Kafka Broker 地址,可以设置多个,以逗号分隔
        # Kafka 自定义 Binding 配置项,对应 KafkaBindingProperties Map
        bindings:
          demo01-output:
            # Kafka Producer 配置项,对应 KafkaProducerProperties 类
            producer:
              sync: true # 是否同步发送消息,默认为 false 异步。

  # Zipkin 配置项,对应 ZipkinProperties 类
  zipkin:
    base-url: http://127.0.0.1:9411 # Zipkin 服务的地址

  # Spring Cloud Sleuth 配置项
  sleuth:
    messaging:
      # Spring Cloud Sleuth 针对 Kafka 组件的配置项
      kafka:
        enabled: true # 是否开启
        remote-service-name: kafka # 远程服务名,默认为 kafka

server:
  port: 18080
spring.sleuth.messaging.kafka 配置项,为 Spring Cloud Sleuth 针对 Kafka 组件的配置项,对应 SleuthMessagingProperties.Kafka 类。
enabled配置项,是否开启,默认为true。remote-service-name配置项,远程服务名,默认为kafka。
13.1.3 MySource
创建 MySource 接口,声明名字为 Output Binding。代码如下:
public interface MySource {

    @Output("demo01-output")
    MessageChannel demo01Output();

}
13.1.4 Demo01Message
创建 Demo01Message 类,示例 Message 消息。代码如下:
public class Demo01Message {

    /**
     * 编号
     */
    private Integer id;

    // ... 省略 setter/getter/toString 方法

}
13.1.5 Demo01Controller
创建 Demo01Controller 类,提供发送消息的 HTTP 接口。代码如下:
@RestController
@RequestMapping("/demo01")
public class Demo01Controller {

    private Logger logger = LoggerFactory.getLogger(getClass());

    @Autowired
    private MySource mySource;

    @GetMapping("/send")
    public boolean send() {
        // 创建 Message
        Demo01Message message = new Demo01Message()
                .setId(new Random().nextInt());
        // 创建 Spring Message 对象
        Message springMessage = MessageBuilder.withPayload(message)
                .build();
        // 发送消息
        return mySource.demo01Output().send(springMessage);
    }

}
13.1.6 ProducerApplication
创建 ProducerApplication 类,启动生产者的应用。代码如下:
@SpringBootApplication
@EnableBinding(MySource.class)
public class ProducerApplication {

    public static void main(String[] args) {
        SpringApplication.run(ProducerApplication.class, args);
    }

}
13.2 搭建消费者
创建 labx-13-sc-stream-mq-kafka-consumer 项目,作为消费者。
13.2.1 引入依赖
创建 pom.xml 文件中,引入相关依赖。
友情提示:和「13.1 搭建生产者」基本一样,点击 链接 查看。
13.2.2 配置文件
创建 application.yaml 配置文件,添加相关配置。
spring:
  application:
    name: demo-consumer-application
  cloud:
    # Spring Cloud Stream 配置项,对应 BindingServiceProperties 类
    stream:
      # Binder 配置项,对应 BinderProperties Map
      #      binders:
      # Binding 配置项,对应 BindingProperties Map
      bindings:
        demo01-input:
          destination: DEMO-TOPIC-01 # 目的地。这里使用 Kafka Topic
          content-type: application/json # 内容格式。这里使用 JSON
          group: demo01-consumer-group # 消费者分组
      # Spring Cloud Stream Kafka 配置项
      kafka:
        # Kafka Binder 配置项,对应 KafkaBinderConfigurationProperties 类
        binder:
          brokers: 127.0.0.1:9092 # 指定 Kafka Broker 地址,可以设置多个,以逗号分隔

  # Zipkin 配置项,对应 ZipkinProperties 类
  zipkin:
    base-url: http://127.0.0.1:9411 # Zipkin 服务的地址

  # Spring Cloud Sleuth 配置项
  sleuth:
    messaging:
      # Spring Cloud Sleuth 针对 kafka 组件的配置项,例如说 SpringMVC
      kafka:
        enabled: true # 是否开启
        remote-service-name: kafka # 远程服务名,默认为 kafka

server:
  port: ${random.int[10000,19999]} # 随机端口,方便启动多个消费者
13.2.3 MySink
创建 MySink 接口,声明名字为 Input Binding。代码如下:
public interface MySink {

    String DEMO01_INPUT = "demo01-input";

    @Input(DEMO01_INPUT)
    SubscribableChannel demo01Input();

}
13.2.4 Demo01Message
创建 Demo01Message 类,示例 Message 消息。
友情提示:和「12.1.4 Demo01Message」基本一样,点击 链接 查看。
13.2.5 Demo01Consumer
创建 Demo01Consumer 类,消费消息。代码如下:
@Component
public class Demo01Consumer {

    private Logger logger = LoggerFactory.getLogger(getClass());

    @StreamListener(MySink.DEMO01_INPUT)
    public void onMessage(@Payload Demo01Message message) {
        logger.info("[onMessage][线程编号:{} 消息内容:{}]", Thread.currentThread().getId(), message);
    }

}
13.2.6 ConsumerApplication
创建 ConsumerApplication 类,启动应用。代码如下:
@SpringBootApplication
@EnableBinding(MySink.class)
public class ConsumerApplication {

    public static void main(String[] args) {
        SpringApplication.run(ConsumerApplication.class, args);
    }

}
13.3 简单测试
使用 ProducerApplication 启动生产者,使用 ConsumerApplication 启动消费者。
① 首先,使用 curl http://127.0.0.1:18080/demo01/send 命令,使用 Kafka Producer 发送一条消息,从而触发 Kafka Consumer 消费一条消息。因为,我们要追踪下该链路。
② 然后,继续使用浏览器,打开 http://127.0.0.1:9411/ 地址,查看链路数据。点击「查找」按钮,便可看到刚才我们调用接口的链路数据。如下图所示:![]()
③ 之后,我们点击该链路数据,可以看到一个 Trace 明细。如下图所示:
④、再之后,点击红圈的个 Span,可以看到一个 Producer 的 Span 明细。如下图所示:
⑤、再之后,点击蓝圈的个 Span,可以看到一个 Consumer 的 Span 明细。如下图所示: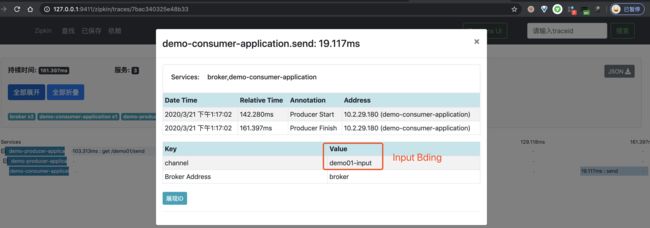
14. ActiveMQ 示例
示例代码对应仓库:
labx-13-sc-sleuth-mq-activemq考虑到让示例更简单,我们的示例项目包含 ActiveMQ 的生产者 Producer 和消费者 Consumer。
本小节,我们来搭建一个 Spring Cloud Sleuth 对 Kafka 消息的发送和消费的链路追踪。该链路通过如下插件实现收集:
-
brave-instrumentation-messaging -
brave-instrumentation-jmsActiveMQ Java 客户端,基于 JMS 1.1 规范实现。
我们来新建一个 labx-13-sc-sleuth-mq-activemq 模块,会包括生产者和消费者两个子项目。最终如下图所示:
另外,我们将使用 Spring-JMS 进行 ActiveMQ 的操作。对 ActiveMQ 感兴趣的胖友,可以后续去看看《Spring Boot 消息队列 ActiveMQ 入门》文章。
友情提示:Spring Cloud Stream ActiveMQ 处于不维护的状态,详情可见《Spring Cloud 消息队列 ActiveMQ 入门》文章。
14.1 引入依赖
在 pom.xml 文件中,引入相关依赖。
        labx-13
        cn.iocoder.springboot.labs
        1.0-SNAPSHOT

    4.0.0

    labx-13-sc-sleuth-mq-activemq


        1.8
        1.8
        2.2.4.RELEASE
        Hoxton.SR1


                org.springframework.boot
                spring-boot-starter-parent
                ${spring.boot.version}
                pom
                import


                org.springframework.cloud
                spring-cloud-dependencies
                ${spring.cloud.version}
                pom
                import


            org.springframework.boot
            spring-boot-starter-web


            org.springframework.cloud
            spring-cloud-starter-zipkin


            org.springframework.boot
            spring-boot-starter-activemq
因为 spring-cloud-starter-zipkin 依赖中,已经包含 brave-instrumentation-messaging 和 brave-instrumentation-jms 依赖,所以无需手动引入。
14.2 配置文件
创建 application.yaml 配置文件,添加相关配置。
spring:
  application:
    name: demo-application-activemq

  # ActiveMQ 配置项,对应 ActiveMQProperties 配置类
  activemq:
    broker-url: tcp://127.0.0.1:61616 # Activemq Broker 的地址
    user: admin # 账号
    password: admin # 密码
    packages:
      trust-all: true # 可信任的反序列化包

  # Zipkin 配置项,对应 ZipkinProperties 类
  zipkin:
    base-url: http://127.0.0.1:9411 # Zipkin 服务的地址

  # Spring Cloud Sleuth 配置项
  sleuth:
    messaging:
      # Spring Cloud Sleuth 针对 JMS 组件的配置项
      jms:
        enabled: true # 是否开启
        remote-service-name: jms # 远程服务名,默认为 jms
spring.sleuth.messaging.jms 配置项,为 Spring Cloud Sleuth 针对 JMS 组件的配置项,对应 SleuthMessagingProperties.Jms 类。
enabled配置项,是否开启,默认为true。remote-service-name配置项,远程服务名,默认为jms。
14.3 DemoController
创建 DemoController 类,提供示例 API 接口。代码如下:
@RestController
@RequestMapping("/demo")
public class DemoController {

    @Autowired
    private DemoProducer producer;

    @GetMapping("/activemq")
    public String echo() {
        this.sendMessage(1);
        return "activemq";
    }

    public void sendMessage(Integer id) {
        producer.syncSend(id);
    }

}
- 在
/demo/activemq接口中,会执行一次 ActiveMQ 发送消息的操作。 - DemoMessage 消息类,直接点击查看。
- DemoProducer 生产者类,直接点击查看。
- DemoConsumer 消费者类,直接点击查看。
14.4 ActiveMQApplication
创建 ActiveMQApplication.java 类,应用启动类。代码如下:
@SpringBootApplication
public class ActiveMQApplication {

    public static void main(String[] args) {
        SpringApplication.run(ActiveMQApplication.class, args);
    }

}
14.5 简单测试
使用 ActiveMQApplication 启动生产者和消费者。
① 首先,使用 curl http://127.0.0.1:8080/demo/activemq 命令,使用 ActiveMQ Producer 发送一条消息,从而触发 ActiveMQ Consumer 消费一条消息。因为,我们要追踪下该链路。
② 然后,继续使用浏览器,打开 http://127.0.0.1:9411/ 地址,查看链路数据。点击「查找」按钮,便可看到刚才我们调用接口的链路数据。如下图所示:![]()
③ 之后,我们点击该链路数据,可以看到一个 Trace 明细。如下图所示:
④、再之后,点击红圈的个 Span,可以看到一个 Producer 的 Span 明细。如下图所示: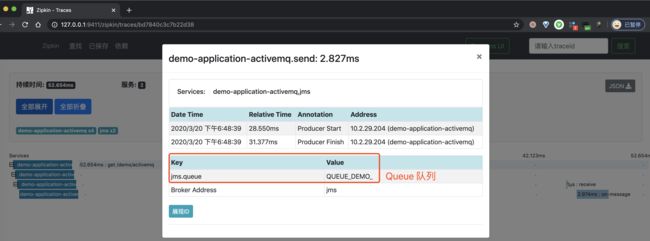
⑤、再之后,点击蓝圈的个 Span,可以看到一个 Consumer 的 Span 明细。如下图所示:
15. RocketMQ 示例
比较遗憾,我们暂时无法在 Zipkin 中,实现对 RocketMQ 的链路追踪。原因如下:
- Brave 暂时没有提供 RocketMQ 的链路追中的插件。
- OpenTracing API Contributions 也没提供对 RocketMQ 的链路追中的插件。
- RocketMQ 自身也并未提供对 OpenTracing 的集成。相关讨论,可见 ISSUE#1525。
如果胖友想要实现对 RocketMQ 的链路追踪,可以考虑下 SkyWalking。详细可见
- 《芋道 Spring Boot 链路追踪 SkyWalking 入门》的「8. RocketMQ 示例」小节
- 《芋道 Spring Cloud 链路追踪 SkyWalking 入门》的「12. RocketMQ 示例」小节
16. 日志框架示例
示例代码对应仓库:
labx-13-sc-sleuth-logback
在使用 Zipkin 排查问题的时候,我们可能希望能够跟链路的日志进行关联,那么我们可以将链路编号( Zipkin TraceId )记录到日志中,从而进行关联。
友情提示:艿艿自己的项目里,在一些业务数据希望跟 Zipkin 链路进行关联时,会考虑新增一个
traceId字段,存储 Zipkin TraceId。例如说:
- 发送聊天消息时,消息记录上会存储链路编号。
- 创建交易订单时,订单记录上会存储链路编号。
这样,在排查该数据记录时,我们就可以拿着
traceId字段,去查响应的链路信息和日志信息。
在 Spring Cloud Sleuth 的 log 模块,提供了基于 SLF4J 门面日志框架的集成,默认将链路的 traceId 和 spanId 附加到日志内容当中。
我们来新建一个 labx-13-sc-sleuth-logback 项目,打印带有链路信息的日志。最终如下图所示:
友情提示:对 Logging 感兴趣的胖友,可以后续去看看《Spring Boot 日志框架 Logging 入门》文章。
16.1 引入依赖
在 pom.xml 文件中,引入相关依赖。
        labx-13
        cn.iocoder.springboot.labs
        1.0-SNAPSHOT

    4.0.0

    labx-13-sc-sleuth-logback


        1.8
        1.8
        2.2.4.RELEASE
        Hoxton.SR1


                org.springframework.boot
                spring-boot-starter-parent
                ${spring.boot.version}
                pom
                import


                org.springframework.cloud
                spring-cloud-dependencies
                ${spring.cloud.version}
                pom
                import


            org.springframework.boot
            spring-boot-starter-web


            org.springframework.cloud
            spring-cloud-starter-zipkin
16.2 配置文件
创建 application.yaml 配置文件,添加相关配置。
spring:
  application:
    name: user-service # 服务名

  # Zipkin 配置项,对应 ZipkinProperties 类
  zipkin:
    base-url: http://127.0.0.1:9411 # Zipkin 服务的地址

  # Spring Cloud Sleuth 配置项
  sleuth:
    # Spring Cloud Sleuth 针对 Web 组件的配置项,例如说 SpringMVC
    web:
      enabled: true # 是否开启,默认为 true
    # Spring Cloud Sleuth 针对 Slf4j 组件的配置项
    log:
      slf4j:
        enabled: true # 是否开启,默认为 true
spring.sleuth.log.slf4j 配置项,为 Spring Cloud Sleuth 针对 SLF4J 组件的配置项,对应 SleuthSlf4jProperties 类。
enabled配置项,是否开启,默认为true。
16.3 UserController
创建 UserController 类,提供示例 API 接口。代码如下:
@RestController
@RequestMapping("/user")
public class UserController {

    private Logger logger = LoggerFactory.getLogger(getClass());

    @GetMapping("/get")
    public String get(@RequestParam("id") Integer id) {
        logger.info("测试日志");
        return "user:" + id;
    }

}- 在
/user/get接口中,会执行一次日志的记录。
16.4 UserServiceApplication
创建 UserServiceApplication 类,应用启动类。代码如下:
@SpringBootApplication
public class ActiveMQApplication {

    public static void main(String[] args) {
        SpringApplication.run(ActiveMQApplication.class, args);
    }

}
16.5 简单测试
Spring Cloud Sleuth 提供的默认日志格式为 [{applicationName},{traceId},{spanId},{export}],通过 TraceEnvironmentPostProcessor 类的代码可以看到,如下图:
{applicationName}:应用名称,即spring.application.name配置项。{traceId}:类似于树结构的 Span 集合,表示一条完整的调用链路,存在唯一标识,即 TraceId 链路编号。-
{spanId}:基本工作单元,一次链路调用(可以是 RPC,DB 等等,没有特定的限制)创建一个 Span,通过一个 64 位 ID 标识它,即 SpanId 跨度编号。 -
{export}:表示是否要将该信息输出到类似 Zipkin 这样的聚合器进行收集和展示。简单来说,就是抽样收集。如果
export为false时,则不进行收集
① 使用 UserServiceApplication 启动 Spring Cloud 应用。启动日志如下:
// ... 省略其它日志

2020-03-20 22:40:53.182  INFO [user-service,,,] 41891 --- [           main] c.i.s.l.s.UserServiceApplication         : Started UserServiceApplication in 2.731 seconds (JVM running for 3.276)
- 因为此时没有链路的 TraceId 和 SpanId,所以
[{applicationName},{traceId},{spanId},{export}]最终被格式化成[user-service,,,]。
② 使用 curl http://127.0.0.1:8080/user/get?id=1 命令,请求示例 API 接口,打印日志,可以看到带有链路信息如下:
2020-03-20 22:42:21.487 INFO [user-service,3e7a452ddeee89a4,3e7a452ddeee89a4,true] 41891 --- [nio-8080-exec-1] c.i.s.l.s.controller.UserController : 测试日志
[{applicationName},{traceId},{spanId},{export}]最终被格式化成[user-service,3e7a452ddeee89a4,3e7a452ddeee89a4,true]。因为这里只有一个 Span,所以 TraceId 和 SpanId 相同。
至此,我们已经完成 Spring Cloud Sleuth 的日志框架示例。后续,如果胖友想要:
- 自定义格式链路的 traceId 和 spanId 打印到日志中的格式,可以参考《芋道 Spring Boot 链路追踪 Zipkin 入门》文章的「11. 日志框架示例」小节。
- 收集日志到 ELK 日志服务中,并提取日志中链路的 traceId 和 spanId 信息,可以参考《Spring Cloud Sleuth 官方文档 —— Log correlation》文档。
17. OpenTracing 示例
示例代码对应仓库:
labx-13-sc-sleuth-opentracing。
在开始本节之前,推荐胖友先阅读下《OpenTracing 官方标准 —— 中文版》规范,对 OpenTracing 有个简单的了解。
在 opentracing-java 项目中,定义了 OpenTracing Java API。而 brave-opentracing 项目,提供了对该 OpenTracing Java API 的实现。这样,我们就可以将使用 OpenTracing API 收集的链路数据,发送给 Zipkin Server 中。
下面,我们来搭建一个 OpenTracing Java API 的使用示例。最终项目如下图所示:
17.1 引入依赖
创建 pom.xml 文件中,引入相关依赖。
        labx-13
        cn.iocoder.springboot.labs
        1.0-SNAPSHOT

    4.0.0

    labx-13-sc-sleuth-opentracing


        1.8
        1.8
        2.2.4.RELEASE
        Hoxton.SR1


                org.springframework.boot
                spring-boot-starter-parent
                ${spring.boot.version}
                pom
                import


                org.springframework.cloud
                spring-cloud-dependencies
                ${spring.cloud.version}
                pom
                import


            org.springframework.boot
            spring-boot-starter-web


            org.springframework.cloud
            spring-cloud-starter-zipkin


            io.opentracing.brave
            brave-opentracing
            0.35.0
通过 brave-opentracing 依赖,引入 Brave 对 Opentracing 的实现。同时 Spring Cloud Sleuth 的 OpentracingAutoConfiguration 会自动创建 BraveTracer Bean。如下图所示:
17.2 配置文件
创建 application.yaml 配置文件,添加相关配置。
spring:
  application:
    name: user-service # 服务名

  # Zipkin 配置项,对应 ZipkinProperties 类
  zipkin:
    base-url: http://127.0.0.1:9411 # Zipkin 服务的地址

  # Spring Cloud Sleuth 配置项
  sleuth:
    # Spring Cloud Sleuth 针对 Web 组件的配置项,例如说 SpringMVC
    web:
      enabled: true # 是否开启,默认为 true
    # Spring Cloud Sleuth 针对 OpenTracing 组件的配置项
    opentracing:
      enabled: true # 是否开启,默认为 true
spring.sleuth.opentracing 配置项,为 Spring Cloud Sleuth 针对 JMS 组件的配置项,对应 SleuthOpentracingProperties 类。
enabled配置项,是否开启,默认为true。
17.3 UserController
创建 DemoController 类,提供示例 API 接口。代码如下:
@RestController
@RequestMapping("/demo")
public class DemoController {

    @Autowired
    private Tracer tracer;

    @GetMapping("/opentracing")
    public String echo() {
        //  创建一个 Span
        tracer.buildSpan("custom_operation").withTag("mp", "芋道源码").start().finish();

        // 返回
        return "opentracing";
    }

} - 在
/demo/opentracing接口中的 - 更多的 Opentracing Java API 的使用,可以看看 opentracing-java 项目提供的示例哈。
17.4 UserServiceApplication
创建 UserServiceApplication 类,项目启动类。代码如下:
@SpringBootApplication
public class UserServiceApplication {

    public static void main(String[] args) {
        SpringApplication.run(UserServiceApplication.class, args);
    }

}
17.5 简单测试
使用 UserServiceApplication 启动 Spring Cloud 应用。
① 首先,使用 curl http://127.0.0.1:8080/user/get?id=1 命令,从而执行一次 Redis 查询操作。因为,我们要追踪下该链路。
② 然后,继续使用浏览器,打开 http://127.0.0.1:9411/ 地址,查看链路数据。点击「查找」按钮,便可看到刚才我们调用接口的链路数据。如下图所示:
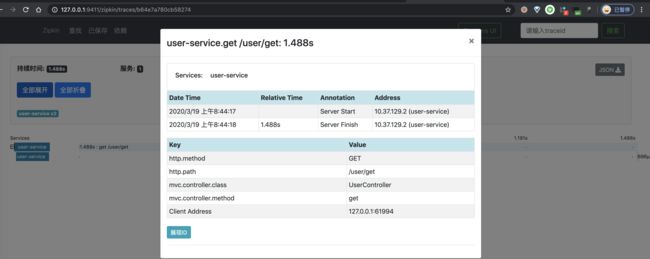
③ 之后,我们点击该链路数据,可以看到一个 Trace 明细。如下图所示:
④ 再之后,分别点击个 Span,可以看到两个 Span 明细。如下图所示:
18. 抽样收集示例
示例代码对应仓库:
labx-13-sc-sleuth-sampler。
在访问量较少时,链路全量收集不会对系统带来多少负担,同时能够完整的观测到系统的运行状况。但是在访问量较大时,全量的链路收集,对链路收集的客户端(应用)、服务端(例如说 Zipkin Server)、存储器(例如说 Elastcsearch)都会带来较大的性能开销,甚至会影响应用的正常运行。
因此,在访问量级较大的情况下,我们往往会选择抽样采样,只选择收集部分链路信息。Spring Cloud Sleuth 的 sampler 模块提供了两种采样策略,如下图所示: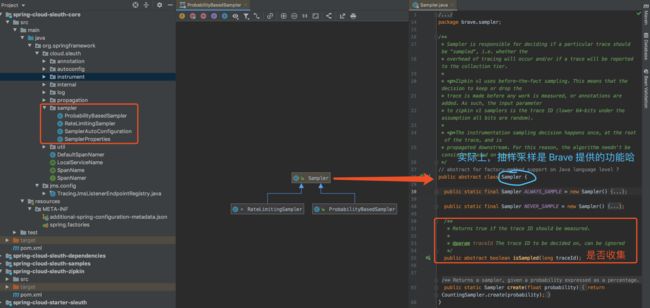
- ProbabilityBasedSampler,基于百分比采样。
- RateLimitingSampler,基于限流采样,即每秒收集的链路信息的数量。
默认配置下,Spring Cloud Sleuth 采用 RateLimitingSampler 作为取样器,限制数量为 10。
下面,我们来新建一个 labx-13-sc-sleuth-sampler 项目,配置使用 ProbabilityBasedSampler 作为采样器,采样百分比为 10%。最终如下图所示:
http://www.iocoder.cn/images/images/Spring-Cloud/2021-01-01/142.png
18.1 引入依赖
在 pom.xml 文件中,引入相关依赖。
        labx-13
        cn.iocoder.springboot.labs
        1.0-SNAPSHOT

    4.0.0

    labx-13-sc-sleuth-sampler


        1.8
        1.8
        2.2.4.RELEASE
        Hoxton.SR1


                org.springframework.boot
                spring-boot-starter-parent
                ${spring.boot.version}
                pom
                import


                org.springframework.cloud
                spring-cloud-dependencies
                ${spring.cloud.version}
                pom
                import


            org.springframework.boot
            spring-boot-starter-web


            org.springframework.cloud
            spring-cloud-starter-zipkin
18.2 配置文件
创建 application.yaml 配置文件,添加相关配置
spring:
  application:
    name: user-service # 服务名

  # Zipkin 配置项,对应 ZipkinProperties 类
  zipkin:
    base-url: http://127.0.0.1:9411 # Zipkin 服务的地址

  # Spring Cloud Sleuth 配置项
  sleuth:
    # Spring Cloud Sleuth 针对 Web 组件的配置项,例如说 SpringMVC
    web:
      enabled: true # 是否开启,默认为 true
    # Spring Cloud Sleuth 针对抽样收集的配置项
    sampler:
      probability: 0.1 # 采样百分比,默认为空。
#      rate: 1 # 限流采样,即每秒可收集链路的数量,默认为 10。
spring.sleuth.sampler 配置项,为 Spring Cloud Sleuth 针对 SLF4J 组件的配置项,对应 SamplerProperties 类。
probability配置项,采样百分比,默认为空,针对 ProbabilityBasedSampler 采样器。rate配置项,限流采样,即每秒可收集链路的数量,默认为 10,针对 RateLimitingSampler 采样器。
如果 probability 和 rate 两个配置项都设置的情况下,采用 ProbabilityBasedSampler 采样器。原因可见 SamplerAutoConfiguration 配置类,如下图所示:
18.3 UserController
创建 UserController 类,提供示例 API 接口。代码如下:
@RestController
@RequestMapping("/user")
public class UserController {

    private Logger logger = LoggerFactory.getLogger(getClass());

    @GetMapping("/get")
    public String get(@RequestParam("id") Integer id) {
        logger.info("测试日志");
        return "user:" + id;
    }

}
18.4 UserServiceApplication
创建 UserServiceApplication 类,应用启动类。代码如下:
@SpringBootApplication
public class UserServiceApplication {

    public static void main(String[] args) {
        SpringApplication.run(UserServiceApplication.class, args);
    }

}
18.5 简单测试
执行 UserServiceApplication,启动该 Spring Cloud 应用。
① 首先,使用 curl http://127.0.0.1:8080/user/get?id=1 命令 10 次,来发起 10 次请求,从而测试 10% 采样率。
② 然后,继续使用浏览器,打开 http://127.0.0.1:9411/ 地址,查看链路数据。点击「查找」按钮,便可看到刚才我们调用接口的链路数据。如下图所示:
只有一条链路数据,符合 10% 采样率的预期。
666. 彩蛋
至此,我们已经完成 Spring Cloud Sleuth 的学习。如下是 Sleuth 相关的官方文档:
- 《Spring Cloud Sleuth 官方文档》
- 《Spring Cloud Sleuth 官方示例》


