SpringBoot @SessionScope注解和Session的用法解释
参考资料
- JSESSIONID是什么
- @SessionScope 解决了不同session下如何生成不同服务实例
目录
- 一. 前期准备
- 二. 被@SessionScope作用的类
- 三. 使用被@SessionScope作用类的Service
- 四. 效果
-
- 4.1 用Edge浏览器进入页面
- 4.2 然后用Edge浏览器进入页面
- 4.3 若将CacheHolder类上的@SessionScope注解去掉
- 五. session
-
- 5.1 JSESSIONID的发送和判定
- 5.2 清空cookie中的JSESSIONID
- 5.3 恢复cookie中的JSESSIONID,再发送ajax请求
- 5.4 使用过错误的JSESSIONID,再发送ajax请求
一. 前期准备
⏹前台
DOCTYPE html>
<html lang="en" xmlns:th="http://www.thymeleaf.org">
<head>
    <meta charset="UTF-8">
    <title>Titletitle>
head>
<body>
<div>
    <button id="btn">获取缓存信息button><br>
    <button id="clear">清空缓存消息button>
div>
<script th:src="@{/js/public/jquery-3.6.0.min.js}">script>
<script th:inline="javascript">

	// 发送获取缓存的请求
    $("#btn").click(function() {
        $.ajax({
            url: "/test19/getCacheValue",
            type: 'POST',
            data: null,
            contentType : 'application/json;charset=utf-8',
            dataType: 'json',
            success: function (data, status, xhr) {
                console.log(data);
            }
        });
    });

    $("#clear").click(function() {
        $.get('/test19/clear');
    });
script>
body>
html>
⏹后台-Controller
import org.springframework.stereotype.Controller;
import org.springframework.web.bind.annotation.*;
import org.springframework.web.servlet.ModelAndView;

import javax.annotation.Resource;

@Controller
@RequestMapping("/test19")
public class Test19Controller {

    @Resource
    private Test19Service service;

    @GetMapping("/init")
    public ModelAndView init() {

        // 页面初始化
        service.init();

        // 指定跳转的页面
        ModelAndView modelAndView = new ModelAndView();
        modelAndView.setViewName("test19");

        return modelAndView;
    }

    @PostMapping("/getCacheValue")
    @ResponseBody
    public void getCacheValue() {
        service.getCacheValue();
    }

    @GetMapping("/clear")
    @ResponseBody
    public void clear() {
        service.clear();
    }
}
二. 被@SessionScope作用的类
- SpringBoot默认是单例模式,也就是说每个用户访问的CacheHolder都是同一个对象
- 被@SessionScope作用的类,每一次会话会生成一个新的对象
import org.springframework.stereotype.Component;
import org.springframework.web.context.annotation.SessionScope;

import java.util.HashMap;
import java.util.Map;

@Component
@SessionScope
public class CacheHolder {

    // 用于缓存的map
    private Map<String, Object> cacheMap = new HashMap<>();

    // 根据画面id获取缓存
    public <T> T getCacheByViewId(String viewId) {
        Object o = cacheMap.get(viewId);
        return (T)o;
    }

    // 根据画面id设置缓存
    public void setCacheByViewId(String viewId, Object value) {
        cacheMap.put(viewId, value);
    }

    // 根据画面id清空缓存
    public void clearCacheByViewId(String viewId) {
        cacheMap.remove(viewId);
    }

    // 清空所有的缓存
    public void clearAllCache() {
        cacheMap.clear();
    }
}
三. 使用被@SessionScope作用类的Service
InitializingBean接口用于Bean初始化的时候,做一些操作HttpSession用于使用session对象
import org.springframework.beans.factory.InitializingBean;
import org.springframework.stereotype.Service;
import org.springframework.util.ObjectUtils;

import javax.annotation.Resource;
import javax.servlet.http.HttpSession;
import java.util.HashMap;
import java.util.Map;
import java.util.Optional;
import java.util.UUID;

@Service
public class Test19Service implements InitializingBean {

    // session对象
    @Resource
    private HttpSession session;

    // 自定义缓存类
    @Resource
    private CacheHolder cacheHolder;

	// 为缓存准备的数据
    private static Map<String, String> dbMap;

    // Bean初始化时,模拟从数据库获取数据
    @Override
    public void afterPropertiesSet() throws Exception {

        // 模拟从数据库查询数据,将查询到的数据放入缓存中
        dbMap = new HashMap<String, String>() {{
            put("name", "贾飞天" + UUID.randomUUID().toString());
            put("num", UUID.randomUUID().toString());
        }};
    }

    public void init() {

        // 页面初始化的时候从自定义的缓存类中获取缓存
        Map<String, Object> map = cacheHolder.getCacheByViewId("test19");
        // 如果获取不到缓存的话
        if (ObjectUtils.isEmpty(map)) {
            // 将模拟数据库查询到的数据放入自定义缓存类中
            cacheHolder.setCacheByViewId("test19", dbMap);
        }

        // 页面初始化的时候,从session中获取缓存的数据
        Object sessionData = session.getAttribute("test19");
        if (ObjectUtils.isEmpty(sessionData)) {
            session.setAttribute("test19", dbMap);
        }

        // 获取session的id
        String id = session.getId();
        System.out.println("session的id为:" + id);
    }

    public void getCacheValue() {

        // 从自定义缓存类中获取缓存并打印
        Map<String, String> cacheMap = cacheHolder.getCacheByViewId("test19");
        if (!ObjectUtils.isEmpty(cacheMap)) {
            System.out.println(cacheMap.get("name"));
            System.out.println(cacheMap.get("num"));
        }

        // 从session中获取缓存并打印
        Optional.ofNullable(session.getAttribute("test19")).ifPresent(item -> {
            Map map = (Map)item;
            System.out.println(map);
        });
        System.out.println("");

    }

    public void clear() {
        // 清空该画面中缓存的数据
        cacheHolder.clearCacheByViewId("test19");
    }
}
四. 效果
@SessionScope作用的类每次会话生成一个对象
4.1 用Edge浏览器进入页面
- CacheHolder类被@SessionScope注解修饰
- 可以看到num和name放入了CacheHolder自定义缓存
- 可以看到cacheHolder的对象地址为 @712b4a92
4.2 然后用Edge浏览器进入页面
- 可以看到从CacheHolder自定义缓存中并没有获取到Edge浏览器进入页面时,放入的数据。并且可以看到cacheHolder的对象地址为 @364f9896
- 因此可以证明被@SessionScope作用的CacheHolder类,每一次会话生成不同的对象
4.3 若将CacheHolder类上的@SessionScope注解去掉
⏹通过Edge浏览器进入
⏹通过Chrome浏览器进入
由上面两张图可以看到,若CacheHolder类上的@SessionScope注解去掉的话,
CacheHolder类变为单例,地址都是@7889。不同的客户端访问得到的是同一个对象,因此缓存功能无法使用。
只有使用了@SessionScope注解,进行了服务隔离,保证每次会话产生不同的实例对象,缓存才有法使用。
五. session
- 每一个浏览器访问一个网站的时候,都会产生一个特定的session
- 当一个网页与服务器建立连接之时,服务器会将生成的sessionID放到cookie中返回给客户端。Cookie中的key为
JSESSIONID,value为生成的sessionID。 - 在发送HTTP网络请求的时候,将cookie中的
JSESSIONID发送到后台,后台通过JSESSIONID可以判断访问的客户端以及会话。
5.1 JSESSIONID的发送和判定
因为该浏览器并非第一次访问该网页,因此CacheHolder和session中都能获取出缓存值
可以看到cookie中存储的JSESSIONID和session对象获取出的id相同
5.2 清空cookie中的JSESSIONID
⏹清空cookie中的JSESSIONID,然后再发送一次ajax请求

⏹因为我们发送的ajax请求中并没有携带JSESSIONID,所以后台无法标识此客户端,因此也无法从session和@SessionScope注解作用的缓存来中获取数据。因此获取到的值皆为null
5.3 恢复cookie中的JSESSIONID,再发送ajax请求
⏹我们可以通过document.cookie='key=value'的形式设置cookie

⏹因为携带了缓存session和CacheHolder时的正确JSESSIONID,因此从两个缓存中能正确的获取出值
5.4 使用过错误的JSESSIONID,再发送ajax请求
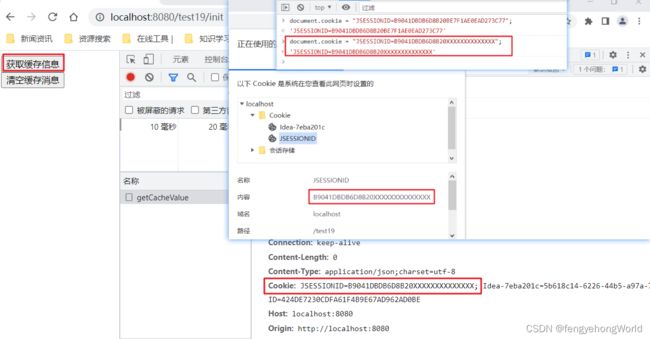
⏹随便编造一个JSESSIONID,设置到cookie中
可以看到,无法获取到缓存值


