LVGL - 在STM32上的移植

一、硬件平台
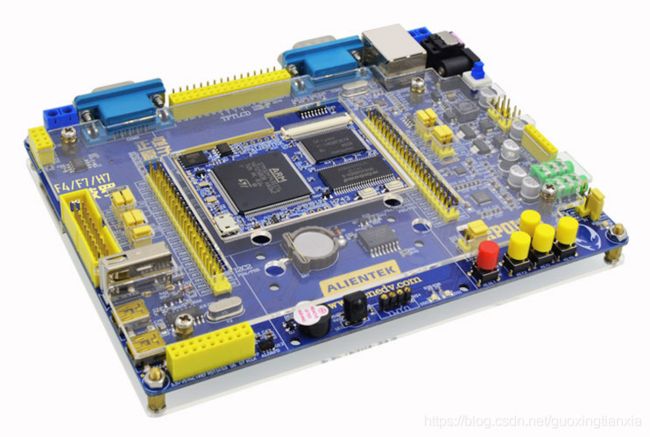
本次移植选用的是正点原子的APOLLO开发板,MCU为STM32F429IG,1M的内部FLASH,256K的SRAM,并且板载了一颗32M的SDRAM。7寸RGB电容屏,分辨率1024 x 600,使用STM32F429的LTDC资源来驱动。

RGBLCD
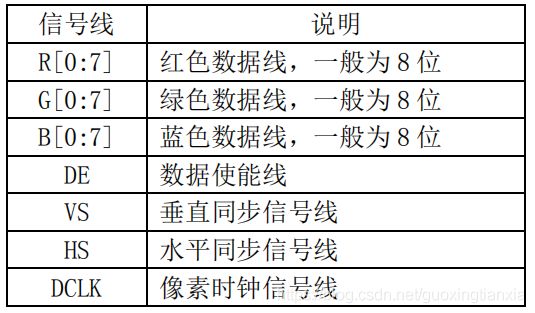
一般的 RGB 屏都有24 根颜色数据线(RGB 各站 8 根,即RGB888 格式),这样可以表示最多 1600W 色,DE、VS、HS 和 DCLK,用于控制数据传输。
LTDC
STM32F429xx 系列芯片都带有 TFT LCD 控制器,即 LTDC,通过这个 LTDC,STM32F429可以直接外接 RGBLCD 屏,实现液晶驱动。
二、LVGL组件包
下载
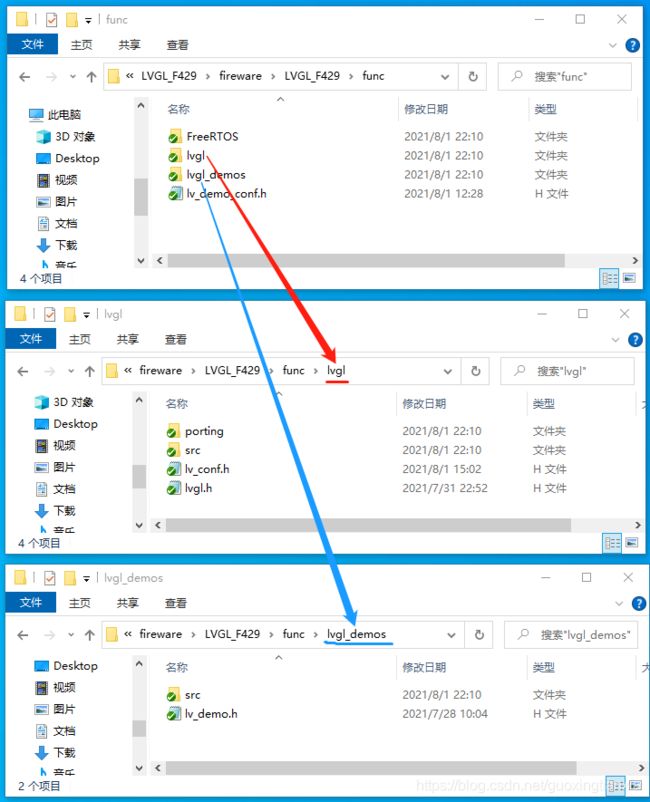
和上一篇一样,在github上下载。本次只用到两个包,一个lvgl本体,一个demo。
lvgl
lv_demos
重要文件说明
对于lvgl和lv_demos,并不需要目录下的所有文件,只需要其中部分即可,注意要切换到release分支。
lvgl/src,lvgl的核心代码。
lvgl/examples/porting,lvgl的硬件接口,分为显示接口、文件系统接口、输入接口,待会儿移植再详细说。
lv_demos/src,lvgl的各种demo示例。

三、开始移植
创建工程
创建一个空的工程,将基础的环境配置好,确保滴答定时器是工作的,并且开启一个LED灯闪烁用以指示。可以用RTOS,也可以用裸机,看个人需要。我这里移植了FreeRTOS。
添加lvgl文件
将刚才点出来的重要的lvgl文件复制到工程目录下。
在工程管理目录下,创建相应的目录,并添加所有的c文件,已经添加h文件的路径。

lvgl_app,后面放自己的gui文件。
lvgl_demo,放官方的,也就是刚才下载的demo文件。
lvgl_porting,放硬件接口文件。
其它都是lvgl的核心文件,与lvgl/src目录下的文件夹对应。
然后有几个文件需要修改名称,分别是 lv_conf_template.h、lv_demo_conf_template.h 和 porting 文件夹下的所有文件,将文件名中的 _template 去掉即可。为什么这么改,这些文件中都有说明。并且修改宏定义以开启改文件下的内容,以及几个文件包含的#include文件名也需要修改。
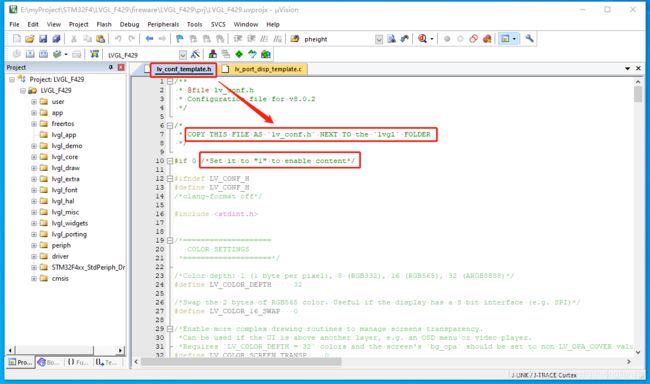
lv_conf.h
配置色彩的显示模式,这里选RGB565。
/*Color depth: 1 (1 byte per pixel), 8 (RGB332), 16 (RGB565), 32 (ARGB8888)*/
#define LV_COLOR_DEPTH     16
配置内存大小,如果工程出现莫名其妙的错误,很有肯就是这里分配小了。
/*Size of the memory available for `lv_mem_alloc()` in bytes (>= 2kB)*/
#  define LV_MEM_SIZE    (64U * 1024U)          /*[bytes]*/
配置调试信息功能,开启调试功能,需要实现调试信息输出接口。这个功能非常好用,lvgl的调试信息输出做的很不错的,我在移植的时候,就遇到问题半天找不到问题出在哪,然后开启这个功能,发现是内存分配小了。
/*1: Print the log with 'printf';
 *0: User need to register a callback with `lv_log_register_print_cb()`*/
#  define LV_LOG_PRINTF   1
配置CPU使用率和帧率显示。
/*1: Show CPU usage and FPS count in the right bottom corner*/
#define LV_USE_PERF_MONITOR     1
配置内存使用情况
/*1: Show the used memory and the memory fragmentation  in the left bottom corner
 * Requires LV_MEM_CUSTOM = 0*/
#define LV_USE_MEM_MONITOR      1
各种大小的字体配置。
/*Montserrat fonts with ASCII range and some symbols using bpp = 4
 *https://fonts.google.com/specimen/Montserrat*/
#define LV_FONT_MONTSERRAT_8     0
#define LV_FONT_MONTSERRAT_10    0
#define LV_FONT_MONTSERRAT_12    0
#define LV_FONT_MONTSERRAT_14    1
#define LV_FONT_MONTSERRAT_16    1
#define LV_FONT_MONTSERRAT_18    0
#define LV_FONT_MONTSERRAT_20    0
#define LV_FONT_MONTSERRAT_22    0
#define LV_FONT_MONTSERRAT_24    1
#define LV_FONT_MONTSERRAT_26    0
#define LV_FONT_MONTSERRAT_28    0
#define LV_FONT_MONTSERRAT_30    0
#define LV_FONT_MONTSERRAT_32    0
#define LV_FONT_MONTSERRAT_34    0
#define LV_FONT_MONTSERRAT_36    0
#define LV_FONT_MONTSERRAT_38    0
#define LV_FONT_MONTSERRAT_40    0
#define LV_FONT_MONTSERRAT_42    0
#define LV_FONT_MONTSERRAT_44    0
#define LV_FONT_MONTSERRAT_46    0
#define LV_FONT_MONTSERRAT_48    0
不列举了,每一项配置,都有注释,可根据需要选择。
lv_port_disp.c
lv_port_disp.c 文件内是需要实现的显示接口,其实就两个函数需要实现,一个是初始化 disp_init ,一个是点填充 disp_flush 。
然后lvgl提供了3中缓存方式可选,方式1/2/3对应的刷新速度分别是慢/中/快,这里选用方法二,不用的就可以注释掉了。另外要说一下,这里的源代码有错误,2/3方法的buf缓存定义错了。
void lv_port_disp_init(void)
{
    /*-------------------------
     * Initialize your display
     * -----------------------*/
    disp_init();	/* 需要自己实现的显示初始化 */

    /*-----------------------------
     * Create a buffer for drawing
     *----------------------------*/

    /**
     * LVGL requires a buffer where it internally draws the widgets.
     * Later this buffer will passed to your display driver's `flush_cb` to copy its content to your display.
     * The buffer has to be greater than 1 display row
     *
     * There are 3 buffering configurations:
     * 1. Create ONE buffer:
     *      LVGL will draw the display's content here and writes it to your display
     *
     * 2. Create TWO buffer:
     *      LVGL will draw the display's content to a buffer and writes it your display.
     *      You should use DMA to write the buffer's content to the display.
     *      It will enable LVGL to draw the next part of the screen to the other buffer while
     *      the data is being sent form the first buffer. It makes rendering and flushing parallel.
     *
     * 3. Double buffering
     *      Set 2 screens sized buffers and set disp_drv.full_refresh = 1.
     *      This way LVGL will always provide the whole rendered screen in `flush_cb`
     *      and you only need to change the frame buffer's address.
     */

    #define MY_DISP_HOR_RES   1024

    /* Example for 1) */
//    static lv_disp_draw_buf_t draw_buf_dsc_1;
//    static lv_color_t buf_1[MY_DISP_HOR_RES * 10];                          /*A buffer for 10 rows*/
//    lv_disp_draw_buf_init(&draw_buf_dsc_1, buf_1, NULL, MY_DISP_HOR_RES * 10);   /*Initialize the display buffer*/

    /* Example for 2) */
    static lv_disp_draw_buf_t draw_buf_dsc_2;
    static lv_color_t buf_2_1[MY_DISP_HOR_RES * 10];                        /*A buffer for 10 rows*/
    static lv_color_t buf_2_2[MY_DISP_HOR_RES * 10];                        /*An other buffer for 10 rows*/
    lv_disp_draw_buf_init(&draw_buf_dsc_2, buf_2_1, buf_2_2, MY_DISP_HOR_RES * 10);   /*Initialize the display buffer*/

    /* Example for 3) also set disp_drv.full_refresh = 1 below*/
//    static lv_disp_draw_buf_t draw_buf_dsc_3;
//    static lv_color_t buf_3_1[MY_DISP_HOR_RES * MY_DISP_VER_RES];            /*A screen sized buffer*/
//    static lv_color_t buf_3_1[MY_DISP_HOR_RES * MY_DISP_VER_RES];            /*An other screen sized buffer*/
//    lv_disp_draw_buf_init(&draw_buf_dsc_3, buf_3_1, buf_3_2, MY_DISP_VER_RES * LV_VER_RES_MAX);   /*Initialize the display buffer*/

    /*-----------------------------------
     * Register the display in LVGL
     *----------------------------------*/

    static lv_disp_drv_t disp_drv;                         /*Descriptor of a display driver*/
    lv_disp_drv_init(&disp_drv);                    /*Basic initialization*/

    /*Set up the functions to access to your display*/

    /*Set the resolution of the display*/
    disp_drv.hor_res = 1024;
    disp_drv.ver_res = 600;

    /*Used to copy the buffer's content to the display*/
    disp_drv.flush_cb = disp_flush;

    /*Set a display buffer*/
    disp_drv.draw_buf = &draw_buf_dsc_2;

    /*Required for Example 3)*/
    //disp_drv.full_refresh = 1

    /* Fill a memory array with a color if you have GPU.
     * Note that, in lv_conf.h you can enable GPUs that has built-in support in LVGL.
     * But if you have a different GPU you can use with this callback.*/
    //disp_drv.gpu_fill_cb = gpu_fill;

    /*Finally register the driver*/
    lv_disp_drv_register(&disp_drv);
}
/*Initialize your display and the required peripherals.*/
static void disp_init(void)
{
    /*You code here*/
    Dev_Lcd_Led_Init();
    Dev_Lcd_Led_On();
    Drv_LTDC_Init();
}
/*Flush the content of the internal buffer the specific area on the display
 *You can use DMA or any hardware acceleration to do this operation in the background but
 *'lv_disp_flush_ready()' has to be called when finished.*/
static void disp_flush(lv_disp_drv_t * disp_drv, const lv_area_t * area, lv_color_t * color_p)
{
    /*The most simple case (but also the slowest) to put all pixels to the screen one-by-one*/

//    int32_t x;
//    int32_t y;
//    for(y = area->y1; y <= area->y2; y++) {
//        for(x = area->x1; x <= area->x2; x++) {
//            /*Put a pixel to the display. For example:*/
//            /*put_px(x, y, *color_p)*/
//            color_p++;
//        }
//    }

    Drv_LTDC_Color_Fill(area->x1, area->y1, area->x2, area->y2, (uint16_t *)color_p);

    /*IMPORTANT!!!
     *Inform the graphics library that you are ready with the flushing*/
    lv_disp_flush_ready(disp_drv);
}
lv_port_indev.c
lv_port_indev.c 文件内是需要实现的信号输入接口。输入的方式有很多,有触摸屏、键盘、鼠标、按键等。
不过本次只使用到了触摸屏,所以其他的输出方式全部可注释掉,或者干脆删掉。
所以这个文件其实也很简单,只要实现两个接口,触摸屏初始化 touchpad_init ,触摸数据读取 touchpad_read 。touchpad_read 又分为触摸状态 touchpad_is_pressed 和触摸坐标 touchpad_get_xy 。
void lv_port_indev_init(void)
{
    /**
     * Here you will find example implementation of input devices supported by LittelvGL:
     *  - Touchpad
     *  - Mouse (with cursor support)
     *  - Keypad (supports GUI usage only with key)
     *  - Encoder (supports GUI usage only with: left, right, push)
     *  - Button (external buttons to press points on the screen)
     *
     *  The `..._read()` function are only examples.
     *  You should shape them according to your hardware
     */

    static lv_indev_drv_t indev_drv;

    /*------------------
     * Touchpad
     * -----------------*/

    /*Initialize your touchpad if you have*/
    touchpad_init();

    /*Register a touchpad input device*/
    lv_indev_drv_init(&indev_drv);
    indev_drv.type = LV_INDEV_TYPE_POINTER;
    indev_drv.read_cb = touchpad_read;
    indev_touchpad = lv_indev_drv_register(&indev_drv);

    /*------------------
     * Mouse
     * -----------------*/

//    /*Initialize your touchpad if you have*/
//    mouse_init();

//    /*Register a mouse input device*/
//    lv_indev_drv_init(&indev_drv);
//    indev_drv.type = LV_INDEV_TYPE_POINTER;
//    indev_drv.read_cb = mouse_read;
//    indev_mouse = lv_indev_drv_register(&indev_drv);

//    /*Set cursor. For simplicity set a HOME symbol now.*/
//    lv_obj_t * mouse_cursor = lv_img_create(lv_scr_act());
//    lv_img_set_src(mouse_cursor, LV_SYMBOL_HOME);
//    lv_indev_set_cursor(indev_mouse, mouse_cursor);

    /*------------------
     * Keypad
     * -----------------*/

//    /*Initialize your keypad or keyboard if you have*/
//    keypad_init();

//    /*Register a keypad input device*/
//    lv_indev_drv_init(&indev_drv);
//    indev_drv.type = LV_INDEV_TYPE_KEYPAD;
//    indev_drv.read_cb = keypad_read;
//    indev_keypad = lv_indev_drv_register(&indev_drv);

    /*Later you should create group(s) with `lv_group_t * group = lv_group_create()`,
     *add objects to the group with `lv_group_add_obj(group, obj)`
     *and assign this input device to group to navigate in it:
     *`lv_indev_set_group(indev_keypad, group);`*/

    /*------------------
     * Encoder
     * -----------------*/

//    /*Initialize your encoder if you have*/
//    encoder_init();

//    /*Register a encoder input device*/
//    lv_indev_drv_init(&indev_drv);
//    indev_drv.type = LV_INDEV_TYPE_ENCODER;
//    indev_drv.read_cb = encoder_read;
//    indev_encoder = lv_indev_drv_register(&indev_drv);

    /*Later you should create group(s) with `lv_group_t * group = lv_group_create()`,
     *add objects to the group with `lv_group_add_obj(group, obj)`
     *and assign this input device to group to navigate in it:
     *`lv_indev_set_group(indev_encoder, group);`*/

    /*------------------
     * Button
     * -----------------*/

//    /*Initialize your button if you have*/
//    button_init();

//    /*Register a button input device*/
//    lv_indev_drv_init(&indev_drv);
//    indev_drv.type = LV_INDEV_TYPE_BUTTON;
//    indev_drv.read_cb = button_read;
//    indev_button = lv_indev_drv_register(&indev_drv);

//    /*Assign buttons to points on the screen*/
//    static const lv_point_t btn_points[2] = {
//            {10, 10},   /*Button 0 -> x:10; y:10*/
//            {40, 100},  /*Button 1 -> x:40; y:100*/
//    };
//    lv_indev_set_button_points(indev_button, btn_points);
}
/*Initialize your touchpad*/
static void touchpad_init(void)
{
    /*Your code comes here*/
    Dev_FT5206_Init();
}
/*Will be called by the library to read the touchpad*/
static void touchpad_read(lv_indev_drv_t * indev_drv, lv_indev_data_t * data)
{
    static lv_coord_t last_x = 0;
    static lv_coord_t last_y = 0;

    /*Save the pressed coordinates and the state*/
    if(touchpad_is_pressed()) {
        touchpad_get_xy(&last_x, &last_y);
        data->state = LV_INDEV_STATE_PR;
    } else {
        data->state = LV_INDEV_STATE_REL;
    }

    /*Set the last pressed coordinates*/
    data->point.x = last_x;
    data->point.y = last_y;
}
/*Return true is the touchpad is pressed*/
static bool touchpad_is_pressed(void)
{
    /*Your code comes here*/
    if (Dev_FT5206_Is_Touch())
    {
        return true;
    }
    return false;
}
/*Get the x and y coordinates if the touchpad is pressed*/
static void touchpad_get_xy(lv_coord_t * x, lv_coord_t * y)
{
    /*Your code comes here*/
    Dev_FT5206_Get_XY((uint16_t *)x, (uint16_t *)y);
//    (*x) = 0;
//    (*y) = 0;
}
lv_port_fs.c
lv_port_fs.c 文件内是文件系统接口,这里暂时不需要,先不用实现。
增加demo任务
/*****************************************************************************
* @brief
* ex:
* @par
* None
* @retval
*****************************************************************************/
void task_lvgl(void *arg)
{
  lv_init();

  lv_port_disp_init();

  lv_port_indev_init();

  lv_demo_widgets();

  while (1)
  {
    lv_task_handler();
    vTaskDelay(1);
  }
}
实现心跳
和rtos一样,lvgl也需要一个定时器来提供心跳,这里使用滴答定时提供1ms的心跳,调用 lv_tick_inc(1)。
/*
*********************************************************************************
*	函 数 名: IncTick
*	功能说明: SysTick滴答定时器每1ms中断一次
*	形    参:无
*	返 回 值: 无
*********************************************************************************
*/
void IncTick(void)
{
  uwTick++;

  lv_tick_inc(1);

  /*系统已经运行*/
  if(xTaskGetSchedulerState() != taskSCHEDULER_NOT_STARTED) {
    xPortSysTickHandler();
  }
}
底层硬件初始化
底层的代码大量参考正点原子的驱动代码,毕竟是原子的开发板嘛,可以节约不少时间。
/*****************************************************************************
* @brief  LTDC初始化
* ex:
* @par
* None
* @retval
*****************************************************************************/
void Drv_LTDC_Init(void)
{
  GPIO_InitTypeDef       GPIO_InitStructure;
  LTDC_InitTypeDef       LTDC_InitStruct;
  LTDC_Layer_InitTypeDef LTDC_Layer_InitStruct;

  RCC_PLLSAIConfig(320, 4, 2);
  RCC_LTDCCLKDivConfig(RCC_PLLSAIDivR_Div4);
  RCC_PLLSAICmd(ENABLE);

  delay_ms(1);  /* 很重要 */

  RCC_AHB1PeriphClockCmd(RCC_AHB1Periph_GPIOF, ENABLE);
  RCC_AHB1PeriphClockCmd(RCC_AHB1Periph_GPIOG, ENABLE);
  RCC_AHB1PeriphClockCmd(RCC_AHB1Periph_GPIOH, ENABLE);
  RCC_AHB1PeriphClockCmd(RCC_AHB1Periph_GPIOI, ENABLE);
//  RCC_AHB1PeriphClockCmd(RCC_AHB1Periph_DMA2D, ENABLE);
  RCC_APB2PeriphClockCmd(RCC_APB2Periph_LTDC, ENABLE);

  GPIO_PinAFConfig(GPIOF, GPIO_PinSource10, GPIO_AF_LTDC);

  GPIO_PinAFConfig(GPIOG, GPIO_PinSource6,  GPIO_AF_LTDC);
  GPIO_PinAFConfig(GPIOG, GPIO_PinSource7,  GPIO_AF_LTDC);
  GPIO_PinAFConfig(GPIOG, GPIO_PinSource11, GPIO_AF_LTDC);

  GPIO_PinAFConfig(GPIOH, GPIO_PinSource9,  GPIO_AF_LTDC);
  GPIO_PinAFConfig(GPIOH, GPIO_PinSource10, GPIO_AF_LTDC);
  GPIO_PinAFConfig(GPIOH, GPIO_PinSource11, GPIO_AF_LTDC);
  GPIO_PinAFConfig(GPIOH, GPIO_PinSource12, GPIO_AF_LTDC);
  GPIO_PinAFConfig(GPIOH, GPIO_PinSource13, GPIO_AF_LTDC);
  GPIO_PinAFConfig(GPIOH, GPIO_PinSource14, GPIO_AF_LTDC);
  GPIO_PinAFConfig(GPIOH, GPIO_PinSource15, GPIO_AF_LTDC);

  GPIO_PinAFConfig(GPIOI, GPIO_PinSource0,  GPIO_AF_LTDC);
  GPIO_PinAFConfig(GPIOI, GPIO_PinSource1,  GPIO_AF_LTDC);
  GPIO_PinAFConfig(GPIOI, GPIO_PinSource2,  GPIO_AF_LTDC);
  GPIO_PinAFConfig(GPIOI, GPIO_PinSource4,  GPIO_AF_LTDC);
  GPIO_PinAFConfig(GPIOI, GPIO_PinSource5,  GPIO_AF_LTDC);
  GPIO_PinAFConfig(GPIOI, GPIO_PinSource6,  GPIO_AF_LTDC);
  GPIO_PinAFConfig(GPIOI, GPIO_PinSource7,  GPIO_AF_LTDC);
  GPIO_PinAFConfig(GPIOI, GPIO_PinSource9,  GPIO_AF_LTDC);
  GPIO_PinAFConfig(GPIOI, GPIO_PinSource10, GPIO_AF_LTDC);

  GPIO_InitStructure.GPIO_Pin   = GPIO_Pin_10;
  GPIO_InitStructure.GPIO_Mode  = GPIO_Mode_AF;
  GPIO_InitStructure.GPIO_Speed = GPIO_Speed_100MHz;
  GPIO_InitStructure.GPIO_OType = GPIO_OType_PP;
  GPIO_InitStructure.GPIO_PuPd  = GPIO_PuPd_NOPULL;
  GPIO_Init(GPIOF, &GPIO_InitStructure);

  GPIO_InitStructure.GPIO_Pin   = GPIO_Pin_6 | GPIO_Pin_7 | GPIO_Pin_11;
  GPIO_InitStructure.GPIO_Mode  = GPIO_Mode_AF;
  GPIO_InitStructure.GPIO_Speed = GPIO_Speed_100MHz;
  GPIO_InitStructure.GPIO_OType = GPIO_OType_PP;
  GPIO_InitStructure.GPIO_PuPd  = GPIO_PuPd_NOPULL;
  GPIO_Init(GPIOG, &GPIO_InitStructure);

  GPIO_InitStructure.GPIO_Pin   = GPIO_Pin_9 | GPIO_Pin_10| GPIO_Pin_11| GPIO_Pin_12| GPIO_Pin_13| GPIO_Pin_14| GPIO_Pin_15;
  GPIO_InitStructure.GPIO_Mode  = GPIO_Mode_AF;
  GPIO_InitStructure.GPIO_Speed = GPIO_Speed_100MHz;
  GPIO_InitStructure.GPIO_OType = GPIO_OType_PP;
  GPIO_InitStructure.GPIO_PuPd  = GPIO_PuPd_NOPULL;
  GPIO_Init(GPIOH, &GPIO_InitStructure);

  GPIO_InitStructure.GPIO_Pin   = GPIO_Pin_0 | GPIO_Pin_1 | GPIO_Pin_2 | GPIO_Pin_4 | GPIO_Pin_5 | GPIO_Pin_6 | GPIO_Pin_7 | GPIO_Pin_9 | GPIO_Pin_10;
  GPIO_InitStructure.GPIO_Mode  = GPIO_Mode_AF;
  GPIO_InitStructure.GPIO_Speed = GPIO_Speed_100MHz;
  GPIO_InitStructure.GPIO_OType = GPIO_OType_PP;
  GPIO_InitStructure.GPIO_PuPd  = GPIO_PuPd_NOPULL;
  GPIO_Init(GPIOI, &GPIO_InitStructure);

  ltdc.Pixsize = 2;
  ltdc.Width   = 1024;   //面板宽度,单位:像素
  ltdc.Height  = 600;    //面板高度,单位:像素
  ltdc.HSync_W = 20;     //水平同步宽度
  ltdc.VSync_W = 3;      //垂直同步宽度
  ltdc.HBP     = 140;    //水平后廊
  ltdc.VBP     = 20;     //垂直后廊
  ltdc.HFP     = 160;    //水平前廊
  ltdc.VFP     = 12;     //垂直前廊

  /* 配置信号极性 */
  LTDC_InitStruct.LTDC_HSPolarity = LTDC_HSPolarity_AL;   /* HSYNC 低电平有效 */
  LTDC_InitStruct.LTDC_VSPolarity = LTDC_VSPolarity_AL;   /* VSYNC 低电平有效 */
  LTDC_InitStruct.LTDC_DEPolarity = LTDC_DEPolarity_AL;   /* DE 低电平有效 */
  LTDC_InitStruct.LTDC_PCPolarity = LTDC_PCPolarity_IPC;

  /* 配置LTDC的同步时序 */
  LTDC_InitStruct.LTDC_HorizontalSync     = ltdc.HSync_W - 1;
  LTDC_InitStruct.LTDC_VerticalSync       = ltdc.VSync_W - 1;
  LTDC_InitStruct.LTDC_AccumulatedHBP     = ltdc.HSync_W + ltdc.HBP - 1;
  LTDC_InitStruct.LTDC_AccumulatedVBP     = ltdc.VSync_W + ltdc.VBP - 1;
  LTDC_InitStruct.LTDC_AccumulatedActiveW = ltdc.HSync_W + ltdc.HBP + ltdc.Width - 1;
  LTDC_InitStruct.LTDC_AccumulatedActiveH = ltdc.VSync_W + ltdc.VBP + ltdc.Height - 1;
  LTDC_InitStruct.LTDC_TotalWidth         = ltdc.HSync_W + ltdc.HBP + ltdc.Width  + ltdc.HFP - 1;
  LTDC_InitStruct.LTDC_TotalHeigh         = ltdc.VSync_W + ltdc.VBP + ltdc.Height + ltdc.VFP - 1;

  /* 背景色 */
  LTDC_InitStruct.LTDC_BackgroundRedValue   = 0;
  LTDC_InitStruct.LTDC_BackgroundGreenValue = 0;
  LTDC_InitStruct.LTDC_BackgroundBlueValue  = 0;

  LTDC_Init(<DC_InitStruct);

  //LTDC层配置
  LTDC_Layer_InitStruct.LTDC_HorizontalStart   = ltdc.HSync_W + ltdc.HBP; //水平起始位置
  LTDC_Layer_InitStruct.LTDC_HorizontalStop    = ltdc.HSync_W + ltdc.HBP + ltdc.Width - 1;
  LTDC_Layer_InitStruct.LTDC_VerticalStart     = ltdc.VSync_W + ltdc.VBP; //垂直起始位置
  LTDC_Layer_InitStruct.LTDC_VerticalStop      = ltdc.VSync_W + ltdc.VBP + ltdc.Height - 1;

  LTDC_Layer_InitStruct.LTDC_PixelFormat       = LTDC_Pixelformat_RGB565; //像素格式
  LTDC_Layer_InitStruct.LTDC_ConstantAlpha     = 255;                     //恒定alpha

  /* Default Color configuration (configure A,R,G,B component values) */
  LTDC_Layer_InitStruct.LTDC_DefaultColorBlue  = 0;  //默认蓝色
  LTDC_Layer_InitStruct.LTDC_DefaultColorGreen = 0;  //默认绿色
  LTDC_Layer_InitStruct.LTDC_DefaultColorRed   = 0;  //默认红色
  LTDC_Layer_InitStruct.LTDC_DefaultColorAlpha = 0;  //默认alpha

  /* Configure blending factors */
  LTDC_Layer_InitStruct.LTDC_BlendingFactor_1  = LTDC_BlendingFactor1_PAxCA; //混合系数
  LTDC_Layer_InitStruct.LTDC_BlendingFactor_2  = LTDC_BlendingFactor2_PAxCA; //混合系数

  /* Start Address configuration : the LCD Frame buffer is defined on SDRAM */
  LTDC_Layer_InitStruct.LTDC_CFBStartAdress    = LCD429_FRAME_BUFFER;   //颜色帧缓冲区地址

  LTDC_Layer_InitStruct.LTDC_CFBLineLength     = ((ltdc.Width * 2) + 3);//颜色帧缓冲区行长
  LTDC_Layer_InitStruct.LTDC_CFBPitch          =  (ltdc.Width * 2);     //颜色帧缓冲区间距
  LTDC_Layer_InitStruct.LTDC_CFBLineNumber     =   ltdc.Height;         //行数

  //配置层1
  LTDC_LayerInit(LTDC_Layer1, <DC_Layer_InitStruct);

  //	/* Configure blending factors */
  //	LTDC_Layer_InitStruct.LTDC_BlendingFactor_1  = LTDC_BlendingFactor1_PAxCA;  //混合系数
  //	LTDC_Layer_InitStruct.LTDC_BlendingFactor_2  = LTDC_BlendingFactor1_PAxCA;  //混合系数
  //
  //	/* Start Address configuration : the LCD Frame buffer is defined on SDRAM */
  //	LTDC_Layer_InitStruct.LTDC_CFBStartAdress    = LCD429_FRAME_BUFFER + BUFFER_OFFSET;
  //
  //	//配置层2
  //	LTDC_LayerInit(LTDC_Layer2, <DC_Layer_InitStruct);

  LTDC_LayerCmd(LTDC_Layer1, ENABLE);
  //	LTDC_LayerCmd(LTDC_Layer2, ENABLE);

  LTDC_ReloadConfig(LTDC_IMReload);//影子寄存器立即重载

  LTDC_Cmd(ENABLE);

  ltdc_framebuf[0] = (uint16_t *)<dc_lcd_framebuf_1;

  //设置为横屏
  Drv_LTDC_Display_Dir_Set(1);

  //清屏
  Drv_LTDC_Clear(WHITE);
}
/*****************************************************************************
* @brief  LTDC填充矩形
* ex:
* @par
* None
* @retval
*****************************************************************************/
void Drv_LTDC_Color_Fill(uint16_t sx, uint16_t sy, uint16_t ex, uint16_t ey, uint16_t *color)
{
  //横屏
  if(ltdc.Dir) {
    for (uint16_t y = sy; y < ey + 1; y++) {
      for (uint16_t x = sx; x< ex + 1; x++) {
        *(uint16_t *)((uint32_t)ltdc_framebuf[0] + ltdc.Pixsize * (LCD_WIDTH * y + x)) = *color;
        color++;
      }
    }
  } else {
    for(uint16_t y = sy; y < ey + 1; y++) {
      for (uint16_t x = sx; x < ex + 1; x++) {
        *(uint16_t *)((uint32_t)ltdc_framebuf[0] + ltdc.Pixsize * (LCD_WIDTH * (LCD_HEIGHT - x - 1) + y)) = *color;
        color++;
      }
    }
  }
}
/*****************************************************************************
* @brief  初始化FT5206触摸屏
* ex:
* @par
* None
* @retval 返回值:0,初始化成功;1,初始化失败
*****************************************************************************/
uint8_t Dev_FT5206_Init(void)
{
  uint8_t temp[2];
  GPIO_InitTypeDef  GPIO_InitStructure;

  RCC_AHB1PeriphClockCmd(DEV_FT5206_TPEN_RCC, ENABLE);
  RCC_AHB1PeriphClockCmd(DEV_FT5206_TCS_RCC,  ENABLE);

  GPIO_InitStructure.GPIO_Pin   = DEV_FT5206_TPEN_PIN;
  GPIO_InitStructure.GPIO_Mode  = GPIO_Mode_IN;
  GPIO_InitStructure.GPIO_Speed = GPIO_Speed_100MHz;
  GPIO_InitStructure.GPIO_OType = GPIO_OType_OD;
  GPIO_InitStructure.GPIO_PuPd  = GPIO_PuPd_UP;
  GPIO_Init(DEV_FT5206_TPEN_PORT, &GPIO_InitStructure);

  GPIO_InitStructure.GPIO_Pin   = DEV_FT5206_TCS_PIN;
  GPIO_InitStructure.GPIO_Mode  = GPIO_Mode_OUT;
  GPIO_InitStructure.GPIO_Speed = GPIO_Speed_100MHz;
  GPIO_InitStructure.GPIO_OType = GPIO_OType_PP;
  GPIO_InitStructure.GPIO_PuPd  = GPIO_PuPd_UP;
  GPIO_Init(DEV_FT5206_TCS_PORT, &GPIO_InitStructure);

  Drv_IIC_Soft_Init(0);

  Dev_FT5206_RST(0);
//  vTaskDelay(20);
  delay_ms(20);
  Dev_FT5206_RST(1);

//  vTaskDelay(50);
  delay_ms(50);
  temp[0] = 0;
  Dev_FT5206_WR_Reg(FT_DEVIDE_MODE,       temp, 1);  //进入正常操作模式
  Dev_FT5206_WR_Reg(FT_ID_G_MODE,         temp, 1);  //查询模式
  temp[0] = 22;
  Dev_FT5206_WR_Reg(FT_ID_G_THGROUP,      temp, 1);  //设置触摸有效值
  temp[0] = 12;
  Dev_FT5206_WR_Reg(FT_ID_G_PERIODACTIVE, temp, 1);  //激活周期,不能小于12,最大14

  Dev_FT5206_RD_Reg(FT_ID_G_LIB_VERSION, &temp[0], 2);

  //版本:0X3003/0X0001/0X0002
  if((temp[0] == 0X30 && temp[1] == 0X03) || temp[1] == 0X01 || temp[1] == 0X02)
  {
    return 0;
  }
  return 1;
}
/*****************************************************************************
* @brief  查询是否有触摸
* ex:
* @par
* None
* @retval 1,有触摸;0,没有触摸
*****************************************************************************/
uint8_t Dev_FT5206_Is_Touch(void)
{
  uint8_t val = 0;

  Dev_FT5206_RD_Reg(FT_REG_NUM_FINGER, &val, 1);  //读取触摸点的状态

  if ((val & 0XF) && ((val & 0XF) < 6))
  {
    return 1;
  }
  return 0;
}
/*****************************************************************************
* @brief  读取触摸位置
* ex:
* @par
* None
* @retval
*****************************************************************************/
void Dev_FT5206_Get_XY(uint16_t *x, uint16_t *y)
{
  uint8_t buf[4];

  Dev_FT5206_RD_Reg(FT_TP1_REG, buf, 4);

  *y = ((uint16_t)(buf[0] & 0X0F) << 8) + buf[1];
  *x = ((uint16_t)(buf[2] & 0X0F) << 8) + buf[3];
}
编译运行
此时编译,应该没有错误了,所有的接口也都实现了。
经验证,确实成功跑了起来,但是,运行很卡顿。
四、优化
使用SDRAM和DMA2D对屏幕刷新率进行优化。
lv_color_t lvgl_disp_buf_1[1024 * 600] __attribute__((at(LCD429_FRAME_BUFFER + 1024 * 600 * 2)));
lv_color_t lvgl_disp_buf_2[1024 * 600] __attribute__((at(LCD429_FRAME_BUFFER + 1024 * 600 * 4)));
void lv_port_disp_init(void)
{
    /*-------------------------
     * Initialize your display
     * -----------------------*/
    disp_init();

    /*-----------------------------
     * Create a buffer for drawing
     *----------------------------*/

    /**
     * LVGL requires a buffer where it internally draws the widgets.
     * Later this buffer will passed to your display driver's `flush_cb` to copy its content to your display.
     * The buffer has to be greater than 1 display row
     *
     * There are 3 buffering configurations:
     * 1. Create ONE buffer:
     *      LVGL will draw the display's content here and writes it to your display
     *
     * 2. Create TWO buffer:
     *      LVGL will draw the display's content to a buffer and writes it your display.
     *      You should use DMA to write the buffer's content to the display.
     *      It will enable LVGL to draw the next part of the screen to the other buffer while
     *      the data is being sent form the first buffer. It makes rendering and flushing parallel.
     *
     * 3. Double buffering
     *      Set 2 screens sized buffers and set disp_drv.full_refresh = 1.
     *      This way LVGL will always provide the whole rendered screen in `flush_cb`
     *      and you only need to change the frame buffer's address.
     */

    #define MY_DISP_HOR_RES   1024

    /* Example for 1) */
//    static lv_disp_draw_buf_t draw_buf_dsc_1;
//    static lv_color_t buf_1[MY_DISP_HOR_RES * 10];                          /*A buffer for 10 rows*/
//    lv_disp_draw_buf_init(&draw_buf_dsc_1, buf_1, NULL, MY_DISP_HOR_RES * 10);   /*Initialize the display buffer*/

    /* Example for 2) */
    static lv_disp_draw_buf_t draw_buf_dsc_2;
//    static lv_color_t buf_2_1[MY_DISP_HOR_RES * 10];                        /*A buffer for 10 rows*/
//    static lv_color_t buf_2_2[MY_DISP_HOR_RES * 10];                        /*An other buffer for 10 rows*/
//    lv_disp_draw_buf_init(&draw_buf_dsc_2, buf_2_1, buf_2_2, MY_DISP_HOR_RES * 10);   /*Initialize the display buffer*/
    lv_disp_draw_buf_init(&draw_buf_dsc_2, lvgl_disp_buf_1, lvgl_disp_buf_2, 1024 * 600);   /*Initialize the display buffer*/

    /* Example for 3) also set disp_drv.full_refresh = 1 below*/
//    static lv_disp_draw_buf_t draw_buf_dsc_3;
//    static lv_color_t buf_3_1[MY_DISP_HOR_RES * MY_DISP_VER_RES];            /*A screen sized buffer*/
//    static lv_color_t buf_3_2[MY_DISP_HOR_RES * MY_DISP_VER_RES];            /*An other screen sized buffer*/
//    lv_disp_draw_buf_init(&draw_buf_dsc_3, buf_3_1, buf_3_2, MY_DISP_VER_RES * LV_VER_RES_MAX);   /*Initialize the display buffer*/

    /*-----------------------------------
     * Register the display in LVGL
     *----------------------------------*/

    static lv_disp_drv_t disp_drv;                         /*Descriptor of a display driver*/
    lv_disp_drv_init(&disp_drv);                    /*Basic initialization*/

    /*Set up the functions to access to your display*/

    /*Set the resolution of the display*/
//    disp_drv.hor_res = 480;
//    disp_drv.ver_res = 320;
    disp_drv.hor_res = Drv_LTDC_Get().Width;
    disp_drv.ver_res = Drv_LTDC_Get().Height;

    /*Used to copy the buffer's content to the display*/
    disp_drv.flush_cb = disp_flush;

    /*Set a display buffer*/
    disp_drv.draw_buf = &draw_buf_dsc_2;

    /*Required for Example 3)*/
    //disp_drv.full_refresh = 1

    /* Fill a memory array with a color if you have GPU.
     * Note that, in lv_conf.h you can enable GPUs that has built-in support in LVGL.
     * But if you have a different GPU you can use with this callback.*/
    //disp_drv.gpu_fill_cb = gpu_fill;

    /*Finally register the driver*/
    lv_disp_drv_register(&disp_drv);
}
/*****************************************************************************
* @brief  LTDC填充颜色矩形
* ex:
* @par
* None
* @retval
*****************************************************************************/
void Drv_LTDC_Color_Fill(uint16_t sx, uint16_t sy, uint16_t ex, uint16_t ey, uint16_t *color)
{
  uint32_t psx, psy, pex, pey;
  uint32_t timeout = 0;
  uint16_t offline;
  uint32_t addr;

  /* 坐标转换 */
  if (ltdc.Dir)
  {
    psx = sx; psy = sy;
    pex = ex; pey = ey;
  }
  else
  {
    psx = sy; psy = ltdc.Height - ex - 1;
    pex = ey; pey = ltdc.Height - sx - 1;
  }
  offline = ltdc.Width - (pex - psx + 1);

  addr = ((uint32_t)ltdc_framebuf[0] + ltdc.Pixsize * (ltdc.Width * psy + psx));

  RCC_AHB1PeriphClockCmd(RCC_AHB1Periph_DMA2D, ENABLE);

  DMA2D->CR     &= ~(DMA2D_CR_START); //先停止DMA2D
  DMA2D->CR      = DMA2D_M2M;         //存储器到存储器模式
  DMA2D->FGPFCCR = DMA2D_RGB565;      //设置颜色格式
  DMA2D->FGOR    = 0;                 //前景层行偏移为0
  DMA2D->OOR     = offline;           //设置行偏移

  DMA2D->FGMAR   = (uint32_t)color;   //源地址
  DMA2D->OMAR    = addr;              //输出存储器地址
  DMA2D->NLR     = (pey - psy + 1) | ((pex - psx + 1) << 16); //设定行数寄存器
  DMA2D->CR     |= DMA2D_CR_START;    //启动DMA2D

  while ((DMA2D->ISR & (DMA2D_FLAG_TC)) == 0)
  {
    timeout++;
    if (timeout > 0X1FFFFF) break;    //超时退出
  }
  DMA2D->IFCR |= DMA2D_FLAG_TC;       //清除传输完成标志
}
优化后的屏幕刷新速度快了很多,看起来舒服多了。