Java EE|File类的常用方法和InputStream, OutputStream 的用法
File类常用方法
在Java中通过File对象描述一个文件(结点,结点对应的文件是否存在不一定)
构造方法
public static void main(String[] args) {
    // 1. 绝对路径的方式创建
    // 1.1 直接传入字符串的路径即可
    File file1 = new File("/Users/harley/Desktop/code/FileTest/a/a.txt");
    // 1.2 传入父路径 + 子路径
    File file2 = new File("/Users/harley/Desktop/code/FileTest/b", "b.txt");
    // 1.3 以File传入 parent
    File parent = new File("/Users/harley/Desktop/code/FileTest");
    File file3 = new File(parent, "c.txt");
}
获取文件属性
判断文件是否存在的方法:
boolean exist():判断文件是否真实存在boolean isDirectory():文件存在 && 文件是文件夹的时候返回trueboolean isFile():文件存在 && 文件是普通文件
代码示例:
public static void main(String[] args) throws IOException {
    File file1 = new File("/Users/harley/Desktop/code/FileTest/hello.txt");
    System.out.println(file1.exists());// false
    file1.createNewFile();
    System.out.println(file1.isDirectory());// false
    System.out.println(file1.isFile());// true
}
获取文件的方法:
- 提取文件名称:
public String getName(),该方法不区分目录与普通文件- 得到父结点路径:
public String getParent()- 获得父目录的文件对象:
public File getParentFile()
代码示例2:
public static void main(String[] args) throws IOException {
    File file = new File("/Users/././harley/Desktop/code/../code/FileTest/test.txt");
    System.out.println(file.getName());
    System.out.println(file.getParent());
    System.out.println(file.getParentFile().getCanonicalPath());
}
// 执行结果
test.txt
/Users/././harley/Desktop/code/../code/FileTest
/Users/harley/Desktop/code/FileTest
得到该文件最后一次被修改的时间:public long lastModified(),返回值以时间戳timestamp的形式表示
timestamp代表从1970 - 01-01开始到某一时间经过的秒数(毫秒)
通过调用
System.currentTimeMIllis()方法可以获取到当前的时间戳
public long length():获取文件的大小
int compareTo(File pathname):按字典序比较两个抽象路径名
获取文件标准路径
public String getAbsolutePath():获取绝对路径public File getAbsoluteFile():获取绝对路径下的文件public String getCanonicalPath():获取标准路径public File getCanonicalFile():获取标准路径下得文件
absolute path和canonical path的区别:
public static void main(String[] args) throws IOException {
    File file = new File("/Users/././harley/Desktop/code/../code/FileTest/test.txt");
    System.out.println(file.exists());// true
    System.out.println(file.getAbsolutePath());
    System.out.println(file.getCanonicalPath());
}
// 执行结果
/Users/././harley/Desktop/code/../code/FileTest/test.txt
/Users/harley/Desktop/code/FileTest/test.txt
对文件树结构的修改
-
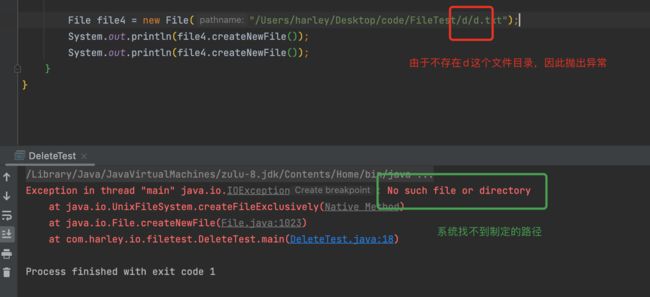
public boolean createNewFile():当且仅当此的文件尚不存在时,才以原子方式创建一个以此抽象路径名命名的新的空文件返回true:创建成功
返回false:创建失败(文件已经存在)
抛出IOException:发生了IO异常(最常见的,是文件应该在的目录现在还不存在)
代码示例:
public static void main(String[] args) throws IOException {
File file4 = new File("/Users/harley/Desktop/code/FileTest/d.txt");
System.out.println(file4.createNewFile());// true
System.out.println(file4.createNewFile());// false
}
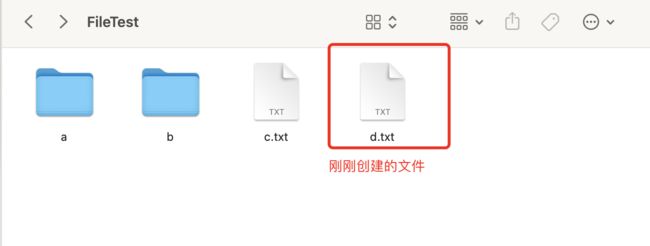
// 第一次创建文件的时候成功了,后面因为文件已经存在因此不会再创建文件了
执行后的文件目录:
如果在不存在的目录下创建文件,会发生什么情况:
还有两个文件的创建方法:
public static File createTempFile(String prefix, String suffix):在默认临时文件目录中创建一个空文件,使用给定的前缀和后缀生成其名称public static File createTempFile(String prefix, String suffix, File directory):在指定目录中创建新的空文件,使用给定的前缀和后缀字符串生成其名称
删除方法:
public boolean delete():立即删除文件,只有当文件目录是正确的情况下删除成功并返回true,其他情况比如非空目录是无法删除的,回返回falsepublic void deleteOnExit():在JVM退出时才真正删除
删除单个文件的代码示例:
public static void main(String[] args) throws IOException {
    File file1 = new File("/Users/harley/Desktop/code/FileTest/d.txt");
    // 在d目录下创建一个文本文件 d.txt,然后再删除
    System.out.println(file1.createNewFile());// true
    System.out.println(file1.delete());// true
}
如果想要删除非空目录,先采用深度优先遍历,删除这个目录下的所有子孙,让这个目录变成空目录,然后再删除该目录
删除非空目录的代码示例:
public static void main(String[] args) throws IOException {
    File file = new File("/Users/harley/Desktop/code/FileTest/c/");
    // 删除c目录下的1目录
    traversal(file);
    file.delete();
}

private static void traversal(File dir) throws IOException {
    File[] files = dir.listFiles();// 查看这个目录下得所有孩子
    for(File file : files) {
        if(file.isDirectory()) {
            // 如果这个孩子也是个目录,就继续深度优先遍历
            System.out.println(file.getCanonicalPath() + "/");
            traversal(file);
            // 当深度优先遍历完成时,该目录为空,可删除
            file.delete();
        }else {
            System.out.println(file.getCanonicalPath());// 得到这个文件的一个标准路径(去除一切无意义的.和..)
            file.delete();
        }
    }
}
删除前,我们看看c目录下的所有文件
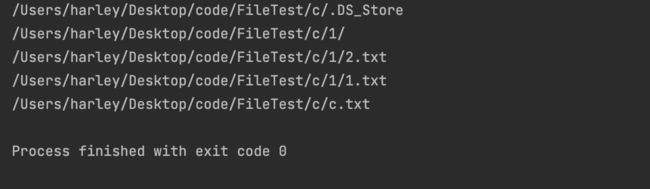
由于是深度优先遍历所以一旦碰到目录,就先将碰到的目录遍历完再遍历自己目录中剩下的
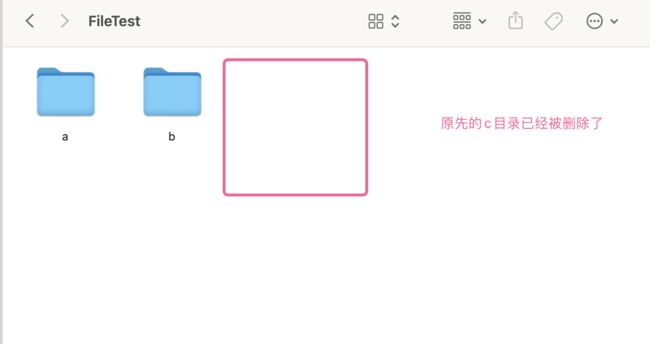
去掉file.delete()的注释,执行代码,删除c目录下所有文件
一切针对树的操作,都需要自己写代码搞定,JDK中只提供了对结点的操作,没有提供针对一棵树的操作
调用delete()方法删除的文件,是不进入回收站的,而是真正的删除,OS上的回收站,实际上缴就是把文件剪切到一个固定目录
创建目录文件(make directory):
boolean mkdir():创建目录,如果目录已经存在或者路径上的父目录还不存在,则创建失败boolean mkdirs():创建目录,一并把路径中目前还不存在的目录都创建出来
代码示例:
public static void main(String[] args) {
    File file = new File("/Users/harley/Desktop/code/FileTest/c/d/e");
    // c目录不存在
    System.out.println(file.mkdir());// false
    System.out.println(file.mkdirs());// true
}
文件重命名:boolean renameTo()
重命名有两个效果,第一个效果是修改文件名称,第二个效果是更改文件位置,即剪切和粘贴
public static void main(String[] args) {
    File file = new File("/Users/harley/Desktop/code/FileTest/test.txt");
    File dest = new File("/Users/harley/Desktop/code/FileTest/test/dest.txt");
    System.out.println(file.renameTo(dest));// true
}
// 通过renameTo方法,我们即修改了文件名,还把文件的位置移动到了test目录下
获取目录下得所有孩子文件
public File[] listFiles() ,通过该方法可以返回目录下的所有孩子
该方法的几种返回结果:
如果目录为空,则返回空数组
如果该文件不是目录或发生IO异常,则返回null
代码示例:
public static void main(String[] args) throws IOException {
    File file = new File("/Users/harley/Desktop/code/FileTest/a");
    File[] files = file.listFiles();
    System.out.println(Arrays.toString(files));// [/Users/harley/Desktop/code/FileTest/a/.DS_Store, /Users/harley/Desktop/code/FileTest/a/a.txt]

    File file1 = new File("/Users/harley/Desktop/code/FileTest/test");
    File[] files1 = file1.listFiles();
    System.out.println(Arrays.toString(files1));// []

    File file2 = new File("/Users/harley/Desktop/code/FileTest/test.txt");
    File[] files2 = file2.listFiles();
    System.out.println(Arrays.toString(files2));// null
}
我们可以通过该方法对文件系统的进行遍历
// 深度优先遍历(更常见)
private static void traversalDepthFirst(File dir) throws IOException {
    // 1. 找到这个目录下得所有孩子
    File[] files = dir.listFiles();
    if(files == null) {
        return;
    }

    // 2. 针对每个孩子,判断目录还是文件
    for(File file : files) {
        if(file.isDirectory()) {
            // 如果是个目录,则继续地柜取遍历处理
            System.out.println("[D] " + file.getCanonicalPath());
            traversalDepthFirst(file);
        }else {
            System.out.println("[F] " + file.getCanonicalPath());
        }
    }
}

// 广度优先遍历
private static void traversalBroadFirst(File dir) throws IOException {
    Deque<File> queue = new LinkedList<>();
    queue.offer(dir);
    while(!queue.isEmpty()) {
        File file = queue.poll();
        if(file.isDirectory()) {
            System.out.println("[D] " + file.getCanonicalPath());
            File[] files = file.listFiles();
            if(files == null) {
                continue;
            }
            for(File file1 : files) {
                queue.offer(file1);
            }
        }else {
            System.out.println("[F] " + file.getCanonicalPath());
        }
    }
}
获取所有根目录: public static File[] listRoots(), 该方法是个静态方法
内容的读写
读取/输入
- 直接读取(以二进制数据的方式读取,表现在代码中byte为单位)
- 文本读取
「InputStream类」
- 该类位于
java.io.InputStream包下,直译过来就是输入流- 本身是一个抽象类,真正使用过程中要依赖这个抽象的具体实现子类,常用的子类就是FileInputStream这个文件的输入流
- 其抽象模型就类似于一个水龙头(InputStream),打开水龙头,由水塔(Input Device或模拟的Input Device)供水输出数据流,然后我们将这些数据流拿个桶(byte数组)接起来
- 需要关闭资源
FileInputStream类下常用的构造方法:
public FileInputStream(File file) throws FileNotFoundException:打开file所在的文件public FileInputStream(String name) throws FileNotFoundException:打开路径所在位置的文件
代码示例:
public static void main(String[] args) throws Exception {
    // 向上转型
    InputStream is  = new FileInputStream("/Users/harley/Desktop/code/FileTest/hello.txt");

    // 准备好一个水桶
    byte[] buf = new byte[1024];// 1024代表最多读取并存储1024滴(字节)的水,即桶的容量

    // 拿着桶取接水
    // 这里的n代表这次真正接到了多少滴(字节)水
    // n一定是小于等于1024 && n >= 0
    int n = is.read(buf);
    byte[] bytes = Arrays.copyOf(buf, n);
    for(byte b : bytes) {
        System.out.printf("%02x ", b);
    }
    is.close();
}
// 执行结果
68 65 6c 6c 6f 20 77 6f 72 6c 64 0a 77 65 20 61 72 65 20 6c 65 61 72 6e 69 6e 67
执行结果对应:
hello world \n we are learning
windows下得换行默认是\r\n,也写作CRLF,分别对应0x0D和0x0A,OSX操作系统下,换行仅为\n,对应0x0A
EOS:
假设现在输入流的一段不是水塔,而是一个人在往输入流里倒水
那么除了接水(接受数据)之外,我们还需要一个明确的信号来判断以后会不会有新的数据了
因为我们在接水的时候,可能一滴水都没接到,但是我们不知道未来还会不会有水来
因此我们引入一个信号EOS - End Of Stream,在代码中,使用-1表示这个信号,因为正常来说,水的数量应该是大于等于0的,所以检测到输入为-1时,就说明不会有新数据来了
理解EOS之后,来看一下上面用到过的读取文件的方法:
abstract int read()方法:一次只接一滴水,返回的是下个字节的数据,当返回值是EOS(-1)时,表示以后没有水了int read(byte[] b)方法:一次接很多水,需要提前准备好桶(即byte[]数组),返回值是本次接到了多少水,当返回值是EOS(-1)时,表示以后没有水了
代码示例:
// read()方法测试
public static void main(String[] args) throws Exception {
    InputStream is = new FileInputStream("/Users/harley/Desktop/code/FileTest/hello.txt");
    while(true) {
        int data = is.read();
        if(data == -1) {
            break;
        }
        byte b = (byte) data;
        System.out.printf("%02x ", b);
    }
    is.close();
}

// read(byte[] b)方法测试
public static void main(String[] args) throws Exception {
    InputStream is = new FileInputStream("/Users/harley/Desktop/code/FileTest/hello.txt");
    byte[] buf = new byte[5];// 一次最多存5个字节的数据
    while(true) {
        int n = is.read(buf);
        // n == 0 只是本次没数据,以后还有
        // n == -1 本次包括以后都没有数据了
        if(n == -1) {
            break;
        }
        for (int i = 0; i < n; i++) {
            byte b = buf[i];
            System.out.printf("%02x ", b);
        }
    }
}
// 两次的执行结果都是
68 65 6c 6c 6f 20 77 6f 72 6c 64 0a 77 65 20 61 72 65 20 6c 65 61 72 6e 69 6e 67
一点小细节:
通过
read(byte[] b)方法读取数据的时候,只是把byte数组中的数据给覆盖了,上述代码中,byte数组的大小仅为5,对于有27个字节的文件来说需要读取6次,最后一次读取的时候,只读了2个字节的数据,那么后面三个字节是上次读取时的数据因此我们在打印的时候,按照本次读取到的数据数量进行打印,而不是对整个byte数组进行打印
try - with- resources语法糖
// 正常情况下是这么写的
try {
    // code...
} catch (SomeException e) {
    // code...
} finally {
    if(is != null)
        is.close();
}

// try-with-resources写法
try (InputStream is = ...) {// 连接资源
    // code...
} catch (SomeException e) {
    // code
}// 无需主动关闭资源,编译的时候,会自动加上is.close()
凡是需要关闭资源的,都可以使用这种写法
处理文本数据(字符数据)
分清字符集(char set)和字符编码规则(char encoding)的概念
计算机的中数据都是数字(有范围的整数),包括图像、声音、文字的本质都是数字
事先规定一个数字范围,给范围内的每个数字都唯一标定一个字符,比如[0,10),每个数字对应一个字符,然后拿到一串数字,将每个数字和字符相对应,就能得到一个字符串
这种编码的规则就称为字符集,但是现实中我们不会每个人都定义自己的字符集,因为这对别人来说是没有意义的
所以,总是有标准委员会来规定好一个字符集,大家都遵守这个字符集,所以就有了各种各样的标准字符集
最常用的就是ASCII和Unicode
但是ASCII的表示范围有限,所以就有了Unicode数量在[0,2^32)之间,可以说ASCII就是Unicode的子集
每个ASCII码占1个字节,每个Unicode码占4个字节,但实际上很多时候我们存储字符只需要ASCII那样一个字节就够了,如果真的按照4个字节存储,就会有很多空间浪费,因此就出现了不同的编码规则,比如UTF-32、UTF-16、UTF-8、GBK
我们常用的是UTF-8(变长的编码规则),一个字符占用的空间1~4不等,ASCII范围内的,仍然是1个字节,中文的一般是3个字节
乱码的问题
看图:

我们可以通过String的构造方法,实现Unicode到给定编码规则的解码
public String(byte bytes[], int offset, int length, String charsetName),传入一个byte数组,偏移量和长度,以及编码规则
代码示例:
public static void main(String[] args) throws IOException {
    try(InputStream is = new FileInputStream("../FileTest/hello.txt")) {
        byte[] buf = new byte[1024];
        int n = is.read(buf);
        String str = new String(buf, 0, n, "UTF-8");
        System.out.println(str);// 我

        // 乱码
        String str1 = new String(buf, 0, n, "GBK");
        System.out.println(str1);// 鎴�
    }
}
我们还能通过Scanner类来进行解码,我们常用的Scanner的构造方法是:
public Scanner(InputStream source),平时我们传入的参数都是System.in即通过终端,这说明System.in的类型就是一个InputStream类
既然传入的参数是个输入流,我们就可以这么写:
public static void main(String[] args) throws Exception {
    try (InputStream is = new FileInputStream("../FileTest/hello.txt")) {
        try (Scanner scanner = new Scanner(is, "UTF-8")) {
            while(scanner.hasNextLine()){
                String line = scanner.nextLine();// 默认去掉了换行符
                System.out.println("|" + line + "|");
            }
        }
    }
}
// 执行结果
|我|
|喜欢|
|写|
|代码|
这种写法的抽象模型还是那个水龙头,只不过在水龙头的出水口加了一个过滤器(字符编码规则),得到的结果就是经过解码之后的值
还有个问题:
public static void main(String[] args) {
    Scanner scanner = new Scanner(System.in);
    // 直接敲回车,意思是这次没有输入,但是以后还会以,因此不会结束,继续等待输入
    // 想要结束输入的一种方法(IDEA中:ctrl/cmd + D, 终端中:ctrl/cmd + Z),即传入EOS
    while(scanner.hasNextLine()) {
        String str = scanner.nextLine();
        System.out.println(str);
    }
}
写入/输出
输出使用OutputStream类,它的模型类似于一个下水道,井盖下的管道(OutputStream)接到一个处理数据的地方
OutputStream的一个子类是FileOutputStream,该子类自带一个功能:
如果文件之前不存在,就会进行创建(创建可能失败:1.权限不够;2.路径上的目录不存在)
如果文件之前存在,会清空之前的文件内容,重新写入
由于内存的写速度远远快于硬盘的写速度,所以,为了平衡这个速度之差,一般通过“缓冲区buffer”来处理
就好像你想吃雪糕,比起每次想吃的时候跑过去买,不如一次性买一大堆回来存到冰箱里慢慢吃,这样就减少了我们去超市购买雪糕的频率了
缓冲区也是这么处理数据的,内存不会每次读到数据就往硬盘里存,这样每次都要等前一个数据写完再写下一个,速度很满,因此准备好内存的一块区域即缓冲区,先存一部分数据,然后一次性写到硬盘中,这个把缓冲区的数据写入硬盘的操作称为“刷盘”
三种情况下,会进行刷盘操作:
- 缓冲区满了或者达到一定阈值
- 每过一段时间刷盘一次
- 进程主动刷盘
极端情况下,可能把数据写入缓冲区的时候,其中部分数据正好遇上刷盘,就直接写到硬盘里了,而另一部分数据则遗留在缓冲区,如果这个时候关闭输出资源,就没有把所有数据写入硬盘
因此,为了确保把缓冲区内可能遗留的数据全部写入Output设备中,我们在关闭资源之前,手动进行一次“刷盘”操作
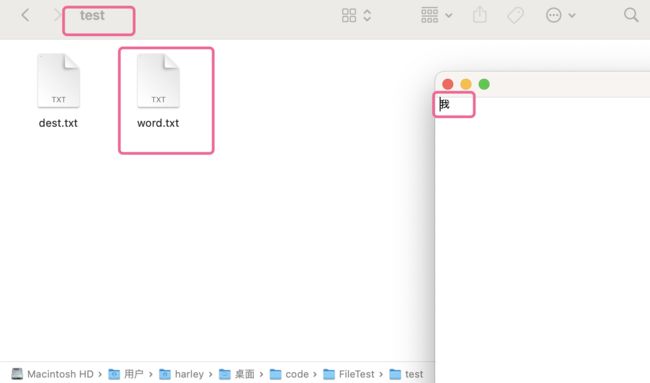
代码示例1:
public static void main(String[] args) throws IOException {
    try (OutputStream os = new FileOutputStream("../FileTest/test/word.txt")) {
        // 0xe6 0x88 0x91是'我'的UTF-8编码的字节序列
        os.write(0xe6);
        os.write(0x88);
        os.write(0x91);
        os.flush();// 关闭之前,手动刷盘
    }
}
写完之后,在test目录下创建了一个word文件,并写入数据:
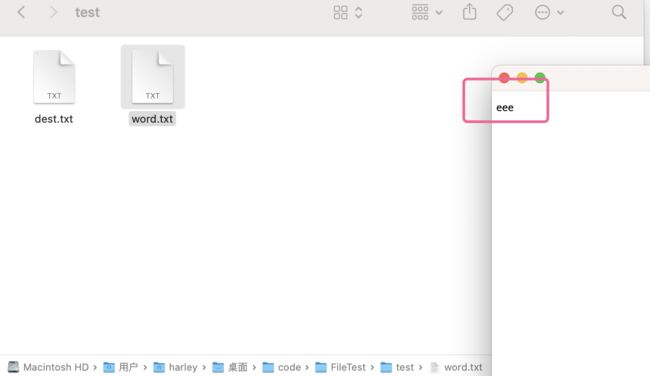
代码示例2:
    public static void main(String[] args) throws IOException {
        try (OutputStream os = new FileOutputStream("../FileTest/test/word.txt")) {
            os.write(0x20);
            os.write(0x0a);
            os.write(0x65);
            os.write(0x65);
            os.write(0x65);
            os.flush();
        }
    }
再次写入的时候,会清空文件内容,重新写入:
所以我们很少使用createNewFile文件,因为这是个空文件,没什么用,更多还是使用Scanner的构造方法来创建文件
同时,我们可以一次写多个文件
public static void main(String[] args) throws IOException {
    try (OutputStream os = new FileOutputStream("../FileTest/test/word.txt")) {
        byte[] buf = {0x65, 0x65, 0x20, 0x65, 0x0a, (byte)0xe6, (byte)0x88, (byte)0x91};
        // os.write(buf);// 一次将buf全部写入
        os.write(buf, 2, 3);// 从下标为2的位置开始写,写3个
        os.flush();
    }
}
想要直接写入字符我们通过一个抽象类Writer的实现类OutputStreamWriter:
public static void main(String[] args) throws IOException {
    try (OutputStream os = new FileOutputStream("../FileTest/test/word.txt")) {
        try (Writer writer = new OutputStreamWriter(os, "UTF-8")) {
            writer.write("你好世界\n");
            writer.write("你好中国");
        }
    }
}
还以一种更推荐的写法,通过PrintWriter,因为这底下有我们熟悉的println()、print()、printf()方法
public static void main(String[] args) throws IOException {
    try (OutputStream os = new FileOutputStream("../FileTest/test/word.txt")) {
        try (Writer writer = new OutputStreamWriter(os, "UTF-8")) {
            try (PrintWriter printWriter = new PrintWriter(writer)) {
                printWriter.println(1 + 1);
                printWriter.print(3);
                printWriter.printf("%d + %s", 3, "我");
                printWriter.flush();// 在最内存调用flush,能把所有外层也刷掉
            }
        }
    }
}