大数据技术之HBase原理与实战归纳分享-下
文章目录
- 整合Phoenix
-
- 定义
- 为何要使用
- 安装
- SHELL操作
- 表的映射
- 简易JDBC示例
- 二级索引
-
- 二级索引配置文件
- 全局索引
- 包含索引
- 本地索引(local index)
- HBase与 Hive 的集成
-
- 使用场景
- 集成方法
- 示例
- 整合已有HBase表示例
整合Phoenix
定义
Phoenix 官网地址 https://phoenix.apache.org/
Phoenix作为一款OLTP和Apache Hadoop的操作分析,是面向HBase的开源 SQL 皮肤,其通过 JDBC API 代替繁重的 HBase 客户端 API来创建表,插入数据和查询 HBase 数据。目前最新版本为5.1.2
Apache Phoenix通过结合两者的优点,在Hadoop中为低延迟应用提供OLTP和操作分析,标准SQL和JDBC api的强大功能与完整的ACID事务功能,以及通过利用HBase作为其后备存储,采用NoSQL使得读写数据更加灵活性。Apache Phoenix与其他Hadoop产品(如Spark、Hive、Pig、Flume和Map Reduce)完全集成。
为何要使用
官方原文:Doesn’t putting an extra layer between my application and HBase just slow things down?
Actually, no. Phoenix achieves as good or likely better performance than if you hand-coded it yourself (not to mention with a heck of a lot less code) by:
翻译为在 Client 和 HBase 之间放一个 Phoenix 中间层不会减慢速度,因为用户编写的数据处理代码和 Phoenix 编写的没有区别(更不用说你写的垃圾的多),不仅如此Phoenix 对于用户输入的 SQL 同样会有大量的优化手段(就像 hive 自带 sql 优化器一样)。
Phoenix 在 5.0 版本默认提供有两种客户端使用(瘦客户端和胖客户端),在 5.1.2 版本安装包中删除了瘦客户端,本文也不再使用瘦客户端。而胖客户端和用户自己写 HBase 的API 代码读取数据之后进行数据处理是完全一样的。
安装
# 当前版本4.16.1可以运行在Apache HBase 1.3、1.4、1.5和1.6上;当前版本5.1.2可以运行在Apache HBase 2.1、2.2、2.3和2.4上。
# 由于前面Hbase是2.5版本,我们先尝试下载phoenix最新版本使用
wget --no-check-certificate https://dlcdn.apache.org/phoenix/phoenix-5.1.2/phoenix-hbase-2.4.0-5.1.2-bin.tar.gz
# 解压 tar 包
tar -xvf phoenix-hbase-2.4.0-5.1.2-bin.tar.gz
# 复制 server 包并拷贝到各个节点的 hbase/lib
cp phoenix-hbase-2.4.0-5.1.2-bin/phoenix-server-hbase-2.4.0-5.1.2.jar hbase-2.5.0/lib/
scp hbase-2.5.0/lib/phoenix-server-hbase-2.4.0-5.1.2.jar hadoop2:/home/commons/hbase-2.5.0/lib/
scp hbase-2.5.0/lib/phoenix-server-hbase-2.4.0-5.1.2.jar hadoop3:/home/commons/hbase-2.5.0/lib/
# 三个节点上都配置环境变量
export PHOENIX_HOME=/home/commons/phoenix-hbase-2.4.0-5.1.2-bin
export PHOENIX_CLASSPATH=$PHOENIX_HOME
export PATH=$PATH:$PHOENIX_HOME/bin
# 三个节点上都使环境变量生效
source /etc/profile
# 先停止
bin/stop-hbase.sh
# 启动
bin/start-hbase.sh
# 进入phoenix根目录
cd phoenix-hbase-2.4.0-5.1.2-bin
# 连接phoenix
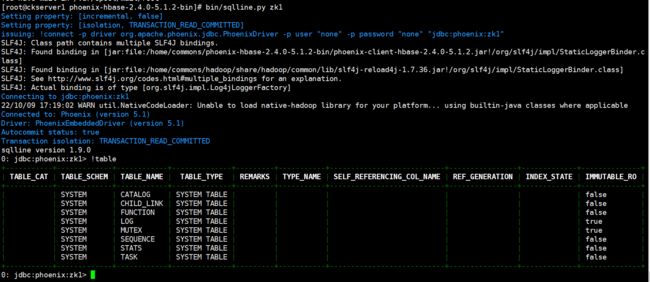
bin/sqlline.py zk1
# 显示所有表
!table
!tables
# 退出
!quit
SHELL操作
# 创建表,直接指定单个列作为 RowKey
CREATE TABLE IF NOT EXISTS student(
id VARCHAR primary key,
name VARCHAR,
age BIGINT,
addr VARCHAR);
# 在 phoenix 中,表名等会自动转换为大写,若要小写,使用双引号,如"us_population"。
# 指定多个列的联合作为 RowKey
CREATE TABLE IF NOT EXISTS student1 (
id VARCHAR NOT NULL,
name VARCHAR NOT NULL,
age BIGINT,
addr VARCHAR
CONSTRAINT my_pk PRIMARY KEY (id, name));
注:Phoenix 中建表,会在 HBase 中创建一张对应的表。为了减少数据对磁盘空间的占用,Phoenix 默认会对 HBase 中的列名做编码处理。具体规则可参考官网链接:https://phoenix.apache.org/columnencoding.html,若不想对列名编码,可在建表语句末尾加上 COLUMN_ENCODED_BYTES = 0;
# 插入数据
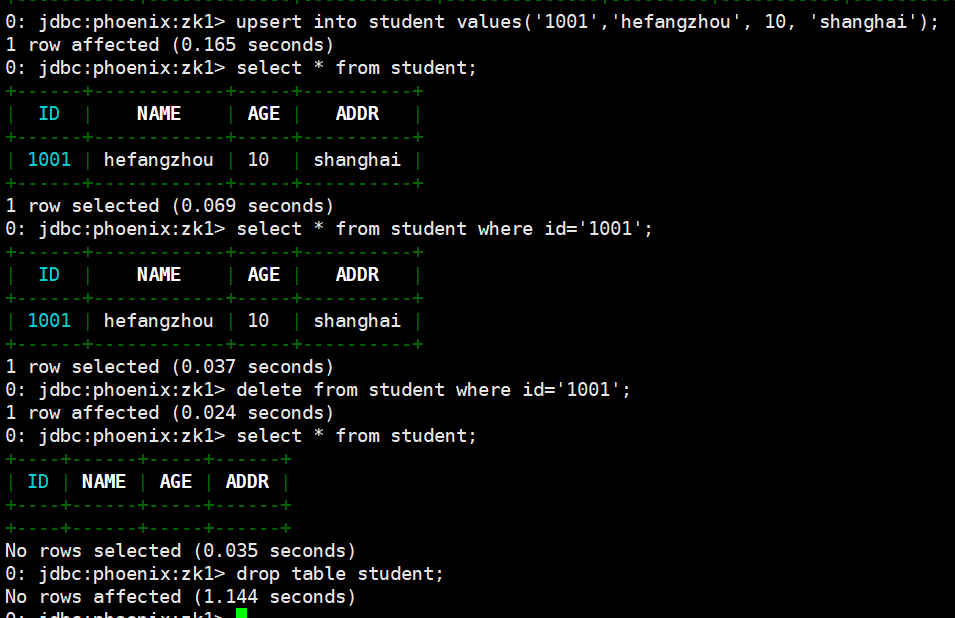
upsert into student values('1001','hefangzhou', 10, 'shanghai');
# 查询记录
select * from student;
select * from student where id='1001';
# 删除记录
delete from student where id='1001';
# 删除表
drop table student;
表的映射
表的关系在默认情况下, HBase 中已存在的表,通过 Phoenix 是不可见的。如果要在 Phoenix 中操作 HBase 中已存在的表,可以在 Phoenix 中进行表的映射。映射方式有两种:视图映射和表映射。
- 视图映射:Phoenix 创建的视图是只读的,所以只能用来做查询,无法通过视图对数据进行修改等操作。在 phoenix 中创建关联 table1 表的视图
# HBase 中 table1 的表结构如下,两个列族 info11、info12。先执行hbase shell
create 'table1' ,'info1','info2'
put 'table1','100001','info1:name','libaishan'
put 'table1','100001','info2:address','nanjing'
# Phoenix shell执行视图创建,先执行bin/sqlline.py zk1
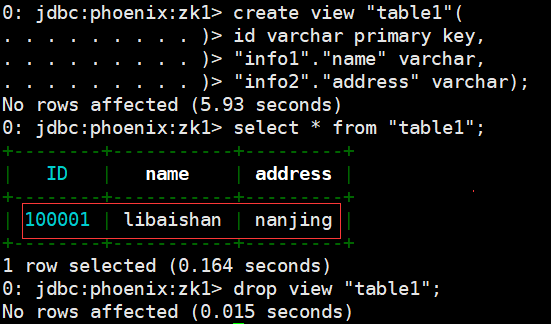
create view "table1"(
id varchar primary key,
"info1"."name" varchar,
"info2"."address" varchar);
select * from "table1";
# 删除视图
drop view "table1";
- 视图映射:在 Pheonix 创建表去映射 HBase 中已经存在的表,是可以修改删除 HBase 中已经存在的数据的。而且,删除 Phoenix 中的表,那么 HBase 中被映射的表也会被删除。注:进行表映射时,不能使用列名编码,需将 column_encoded_bytes 设为 0。
create table "table2"(
		id varchar primary key,
		"info1"."name" varchar,
		"info2"."address" varchar)
column_encoded_bytes=0;
- 数字类型说明:HBase 中的数字,底层存储为补码,而 Phoenix 中的数字,底层存储为在补码的基础上,将符号位反转。故当在 Phoenix 中建表去映射 HBase 中已存在的表,当 HBase 中有数字类型的字段时,会出现解析错误的现象。
# Hbase 操作示例
create 'test_number','info'
put 'test_number','1001','info:number',Bytes.toBytes(1000)
scan 'test_number',{COLUMNS => 'info:number:toLong'}
# phoenix 操作示例
create view "test_number"(id varchar primary key,"info"."number" bigint);
select * from "test_number";
解决上述问题的方案有以下两种:
- Phoenix 种提供了 unsigned_int,unsigned_long 等无符号类型,其对数字的编码解码方式和 HBase 是相同的,如果无需考虑负数,那在 Phoenix 中建表时采用无符号类型是最合适的选择。
- phoenix 演示:
drop view "test_number";
create view "test_number"(id varchar primary key,"info"."number" unsigned_long);
select * from "test_number";
- 如需考虑负数的情况,则可通过 Phoenix 自定义函数,将数字类型的最高位,即符号位反转即可,自定义函数可参考如下接:https://phoenix.apache.org/udf.html。
简易JDBC示例
这里演示一个标准的 JDBC 连接操作,实际开发中会直接使用别的框架内嵌的Phoenix 连接,添加maven 依赖
<dependency> <groupId>org.apache.phoenix</groupId> <artifactId>phoenix-client-hbase-2.4</artifactId> <version>5.1.2</version> </dependency>
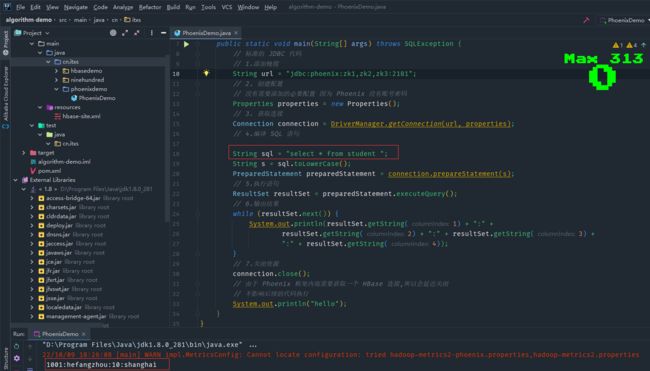
重新执行phoenix shell操作关于student表创建和插入数据,测试代码PhoenixDemo.java
package cn.itxs.phoenixdemo;

import java.sql.*;
import java.util.Properties;

public class PhoenixDemo {
    public static void main(String[] args) throws SQLException {
        // 标准的 JDBC 代码
        // 1.添加链接
        String url = "jdbc:phoenix:zk1,zk2,zk3:2181";
        // 2. 创建配置
        // 没有需要添加的必要配置 因为 Phoenix 没有账号密码
        Properties properties = new Properties();
        // 3. 获取连接
        Connection connection = DriverManager.getConnection(url, properties);
        // 4.编译 SQL 语句

        String sql = "select * from student ";
        String s = sql.toLowerCase();
        PreparedStatement preparedStatement = connection.prepareStatement(s);
        // 5.执行语句
        ResultSet resultSet = preparedStatement.executeQuery();
        // 6.输出结果
        while (resultSet.next()) {
            System.out.println(resultSet.getString(1) + ":" +
                    resultSet.getString(2) + ":" + resultSet.getString(3) +
                    ":" + resultSet.getString(4));
        }
        // 7.关闭资源
        connection.close();
        // 由于 Phoenix 框架内部需要获取一个 HBase 连接,所以会延迟关闭
        // 不影响后续的代码执行
        System.out.println("hello");
    }
}
运行程序,打印出前面phoenix shell插入的数据
二级索引
二级索引配置文件
添加如下配置到 HBase 的 HRegionserver 节点的 hbase-site.xml,之后重启Hbase集群
<property>
 	<name>hbase.regionserver.wal.codecname>
  	<value>org.apache.hadoop.hbase.regionserver.wal.IndexedWALEditCodecvalue>
property>
全局索引
Global Index 是默认的索引格式,创建全局索引时,会在 HBase 中建立一张新表。也就是说索引数据和数据表是存放在不同的表中的,因此全局索引适用于多读少写的业务场景。
写数据的时候会消耗大量开销,因为索引表也要更新,而索引表是分布在不同的数据节点上的,跨节点的数据传输带来了较大的性能消耗。在读数据的时候 Phoenix 会选择索引表来降低查询消耗的时间。
创建单个字段的全局索引。
# 创建索引语法
CREATE INDEX my_index ON my_table (my_col);
# 例如
create index my_index on student(age);
# 查看二级索引是否有效,可以使用 explain 执行计划,有二级索引之后会变成范围扫描.
explain select id,age from student where age = 10;
# 如果想查询的字段不是索引字段的话索引表不会被使用,也就是说不会带来查询速度的提升。
explain select id,name from student where age = 10;
# 删除索引语法
DROP INDEX my_index ON my_table
# 例如
drop index my_index on student;
若想解决上述问题,可采用如下方案:
- 使用包含索引
- 使用本地索引
包含索引
包含索引(covered index)创建携带其他字段的全局索引(本质还是全局索引)
# 包含索引语法如下
CREATE INDEX my_index ON my_table (v1) INCLUDE (v2);
# 先删除之前的索引:
drop index my_index on student1;
#创建包含索引
create index my_index on student(age) include (name);
# 使用执行计划查看效果,结果显示已走了RANGE SACN
explain select id,name from student where age = 10;
本地索引(local index)
本地索引(local index) 适用于写操作频繁的场景。索引数据和数据表的数据是存放在同一张表中(且是同一个 Region),避免了在写操作的时候往不同服务器的索引表中写索引带来的额外开销。
# 本地索引语法如下,my_column 可以是多个。
CREATE LOCAL INDEX my_index ON my_table (my_column);
# 本地索引会将所有的信息存在一个影子列族中,虽然读取的时候也是范围扫描,但是没有全局索引快,优点在于不用写多个表了。
# 删除之前的索引
drop index my_index on student;
# 创建本地索引
CREATE LOCAL INDEX my_index ON student (age,name);
# 使用执行计划
explain select id,name from student where age = 10;
HBase与 Hive 的集成
使用场景
如果大量的数据已经存放在 HBase 上面,需要对已经存在的数据进行数据分析处理,那么 Phoenix 并不适合做特别复杂的 SQL 处理,此时可以使用 hive 映射 HBase 的表格,之后写 HQL 进行分析处理。
集成方法
在 hive-site.xml 中添加 zookeeper 的属性,如下:
<property>
    <name>hive.zookeeper.quorumname>
    <value>zk1,zk2,zk3value>
property>
<property>
    <name>hive.zookeeper.client.portname>
    <value>2181value>
property>
示例
接下来先建立 Hive 表,关联 HBase 表,插入数据到 Hive 表的同时能够影响 HBase 表
- 在 Hive 中创建表同时关联 HBase
CREATE TABLE hive_emp(
  empno INT,
  empname string,
  deptno INT
) STORED BY 'org.apache.hadoop.hive.hbase.HBaseStorageHandler' WITH SERDEPROPERTIES (
  "hbase.columns.mapping" = ":key,info:empname,info:deptno"
) TBLPROPERTIES ("hbase.table.name" = "hbase_emp");
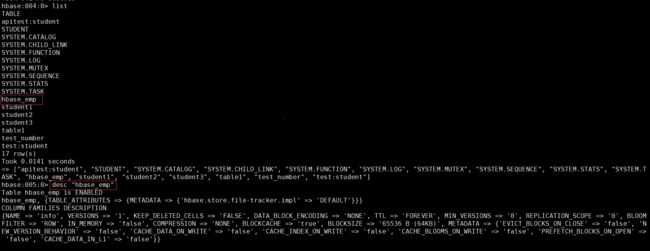
完成之后,可以分别进入 Hive 和 HBase 查看,都生成了对应的表。
- 在 Hive 中创建临时中间表,用于 load 文件中的数据。(不能将数据直接 load 进 Hive 所关联 HBase 的那张表中)
CREATE TABLE emp_mid( empno int, ename string, deptno int)row format delimited fields terminated by ' ';
- 新建导入数据文件emp.txt。
1001 zhangsan 1001002 lisi 1001003 hangong 1001004 xieren 1011005 lili 1011006 guojia 102
- 往Hive 中间表emp_mid中 load 数据
load data local inpath '/home/commons/data/emp.txt' into table emp_mid;
- 通过 insert 命令将中间表中的数据导入到 Hive 关联 Hbase 的那张表中。
insert into table hive_emp select * from emp_mid;
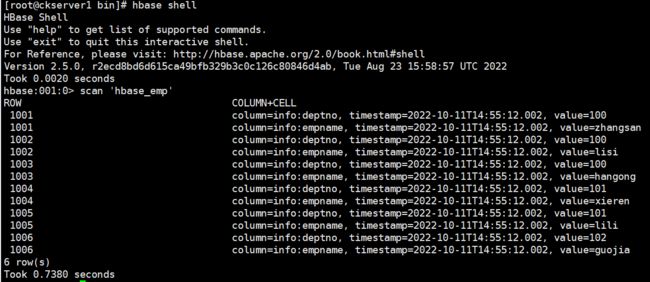
- 查看 Hive 以及关联的 HBase 表中是否已经成功的同步插入了数据。
# Hive表中查看数据select * from hive_emp;
# HBase表中查看数据scan 'hbase_emp'
整合已有HBase表示例
上个示例中在 HBase 中已存储了表 hbase_emp,接着我们在 Hive 中创建一个外部表hive_emp_external来关联 HBase 中的 hbase_emp 这张表,使之可以借助 Hive 来分析 HBase 这张表中的数据。
- 在 Hive 中创建外部表hive_emp_external
CREATE EXTERNAL TABLE hive_emp_external( empno INT, empname string, deptno INT) STORED BY 'org.apache.hadoop.hive.hbase.HBaseStorageHandler' WITH SERDEPROPERTIES ( "hbase.columns.mapping" = ":key,info:empname,info:deptno") TBLPROPERTIES ("hbase.table.name" = "hbase_emp");
- 关联后就可以使用 Hive 函数进行一些分析操作了
select deptno,count(empname) from hive_emp_external group by deptno;
**本人博客网站 **IT小神 www.itxiaoshen.com
