Swagger之Hello World !
目录
■1.前言・Swagger介绍
■2.例子,如果基于Spring Boot项目,实现Swagger---非常简单
2.1.已有的SpringBoot项目
2.2.修改POM文件
2.3.添加Config文件
2.4.访问
2.5.访问效果以及对应的代码
效果
代码
2.6.类的标注
2.7.启动Log
2.8.xxx
2.9.xxx
■3.非Spring 项目中,Swagger的运用
3.0.Sping介绍
3.1.简介
3.2.SwaggerConfig
3.3.配置Swagger相关Bean
3.4.访问
3.5.对于非Spring工程,如何加载Swagger的配置类
3.6.Web工程,如何配置,能让一个类在服务启动的时候,被加载
方法1(最基本方法):
方法2:@WebListener
3.7.ServletContextListener
3.8.非 Spring项目,Swagger UI 的静态资源文件 在jar文件中, 需要单独 提取出来,再配置到某个地方
3.9.OpenAPI(Swagger)是什么
3.10.Swagger中的 YAML是什么
3.11.Swagger中的 YAML 是如何生成的
3.12.Swagger中的 npm 是指什么
3.13.nodejs 如何和 Swagger相关联
3.14.如何在nodejs中使用swagger---博客
3.15.nodejs的swagger 和spring boot 的swagger有什么区别
3.16.后台是java 能否使用nodejs 的swagger 生成 API文档
3.17.nodejs的nodejs,扫描的代码是什么代码
3.18.Java RestFul的Swagger中,扫描的代码是什么代码
3.19.XXX
3.20.XXX
3.20.XXX
3.21.XXX
■4.Springbox 和 Swagger之间有什么关系 ,有什么区别
====
■1.前言・Swagger介绍
项目去IF设计书化,使用Swagger生成API接口。
先了解一下Swagger
Swagger是一组开源工具,用于设计、构建、文档化和测试RESTful API。它提供了一种基于JSON或YAML格式的API描述语言,可以定义API的操作、参数、响应和安全规范,并生成易于阅读和交互的API文档。Swagger还提供了一组可视化工具,包括Swagger UI和Swagger Editor,可以帮助开发人员快速构建和测试API。使用Swagger可以提高API的可读性、可维护性和交互性,从而促进API的开发和使用。
学习资料
官方文档:Swagger Documentation
Swagger Editor:Swagger Editor
Swagger UI:REST API Documentation Tool | Swagger UI
使用Swagger自动生成API文档:https://www.cnblogs.com/kevingrace/p/7883099.html
使用Swagger构建RESTful API:https://www.jianshu.com/p/9b1b75b4f3ea
Swagger入门教程:https://www.cnblogs.com/panpanwelcome/p/10094733.html
Swagger的使用及其原理简介:https://www.jianshu.com/p/a5f6e5e9f4cf
Spring Boot集成Swagger:https://www.jianshu.com/p/03c7b314d1f8
===
■2.例子,如果基于Spring Boot项目,实现Swagger---非常简单
2.1.已有的SpringBoot项目
SpringBoot + Thymeleaf 之 HelloWorld_sun0322的博客-CSDN博客
====
2.2.修改POM文件
	    io.springfox
	    springfox-swagger2
	    2.9.2


	    io.springfox
	    springfox-swagger-ui
	    2.9.2
===
2.3.添加Config文件
package com.sxz.test.one.config;
import org.springframework.context.annotation.Bean;
import org.springframework.context.annotation.Configuration;
import com.google.common.base.Predicates;
import springfox.documentation.builders.ApiInfoBuilder;
import springfox.documentation.builders.PathSelectors;
import springfox.documentation.builders.RequestHandlerSelectors;
import springfox.documentation.service.ApiInfo;
import springfox.documentation.service.Contact;
import springfox.documentation.spi.DocumentationType;
import springfox.documentation.spring.web.plugins.Docket;
import springfox.documentation.swagger2.annotations.EnableSwagger2;
@Configuration
@EnableSwagger2
public class Swagger2Config {
/**
* 创建API应用
* apiInfo() 增加API相关信息
* 通过select()函数返回一个ApiSelectorBuilder实例,用来控制哪些接口暴露给Swagger来展现,
* 指定扫描的包路径来定义指定要建立API的目录。
* @return
*/
@Bean
public Docket coreApiConfig(){
return new Docket(DocumentationType.SWAGGER_2)
.apiInfo(adminApiInfo())
.groupName("xxxApi")
.select()
//只显示user下面的路径
.paths(Predicates.and(PathSelectors.regex("/user/.*")))
.apis(RequestHandlerSelectors.basePackage("com.sxz"))
.build();
}
private ApiInfo adminApiInfo(){
return new ApiInfoBuilder()
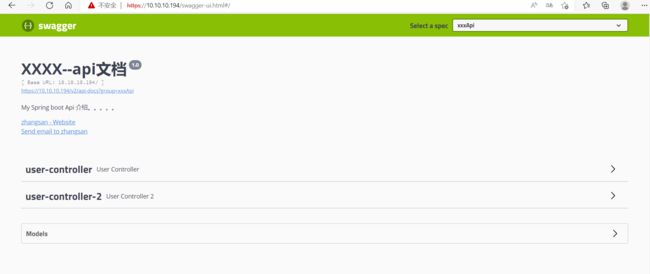
.title("XXXX--api文档")
.description("My Spring boot Api 介绍。。。。。")
.version("1.0")
.contact(new Contact("zhangsan","https://blog.csdn.net/sxzlc","[email protected]"))
.build();
}
}
===
2.4.访问
https://10.10.10.194/swagger-ui.html#/
===
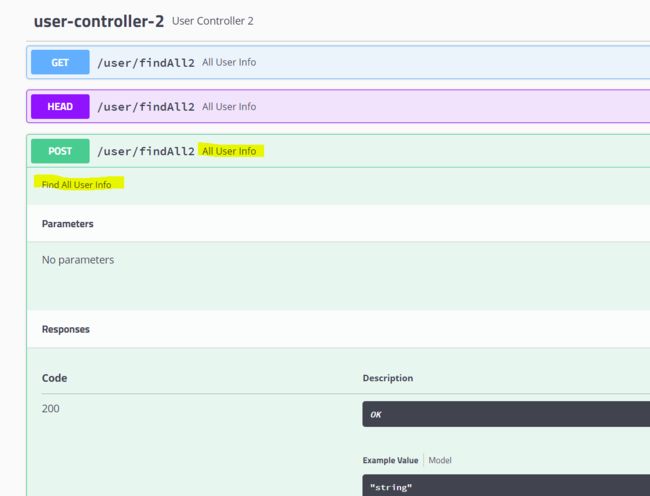
2.5.访问效果以及对应的代码
效果
代码
package com.sxz.test.one.controller;

import java.util.List;

import org.springframework.beans.factory.annotation.Autowired;
import org.springframework.stereotype.Controller;
import org.springframework.ui.Model;
import org.springframework.web.bind.annotation.RequestMapping;

import com.sxz.test.one.entity.User;
import com.sxz.test.one.service.UserService;

import io.swagger.annotations.Api;
import io.swagger.annotations.ApiOperation;
import io.swagger.annotations.ApiParam;
import lombok.extern.slf4j.Slf4j;

@Api(value = "User Info")
@Controller
@RequestMapping("/user")
@Slf4j
public class UserController2 {

    @Autowired
    UserService userService;

    @ApiOperation(value = "All User Info",notes = "Find All User Info")
    @RequestMapping("/findAll2")
    public String findAll(
    		@ApiParam(value = "Model",required = true,example = "example model")
    		Model model){

    	log.info("Hello World !-------!");
    	List userList = userService.findAll();
    	model.addAttribute("userList",userList);

    	return "helloThymeleafMyBatis.html";

    }
}
xxx
2.6.类的标注
xxxx
在完成了上述配置后,其实已经可以生产文档内容,但是这样的文档主要针对请求本身,描述的主要来源是函数的命名,通常需要自己增加一些说明来丰富文档内容。
Swagger使用的注解及其说明:
@Api:用在类上,说明该类的作用。
@ApiOperation:注解来给API增加方法说明。
@ApiParam:定义在参数上
@ApiResponses:用于表示一组响应
@ApiResponse:用在@ApiResponses中,一般用于表达一个错误的响应信息
l code:数字,例如400
l message:信息,例如"请求参数没填好"
l response:抛出异常的类@ApiModel:描述一个Model的信息(一般用在请求参数无法使用@ApiImplicitParam注解进行描述的时候)
l @ApiModelProperty:描述一个model的属性
@ApiImplicitParams: 用在方法上包含一组参数说明。
@ApiImplicitParam:用来注解来给方法入参增加说明。
@ApiImplicitParam的参数说明:
paramType:指定参数放在哪个地方
header:请求参数放置于Request Header,使用@RequestHeader获取 query:请求参数放置于请求地址,使用@RequestParam获取 path:(用于restful接口)–>请求参数的获取:@PathVariable body:(不常用) form(不常用)
name:参数名
dataType:参数类型
required:参数是否必须传
true | false
value:说明参数的意思
defaultValue:参数的默认值
xxxx
2.7.启动Log
。。。。。。。
[2023-07-31 19:04:20.990] [level: INFO] [Thread: main] [ Class:org.springframework.boot.web.servlet.context.ServletWebServerApplicationContext >> Method: prepareWebApplicationContext:285 ]
INFO:Root WebApplicationContext: initialization completed in 5824 ms
[2023-07-31 19:04:24.578] [level: INFO] [Thread: main] [ Class:springfox.documentation.spring.web.PropertySourcedRequestMappingHandlerMapping >> Method: initHandlerMethods:69 ]
INFO:Mapped URL path [/v2/api-docs] onto method [springfox.documentation.swagger2.web.Swagger2Controller#getDocumentation(String, HttpServletRequest)]
[2023-07-31 19:04:24.889] [level: INFO] [Thread: main] [ Class:org.springframework.scheduling.concurrent.ThreadPoolTaskExecutor >> Method: initialize:181 ]
INFO:Initializing ExecutorService 'applicationTaskExecutor'
[2023-07-31 19:04:25.143] [level: INFO] [Thread: main] [ Class:org.springframework.boot.autoconfigure.web.servlet.WelcomePageHandlerMapping >> Method:
INFO:Adding welcome page: class path resource [static/index.html]
。。。。。。。
2.8.xxx
xxxx
2.9.xxx
xxxx
===
■3.非Spring 项目中,Swagger的运用
3.0.Sping介绍
Spring Boot,Sprint Batch,ThymeLeaf 学习_sun0322的博客-CSDN博客
xxxx
3.1.简介
Swagger是一种用于创建、文档化和测试Restful API的工具,不限于特定的框架或工程。即使你的web工程不是基于Spring或Spring Boot的,你仍然可以使用Swagger来实现API文档化和测试。
如果你的web工程不是基于Spring或Spring Boot的,你可以使用Swagger2配置Swagger,提供API文档化和测试的功能。下面给出一个示例配置:
xxxx
3.2.SwaggerConfig
import org.springframework.context.annotation.Configuration;
import springfox.documentation.builders.ApiInfoBuilder;
import springfox.documentation.builders.PathSelectors;
import springfox.documentation.builders.RequestHandlerSelectors;
import springfox.documentation.service.ApiInfo;
import springfox.documentation.spi.DocumentationType;
import springfox.documentation.spring.web.plugins.Docket;
import springfox.documentation.swagger2.annotations.EnableSwagger2;

@Configuration
@EnableSwagger2
public class SwaggerConfig {

   public Docket api() {
      return new Docket(DocumentationType.SWAGGER_2)
            .select()
            .apis(RequestHandlerSelectors.basePackage("com.example.api")) // 修改为你的API接口所在的包路径
            .paths(PathSelectors.any())
            .build()
            .apiInfo(apiInfo());
   }

   private ApiInfo apiInfo() {
      return new ApiInfoBuilder()
            .title("API文档")
            .description("描述你的API")
            .version("1.0")
            .build();
   }
}
xxxx
3.3.配置Swagger相关Bean
import org.springframework.context.annotation.Bean;
import org.springframework.context.annotation.Configuration;

@Configuration
public class AppConfig {

   @Bean
   public SwaggerConfig swaggerConfig() {
      return new SwaggerConfig();
   }
}
===
3.4.访问
启动工程并访问Swagger UI:当你的工程启动后,你可以通过访问Swagger UI来查看生成的API文档。Swagger UI的访问地址一般是
http://localhost:port/swagger-ui.html,其中port是你的web应用的端口号。==
需要注意的是,以上示例代码是以Java配置的方式示范,如果你的工程使用其他配置方式(如XML配置),你需要相应地进行调整。
==
以上是一个基本的Swagger2配置示例,通过在工程中配置Swagger,你可以实现API文档化和测试的功能。具体的配置细节可能会因为工程的不同而有所差异,你可以根据Swagger官方文档或相关的API文档进行调整和修改。
xxxx
3.5.对于非Spring工程,如何加载Swagger的配置类
对于非Spring工程,如果你想要让程序加载Swagger的配置类
public class MainClass {
   public static void main(String[] args) throws Exception {
      Class swaggerConfigClass = Class.forName("你的包名.SwaggerConfig"); // 修改为SwaggerConfig类所在的包名
   }
}
xxx
调用SwaggerConfig类的api()方法:通过反射调用SwaggerConfig类中的api()方法来获取Docket对象。
public class MainClass {
   public static void main(String[] args) throws Exception {
      Class swaggerConfigClass = Class.forName("你的包名.SwaggerConfig"); // 修改为SwaggerConfig类所在的包名

      Object swaggerConfigObject = swaggerConfigClass.newInstance();

      Method apiMethod = swaggerConfigClass.getDeclaredMethod("api");

      Docket docket = (Docket) apiMethod.invoke(swaggerConfigObject);
   }
}
使用Docket对象进行Swagger的配置和初始化。
public class MainClass {
   public static void main(String[] args) throws Exception {
      Class swaggerConfigClass = Class.forName("你的包名.SwaggerConfig"); // 修改为SwaggerConfig类所在的包名

      Object swaggerConfigObject = swaggerConfigClass.newInstance();

      Method apiMethod = swaggerConfigClass.getDeclaredMethod("api");

      Docket docket = (Docket) apiMethod.invoke(swaggerConfigObject);

      // 根据你的实际需求,进行其他的Swagger配置(例如设置路径,设置API文档信息等)

      // 初始化Swagger
      Swagger swagger = docket.initialize();

      // 可以根据需要将Swagger对象保存下来,供其他需要使用Swagger的地方使用
   }
}
sss
以上是在非Spring工程中手动加载Swagger配置类的方法,你可以根据实际情况进行调整。需要注意的是,这种方式需要手动处理加载和初始化,相对于Spring工程中的自动注入来说,比较繁琐。如果你的项目是非常简单的项目,也可以考虑使用Spring或Spring Boot来简化Swagger的配置和集成。
3.6.Web工程,如何配置,能让一个类在服务启动的时候,被加载
方法1(最基本方法):
首先,创建一个类实现
javax.servlet.ServletContextListener接口并重写contextInitialized方法,该方法会在Web应用启动时被调用。在该方法中,你可以执行你想要在服务启动时加载的逻辑。
↓
import javax.servlet.ServletContextEvent;
import javax.servlet.ServletContextListener;

public class MyServletContextListener implements ServletContextListener {
   @Override
   public void contextInitialized(ServletContextEvent servletContextEvent) {
      // 这里写你想要在服务启动时加载的逻辑
   }

   @Override
   public void contextDestroyed(ServletContextEvent servletContextEvent) {
      // 服务关闭时的逻辑
   }
}
然后,在
web.xml中配置该监听器。找到web.xml文件,添加以下代码:
你的包名.MyServletContextListener
xxx
当你的Web应用启动时,
MyServletContextListener类的contextInitialized方法将会被调用,在该方法中可以执行你想要在服务启动时加载的逻辑。===
方法2:@WebListener
注意:在最新的Servlet规范和Servlet 3.0之后,你还可以使用注解的方式配置
ServletContextListener。你可以在想要加载的类上添加@WebListener注解,并将其放置在类上方。
xxx
import javax.servlet.annotation.WebListener;
import javax.servlet.ServletContextEvent;
import javax.servlet.ServletContextListener;

@WebListener
public class MyServletContextListener implements ServletContextListener {
   @Override
   public void contextInitialized(ServletContextEvent servletContextEvent) {
      // 这里写你想要在服务启动时加载的逻辑
   }

   @Override
   public void contextDestroyed(ServletContextEvent servletContextEvent) {
      // 服务关闭时的逻辑
   }
}
↑
这种方式更简洁,并且不需要在
web.xml中进行配置。无论是使用
web.xml配置还是使用注解配置ServletContextListener,都可以达到在Web服务启动时加载某个类的目的。
xxx
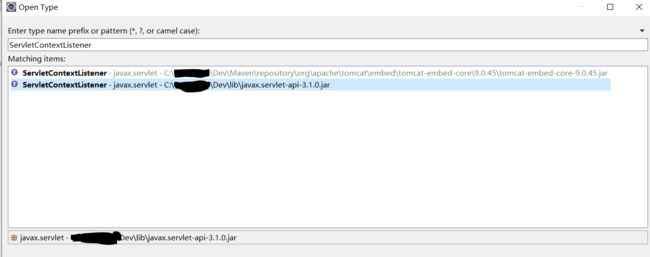
3.7.ServletContextListener
===
 * DO NOT ALTER OR REMOVE COPYRIGHT NOTICES OR THIS HEADER.

package javax.servlet;

import java.util.EventListener;

/**
 * Interface for receiving notification events about ServletContext
 * lifecycle changes.
 *
 * In order to receive these notification events, the implementation
 * class must be either declared in the deployment descriptor of the web
 * application, annotated with {@link javax.servlet.annotation.WebListener},
 * or registered via one of the addListener methods defined on
 * {@link ServletContext}.
 *
 * Implementations of this interface are invoked at their
 * {@link #contextInitialized} method in the order in which they have been
 * declared, and at their {@link #contextDestroyed} method in reverse
 * order.
 *
 * @see ServletContextEvent
 *
 * @since Servlet 2.3
 */
public interface ServletContextListener extends EventListener {

    /**
     * Receives notification that the web application initialization
     * process is starting.
     *
     * All ServletContextListeners are notified of context
     * initialization before any filters or servlets in the web
     * application are initialized.
     *
     * @param sce the ServletContextEvent containing the ServletContext
     * that is being initialized
     */
    public void contextInitialized(ServletContextEvent sce);

    /**
     * Receives notification that the ServletContext is about to be
     * shut down.
     *
     * All servlets and filters will have been destroyed before any
     * ServletContextListeners are notified of context
     * destruction.
     *
     * @param sce the ServletContextEvent containing the ServletContext
     * that is being destroyed
     */
    public void contextDestroyed(ServletContextEvent sce);
}
xxx
3.8.非 Spring项目,Swagger UI 的静态资源文件 在jar文件中, 需要单独 提取出来,再配置到某个地方
xxx
如果您的项目不是Spring项目,您需要手动提取Swagger UI的静态资源文件,并将它们放在您的项目中。您可以从Swagger官网下载Swagger UI的静态资源文件,并将它们放在您的项目中的一个静态资源文件夹中。
然后,您需要在您的应用程序中配置Swagger UI的路径。您可以在应用程序的配置文件中添加以下配置:
xxx
@WebServlet(
    name = "SwaggerUIServlet",
    urlPatterns = {"/swagger/*"}
)
public class SwaggerUIServlet extends HttpServlet {
    protected void doGet(HttpServletRequest request, HttpServletResponse response) throws ServletException, IOException {
        String path = request.getPathInfo();
        String resourcePath = "/static/swagger" + path;
        InputStream inputStream = getServletContext().getResourceAsStream(resourcePath);
        if (inputStream != null) {
            byte[] buffer = new byte[1024];
            int bytesRead;
            while ((bytesRead = inputStream.read(buffer)) != -1) {
                response.getOutputStream().write(buffer, 0, bytesRead);
            }
            inputStream.close();
        } else {
            response.sendError(HttpServletResponse.SC_NOT_FOUND);
        }
    }
}
xxx
3.9.OpenAPI(Swagger)是什么
OpenAPI(以前称为Swagger)是一种用于设计和描述RESTful API的规范。它提供了一种可读性强且易于理解的方式来描述API的结构,包括请求和响应的参数、路径、操作等。OpenAPI规范可以用于生成客户端代码、自动生成文档、进行测试和验证等。它是一种开放标准,由OpenAPI规范委员会进行维护。
xxx
3.10.Swagger中的 YAML是什么
Swagger中的YAML是一种轻量级的数据序列化格式,它被用来描述RESTful API。它是一种基于文本的格式,易于阅读和编写。YAML文件可以包含关于API的所有信息,如API的路径、请求和响应参数、授权信息等。使用YAML格式可以方便地定义和管理API文档,同时也有助于自动生成客户端和服务器端代码。Swagger支持JSON和YAML格式,并且可以根据需要进行转换。
xxx
3.11.Swagger中的 YAML 是如何生成的
Swagger中的YAML是通过编写Swagger规范的OpenAPI文档来生成的。OpenAPI规范是一种用于定义RESTful API的语言和格式,它可以通过YAML或JSON格式的文件来描述API的各个方面,包括API的参数、请求和响应格式、接口路径、请求方法等等。
要生成Swagger中的YAML,可以使用OpenAPI规范的编辑器或生成器工具,例如Swagger Editor、Swagger UI、ReDoc等等。这些工具可以让您通过GUI界面或直接编辑YAML文件来创建OpenAPI文档,然后将其导出为YAML格式,以供Swagger使用。
需要注意的是,生成的YAML文档必须符合OpenAPI规范,否则Swagger可能无法正确解析和显示。因此,在编写YAML文档时,应仔细阅读OpenAPI规范文档,并确保文档的格式、语法和内容都符合规范。
xxx
3.12.Swagger中的 npm 是指什么
在 Swagger 中,npm 是 Node.js 的包管理器。它允许开发者安装和管理 Node.js 的包和依赖项。Swagger 使用 npm 来安装和管理其工具和插件,并确保这些工具和插件在使用 Swagger 时能够正常工作。因此,如果您要使用 Swagger,您需要安装 Node.js 和 npm。
xxx
3.13.nodejs 如何和 Swagger相关联
xxx
Node.js 可以使用 Swagger 来生成 API 文档和进行 API 测试。实现方式如下:
=====
1.安装 Swagger:可以使用 npm 来安装 Swagger,命令如下:
npm install -g swagger
2.创建 Swagger 项目:使用下面的命令创建一个 Swagger 项目:
swagger project create 3.编辑 Swagger API 文档:在项目目录下的 api/swagger/swagger.yaml 文件中,定义 API 文档。在这个文件中,你可以定义 API 的路径、请求参数、响应等信息。
4.实现 API 逻辑:在项目目录下的 api/controllers 目录中,实现 API 的逻辑。
5.启动 Swagger 项目:使用下面的命令启动 Swagger 项目:
swagger project start6.访问 API 文档:在浏览器中输入 http://localhost:10010/docs,即可访问生成的 API 文档。
=====
通过以上步骤,你就可以使用 Node.js 和 Swagger 相关联了
xxx
3.14.如何在nodejs中使用swagger---博客
如何在nodejs中使用swagger_node使用swigger_青浅l的博客-CSDN博客
3.15.nodejs的swagger 和spring boot 的swagger有什么区别
Node.js 的 Swagger 和 Spring Boot 的 Swagger 在实现上存在一些区别。
下面是它们之间的一些区别:
===
编程语言:
Node.js 的 Swagger 是基于 JavaScript 的开发,而 Spring Boot 的 Swagger 是基于 Java 的开发。
===
框架:
Node.js 的 Swagger 主要针对 Express.js 这样的 Node.js Web 框架进行集成,而 Spring Boot 的 Swagger 是与 Spring MVC 和 Spring Boot 框架进行紧密集成。
===
配置方式:在 Node.js 的 Swagger 中,可以通过在代码中注释 API 相关的信息来生成 API 文档。而在 Spring Boot 的 Swagger 中,通常使用注解来定义 API 的信息,例如在控制器类和方法上添加 @ApiOperation 和 @ApiParam 等注解。
===
工具支持:
Node.js 的 Swagger 有一些针对 Express.js 的 Swagger 中间件,例如 swagger-ui-express、swagger-jsdoc 等,可以方便地集成 Swagger UI 和生成 API 文档。而 Spring Boot 的 Swagger 有一个官方支持的 Swagger 集成模块叫做 springfox,可以方便地集成 Swagger UI 和生成 API 文档。
xxx
3.16.后台是java 能否使用nodejs 的swagger 生成 API文档
xxxx
在Node.js项目中安装swagger-jsdoc和swagger-ui-express库。
在Node.js项目中创建一个swagger.js文件,用于配置swagger文档生成参数和路由。
const express = require('express');
const swaggerJsdoc = require('swagger-jsdoc');
const swaggerUi = require('swagger-ui-express');

const app = express();
const port = 3000;

// 配置swagger-jsdoc
const options = {
  swaggerDefinition: {
    info: {
      title: 'API文档',
      version: '1.0.0',
      description: 'API接口文档',
    },
    basePath: '/',
  },
  apis: ['./routes/*.js'], // 匹配路由文件路径
};
const specs = swaggerJsdoc(options);

// 生成API文档路由
app.use('/api-docs', swaggerUi.serve, swaggerUi.setup(specs));

// 启动服务器
app.listen(port, () =>
  console.log(`Server listening at http://localhost:${port}`)
);
xxx
在Node.js项目中的路由文件中添加swagger注释,用于生成API文档。
/**
 * @swagger
 * /api/users:
 *   get:
 *     summary: 获取所有用户
 *     description: 获取所有用户的详细信息
 *     responses:
 *       200:
 *         description: 成功获取用户列表
 *       500:
 *         description: 服务器内部错误
 */
router.get('/api/users', (req, res) => {
  // 处理获取用户的逻辑
});
xxx
启动Node.js服务器并访问http://localhost:3000/api-docs,你将看到生成的API文档。
===
需要注意的是,上述步骤是在Node.js项目中生成API文档,而不是直接在Java后台使用Node.js的swagger库。所以,你仍然需要在Java后台实现API接口,并将其文档化。
===
然后,你可以将生成的API文档部署在Node.js服务器上,供其他开发人员或用户查看。
xxx
在Java的Web API项目中,添加Swagger的Java库(例如swagger-core和swagger-ui)到你的构建工具(例如Maven或Gradle)中。
import io.swagger.annotations.Api;
import io.swagger.annotations.ApiOperation;
import io.swagger.annotations.ApiParam;
import org.springframework.http.ResponseEntity;
import org.springframework.web.bind.annotation.GetMapping;
import org.springframework.web.bind.annotation.PathVariable;
import org.springframework.web.bind.annotation.RestController;

@RestController
@Api(tags = "用户API")
public class UserController {

    @GetMapping("/api/users/{id}")
    @ApiOperation(value = "获取用户信息", notes = "根据用户ID获取用户详细信息")
    public ResponseEntity getUserById(@ApiParam(value = "用户ID", required = true) @PathVariable("id") Long id) {
        // 根据ID查询用户
        User user = userService.getUserById(id);
        return ResponseEntity.ok(user);
    }
}
xxxx
在Node.js中,使用swagger-jsdoc库来生成API文档并提供给前端展示。你可以将生成的API文档部署在Node.js服务器上,例如使用Express框架进行部署。
const express = require('express');
const swaggerJsdoc = require('swagger-jsdoc');
const swaggerUi = require('swagger-ui-express');

const app = express();
const port = 3001;

// Swagger配置
const options = {
  swaggerDefinition: {
    info: {
      title: 'API文档',
      version: '1.0.0',
      description: 'API接口文档',
    },
    basePath: '/',
  },
  apis: ['./controllers/*.java'], // 匹配Java控制器文件路径
};
const specs = swaggerJsdoc(options);

// 生成API文档路由
app.use('/api-docs', swaggerUi.serve, swaggerUi.setup(specs));

// 启动Node.js服务器
app.listen(port, () =>
  console.log(`Server listening at http://localhost:${port}`)
);
xx
在Java项目中的API文档生成完成后,将生成的API文档(一般是JSON格式)提供给Node.js服务器,让其动态生成并展示API文档。
====
需要注意的是,Node.js和Java是两个独立的运行时环境,无法直接将Java代码嵌入到Node.js代码中。所以,你需要确保Java项目中的API文档生成和Node.js服务器之间能够进行协作,例如通过文件传输、HTTP请求等方式将生成的API文档传递给Node.js服务器来展示
xxx
3.17.nodejs的nodejs,扫描的代码是什么代码
Node.js 的 Swagger 扫描的代码是你的后台项目代码,也就是你在 Node.js 中编写的 API 相关的代码。
Swagger 通过解析代码中的相关注释来提取 API 的信息并生成 API 文档。通常情况下,你需要在你的 API 路由的代码中使用特定的注释格式,来标识每个 API 的路由、请求方式、参数、响应等信息。
在示例代码中,我们使用了 swagger-jsdoc 中间件来扫描通过 JSDoc 注释标注的 API 相关信息。通过在路由的处理函数前使用注释,swagger-jsdoc 可以自动从代码中提取这些信息并生成 Swagger 规范的 JSON。
以下是一个示例 API 路由的代码
/**
 * @swagger
 * /api/users:
 *   get:
 *     summary: 获取用户列表
 *     description: 获取所有用户的列表
 *     responses:
 *       '200':
 *         description: 成功获取用户列表
 *     tags:
 *       - 用户
 */
router.get('/api/users', (req, res) => {
  // 处理逻辑
});
xx
在上述示例中,我们在路由处理函数之前使用了
@swagger注释来标识该路由的 API 信息。注释指定了请求方式、路径、概要、描述、响应等信息,swagger-jsdoc 将会解析这些注释并生成相应的 API 文档。因此,当你运行 Node.js 应用时,Swagger 会根据路由代码中的注释解析和生成 API 文档,并提供可视化界面来展示和测试 API。扫描的代码就是你的后台项目代码中使用了 Swagger 注释的 API 路由代码。
xxx
3.18.Java RestFul的Swagger中,扫描的代码是什么代码
在 Java RestFul 中使用 Swagger,扫描的代码是你的后台项目中使用了 Swagger 注解的 API 接口代码。
Swagger 提供了一组特定的注解,用来标识 API 的相关信息,包括接口的路径、请求方法、参数、响应等。
下面是一个示例代码,展示了如何在 Java RestFul 中使用 Swagger 注解:
@RestController
@RequestMapping("/api/users")
@Api(value = "用户管理", tags = "用户管理")
public class UserController {

  @GetMapping
  @ApiOperation(value = "获取所有用户", notes = "获取所有用户的列表")
  public List getAllUsers() {
    // 处理逻辑
  }

  @PostMapping
  @ApiOperation(value = "创建用户", notes = "根据传入的用户信息创建新用户")
  public User createUser(@RequestBody User user) {
    // 处理逻辑
  }

  // 还可以添加其他接口

}
xxx
在上述示例中,我们使用了
@Api注解来标识整个 API 接口的相关信息,包括接口的名称和标签。===
在每个具体的接口方法上,我们使用了
@ApiOperation注解来标识接口的具体操作信息,包括接口的名称、描述等。===
此外,我们还可以使用其他的 Swagger 注解来标识接口的参数、响应等信息,例如
@ApiParam和@ApiResponse等。===
当你运行 Java RestFul 应用时,Swagger 会根据代码中的注解解析和生成 API 文档,并提供可视化界面来展示和测试 API。
===
因此,扫描的代码是你的后台项目中使用 Swagger 注解的 API 接口代码。这些注解用来描述和定义 API 的各种信息,Swagger 会解析这些注解,并生成相应的 API 文档。
xxx
3.19.XXX
xxx
3.20.XXX
xxx
xxx
3.20.XXX
xxx
3.21.XXX
xxx
■4.Springbox 和 Swagger之间有什么关系 ,有什么区别
xxxx
Springbox和Swagger是两个不同的工具,但它们之间有一些关联和区别。
- 关系:
- Springbox:Springbox(也称为Spring Rest Docs)是一个Spring框架的扩展,它通过为RESTful API生成文档来帮助开发人员进行API文档编写。它可以使用各种测试框架(如JUnit或TestNG)生成API文档,并与Spring MVC集成。
- Swagger:Swagger是一个用于设计、构建和文档化RESTful API的工具集。它提供了一系列工具和库,用于描述API的规范、生成交互式文档和实现API客户端或服务器。
- 区别:
- 功能:Springbox主要关注API文档的编写和生成,它与Spring框架紧密集成,并提供了一种将测试结果集成到文档中的方式。Swagger则提供了一种描述API规范的方式,并生成交互式文档,支持根据规范生成API客户端和服务器代码。
- 使用语言:Springbox是特定于Spring框架的工具,用于Java开发。Swagger则是一种通用的API描述语言,支持多种编程语言和开发框架。
- 扩展性:Springbox提供了与Spring框架集成的机制,可在开发过程中与其他Spring工具和库无缝集成。Swagger虽然支持与一些框架的集成(如Spring Boot),但在扩展方面较为灵活,可以与多种平台和框架进行集成。
综上所述,Springbox和Swagger是两个不同的工具,它们都有助于API文档的开发,但功能、使用语言和扩展性等方面存在一些区别。
===