QT Creator配置Github Copilot
目录
官网原文
实际配置操作
免费获取Github Copilot
配置QT Github Copilot
在Neovim中配置Github Copilot
将Neovim、copilot同QT关联起来
如何使用
官网原文
Using GitHub Copilot
The Copilot plugin (disabled by default) integrates GitHub Copilot into Qt Creator. You can view suggestions from Copilot in the Edit mode.
Note: If you enable the Copilot plugin, you must agree with and abide by the GitHub terms of use. It is your responsibility to know and accept the requirements and parameters of using Copilot, such as ensuring you have the rights to grant it access to your code. Also, you must understand the implications of using it and the suggestions it produces, such as code copyright and accuracy.
Requirements
To use the Copilot plugin, you need:
- An active GitHub Copilot subscription
- GitHub Copilot Neovim plugin installed, as described in About GitHub Copilot and Neovim
Enabling the Copilot Plugin
To enable the Copilot plugin:
- Select Help > About Plugins > Utilities > Copilot to enable the plugin.
- Select Help > About Plugins > Utilities > Copilot to enable the plugin.
Setting Copilot Preferences
To set preferences for using Copilot:
- Select Edit > Preferences > Copilot
- Select the Enable Copilot check box to use Copilot.
- Select Sign In to sign into your subscription, activate your device, and authorize the GitHub Copilot plugin.
The button turns into a Sign Out button.
- In the Node.js path field, enter the full path to the Node.js executable.
- In the Path to agent.js field, enter the path to agent.js in the Copilot Neovim plugin.
- Select the Request completions automatically checkbox to receive suggestions for the current text cursor position when you make changes.
Receiving Suggestions
When you write code in the Edit mode and Request completions automatically is enabled, Copilot automatically makes suggestions when you type.
------这里有个视频但没法贴过来,问题不大------
To manually request a suggestion at the current editor's cursor position, select Request Copilot Suggestion in the context menu.
Hover the mouse over a suggestion to show a toolbar with "" buttons for cycling between Copilot suggestions.
To apply a suggestion as a whole, select Apply or press the Tab key.
To apply a suggestion word-by-word, select Apply Word or press Alt+Right.
To reject a suggestion, press Esc or the arrow keys.
Enabling and Disabling Suggestions
You can enable and disable the Copilot suggestions either globally for all projects or at project level for a particular project.
To enable or disable Copilot suggestions globally, select the (Toggle Copilot) button. This also sets the value of the Enable Copilot check box in Edit > Preferences accordingly.
To enable or disable Copilot suggestions for a particular project, select Projects > Project Settings > Copilot, and then select or deselect the Enable Copilot check box.
实际配置操作
注:以上是QT官方文档给出的关于Github Copilot的插件安装并使用的方法、演示,可以在这个官方文档页面直接用浏览器翻译并对照说明。
但是,这个文档一开始的两步非常重要,而且只有QT Creator 11可以内置github copilot,版本不对的再下一个就是了,电脑上可以同时存在很多个Creator。没有文档中下面这两步是根本启动不了QT copilot的,即:

以下给懒得再跑去Github文档和Neovim文档中一步一步翻译加配置的小伙伴直接提供我的操作步骤:
免费获取Github Copilot
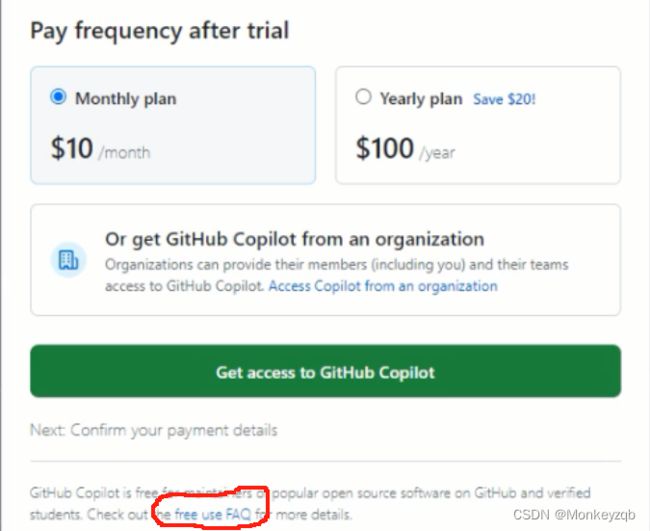
首先,如上述文档截图所示,你必须先获得Github Copilot的订阅权限,有两种方法:
- 在Github上用钱买Copilot的月票、年票(很显然每个人都可以,这也是最省事的获取方法),如图(该图需要进入你的Github账号然后点击右上角头像),然后按提示购买即可。

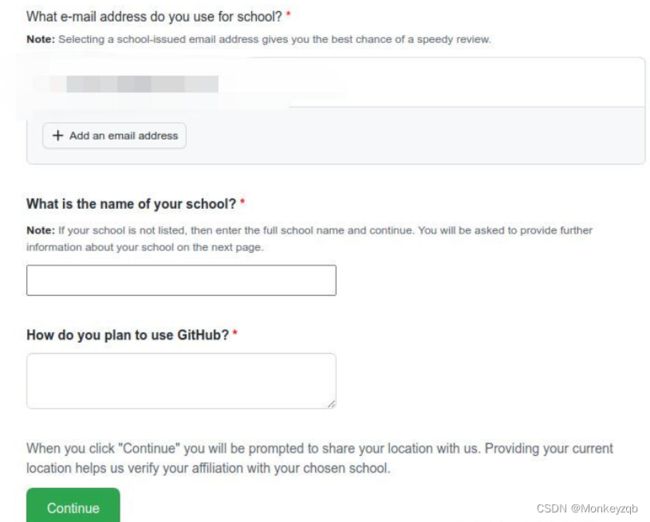
- 通过Github的学生认证获取一年的免费使用(在校的每一年都可以重新认证并免费续约),同样从上图处点击copilot,然后跳转至大致下图:(我已经注册过了页面变了,找的老图)
点击红圈跳转链接,后续操作网上大致都有,这里从网上很少提到的最后一步上传学生认证的几个关键点说起。
- 如果你用的是国内学校的学生身份认证,千万千万不要在一开始填写你教育邮箱那个界面(如下图)用科学上网,之后的所有界面相关的操作都不要使用魔法,Github相关界面卡就卡吧,放那儿等一会或者好一会就好了,不然下一个页面的最后一步就会给你报错重来了。
- 假设你一路绿灯来到了这一步(如下图),恭喜你,你离成功只差一步,请上传你的证明文件。截至2023年10月10日这一天我没有在这个界面找到“Proof Type”这个选择框,但是老一点的界面里是有的,但这根本没有影响(因为有些人报错要选择Proof Type“为”Other“)。

- 如果你很幸运的上传了文件并且按照下方的提示纠正了文件中的信息,然而最后出现了一句话(如下图),那你也很幸运和我犯了一样的错误,而这个错误很好解决,原因是你没有在文件中明确(也许太模糊了)指出你的”唯一性编号“,也就是你的学籍号码或者学生卡编号。我在这里使用的是学信网的在线验证的学籍号(因为我的学生卡上没有日期等能证明开始和结束时间的日期),提高了清晰度后再次上传就成功了。

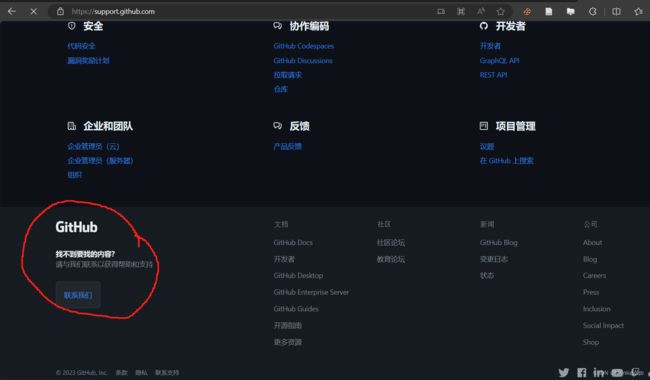
- 如果你的错误网上找不到解决方案,你也没办法解决,那就向Github官方发消息(工单)吧!可以在这个地址一步一步按照提示选择你的问题类型并写明问题(可以用中文),发送工单后等待几个小时到一天不等的时间那边就会回复你了。
配置QT Github Copilot
接下来的操作绕来绕去的很麻烦,我也是折腾了两天才弄好,大家实在看累了可以先放着过段时间再来配也是没问题的。
下图是QT官方给出的内置copilot插件的前置步骤,其中步骤1我们在上文默认解决了,接下来是步骤2。

要明确一点,这个网址是Github官方给出的,即使用Neovim+copilot的组合,实现在QT Creator中内置Copilot的功能,我们要先下载一个Neovim然后在Neovim中启动copilot。
在Neovim中配置Github Copilot
- 这里是Neovim的下载网址,这里是Nodejs的下载地址,直接官网下载就行,几乎满速下载。Nodejs是Neovim、Github官方要求下载的,下就完事了。注意一下下图Github官方要求的Nodejs和Neovim版本,我是直接下的最新的。

- 然后我们需要用git命令将Neovim copilot插件搞到自己的电脑(Windows系统)上,这是Github给出的Git bash指令(你需要在电脑上安装Git bash,可以参考这篇文章):
git clone https://github.com/github/copilot.vim.git \
$HOME/AppData/Local/nvim/pack/github/start/copilot.vim- 直接随便找个地方右键“Git bash here”,调出Git bash然后复制进去。
---------------------------------注:如果你的系统不是Windows,Github官方有其它系统的对应指令,参考这里。
- 如果你在git bash中成功执行了上面的指令,你的本地会多一个文件夹,就是需要的neovim copilot插件,文件夹地址参考下图,这个地址后面要用到。
![]()
- 然后我们要在刚下载的Neovim中配置copilot,大致步骤如下:
(1)打开neovim.exe(我的路径如下D:\Nvim\bin\nvim.exe)
(2)在跳出来类vim界面后,键盘输入
:Copilot setup也就是先打一个冒号,然后输入Copilot setup(注意空格),这个时候大概率会卡一下然后跳出来一些文字,大致意思给你一个8位的字符串,让你等几秒就会跳转Github用这个字符串授权copilot。
- 之后跳转Github后会让你输入刚刚的字符串,然后提示成功后就可以了,可以把所有界面都关了。
将Neovim、copilot同QT关联起来
这个时候,我们打开QT Creator 11,按照下图QT文档所示步骤操作:

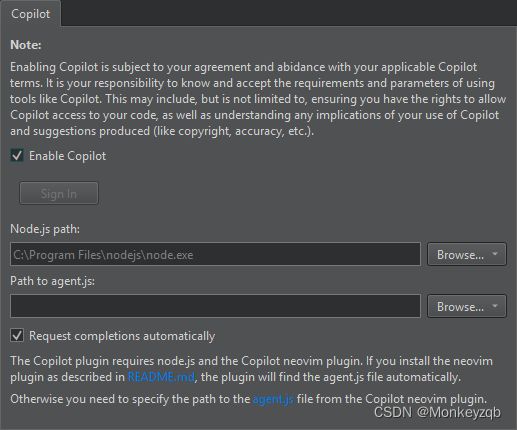
到这里我们启用了copilot,但QT还不知道copilot在哪儿,要配置路径,下面是QT官方文档指示:

当你在“Edit”中找到“Copilot”后,默认界面应该是根据你之前下载的nodejs和copilot插件路径自动填写的,如果没有自动填写,请参照我的截图(如下)自行找到文件夹选择文件即可:
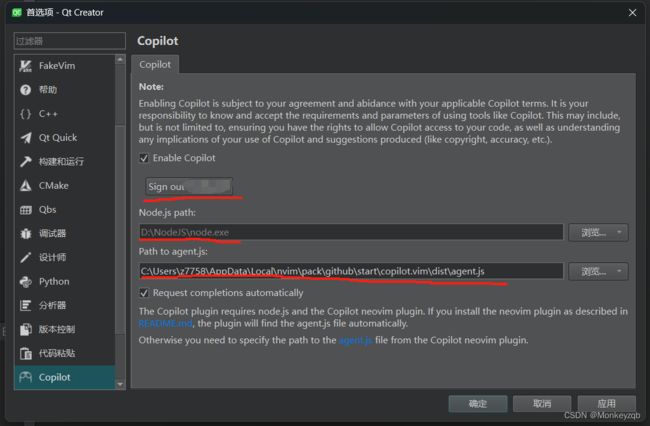
而当你正确的选择了对应文件的路径后,上面那个"sign out xxx"就会自动识别为你的Github账号,如果不自动识别就是之前的步骤不对。
如何使用
当你上面的步骤都成功了后,恭喜你,可以在QT Creator 11中开始使用copilot了,目前我的最基本的使用方法就是写一段注释,中英文都可,然后回车到下一行,等待自动生成代码后,敲Tab键接受自动生成的代码。
制作不易,有问题请讨论