Jenkins自动化测试
学习 Jenkins 自动化测试的系列文章
- Robot Framework 概念
- Robot Framework 安装
- Pycharm + Robot Framework 环境搭建
- Robot Framework 介绍
- Jenkins 自动化测试
1. Robot Framework 概念
Robot Framework是一个基于Python的,可扩展的关键字驱动的自动化测试框架。
它有几个主要特点:
- 使用简单易用的表格式语法创建测试用例;
- 提供从现有关键字扩展到更高级别关键字功能;
- 提供易于阅读的结果报告和 HTML 的 log;
- 提供标记以分类和选择要执行的测试用例;
- 平台和应用程序是独立的;
- 支持创建数据驱动的测试用例;
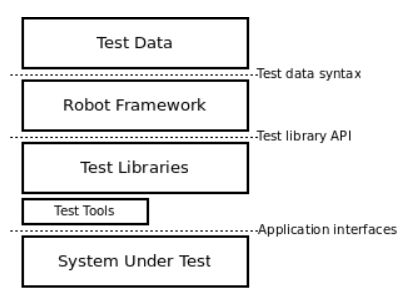
测试数据是简单,易于编辑的表格格式,启动 Robot Framework 时,它会处理测试数据,执行测试用例并生成日志和报告。核心框架对测试中的目标一无所知,与它的交互由测试库处理,库可以直接使用应用程序接口,也可以使用低级测试工具作为驱动程序。
2. Robot Framework 安装
通过 pip 安装 Robot Framework:
- 链接下载 python, 设置环境变量,CMD 控制台输入 python 验证是否安装成功。
- 链接下载 pip,解压,CMD 控制台进入解压目录,输入 python setup.py install , 安装成功,设置环境变量,输入 pip 验证是否安装成功。
3. pip 安装 wxpython 2.8.12.1: pip install wxpython==2.8.12.1
4. pip 安装 robotframework: pip install robotframework
5. pip 安装 robotframework-selenium2library: pip install robotframework-selenium2library
6. pip 安装 rtomac-robotframework-selenium2library: pip install rtomac-robotframework-selenium2library
7. pip 安装 decorator-3.3.3.tar: pip install decorator
8. pip 安装 robotframework-ride: pip install robotframework-ride
9. CMD 输入 ride.py, 弹出 RIDE 界面即为 Robot Framework 框架搭建成功。
10. 创建桌面 RIDE 图标:桌面鼠标右击创建快捷方式, 在请键入对象 处输入 C:\Programs\Python27\pythonw.exe -c "from robotide import main; main()" ,点击下一步设置图标名称 RIDE 。将图标更改为机器人图标,右击 RIDE 选择属性,点击更改图标, 在浏览器中选择目录 F:\Python27\Lib\site-packages\robotide\widgets 找到 robot.ico,点击确定,图标变为机器人图标 RIDE, Done!
提示: 如果 pip 安装时出现如下错误:
是由于未设置代理导致的 timeout, 通过设置代理 pip install wxpython==2.8.12.1 --proxy=
3. Pycharm + Robot Framework 环境搭建
- 下载 Pycharm
- Pycharm 中配置 intelliBot:Pycharm 中点击 File -> Settings -> Plugins, 在 搜索栏输入 intelliBot, 点击安装,需要设置代理的话点击 HTTP Proxy Settings 设置代理下载安装。
- Pycharm 中配置 suite 和 case 的运行环境:
配置 suite: Robot Run TestSuite / -d results $FileName$ / $FileDir$
配置 case: Robot Run SingleTestCase / -d results -t "$SelectedText$" ./ / $FileDir$
4. 测试环境是否搭建成功:
一个简单的 case:
*** Settings ***
Documentation    Example case for test
Force Tags    owner
Library    Selenium2Library
Library    Collections

*** Variables ***
${var}     1
${result}   1

*** Test Cases ***
First Case
    [Documentation]    this is a first case for test example
    [Tags]    person
    Log to console    ${var}
    Log to console    ${result}
    should be equal    ${result}    ${var}
文件名右击 -> External Tools -> Robot Run TestSuite, 显示测试结果,环境搭建成功 。
4. Robot Framework 介绍
4.1 变量 Variables
Robot Framework 用 $,@,& 分别表示标量,列表,和字典。在 Variables 下创建变量,一个简单的 case 如下所示:
*** Variables ***
${var}  value
@{list}  a  b  c  ${var}
&{dict}  key1=name key2=${list}

*** Test Cases ***
First Case
Log to console ${var}
Log to console ${list}
Log to console ${dict}
对应于 python 的语法为 var = “value”, list1 = [‘a’,’b’,’c’,var], dict1={‘key1’:’name’, ‘key2’:list1} 。
用作分隔符的空格可以变化,只要大于两个空格即可,因此可以很好的对齐数据,建议在关键字和参数之间使用 4 个空格 。
4.2 关键字 Keywords
关键字 keywords 分为内置关键字和自定义关键字。
常用内置关键字:
- Set Variable If: ${var2} Set Variable If condition value1 value2 ,给出一个条件和两个值,如果条件为true,则返回第一个值,否则返回第二个值;
- Should contain: Should Contain ${result} value ,如果 result 不包括 value 一次或者多次,则测试失败;
- log: 记录给定信息;
- log to console: 将给定信息打印到控制台;
- set suite variable: Set Suite Variable ${Scalar} ${Hello world} ,使变量在当前 suite 范围内都是可用的;
- Run Keyword If: Run Keyword If condition action arg ,如果 condition 为 true, 则使用给定的参数运行指定的关键字;
自定义关键字:
resource.txt

*** Test Cases ***
First Case
    [Documentation]    this is a first case for resource
    [Tags]    anan
    Calculate and Check Equals
    Calculate and Check Equals  expression=6+3    expected=${9}

*** Keywords ***
Calculate and Check Equals
    [Arguments]    ${expression}=3+3    ${expected}=${6}
    ${res}    Evaluate    ${expression}
    Log to console    expression=${expression}
    should be equal    ${res}    ${expected}
自定义关键字 Calculate and Check Equals,该关键字类似 python 的方法,有两个参数 expression 和 expected 默认值均为 6,如果输入参数不指定则用默认值。
4.3 resource / Library
setting 表里使用 resource 导入文件,文件中包含了关键字的定义。
setting 表里使用 library 导入内置库和自定义库,库中定义了一系列方法。
*** Settings ***
Documentation    Example case for resource
Force Tags    owner
Resource    ./resource/resource.txt
Library    Selenium2Library
Library    Collections
Library    ./lib/robot.py
其中 robot.py 是自定义库。
4.4 自定义库
自定义库中定义了一系列关键字的方法。
robot.py

import hashlib


def gen_sign(*args):
    m = hashlib.md5()
    m.update(''.join(args))
    return m.hexdigest()
def gen_sign_keywords(*args):
    m = hashlib.md5()
    m.update(''.join(args))
resource.txt
*** Test Cases ***
First Case
[Documentation] this is a first case for resource
[Tags] anan
Calculate and Check Equals
Calculate and Check Equals expression=6+3 expected=${9}
*** Keywords ***
Calculate and Check Equals
[Arguments] ${expression}=3+3 ${expected}=${6}
${res} Evaluate ${expression}
Log to console expression=${expression}
should be equal ${res} ${expected}
${result} gen_sign @{list1}
log to console ${result}
4.5 setup & teardown
在 test case 执行前执行 Test Setup,执行后执行 Teardown 。
这样做,如果多个 test case 都需要执行 Test Setup 和 Teardown 时,可以将共同的部分放到 Suite Setup 和 Suite Teardown 中执行,这样只需要执行一次即可。
*** Settings ***
Suite Setup    Commen_Suite_Setup
Suite Teardown    Commen_Suite_Teardown
Documentation    Example case for resource
Force Tags    owner
Resource    ./resource/resource.txt
Library    Selenium2Library
Library    Collections
Library    ./lib/robot.py
robot framework 测试例子:
*** Settings ***
Suite Setup    Commen_Suite_Setup
Suite Teardown    Commen_Suite_Teardown
Documentation    Example case for resource
Force Tags    owner
Resource    ./resource/resource.txt
Library    Selenium2Library
Library    Collections
Library    ./lib/robot.py

*** Test Cases ***

First Case
    [Documentation]    this is a first case for resource
    [Tags]    anan
    Calculate and Check Equals
    Calculate and Check Equals  expression=6+3    expected=${9}
    ${result_first_case}    gen_sign    @{list1}
    Set Suite Variable    ${test_id}    ${result_first_case}
    Log to console    ${test_id}
Second Case
    [Documentation]    this is a second case for custom lib
    [Tags]    anan
    ${sign}    gen_sign    @{list1}
    Log to console    ${sign}
    Log to console    ${test_id}
*** Settings ***
Documentation this is a test demo case
Library ./../lib/robot.py
*** Variables ***
${var1} value
@{list1} a b c d
&{dict1} key1=sf key2=${list1}
${INSTANTIATE_JSON_FILE}
${INSTANCEID}
*** Keywords ***
Calculate and Check Equals
[Arguments] ${expression}=3+3 ${expected}=${6}
${res} Evaluate ${expression}
Log to console expression=${expression}
should be equal ${res} ${expected}
${result} gen_sign @{list1}
log to console ${result}
should contain ${result} c
log to console ${result}
Commen_Suite_Setup
Common_Case_Setup
Common_Case_Log
Commen_Suite_Teardown
Undeploy_Case_Setup
Common_Case_Setup
Log to console ${var1}
Common_Case_Log
Log to console huyun's test case
Undeploy_Case_Setup
Log to console undeploy case setupimport hashlib
def gen_sign(*args):
m = hashlib.md5()
m.update(''.join(args))
return m.hexdigest()
def gen_sign_keywords(*args):
m = hashlib.md5()
m.update(''.join(args))5. Jenkins 自动化测试
5.1 持续集成构建
持续集成构建步骤: 代码集成 -> 编译 -> 打包 -> 部署 -> 测试
代码集成: 分支管理,用到的工具有 SVN 或者 Git。
编译/打包: 用到的工具有 maven、IDE 等。
部署: 将软件安装到服务器或者客户端。
测试: daily build,持续集成构建, CI(Continuous integration) 版本。
5.2 自动化测试
自动化测试概念: 通过编写脚本用机器代替人工执行测试。
自动化测试流程:
- 功能测试流程: 需求分析 - 测试计划 - 用例设计 - 测试执行 - 测试报告
- 自动化测试流程: 测试用例选择 - 用例编码实现 - 测试执行 - 测试报告
5.3 自动化测试框架
自动化测试框架(Robot Framework):
自动化测试框架分为几种类型:
- 关键字驱动框架: 将测试过程的操作方法抽象为关键字;
- 数据驱动框架: 将测试中用到的数据在自动化测试过程中自动加载;
- 混合型框架: 数据驱动、关键字驱动等多种技术融合的框架;
5.4 Jenkins 自动化测试
Jenkins是一个功能强大的应用程序,该程序允许持续集成和持续交付项目。
Python接口自动化测试零基础入门到精通(2023最新版)


