多级缓存的实现方案
本文技术结构
上一篇文章已经实现了jvm的进程缓存,这里就不再赘述,感兴趣的朋友请前往查看
jvm进程缓存实现_weixin_42231329的博客-CSDN博客
由于是使用nginx编写程序,所以要使用lua语言。这里只对本文所用的lua语法做简单介绍。
lua语法
数据类型
变量
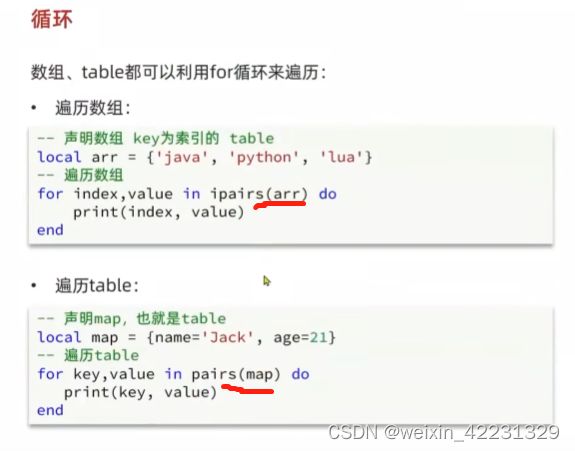
循环
需要注意的是:遍历数组是 ipairs;遍历table是pairs
函数
条件控制
其实还是跟java很类似的, 然后也能够找到vue的身影,所以说开发语言其实都是有一点相似度的,精通任意一门语言后其它的语言还是很好入门的。
OpenResty的环境搭建与使用
环境搭建
安装OpenResty的依赖开发库
yum install -y pcre-devel openssl-devel gcc --skip-broken
安装OpenResty仓库
yum-config-manager --add-repo https://openresty.org/package/centos/openresty.repo
这一步的时候有可能会提示命令不存在的错误,那么就需要先进性安装工具包
yum install -y yum-utils
安装软件包
yum install -y openresty
安装opm工具
opm是OpenResty的一个管理工具,可以帮助我们安装一个第三方的Lua模块。
yum install -y openresty-opm
默认情况下,OpenResty安装的目录是:/usr/local/openresty,具体如下:
[root@localhost luaHome]# cd /usr/local/openresty/
[root@localhost openresty]# tree
.
├── bin
├── COPYRIGHT
├── luajit
├── nginx
│   ├── conf
│   ├── html
│   ├── logs
│   └── sbin
│       └── nginx
├── resty.index
├── site
└── zlib
88 directories, 329 files
查询目录下的nginx目录,会发现OpenResty就是在Nginx基础上集成了一些Lua模块。
所以直接启动nginx就可以了,启动之前可以先更改端口号为8081,方便本地的nginx反向代理至虚拟机中的OpenResty
cd /usr/local/openresty/nginx/sbin
./nginx
或者启动/usr/local/openresty/bin/openresty 也是可以的,因为这个文件做了软连接
openresty -> /usr/local/openresty/nginx/sbin/nginx
浏览器中访问
出现这个页面后,那么恭喜你,你已经openResty入门了!
实现反向代理
接下来在本地中安装一个nginx,反向代理至虚拟机中的OpenResty就可以了
在正式玩OpenResty之前先创建一个web项目,就是简单的实现两个get请求,/item/{id},/item/stock/{id} 同样实现数据库请求就可以,这里就不赘述了。
下面的所有涉及到nginx修改的操作都是在虚拟中进行的,本地的nginx只是一个反向代理。将所有的请求都代理至虚拟机的nginx中。所以更改配置文件运行后就不做任何修改了。
先将本地的nginx.conf 贴出来
#user nobody;
worker_processes 1;
events {
worker_connections 1024;
}
http {
include mime.types;
default_type application/octet-stream;
sendfile on;
#tcp_nopush on;
keepalive_timeout 65;
upstream nginx-cluster{
#这里是可以配置成集群的,当前的集群中只做一台,方便演示,记得换成自己的虚拟机IP
server 192.168.0.3:8081;
}
server {
listen 80;
server_name localhost;
location /api {
proxy_pass http://nginx-cluster;
}
location / {
root html;
index index.html index.htm;
}
error_page 500 502 503 504 /50x.html;
location = /50x.html {
root html;
}
}
}
openResty获取请求参数
| 参数格式 |
参数示例 |
参数解析代码示例 |
| 路径占位符 |
/item/1 |
①正则表达式: location ~ /item/(\d+) { content_by_lua_file lua/item.lua; } ②匹配到的参数会自动存贮在ngx.var数组中,直接获取 local id = ngx.var[1] -- 前面有介绍过,数组的获取是从角标1开始 |
| 请求头 |
id:1 |
-- 获取请求头,返回的的table类型,也就是相当于map local headers = ngx.req.get_headers() |
| get请求参数 |
?id=1 |
-- 获取get请求,返回值是table类型 local getParams = ngx.req.get_post_args() |
| post表单参数 |
id=1 |
--获取请求体 local postBody = ngx.req.read_body() --获取post表单参数,返回的是table类型 local postParams = ngx.req.get_post_args() |
| json参数 |
{"id":1} |
--获取body中的json参数,返回的是string类型 local jsonBody = ngx.req.get_body_data() |
修改nginx.conf
修改虚拟机中的nginx.conf
在http中添加
#lua 模块 加载
lua_package_path "/usr/local/openresty/lualib/?.lua;;";
#c模块     记载
lua_package_cpath "/usr/local/openresty/lualib/?.so;;";
#在server中添加监听
location ~ /api/item/(\d+) {
      #默认的响应类型
      default_type application/json;
      #相应结果由lua/item.lua文件来决定的
     content_by_lua_file lua/item.lua;
 }
编写lua公用函数
新建 /use/local/openresty/lualib/common.lua 文件

-- 封装函数,发送请求(默认为get请求),并解析响应数据
local funcation read_http(path,params)
    --path 就是请求的路径,这个路径会被nginx监听到,然后反向代理至本地服务中
    local resp = ngx.location.capture(path,{
        method = ngx.HTTP_GET,
        args = params,
    })
    if not resp then
        -- 记录错误信息,返回404
        ngx.log(ngx.ERR, "http not found, path: ", path , ", args: ", args)
        ngx.exit(404)
    end
    return resp.body
end
-- 将方法导出
local _M = {
    read_http = read_http
}
return _M
编写业务lua文件
新增item.lua文件,并编辑
文件所在路径: /usr/local/openresty/nginx/lua/item.lua
调用之前编写的函数

--导入common函数库
local common = require('common')
local read_http = common.read_http
--导入cjson
local cJson = require('cjson')
-- 获取路径参数
local id = ngx.var[1]
--查询商品
local itemJSON = read_http("/item/" .. id , nil)
--查询库存
local stockJSON = read_http("/item/stock/" .. id , nil)
--拼接数据,要先将json数据转成lua的table数据
local item = cJson.decode(itemJSON)
local stock = cJson.decode(stockJSON)
item.stock = stock.stock
item.sold = stock.sold
local result = cJson.encode(item)
--返回结果
ngx.say(result)
read_http的path是由nginx发起的,它无法直接到达服务器,所以需要新增这个路径的监听代码
nginx.conf 文件中新增监听代码
upstream tomcat-cluster{
        # 由于nginx是采用轮询的机制,所以会出现,同一个key到多台服务器中查询,增加了服务器的负载,浪费了内存。
        # 为提高集群的缓存命中率,实现同一个key永远访问同一台服务器,需要修改nginx的负载均衡算法
        hash $request_uri; # request_uri:请求路径 ; hash:对路径进行hash运算,只要hash值不变,那么就可以确保永远访问同一台服务器,类似于redis的散列插槽
        server 192.168.0.14:8081;
        server 192.168.0.14:8082;
    }

location /item {
            proxy_pass http://tomcat-cluster;
        }
测试运行
ok!全部编辑完成,进行测试。
先跳过本地nginx的代理,直接访问虚拟机中的代理
在浏览器中进行访问
单独访问item接口
单独访问stock接口
不难发现,其实item中是包含了stock的字段的。
那么现在访问本地nginx
确认一下编写的业务lua文件是否成功将两个接口中的数据拼接成功
ok!OpenResty就完成搭建并且能够熟练操作了。你已经精通了啊!
redis缓存搭建
redis预热
为了减轻服务器的压力,所以应该是nginx缓存未命中的情况下先查找redis缓存,未命中的情况下再查找jvm缓存,再次未命中的情况下再查找数据库。所以先来搭建redis缓存。
首先实现redis的预热。这个是需要在intellij中实现的。
pom文件中引入依赖
            org.springframework.boot
            spring-boot-starter-data-redis
编写配置类
@Component
public class RedisHandler implements InitializingBean {
@Autowired
private StringRedisTemplate redisTemplate;
@Autowired
private ItemService itemService;
@Autowired
private ItemStockService stockService;
private final static ObjectMapper MAPPER = new ObjectMapper();
@Override
public void afterPropertiesSet() throws Exception {
//初始化缓存
List- itemList = itemService.list();
System.out.println("itemlist : "+itemList.size());
for (Item item : itemList){
String json = MAPPER.writeValueAsString(item);
redisTemplate.opsForValue().set("item:id:"+item.getId(), json);
}
List
stockList = stockService.list();
for (ItemStock stock : stockList){
String json = MAPPER.writeValueAsString(stock);
redisTemplate.opsForValue().set("item:stock:id:"+stock.getId(), json);
}
}
}
编写yml文件
spring:
  redis:
    host: 192.168.0.3
    port: 16379
重起项目,查看redis数据库,数据已经加载成功了。
使用openResty操作查询redis缓存
公用函数文件中编写redis缓存操作函数
--导入redis模块  单机
local redis = require "resty.redis"
--创建redis对象
local redisObj = redis:new()
--设置redis超时时间(建立链接超时时间  发送请求超时时间  响应结果超时时间) 单位:毫秒
redisObj:set_timeouts(1000,1000,1000)

-- 管理redis连接池   单机
local function redis_pool(red)
    local pool_max_idle_time = 10000 -- 连接的空闲时间,单位是毫秒
    local pool_size = 100 --连接池大小
    local ok, err = red:set_keepalive(pool_max_idle_time, pool_size)
    if not ok then
        ngx.log(ngx.ERR, "放入redis连接池失败: ", err)
    end
end


-- 查询redis的方法 ip和port是redis地址,key是查询的key   单机
local function read_redis(ip, port, key)
    -- 获取一个连接
    local ok, err = redisObj:connect(ip, port)
    if not ok then
        ngx.log(ngx.ERR, "连接redis失败 : ", err)
        return nil
    end
    -- 查询redis
    local resp, err = redisObj:get(key)
    -- 查询失败处理
    if not resp then
        ngx.log(ngx.ERR, "查询Redis失败: ", err, ", key = " , key)
    end
    --得到的数据为空处理
    if resp == ngx.null then
        resp = nil
        ngx.log(ngx.ERR, "查询Redis数据为空, key = ", key)
    end
    redis_pool(redisObj)
    return resp
end
方法封装完毕后,在业务lua中调用
function read_data(key,path,params)
    --先查询redis
    local resp = read_redis('127.0.0.1',16379,key)
    if not resp then
        --redis中查询不到再查询jvm线程缓存
        resp = read_http(path,params)
        ngx.log(ngx.ERR, "redis 查询失败,尝试查询http, key: ", key )
    end
    return resp
end
--查询商品
local itemJSON = read_data("item:id:" .. id,"/item/" .. id , nil)
--查询库存
local stockJSON = read_data("item:stock:id:" .. id,"/item/stock/" .. id , nil)
在浏览器中测试,结果正常返回,且nginx中没有报错,说明是正常查询的redis。
接下来,将10001这个key从redis中删除,再进行测试,主要查看nginx的报错日志
item.lua:13: read_data(): redis 查询失败,尝试查询http, key: item:id:10001 while sending to client, client: 192.168.0.14, server: localhost, request: "GET /api/item/10001 HTTP/1.0", host: "nginx-cluster"
这就可以证明,在redis缓存未命中的情况下,会自动去查询tomcat。
nginx本地缓存使用
直接在nginx.conf的http中添加配置
lua_shared_dict nginx_item_cache 200m;
到业务lua中编写操作nginx本地缓存的代码:
--封装查询函数
function read_data(key,path,params,expire)
    local val = nginx_item_cache:get(key)
    if not val then
        ngx.log(ngx.ERR, "本地缓存查询失败,尝试查询redis, key: ", key )
        val = read_redis('127.0.0.1',16379,key)
        if not val then
            val = read_http(path,params)
            ngx.log(ngx.ERR, "redis 查询失败,尝试查询http, key: ", key )
        end
    end
    -- set方法,指定 key  value  过期时间单位秒
    nginx_item_cache:set(key,val,expire)
    return val
end
--查询商品
local itemJSON = read_data("item:id:" .. id,"/item/" .. id , nil,20)
--查询库存
local stockJSON = read_data("item:stock:id:" .. id,"/item/stock/" .. id , nil,10)
reload之后进行测试,浏览器请求后发现,先进行本地缓存的查询,再查询redis缓存,未命中再去查询jvm进程缓存
[lua] item.lua:13: read_data(): 本地缓存查询失败,尝试查询redis, key: item:id:10001, client: 192.168.0.14, server: localhost, request: "GET /api/item/10001 HTTP/1.0", host: "nginx-cluster"
[lua] common.lua:36: read_redis(): 查询Redis数据为空, key = item:id:10001, client: 192.168.0.14, server: localhost, request: "GET /api/item/10001 HTTP/1.0", host: "nginx-cluster"
[lua] item.lua:17: read_data(): redis 查询失败,尝试查询http, key: item:id:10001 while sending to client, client: 192.168.0.14, server: localhost, request: "GET /api/item/10001 HTTP/1.0", host: "nginx-cluster"
在我们设置的有效期内都只会从本地缓存中获取,超时后,将再次去redis查询,之后存入nginx本地缓存。
ok!以上就是多级缓存的简单实现!
下一次准备玩一下缓存同步!
关于redis_cluster的配置方式,请各位看官老爷评论交流!


