#Janus# 安卓系统启动流程之《AMS 启动流程》
最近学习系统启动流程,这里对于AMS是如何启动的过程做一个输出,基于安卓源码8.0版本。
AMS的介绍就不多说了,百度一大堆,下面直接上过程:
SystemServer.class 中main方法里,调用了SystemServer的run()方法
/**

* The main entry point from zygote.

*/

public static void main(String[] args) {

    new SystemServer().run();

}
看一下run()方法里做了什么:
private void run() {

    try {
        traceBeginAndSlog("InitBeforeStartServices");
        if (System.currentTimeMillis() < EARLIEST_SUPPORTED_TIME) {
            Slog.w(TAG, "System clock is before 1970; setting to 1970.");
            SystemClock.setCurrentTimeMillis(EARLIEST_SUPPORTED_TIME);
        }
        String timezoneProperty =  SystemProperties.get("persist.sys.timezone");
        if (timezoneProperty == null || timezoneProperty.isEmpty()) {
            Slog.w(TAG, "Timezone not set; setting to GMT.");
            SystemProperties.set("persist.sys.timezone", "GMT");

        }

        if (!SystemProperties.get("persist.sys.language").isEmpty()) {
            final String languageTag = Locale.getDefault().toLanguageTag();
            SystemProperties.set("persist.sys.locale", languageTag);
            SystemProperties.set("persist.sys.language", "");
            SystemProperties.set("persist.sys.country", "");
            SystemProperties.set("persist.sys.localevar", "");
        }

        Binder.setWarnOnBlocking(true);

        Slog.i(TAG, "Entered the Android system server!");

        int uptimeMillis = (int) SystemClock.elapsedRealtime();

        EventLog.writeEvent(EventLogTags.BOOT_PROGRESS_SYSTEM_RUN, uptimeMillis);

        if (!mRuntimeRestart) {

            MetricsLogger.histogram(null, "boot_system_server_init", uptimeMillis);

        }

        SystemProperties.set("persist.sys.dalvik.vm.lib.2", VMRuntime.getRuntime().vmLibrary());

        VMRuntime.getRuntime().clearGrowthLimit();

        VMRuntime.getRuntime().setTargetHeapUtilization(0.8f);

        Build.ensureFingerprintProperty();

        Environment.setUserRequired(true);

        BaseBundle.setShouldDefuse(true);

        BinderInternal.disableBackgroundScheduling(true);

        BinderInternal.setMaxThreads(sMaxBinderThreads);

        android.os.Process.setThreadPriority(

            android.os.Process.THREAD_PRIORITY_FOREGROUND);

        android.os.Process.setCanSelfBackground(false);

        Looper.prepareMainLooper();

        System.loadLibrary("android_servers");

        performPendingShutdown();

        createSystemContext();

        mSystemServiceManager = new SystemServiceManager(mSystemContext);

        mSystemServiceManager.setRuntimeRestarted(mRuntimeRestart);

        LocalServices.addService(SystemServiceManager.class, mSystemServiceManager);

        SystemServerInitThreadPool.get();

    } finally {

        traceEnd();  // InitBeforeStartServices

    }
    // ① 重点在这里,这里启动了各种系统服务,我们关注的AMS,也是由 startBootstrapServices(); 方法启动的。
    try {
         traceBeginAndSlog("StartServices");
         startBootstrapServices();
         startCoreServices();
         startOtherServices();
         SystemServerInitThreadPool.shutdown();

    } catch (Throwable ex) {

        Slog.e("System", "******************************************");

        Slog.e("System", "************ Failure starting system services", ex);

        throw ex;

    } finally {

        traceEnd();

    }

    if (StrictMode.conditionallyEnableDebugLogging()) {
        Slog.i(TAG, "Enabled StrictMode for system server main thread.");
    }

    if (!mRuntimeRestart && !isFirstBootOrUpgrade()) {
        int uptimeMillis = (int) SystemClock.elapsedRealtime();
        MetricsLogger.histogram(null, "boot_system_server_ready", uptimeMillis);
        final int MAX_UPTIME_MILLIS = 60 * 1000;
        if (uptimeMillis > MAX_UPTIME_MILLIS) {
            Slog.wtf(SYSTEM_SERVER_TIMING_TAG,
                    "SystemServer init took too long. uptimeMillis=" + uptimeMillis);
        }
    }
    // Loop forever.
    Looper.loop();
    throw new RuntimeException("Main thread loop unexpectedly exited");

}
在注释①的位置,就是启动各种服务方法,在startBootstrapServices()中启动了ActivityManagerService,继续往下看:
private void startBootstrapServices() {

   …//多余代码删除

    // Activity manager runs the show.

    traceBeginAndSlog("StartActivityManager");

    mActivityManagerService = mSystemServiceManager.startService(ActivityManagerService.Lifecycle.class).getService();

    mActivityManagerService.setSystemServiceManager(mSystemServiceManager);

    mActivityManagerService.setInstaller(installer);

    traceEnd();

…//多余代码删除

}
首先先看这一行代码
mActivityManagerService = mSystemServiceManager.startService(ActivityManagerService.Lifecycle.class).getService();
这里调用了mSystemServiceManager.startService()方法,并且传入了一个ActivityManagerService.Lifecycle.class作为参数,然后再调用getService()方法获取到AMS对象;
这里有三个问题:
第一、ActivityManagerService.Lifecycle.class是什么?
第二、mSystemServiceManager是谁?
第三、 mSystemServiceManager.startService里做了什么?
首先第一个问题,ActivityManagerService.Lifecycle.class是什么呢?我们先点进去看他的代码:
public class ActivityManagerService extends IActivityManager.Stub

    implements Watchdog.Monitor, BatteryStatsImpl.BatteryCallback {

…//省略多余代码

    public static final class Lifecycle extends SystemService {

        private final ActivityManagerService mService;

        public Lifecycle(Context context) {

            super(context);
            mService = new ActivityManagerService(context);
        }

        @Override

        public void onStart() {

            mService.start();

        }
        public ActivityManagerService getService() {

            return mService;

        }

    }

…//省略多余代码

}
从代码中来看,他是ActivityManagerService内部的一个静态内部类,继承了SystemService,在其内部构造方法中初始化了ActivityManagerService的实例,而且onStart()方法中调用了AMS的start()方法,getService()方法返回了AMS的实例。
那么我们大胆推测,这个Lifecycle,就是用来获取AMS实例对象并且启动AMS的包装类!现在我们知道谁来启动AMS了,那么启动方法是在哪里调用的呢?
带着疑问我们先继续看第二个问题,mSystemServiceManager又是什么呢?继续看代码
/**
* All system services
*/
SystemServiceManager mSystemServiceManager;
mSystemServiceManager是SystemServiceManager,他主要的作用就是管理SystemService系统服务的创建、启动和其他生命周期事件。
继续第三个问题,startService()方法中做了什么:
我们进入它的startService()方法中看一下,同名方法有很多,我们上面的代码中参数传入的是一个class,并且我们已经知道ActivityManagerService.Lifecycle继承了SystemService,所以我们应该查看这个带泛型并且参数为class的方法
@SuppressWarnings("unchecked")

public  T startService(Class serviceClass) {

    try {

        final String name = serviceClass.getName();//①

        Slog.i(TAG, "Starting " + name);

        Trace.traceBegin(Trace.TRACE_TAG_SYSTEM_SERVER, "StartService " + name);
        // Create the service.
        if (!SystemService.class.isAssignableFrom(serviceClass)) {

            throw new RuntimeException("Failed to create " + name
                    + ": service must extend " + SystemService.class.getName());
        }
        final T service;
        try {

            Constructor constructor = serviceClass.getConstructor(Context.class);//②

            service = constructor.newInstance(mContext);

        } catch (InstantiationException ex) {
            throw new RuntimeException("Failed to create service " + name
                    + ": service could not be instantiated", ex);
        } catch (IllegalAccessException ex) {
            throw new RuntimeException("Failed to create service " + name
                    + ": service must have a public constructor with a Context argument", ex);
        } catch (NoSuchMethodException ex) {
            throw new RuntimeException("Failed to create service " + name
                    + ": service must have a public constructor with a Context argument", ex);
        } catch (InvocationTargetException ex) {
            throw new RuntimeException("Failed to create service " + name
                    + ": service constructor threw an exception", ex);
        }

        startService(service);
        return service;

    } finally {
        Trace.traceEnd(Trace.TRACE_TAG_SYSTEM_SERVER);
    }
}
其实代码中很简单(关注注释①和②),它就是通过反射获取到Lifecycle对象,然后又通过反射方法执行了Lifecycle的构造方法得到了Lifecycle的实例,最后将这个实例作为参数又调用了startService()方法, 继续往下看

查看第三个方法(因为传入的参数是个实例对象,并且是SystemService的子类)
public void startService(@NonNull final SystemService service) {

    // Register it.

    mServices.add(service);

    // Start it.

    long time = SystemClock.elapsedRealtime();

    try {

    service.onStart();

    } catch (RuntimeException ex) {

        throw new RuntimeException("Failed to start service " + service.getClass().getName()

    + ": onStart threw an exception", ex);

    }

    warnIfTooLong(SystemClock.elapsedRealtime() - time, service, "onStart");

}
其他内容先不管,看到try catch内,调用了service的onStart()方法,这个service是通过反射获取到的ActivityManagerService.Lifecycle对象,我们再回到之前的代码中看
public static final class Lifecycle extends SystemService {

    private final ActivityManagerService mService;

    public Lifecycle(Context context) {
        super(context);
        mService = new ActivityManagerService(context);
    }

    @Override
    public void onStart() {
        mService.start();
    }

    public ActivityManagerService getService() {
        return mService;
    }

}
看到这是不是一切都明白了?Lifecycle内的onStart方法中调用了AMS的start()方法,start()就是AMS的启动方法,到这里AMS就是被启动了,同时又通过getService()方法获取到了AMS的实例,用来做其他初始化操作。
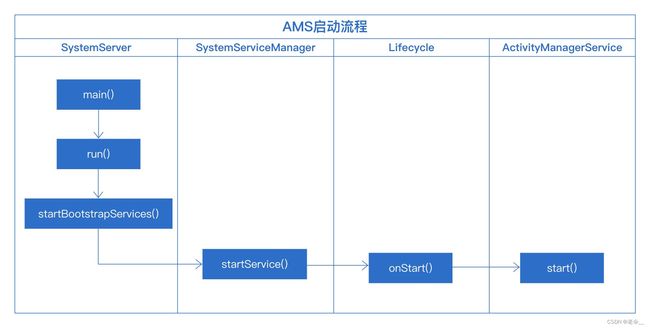
下面附上AMS启动方法调用流程图,其实整体流程非常简单,而且这也只是Android系统启动流程的非常小的一部分,写这篇也是对自己学习过程的一个记录,接下来会继续总结其他系统组件启动流程~