深入了解 Squid 代理服务器及应用
目录
- 一、Squid 代理服务器是什么
-
- 1. Squid工作机制
- 2. 代理的基本类型
-
- 2.1 传统代理
- 2.2 透明代理
- 2.3 反向代理
- 3. 使用代理的好处
- 二、搭建 Squid 代理服务器
-
- 1. 编译安装
- 2. 修改Squid的配置文件
- 3. squid 运行控制
- 4. 创建 Squid 服务脚本
- 三、构建传统代理服务器
-
- 1. 环境配置
- 2. 搭建步骤
-
- 2.1 squid 服务器配置
- 2.2 Web1配置
- 2.3 客户端配置(添加代理)
- 2.4 测试
- 四、构建透明代理服务器
-
- 1. 环境配置
- 2. squid 服务器配置
- 3. Web1 服务器配置
- 4. 客户机测试
- 五、ACL 访问控制
-
- 1. 概述
- 2. 定义访问控制列表
- 六、Squid 日志分析
- 七、反向代理
-
- 1. 服务器配置
- 2. 配置 Squid 服务器
- 3. Web 服务器页面准备
- 4. 客户端访问测试
一、Squid 代理服务器是什么
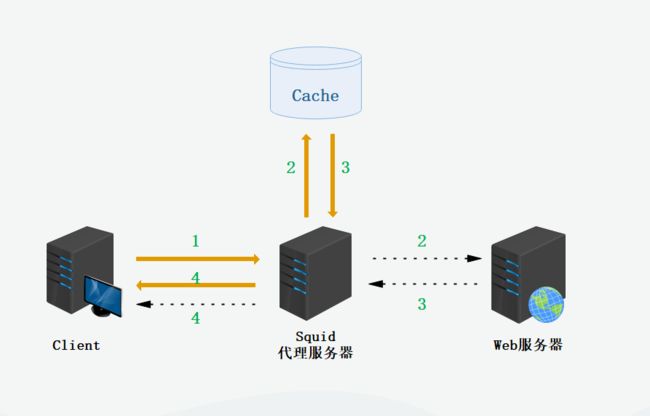
1. Squid工作机制
Web代理的工作机制,缓存网页对象,减少重复请求
- Squid 是一个缓存 Internet 数据的一个软件,它接收用户的下载申请,并自动处理所下载的数据。
- 也就是说,当一个用户想要下载一个主页时,它向 Squid 发出一个申请,要 Squid 替它下载,然后 Squid 连接所申请网站并请求该主页,接着把该主页传给用户同时保留一个备份,当别的用户申请同样的页面时,Squid 把保存的备份立即传给用户,减少了向 Internet 提交重复的 Web 请求的过程,提高了用户下载网页的速度,隐藏了客户机的真实 IP
2. 代理的基本类型
2.1 传统代理
适用于Internet,需在客户机指定代理服务器的地址和端口。
2.2 透明代理
客户机不需指定代理服务器的地址和端口,而是通过默认路由、防火墙策略将Web访问重定向给代理服处理
2.3 反向代理
squid不会使用默认80,不需要制定squid的ip:port:需要指定代理服务器,反向代理定义一个后端真实服务器的地址池,通过定义地址池进行反向代理
如果Squid反向代理服务器中缓存了该请求的资源,则将该请求的资源直接返回给客户端;否则反向代理服务器将向后台的WEB服务器请求资源,然后将请求的应答返回给客户端,同时也将该应答缓存(静态)在本地,供下一个请求者使用。(是否确认缓存在本地还得通过配置文件来定义)
nginx
upstream tomcat_server {
ip_port weight
......
}
location
  proxy_pass http://tomcat_server
3. 使用代理的好处
- 提高Web访问速度:将获得的网页数据(静态Web元素)保存到缓存中并发送给客户机,以便下次请求相同的数据时快速响应
- 隐藏客户机的真实IP地址:代替客户机向网站请求数据,从而可以隐藏用户的真实IP地址。
二、搭建 Squid 代理服务器
1. 编译安装
- 关闭防火墙以及安全增强系统
systemctl stop firewalld
systemctl disable firewalld
setenforce 0
- 安装 gcc gcc-c++ 及编译器以编译环境
yum -y install gcc gcc-c++ make
- 上传安装包并解压
[root@squid /opt]#rz -E
rz waiting to receive.
[root@squid /opt]#
[root@squid /opt]#ls
rh  squid-3.5.28.tar.gz
[root@squid /opt]#tar zxvf squid-3.5.28.tar.gz
- 编译安装
[root@squid /opt]#cd squid-3.5.28/

./configure --prefix=/usr/local/squid \
--sysconfdir=/etc \
--enable-arp-acl \
--enable-linux-netfilter \
--enable-linux-tproxy \
--enable-async-io=100 \
--enable-err-language="Simplify_Chinese" \
--enable-underscore \
--enable-poll \
--enable-gnuregex

make -j 4 && make install
- 脚本详解
./configure --prefix=/usr/local/squid                           ##安装目录
--sysconfdir=/etc/                                              ##单独将配置文件修改到/etc目录下
--enable-arp-acl                                                ##可在ACL中设置通过MAC地址进行管理,防止IP欺骗
--enable-linux-netfilter                                        ##使用内核过滤
--enable-linux-tproxy                                           ##支持透明模式
--enable-async-io=100                                       	##异步I/O,提升储存性能,值可修改
--enable-err-language="Simplify_Chinese"      					##错误信息的显示语言
--enable-underscore                                             ##允许URL中有下划线
--enable-poll                                                   ##使用Poll()模式,提升性能
--enable-gnuregex                                               ##使用GNU正则表达式
- 创建链接文件,优化路径
#创建软链接至路径环境变量,方便系统识别 squid 的系统命令
ln -s /usr/local/squid/sbin/* /usr/local/sbin
- 创建程序用户、组,改变目录属主
#创建程序用户 squid,保证系统安全性
useradd -M -s /sbin/nologin squid

#为 /usr/local/squid/var 目录递归指定属主属组
chown -R squid:squid /usr/local/squid/var/
2. 修改Squid的配置文件
vim /etc/squid.conf
...
#56行,插入下面内容,放在 http_access deny all 之前,允许任意客户机使用代理服务
http_access allow all

#61行,插入下面内容,
cache_effective_user squid				#添加指定程序用户,用来设置初始化、运行时缓存的账号,否则启动不成功
cache_effective_group squid				#添加指定账号基本组
- 内容详解
http_access allow all   			    #允许任意客户机使用代理服务,控制规则自上而下匹配
http_access deny all
http_port 3128           		 		#用来指定代理服务监听的地址和端口(默认的端口号为3128)
cache_effective_user squid    			#添加,指定程序用户,用来设置初始化、运行时缓存的账号,否则启动不成功
cache_effective_group squid   	 		#添加,指定账号基本组
coredump_dir /usr/local/squid/var/cache/squid   #指定缓存文件目录

3. squid 运行控制
squid -k parse									#检查配置文件语法是否正确
squid –zX										#-z 选项用来初始化缓存目录
squid											#启动 squid 服务
netstat -anpt | grep "squid"					#squdi 端口号为 tcp 3128

4. 创建 Squid 服务脚本
vim /etc/init.d/squid

#!/bin/bash
#chkconfig: 2345 90 25
PID="/usr/local/squid/var/run/squid.pid"
CONF="/etc/squid.conf"
CMD="/usr/local/squid/sbin/squid"

case "$1" in
   start)
     netstat -natp | grep squid &> /dev/null
     if [ $? -eq 0 ]
     then
       echo "squid is running"
       else
       echo "正在启动 squid..."
       $CMD
     fi
   ;;
   stop)
     $CMD -k kill &> /dev/null
     rm -rf $PID &> /dev/null
   ;;
   status)
     [ -f $PID ] &> /dev/null
        if [ $? -eq 0 ]
          then
            netstat -natp | grep squid
          else
            echo "squid is not running"
        fi
   ;;
   restart)
      $0 stop &> /dev/null
      echo "正在关闭 squid..."
         $0 start &> /dev/null
      echo "正在启动 squid..."
   ;;
   reload)
      $CMD -k reconfigure
   ;;
   check)
      $CMD -k parse
   ;;
   *)
      echo "用法:$0{start|stop|status|reload|check|restart}"
   ;;
esac
#2345 是默认自启动级别,90 是启动优先级,25 是停止优先级,优先级范围是 0~100,数字越大,优先级越低
- 赋权
chmod +x /etc/init.d/squid					#给该服务启动脚本可执行权限
chkconfig --add squid						#将该服务加入 chkconfig 管理
chkconfig --level 35 squid on				#能够在级别3(字符界面),级别5(视图界面)中自启动
chkconfig --list squid						#查看运行级别

- 测试
[root@squid /opt/squid-3.5.28]#chkconfig squid on
[root@squid /opt/squid-3.5.28]#service squid restart
正在关闭Squid...
正在启动Squid...

[root@squid /opt/squid-3.5.28]#lsof -i:3128
COMMAND   PID  USER   FD   TYPE DEVICE SIZE/OFF NODE NAME
squid   47928 squid   10u  IPv6  57702      0t0  TCP *:squid (LISTEN)
三、构建传统代理服务器
1. 环境配置
| 主机 | 主机名 | 操作系统 | IP 地址 | 主要软件 |
|---|---|---|---|---|
| squid | CentOS 7-3 | CentOS 7 | 192.168.8.14 | squid-3.5.28.tar.gz |
| Web1 | CentOS 7-4 | CentOS 7 | 192.168.8.13 | httpd |
| 客户端 | Win10 | Windows10 | 192.168.8.88 | / |

2. 搭建步骤
2.1 squid 服务器配置
vim /etc/squid.conf
......
http_access allow all
http_access deny all
http_port 3128
cache_effective_user squid
cache_effective_group squid
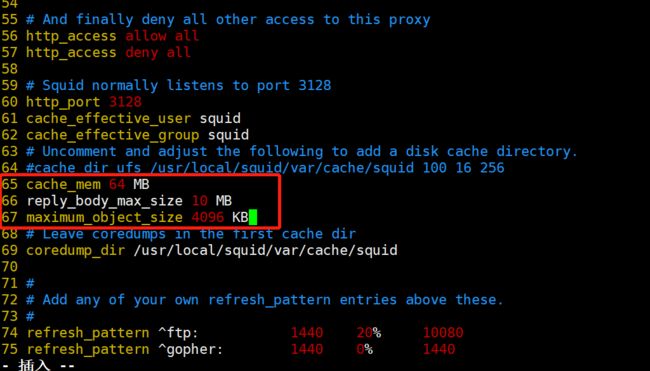
#63行,插入
cache_mem 64 MB
#指定缓存功能所使用的内存空间大小,便于保持访问较频繁的WEB对象,容量最好为4的倍数,单位为MB,建议设为物理内存的1/4
reply_body_max_size 10 MB
#允许用户下载的最大文件大小,以字节为单位,当下载超过指定大小的Web对象时,浏览器的报错页面中会出现“请求或访问太大”的提示默认设置0表示不进行限制
maximum_object_size 4096 KB
#允许保存到缓存空间的最大对象大小,以KB为单位,超过大小限制的文件将不被缓存,而是直接转发给用户
service squid restart
或
systemctl restart squid #重启服务以使配置生效
netstat -natp | grep squid #确认是否启动成功

- 修改防火墙规则
iptables -F
iptables -I INPUT -p tcp --dport 3128 -j ACCEPT
iptables -L INPUT

2.2 Web1配置
systemctl stop firewalld.service
setenforce 0
yum -y install httpd
systemctl start httpd
netstat -natp | grep 80
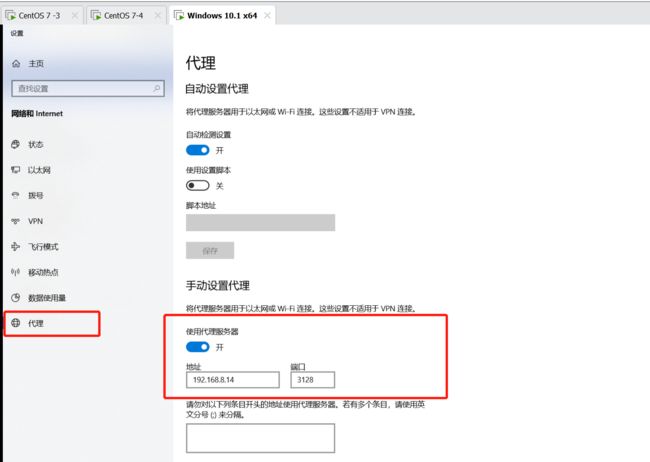
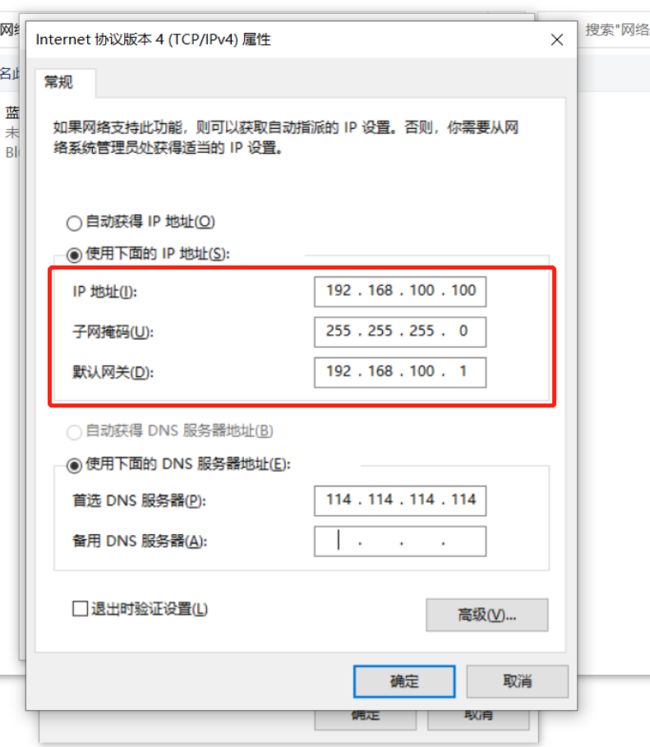
2.3 客户端配置(添加代理)
- win10 配置 IP

- 打开浏览器,配置代理功能

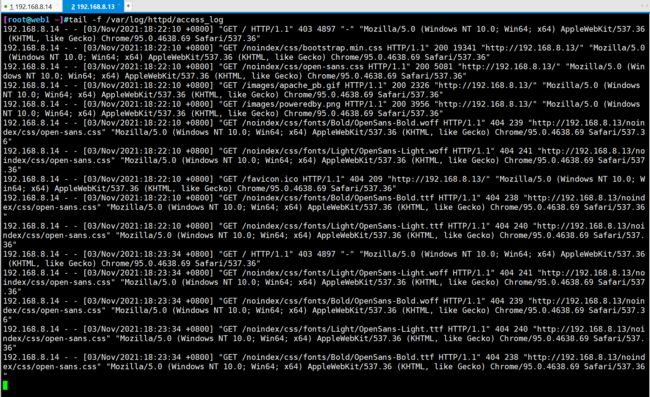
2.4 测试
-
win10打开浏览器访问 Web1

-
查看 Web1 访问日志的新增记录
tail -f /var/log/httpd/access_log
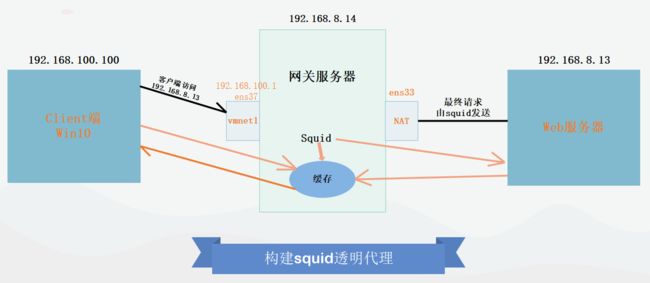
四、构建透明代理服务器
1. 环境配置
| 主机 | 主机名 | 操作系统 | IP 地址 | 主要软件 |
|---|---|---|---|---|
| squid | CentOS 7-3 | CentOS 7 | ens33:192.168.8.14 / ens37:192.168.100.1 | squid-3.5.28.tar.gz |
| Web1 | CentOS 7-4 | CentOS 7 | 192.168.8.13 | httpd |
| 客户端 | Win10 | Windows10 | 192.168.100.100 | / |
2. squid 服务器配置
systemctl stop firewalld
systemctl disable firewalld
yum install -y iptables*
systemctl start iptables
systemctl enable iptables

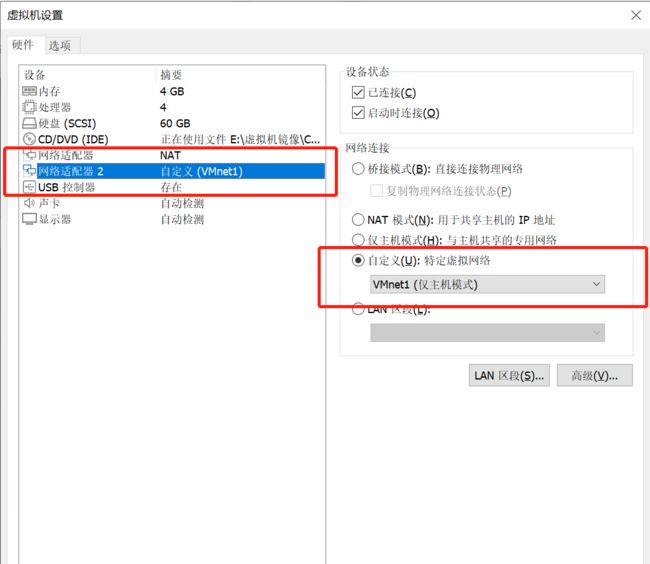
- 添加网卡后编辑网卡信息
cd /etc/sysconfig/network-scripts/
cp ifcfg-ens33 ifcfg-ens37

vim ifcfg-ens37
systemctl restart network

ifconfig
ens37: flags=4163<UP,BROADCAST,RUNNING,MULTICAST>  mtu 1500
        inet 192.168.100.1  netmask 255.255.255.0  broadcast 192.168.100.255
        inet6 fe80::b0ae:fa5f:ec3c:1d9b  prefixlen 64  scopeid 0x20<link>
        ether 00:0c:29:f0:35:c4  txqueuelen 1000  (Ethernet)
        RX packets 13  bytes 2427 (2.3 KiB)
        RX errors 0  dropped 0  overruns 0  frame 0
        TX packets 132  bytes 22247 (21.7 KiB)
        TX errors 0  dropped 0 overruns 0  carrier 0  collisions 0

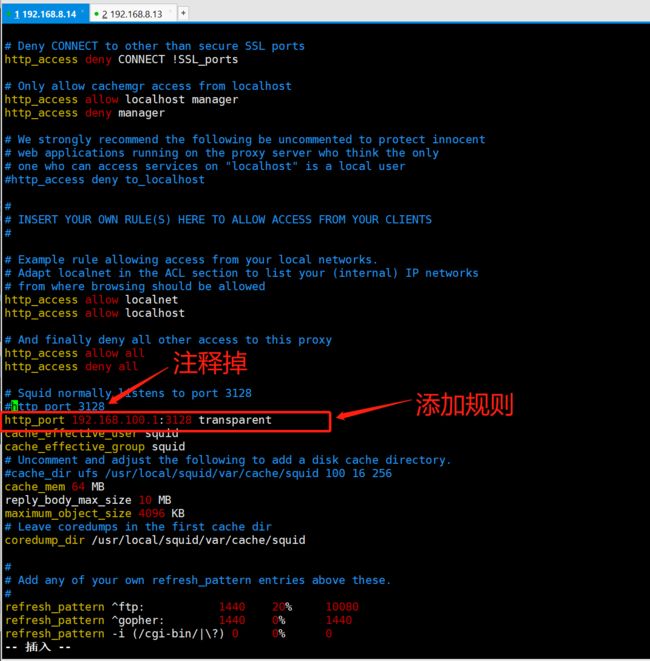
- 修改主配置文件
60行修改添加提供内网服务的IP地址,和支持透明代理选项 transparent
vim /etc/squid.conf
......
http_access allow all
http_access deny all

http_port 192.168.100.1:3128 transparent

systemctl restart squid
netstat -anpt | grep "squid"
- 开启路由转发,实现本机中不同网段的地址转发
echo 'net.ipv4.ip_forward = 1' >> /etc/sysctl.conf
sysctl -p
![]()
- 修改防火墙规则
#添加防火墙规则(将来源为100网段:80/443端口的流量重定向到3128端口)
iptables -F
iptables -t nat -F
iptables -t nat -I PREROUTING -i ens33 -s 192.168.100.0/24 -p tcp --dport 80 -j REDIRECT --to 3128
iptables -t nat -I PREROUTING -i ens33 -s 192.168.100.0/24 -p tcp --dport 443 -j REDIRECT --to 3128
iptables -I INPUT -p tcp --dport 3128 -j ACCEPT
3. Web1 服务器配置
systemctl stop firewalld
systemctl disable firewalld
setenforce 0

yum install -y httpd
systemctl start httpd.service
4. 客户机测试
- 关闭之前设置的代理服务器功能,更改IP地址与网段,然后访问

- 在web1 上查看访问日志,显示的是由代理服务器的外网口代替客户机在访问

五、ACL 访问控制
1. 概述
- 在配置文件squid.conf 中,ACL访问控制通过以下两个步骤来实现
① 使用acl 配置项定义需要控制的条件;
② 通过http_access配置项对已定义的列表做“允许”或“拒绝”访问的控制。
2. 定义访问控制列表
-
格式:acl 列表名称、列表类型、列表内容
① 列表名称:名称自定义,相当于给 acl 起个名字(有点类似于shell脚本变量名)
② 列表类型:必须使用 squid 预定义的值,对应不同类别的控制条件
③ 列表内容:是要控制的具体对象,不同类型的列表所对应的内容也不一样,可以有多个值(以空格为分隔,为“或”的关系) -
方法一
vim /etc/squid.conf
.......
acl localhost src 192.168.8.14/24            	 	#源地址为192.168.8.14
acl MYLAN src 192.168.100.0/24    					#客户机网段
acl destinationhost dst 192.168.8.13/24    	 	#目标地址为192.168.8.13
acl MC20 maxconn 20                             	#最大并发连接20
acl PORT port 21                                  	#目标端口21
acl DMBLOCK dstdomain .qq.com                   	#目标域,匹配域内所有站点
acl BURL url_regex -i ^rtsp:// ^emule://       		#以rtsp://. emule://开头的URL,-i表示忽略大小写
acl PURL urlpath_regex -i \.mp3$ \.mp4$ \.rmvb$   	#以 .mp3、.mp4、.rmvb结尾的URL路径
acl WORKTIME time MTWHF 08:30-17:30             	#时间为周一-至周五8:30~17:30, "MTWHF"为每个星期的英文首字母
- 方法二
#启动对象列表管理
mkdir /etc/squid
vim /etc/squid/dest.list
192.168.8.14     #Squid服务器IP
192.168.100.0/24     #任意需要的网段

vim /etc/squid.conf
......
acl destinationhost dst "/etc/squid/dest.list"    #调用指定文件中的列表内容
http_access deny (或allow) destinationhost      #注意,如果是拒绝列表,需要放在http_access allow all 前面

systemctl restart squid
六、Squid 日志分析
-
sarg(Squid Analysis Report Generator),是一款squid日志分析工具,采用HTML格式,详细列出每一位用户访问Internet的站点信息、时间占用信息、排名、连接次数、访问量等
-
安装 sarg 日志工具
yum install -y gd gd-devel pcre-devel 		 	 #安装图像处理软件包
mkdir /usr/local/sarg
tar zxvf sarg-2.3.7.tar.gz -C /opt/	##将zxvf sarg-2.3.7.tar.gz压缩包上传到/opt目录下

cd /opt/sarg-2.3.7
./configure --prefix=/usr/local/sarg \
--sysconfdir=/etc/sarg \     					 #配置文件目录,默认是/usr/loca/etc
--eenable-xtraprotection      					 #额外安全防护

./configure --prefix=/usr/local/sarg --sysconfdir=/etc/sarg --enable-extraprotection
make && make install
- 修改sarg配置文件
vim /etc/sarg/sarg.conf
	>>7行--取消注释
	access_log /usr/local/squid/var/logs/access.log  #指定访问日志文件
	>>25行--取消注释
	title "Squid User Access Reports"     	#网页标题
	>>120行--取消注释,修改
	output_dir /var/www/html/sarg      		#报告输出目录
	>>178行--取消注释
	user_ip no           					#使用用户名显示
	>>184行--取消注释,修改
	topuser_sort_field connect reverse     	#top排序中,指定连接次数采用降序排列,	升序是normal
	>>190行--取消注释,修改
	user_sort_field connect reverse      	#对于用户访问记录,连接次数按降序排序
	>>206行--取消注释,修改
	exclude_hosts /usr/local/sarg/noreport  #指定不计入排序的站点列表的文件
	>>257行--取消注释
	overwrite_report no         #同名同日期的日志是否覆盖
	>>289行--取消注释,修改
	mail_utility mailq.postfix       #发送邮件报告命令
	>>434行--取消注释,修改
	charset UTF-8          #指定字符集UTF-8
	>>518行--取消注释
	weekdays 0-6          #top排行的星期周期
	>>525行--取消注释
	hours 0-23           #top排行的时间周期
	>>633行--取消注释
	www_document_root /var/www/html      #指定网页根目录
cd /usr/local/sarg/
touch noreport		##添加不计入站点文件,添加的域名将不被显示在排序中
ln -s /usr/local/sarg/bin/sarg /usr/local/bin/		##设置软链接方便管理
sarg		##开启
- 安装http服务并验证页面
yum install httpd -y
systemctl start httpd
- 优化-添加定时报告
vim /usr/local/sarg/report.sh		##编写脚本,添加计划任务,执行每天生成报告
	#!/bin/bash
	#Get current date
	TODAY=$(date +%d/%m/%Y)
	#Get one week ago today
	YESTERDAY=$(date -d "1 day ago" +%d/%m/%Y)
	/usr/local/sarg/bin/sarg -l /usr/local/squid/var/logs/access.log -o /var/www/html/sarg -z -d $YESTERDAY-$TODAY &> /dev/null
	exit 0
chmod +x /usr/local/sarg/report.sh
crontab -e
	0 0 * * * /usr/local/sarg/report.sh
七、反向代理
1. 服务器配置
| 服务器 | 主机名 | IP地址 | 主要软件 |
|---|---|---|---|
| Squid 服务器 | squid_server | 192.168.8.14 | squid |
| Web1 服务器 | web_server1 | 192.168.8.13 | apache |
| Web2 服务器 | web_server2 | 192.168.8.15 | apache |
| Win10 客户端 | Windows | 192.168.8.88 | edge 浏览器 |
2. 配置 Squid 服务器
- 2.1 修改 squid 配置文件
[root@squid_server ~]# vim /etc/squid.conf

······
##60行,插入
http_port 192.168.8.14:80 accel vhost vport
http_port 192.168.8.14:443 accel vhost vport
cache_peer 192.168.8.13 parent 80 0 no-query originserver round-robin max_conn=30 weight=1 name=web1
cache_peer 192.168.8.15 parent 80 0 no-query originaservr round-robin max_conn=30 weight=1 name=web2
cache_peer_domain web1 web2 www.test.com
##表示对 www.test.com 的请求,squid 向 192.168.8.14 和 192.168.8.15 的 80 端口发出请求

参数解释:
http_port 192.168.8.14:80 accel vhost vport
squid 从一个缓存应用变成了供 Web 服务器使用的加速应用,这个时候 squid 在 80 端口监听请求,同时和 web server 的请求端口 vhost vport 绑定。这个时候请求到了 squid,squid 是不用转发请求的,而是直接要么从缓存中拿数据要么向绑定的端口直接请求数据。
accel:反向代理加速模式
vhost:支持域名或主机名来表示代理节点
vport:支持 IP 和端口来表示代理节点
cache_peer 192.168.10.30 parent 80 0 no-query originserver round-robin max_conn=30 weight=1 name=web1
parent:代表父节点,上下关系,非平级关系
80:代理内部 web 服务器的 80 端口
0:没有使用 ICP(电信运营商),表示就一台 squid 服务器
no-query:不做查询操作,直接获取数据
originserver:指定是源服务器
ronud-robin:指定 squid 通过轮询的方式将请求分发到其中一台父节点
max_conn:指定最大连接数
weight:指定权重
name:设置别名
- 2.2 清空无效的路由规则,重启 squid
iptables -F
iptables -t nat -F
systemctl restart squid
3. Web 服务器页面准备
- WEB1
yum install -y httpd
systemctl start httpd && systemctl enable httpd
echo "this is a web_server1_test" > /var/www/html/index.html
- Web2
yum install -y httpd
systemctl start httpd && systemctl enable httpd
echo "this is a web_server2_test" > /var/www/html/index.html
4. 客户端访问测试
- 添加主机映射
