openEuler 22.03 x86架构下docker运行arm等架构的容器——筑梦之路
为什么要这样做?
随着国产化的普及,国家政策对信创产业的支持,尤其一些金融证券行业、政府单位等,逐渐开始走国产化信创的路线,越来越多接触到国产 CPU (
arm平台,比如华为的鲲鹏处理器)自己买
arm平台的CPU,这个成本着实吃不消,于是尝试x86平台运行arm平台的容器来降本增效。
环境说明
1. 操作系统版本: 华为openEuler 22.03 lts x86_64
2. docker版本:20.10.12 二进制方式安装
3. buildx插件版本:0.9.1
Docker二进制方式安装和buildx插件安装
1. 二进制方式安装docker并配置
# 二进制方式安装docker并配置

#下载二进制离线压缩包
wget https://download.docker.com/linux/static/stable/x86_64/docker-20.10.12.tgz

#解压文件
tar -zxvf docker-20.10.12.tgz

chmod +x docker/*

#将二进制文件拷贝到/usr/bin/
cp docker/* /usr/bin/

#注册到系统服务
vim /usr/lib/systemd/system/docker.service
[Unit]
Description=Docker Application Container Engine
Documentation=https://docs.docker.com
After=network-online.target firewalld.service
Wants=network-online.target

[Service]
Type=notify
#指定docker存储目录/TRS/APP/docker/lib
ExecStart=/usr/bin/dockerd --graph /APP/docker/
ExecReload=/bin/kill -s HUP $MAINPID
LimitNOFILE=infinity
LimitNPROC=infinity
LimitCORE=infinity
asksMax=infinity
TimeoutStartSec=0
Delegate=yes
KillMode=process
Restart=on-failure
StartLimitBurst=3
StartLimitInterval=60s

[Install]
WantedBy=multi-user.target

#重载
mkdir -p /APP/docker/lib
systemctl daemon-reload

#启动服务并加入开机启动
systemctl enable docker --now

#检查
systemctl status docker

# 配置
mkdir -p /etc/docker

cat > /etc/docker/daemon.json <
2. 安装docker-buildx插件
# 创建目录

mkdir -p  ~/.docker/cli-plugins/

# 下载插件并改名

wget -c https://github.com/docker/buildx/releases/download/v0.9.1/buildx-v0.9.1.linux-amd64

mv buildx-v0.9.1.linux-amd64 docker-buildx

chmod +x docker-buildx

mv docker-buildx ~/.docker/cli-plugins/

# 检查验证

docker buildx  version

docker buildx ls
注册可支持的架构解释器
不指定 CPU 平台,使用
register来注册可支持的架构解析器
docker run --rm \
> --privileged \
> multiarch/qemu-user-static:register \
> --reset
ls /proc/sys/fs/binfmt_misc/ cat /proc/sys/fs/binfmt_misc/qemu-mips64el
cat /proc/sys/fs/binfmt_misc/qemu-aarch64
cat /proc/sys/fs/binfmt_misc/qemu-ppc64le启动arm架构的容器
1. 下载qemu-aarch64-static
GitHub - multiarch/qemu-user-static: :earth_africa: `/usr/bin/qemu-*-static`
wget -c https://github.com/multiarch/qemu-user-static/releases/download/v7.2.0-1/qemu-aarch64-static

# 其他架构

https://github.com/multiarch/qemu-user-static/releases/download/v7.2.0-1/qemu-arm-static

https://github.com/multiarch/qemu-user-static/releases/download/v7.2.0-1/qemu-mips-static

https://github.com/multiarch/qemu-user-static/releases/download/v7.2.0-1/qemu-mips64-static

https://github.com/multiarch/qemu-user-static/releases/download/v7.2.0-1/qemu-mipsel-static

https://github.com/multiarch/qemu-user-static/releases/download/v7.2.0-1/qemu-ppc64-static

https://github.com/multiarch/qemu-user-static/releases/download/v7.2.0-1/qemu-s390x-static

https://github.com/multiarch/qemu-user-static/releases/download/v7.2.0-1/qemu-x86_64-static
chmod +x qemu-aarch64-static启动容器时将
qemu-aarch64-static带入到容器内
注意 qemu-aarch64-static 二进制文件的路径,可以自己归纳到指定的路径,只需要带入到容器内的 /usr/bin 目录下就好了
简单测试
# 进运行一条命令查看架构

docker run -t --rm --platform arm64 -v `pwd`/qemu-aarch64-static:/usr/bin/qemu-aarch64-static alpine uname -m

docker run -i --rm --platform arm64 -v `pwd`/qemu-aarch64-static:/usr/bin/qemu-aarch64-static debian:11 uname -m

# 创建一个容器并开启一个终端

docker run -it --rm --platform arm64 -v `pwd`/qemu-aarch64-static:/usr/bin/qemu-aarch64-static debian:11 /bin/bash
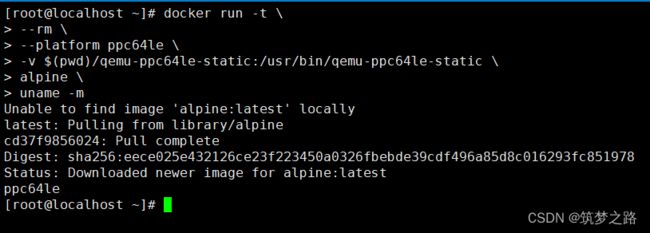
同理,启动ppc64le架构的镜像如下:
wget -c https://github.com/multiarch/qemu-user-static/releases/download/v7.2.0-1/qemu-ppc64le-static

chmod +x qemu-ppc64le-static

# 简单测试

docker run -t \
--rm \
--platform ppc64le \
-v $(pwd)/qemu-ppc64le-static:/usr/bin/qemu-ppc64le-static \
alpine \
uname -m
以上测试了两种非x86架构的镜像,均可以正常运行,其他架构的类似,这里就不再赘述。
龙芯架构这里,做特别说明
loongarch 架构的支持
1. 注册解释器
wget https://gitee.com/michael0066/qemu-loongarch64-static/blob/master/qemu-loongarch64-static

chmod +x qemu-loongarch64-static
# 注册
echo ":qemu-loongarch64:M::\x7fELF\x02\x01\x01\x00\x00\x00\x00\x00\x00\x00\x00\x00\x02\x00\x02\x01:\xff\xff\xff\xff\xff\xfe\xfe\x00\xff\xff\xff\xff\xff\xff\xff\xff\xfe\xff\xff\xff:/usr/bin/qemu-loongarch64-static:" > /proc/sys/fs/binfmt_misc/register
# 查看
ls /proc/sys/fs/binfmt_misc/ |grep loonqemu-loongarch642. 简单测试
docker run --rm \
--platform loongarch64 -t \
-v `pwd`/qemu-loongarch64-static:/usr/bin/qemu-loongarch64-static \
loongsongd/debian10_loongarch64_x64:e15.0 \
uname -m
参考资料:
x86 架构运行 其他架构镜像 - 简书
https://hub.docker.com/r/loongsongd/debian10_loongarch64_x64
构建arm镜像
以构建arm64镜像为例来说明如何构建其他平台架构的镜像。
1. 编写Dockerfile
FROM centos:7.9.2009
COPY ./qemu-aarch64-static /usr/bin/qemu-aarch64-static
RUN yum install -y net-tools gcc gcc-c++ make vim && \
    yum clean all
2. 构建镜像
docker build \
--platform arm64 \
-t centos_make:7.9_aarch64 .
3. 检查验证
docker inspect centos_make:7.9_aarch64 | grep -i 'architecture'
另一种方式:
docker build --rm -t "arm64v8/redis_new" -<这里没有使用buildx插件来构建其他架构的镜像,也是一种方法。但在云原生一般场景下构建多架构的docker镜像还是推荐使用docker buildx方式。


