上传文件
概述
当Django在处理文件上传时,文件的数据被存储在request.FILES属性中
FILES只有在请求的方法为POST且提交的form表单带有enctype="multipart/form-data"属性的情况才会包含数据。否则,FILES将为一个空的类似字典的对象
FILES中的键为input的name属性值
上传界面
DOCTYPE html>
<html lang="en">
<head>
    <meta charset="UTF-8">
    <title>文件上传title>
head>
<body>
    <form method="post" action="/upfile/" enctype="multipart/form-data">
        {% csrf_token %}
        <input type="file" name="file">
        <input type="file" name="file">
        <input type="file" name="pic">
        <input type="submit" value="上传">
    form>
body>
html>
文件存储路径
在static目录下创建名为media的目录
配置路径:
settings
# 文件上传的路径
MEDIA_URL = '/media/'   # 访问资源的地址如 http://127.0.0.1:5000/media/1.jpg # 写相对路径也可以 MEDIA_ROOT=os.path.join(BASE_DIR,"static/media")
request.FILES数据结构
{
    'file': [
        a.txt (text/plain)>,
        b.txt (text/plain)> ], 'pic': [ .jpg (image/jpeg)> ] }
视图实现
from django.conf import settings
def upfile(request):
    if request.method == "GET":
        return render(request, "upfile.html")
    else:
        # print(request.FILES)
        for name in request.FILES:
            files = request.FILES.getlist(name)
            # print(files)
            for file in files:
                #处理每个文件
                filePath = r"%s\%s"%(settings.MEDIA_ROOT,file.name)
                with open(filePath, "wb") as fp:
                    # 将文件数据切片写入描述符
                    for part in file.chunks():
                        fp.write(part)
        return HttpResponse("上传文件成功")
图片生成缩略图
# 生成缩略图

from PIL import Image
im = Image.open('c.jpg')
print(im.format, im.size, im.mode) # JPEG (840, 1024) RGB im.thumbnail((100,200)) im.save("c1.jpg", "JPEG")
分页
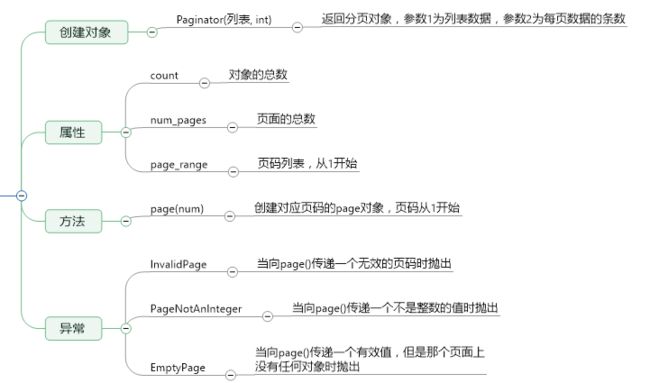
Paginator对象
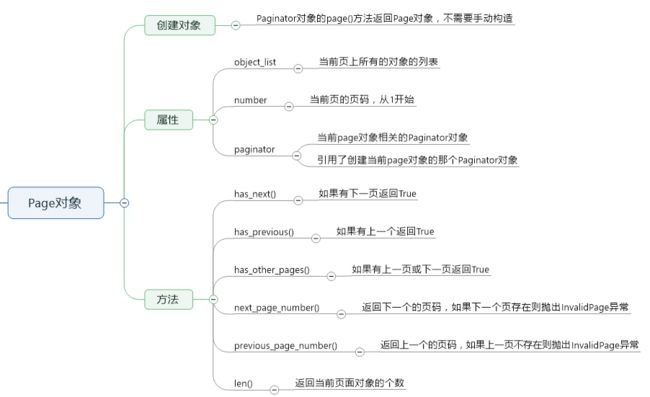
Page对象
示例
from django.core.paginator import Paginator
def students(request, num):
    allStudents = Student.objects.all()
    #分页 每页6条数据
    paginator = Paginator(allStudents, 6)
    print(paginator.count, paginator.num_pages, paginator.page_range)
    pageStus = paginator.page(num)
    return render(request, "students.html", {"stus":pageStus})
DOCTYPE html>
<html lang="en">
<head>
    <meta charset="UTF-8">
    <title>学生信息title>
head>
<body>
<h1>学生信息h1>
<ul>
    {% for stu in stus %}
        <li>{{ stu.name }}--{{ stu.grade }}--{{ stu.age }}li>
    {% endfor %}
ul>
{% if stus.has_previous %}
    <a href="/students/{{ stus.previous_page_number }}">上一页a>
{% endif %}


{% for index in stus.paginator.page_range %}
    {% if index == stus.number %}
        {{ index }}
    {% else %}
    <a href="/students/{{ index }}/">{{ index }}a>
    {% endif %}
{% endfor %}
{% if stus.has_next %}
<a href="/students/{{ stus.next_page_number }}">下一页a>
{% endif %}
body>
html>
Ajax
问题
使用视图通过上下文向模板中传递数据,需要先加载完成模板的静态页面,再执行模板模型代码,生成最后的HTML代码,返回给浏览器,这个过程将页面与数据集成到了一起,扩展性差
解决
通过ajax的方式获取数据,再通过DOM操作将数据呈现到界面上
异步:如发邮件(注册的时候提示邮件已经发送成功,其实并没有) 能提高用户体验。 如豆瓣,防止页面卡死。
前端代码
<html lang="en"> <head> <meta charset="UTF-8"> <title>展示学生title> <script type="text/javascript" src="/static/js/jquery-3.1.1.min.js">script> head> <body> <button id="btn">显示学生信息button> <ul id="stus"> ul> <script type="text/javascript"> $(document).ready(function () { $("#btn").bind("click", function () { /* $.get("/allStudents/",{"a":1,"b":2},function (data, status) { console.log("************************2"); console.log(data, status); stus = data["data"]; for (var i = 0; i < stus.length; i++){ stu = stus[i]; $li = $(""+stu.name+"---"+stu.age+" "); $("#stus").append($li) } }); */ $.ajax({ url:"/allStudents/", type:"get", data:{"a":1,"b":2,"c":3}, dataType:"json", success:function (data, status) { console.log("************************2"); console.log(data, status); stus = data["data"]; for (var i = 0; i < stus.length; i++){ stu = stus[i]; $li = $(""+stu.name+"&&&"+stu.age+" "); $("#stus").append($li) } } }); console.log("************************1"); }); }); script> body> html>def allStudents(request): if request.method == "GET": if not request.is_ajax(): return render(request, "allStudents.html") else: stus = Student.objects.all() arr = [] for stu in stus: arr.append({"name":stu.name, "age":stu.age}) return JsonResponse({"data":arr})富文本
安装:pip install django-tinymce
在站点中使用
激活应用
INSTALLED_APPS = [
    'django.contrib.admin',
    'django.contrib.auth',
    'django.contrib.contenttypes',
    'django.contrib.sessions', 'django.contrib.messages', 'django.contrib.staticfiles', 'myApp', 'tinymce', ]
配置
TINYMCE_DEFAULT_CONFIG={
    'theme':'advanced',
    'width':600,
    'height':400 }
模型
from tinymce.models import HTMLField
class Article(models.Model): title = models.CharField(max_length=20) content = HTMLField()
admin.py
admin.site.register(Article)在自定义页面中使用
DOCTYPE html>
<html lang="en">
<head>
    <meta charset="UTF-8">
    <title>书写博客title>
    <script type="text/javascript" src="/static/tiny_mce/tiny_mce.js">script>
    <script type="text/javascript">
        tinyMCE.init({
            'mode':'textareas',
            'theme':'advanced',
            'width':600,
            'height':400
        });
    script>
head>

<body>
    <form method="post" action="/tinymce/">
        {% csrf_token %}
        <input type="text" name="title" value=""><hr/>
        <textarea name="article">textarea><hr/>
        <input type="submit" value="提交">
    form>
body>
html>
Celery
问题
用户发起request请求,并等待response返回。在本次views中,可能需要执行一段耗时的程序,那么用户会等待很长时间,造成不好的用户体验
网站每小时需要同步数据(天气预报信息),但是http是需要触发的,难道要一个小时请求一次吗?
解决方案
使用celery:将耗时的程序放到celery中执行 使用celery定时执行
celery
任务task:就是一个python函数
队列queue:将需要执行的任务加入队列中
工人worker:在一个新的进程中负责执行队列中的任务
代理broker:负责调度,在布置环境中使用redis
安装
pip  install  celery==3.1.25
pip  install  celery-with-redis==3.0
pip  install  django-celery==3.2.1
配置
激活应用
INSTALLED_APPS = [
    'django.contrib.admin',
    'django.contrib.auth',
    'django.contrib.contenttypes',
    'django.contrib.sessions', 'django.contrib.messages', 'django.contrib.staticfiles', 'myApp', 'tinymce', 'djcelery', ]
配置redis
#celery
import djcelery
djcelery.setup_loader()
#配置redis数据库
#redis://:密码@ip:端口/库
BROKER_URL='redis://:[email protected]:6379/0'
#配置任务文件 CELERY_IMPORTS=("myApp.task")
创建任务文件,并分装任务
# 在应用目录下创建名为task.py的文件
# -*- coding:utf-8 -*-
from celery import task import time @task def longIO(): print("开始耗时操作……") time.sleep(5) print("结束耗时操作……")
迁移
python manage.py migrate
生成celery所需要的表
添加celery.py文件
将已存在的celery.py添加到工程目录下的与工程目录同名的目录下
celery.py
from __future__ import absolute_import

import os
from celery import Celery
from django.conf import settings

os.environ.setdefault('DJANGO_SETTINGS_MODULE', 'whthas_home.settings')

app = Celery('portal')

app.config_from_object('django.conf:settings')
app.autodiscover_tasks(lambda: settings.INSTALLED_APPS)


@app.task(bind=True)
def debug_task(self):
    print('Request: {0!r}'.format(self.request))
导入celery
在工程目录下的与工程目录同名的目录中的__init__.py文件中添加from .celery import app as celery_app
在视图使用任务
from myApp.task import longIO
def registe(request): longIO.delay() return HttpResponse("sunck is a good man")
启动redis
redis-server.exe redis.windows.conf启动worker
python manage.py celery worker --loglevel=info