Generative AI 新世界 | Falcon 40B 开源大模型的部署方式分析
在上期文章,我们探讨了如何在自定义数据集上来微调(fine-tuned)模型。本期文章,我们将重新回到文本生成的大模型部署场景,探讨如何在 Amazon SageMaker 上部署具有 400 亿参数的 Falcon 40B 开源大模型。
亚马逊云科技开发者社区为开发者们提供全球的开发技术资源。这里有技术文档、开发案例、技术专栏、培训视频、活动与竞赛等。帮助中国开发者对接世界最前沿技术,观点,和项目,并将中国优秀开发者或技术推荐给全球云社区。如果你还没有关注/收藏,看到这里请一定不要匆匆划过,点 这里让它成为你的技术宝库!
我们将对比两种不同的部署方式:
- 开箱即用的 Amazon SageMaker JumpStart 部署方式
- 更细控制颗粒度的 Amaon SageMaker Notebook 部署方式
Falcon 40B 开源大模型概述
Flacon 40B 是由阿拉伯联合酋长国技术创新研究所(TII)开发的大语言模型。它于 2023 年 2 月发布,是目前最大的开源大语言模型之一。Flacon 40B 有 400 亿个参数,比 GPT-3 和 LLaMA 都要多。Flacon 40B 是在大量的文本和代码数据集上完成模型训练的,包括 RefinedWeb 数据集,这是一个 Common Crawl 数据集的过滤版本。
1.Flacon 40B 的特点
Falcon 40B 具有多种使其成为强大的大型语言模型之功能,这些功能包括:
- 大尺寸:Flacon 40B 有 400 亿个参数,这使其能够学习单词和概念之间的更多复杂关系
- 高效训练:Falcon 40B 使用多种技术来使其训练更加高效,例如 3D 并行性和 ZeRO 优化
- 高级架构:Falcon 40B 使用先进的架构,包括 FlashAttention 和 Multi-query Attention。这些技术使 Flacon 40B 能够更好地理解文本中的长距离依赖关系
- 开源:Flacon 40B 是开源的,允许研究和开发人员对其进行实验和改进
2.Flacon 40B 的训练数
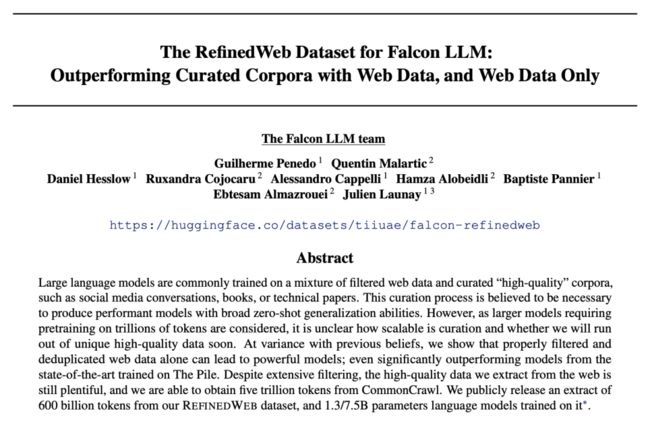
Falcon-40B 接受了 RefinedWeb 的 1,000 亿个 token 的训练,RefinedWeb 是一个经过过滤和重复数据删除的高质量网络数据集。值得一提的是,Falcon 团队认为他们使用 RefinedWeb 数据集的数据质量非常优秀,为此他们还专门发过一篇论文,如下所示:
Source:https://arxiv.org/pdf/2306.01116.pdf,2023/06?trk=cndc-detail
3.Flacon 40B 的训练参数和过程
Falcon-40B 使用了 Amazon SageMaker 进行训练,在 p4d 实例中使用了 384 个 A100 40GB GPU。训练过程中,Falcon-40B 使用了 3D 并行度策略(TP=8、PP=4、DP=12)和 ZeRO。模型训练于 2022 年 12 月开始,历时两个月。其主要的训练参数如下所示:
Source: https://huggingface.co/tiiuae/falcon-40b?trk=cndc-detail
4.Flacon 40B 的模型结构
Falcon-40B 是一个因果解码器模型(causal decoder-only model ),在因果语言建模任务(即预测下一个 token)上训练。该架构主要参考在 GPT-3 论文(Brown et al., 2020)上做了以下主要改进:
- 位置嵌入(Positional embeddings):采用 rotary 位置嵌入(论文:Su et al., 2021)
- 注意力机制(Attention):采用 multiquery(论文:Shazeer et al., 2019)和 FlashAttention(论文:Dao et al., 2022)
- 解码器模块:采用了具有两层 norms 的并行注意力/ MLP
其公布的超参数配置如下所示:
Source: https://huggingface.co/tiiuae/falcon-40b?trk=cndc-detail
5.Flacon 40B 的性能
Falcon 40B 已被证明在多项基准测试中优于其他 LLM,包括 GLUE、SQuAD 和 RACE。它也被证明对于各种任务都有效,例如文本生成、机器翻译和问答。
Falcon 40B 模型的主要参数如下:
- 参数:400 亿
- 训练数据:1 万亿 Token
- 架构:Transformer
- 优化器:Adam
- 损失函数:交叉熵
- 评估指标:BLEU、ROUGE、F1
部署方式一:使用 Amazon SageMaker JumpStart 进行部署
本节将介绍在 Amazon SageMaker JumpStart 中,如何使用 SageMaker Python SDK 部署 Falcon 40B 开源大模型以生成文本。这个示例包括:
- 设置开发环境
- 获取全新 Falcon 40B 的开源大模型的 Hugging Face id 和版本
- 使用 JumpStartModel 函数部署 Falcon 40B 大模型
- 进行推理并与模型对话(包括代码生成、问题解答、翻译等)
- 清理环境
1.启动 Amazon SageMaker JumpStart 环境
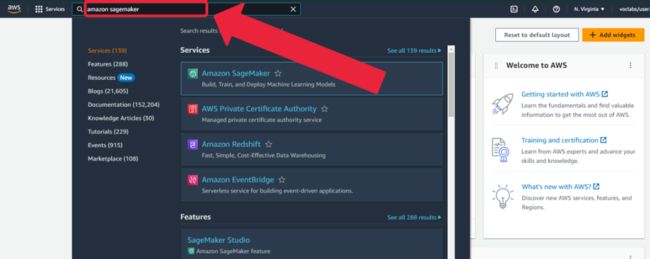
1. 在亚马逊云科技控制台输入“Amazon SageMaker”。
2. 点击“Studio”, 然后点击“Open Studio”。
3. 点击“Launch -> Studio”。
- 等待 Amazon SageMaker Studio 启动完成。
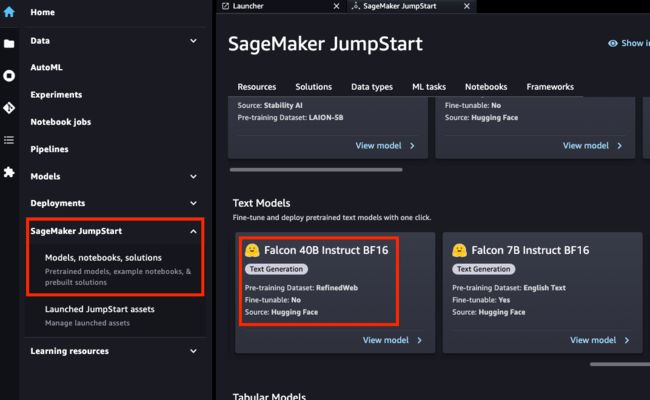
- 点击“SageMaker JumpStart -> Models, notebooks, solutions”后,选择“Text Models -> Falcon 40B Instruct BF16”。
- 选择“Run in notebook -> Open notebook”。
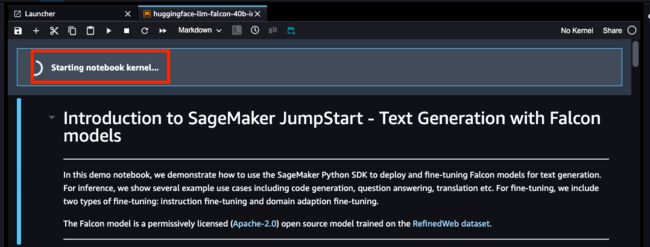
- 等待“Starting notebook kernel…”启动完成后,就可以执行部署 Falcon 40B 开源大模型的示例代码了!
本节实验的完整代码,可以在亚马逊云科技的 SageMaker 代码库中获得。
该实验完整代码的 GitHub 地址如下:
https://github.com/aws/amazon-sagemaker-examples/blob/main/introduction_to_amazon_algorithms/jumpstart-foundation-models/text-generation-falcon.ipynb?trk=cndc-detail
感兴趣的开发者可以参考以上这个示例,逐个单元执行代码完成该实验。由于亚马逊云科技的这个 Notebook 写得清楚简洁,恕不在此赘述其详细代码细节,感兴趣的读者可自行参考前面步骤,建立执行环境并亲身体验。
部署方式二:使用 Amazon SageMaker Notebook 进行部署
本节将介绍如何使用新的 Hugging Face LLM 推理容器将开源大语言模型,比如 Falcon 40B 部署到 Amazon SageMaker 进行推理的示例。这个示例包括:
- 设置开发环境
- 获取全新 Hugging Face LLM DLC
- 将 Falcon 40B 部署到 Amazon SageMaker
- 进行推理并与模型对话
- 清理环境
1.设置开发环境
我们将使用 Amazon SageMaker python SDK 将 Falcon 40B 部署到终端节点用于模型推理。我们首先需要确保正确安装了 Amazon SageMaker python SDK。如下代码所示:
# install supported sagemaker SDK
!pip install "sagemaker>=2.175.0" --upgrade –quiet

import sagemaker
import boto3
sess = sagemaker.Session()
# sagemaker session bucket -> used for uploading data, models and logs
# sagemaker will automatically create this bucket if it not exists
sagemaker_session_bucket=None
if sagemaker_session_bucket is None and sess is not None:
    # set to default bucket if a bucket name is not given
    sagemaker_session_bucket = sess.default_bucket()

try:
    role = sagemaker.get_execution_role()
except ValueError:
    iam = boto3.client('iam')
    role = iam.get_role(RoleName='sagemaker_execution_role')['Role']['Arn']

sess = sagemaker.Session(default_bucket=sagemaker_session_bucket)

print(f"sagemaker role arn: {role}")
print(f"sagemaker session region: {sess.boto_region_name}")
关于更多 Amazon SageMaker 所需权限的 IAM 角色详细配置说明,可以参考这个文档:
https://docs.aws.amazon.com/sagemaker/latest/dg/sagemaker-roles.htm?trk=cndc-detail
2.获取 Hugging Face LLM DLC
Hugging Face LLM DLC 是一款全新的专用推理容器,可在安全的托管环境中轻松部署 LLM。DLC 由文本生成推理(TGI)提供支持,这是一种用于部署和服务大型语言模型(LLM)的开源、专门构建的解决方案。TGI 使用张量并行和动态批处理为最受欢迎的开源 LLM 实现高性能文本生成。借助于 Amazon SageMaker 上推出的全新 Hugging Face LLM Inference DLC,客户可以获得支持高并发、低延迟的 LLM 体验。
与部署常规 Hugging Face 模型相比,我们首先需要检索容器 uri 并将其提供给 HuggingFaceModel 模型类,并使用 image_uri 指向该镜像。要在 Amazon SageMaker 中检索新的 Hugging Face LLM DLC,我们可以使用 sagemaker SDK 提供的 get_huggingface_llm_image_uri 方法。此方法允许我们根据指定的后端、会话、区域和版本检索所需的 Hugging Face LLM DLC 的 URI。
所有可用的 HuggingFace LLM DLC 版本可参考:
https://github.com/aws/deep-learning-containers/blob/master/available_images.md#huggingface-text-generation-inference-containers?trk=cndc-detail
from sagemaker.huggingface import get_huggingface_llm_image_uri

# retrieve the llm image uri
llm_image = get_huggingface_llm_image_uri(
  "huggingface",
  version="0.9.3"
)

# print ecr image uri
print(f"llm image uri: {llm_image}")
3.将 Falcon 40B 部署到 Amazon SageMaker 终端节
要将 Falcon 40b Instruct 部署到 Amazon SageMaker,我们需要创建 HuggingFaceModel 模型类并定义相关的端点配置,包括 hf_model_id、instance_type 等。本演示中,我们将使用带有 4 个 NVIDIA A10G GPU 和 96GB GPU 内存的 g5.12xlarge 实例类型。
另外,Amazon SageMaker 的配额可能因账户而异。如果超出配额,你可以通过以下服务配额控制台增加配额:
https://console.aws.amazon.com/servicequotas/home/services/sagemaker/quotas?trk=cndc-detail
部署代码如下所示:
import json
from sagemaker.huggingface import HuggingFaceModel

# sagemaker config
instance_type = "ml.g5.12xlarge"
number_of_gpu = 4
health_check_timeout = 300

# TGI config
config = {
  'HF_MODEL_ID': "tiiuae/falcon-40b-instruct", # model_id from hf.co/models
  'SM_NUM_GPUS': json.dumps(number_of_gpu), # Number of GPU used per replica
  'MAX_INPUT_LENGTH': json.dumps(1024),  # Max length of input text
  'MAX_TOTAL_TOKENS': json.dumps(2048),  # Max length of the generation (including input text)
  # 'HF_MODEL_QUANTIZE': "bitsandbytes", # comment in to quantize
}

# create HuggingFaceModel
llm_model = HuggingFaceModel(
  role=role,
  image_uri=llm_image,
  env=config
)
细心的读者,会在上面的示例代码中找到一行注释掉的代码:
# 'HF_MODEL_QUANTIZE': "bitsandbytes", # comment in to quantize
关于量化(quantize)的知识范畴,是另一个有趣并宏大的知识领域,我们将在下一节 Falcon 40B 大模型微调的文章中,另外详细阐述。
创建 HuggingFaceModel 之后,我们就可以用 deploy 方法,将其部署到 Amazon SageMaker 的终端节点了,我们将使用 ml.g5.12xlarge 实例类型部署模型。文本生成推理(TGI) 将在所有 GPU 上自动分发和分片模型,如下代码所示:
# Deploy model to an endpoint
# https://sagemaker.readthedocs.io/en/stable/api/inference/model.html#sagemaker.model.Model.deploy
llm = llm_model.deploy(
  initial_instance_count=1,
  instance_type=instance_type,
  # volume_size=400, # If using an instance with local SSD storage, volume_size must be None, e.g. p4 but not p3
  container_startup_health_check_timeout=health_check_timeout, # 10 minutes to be able to load the model
)
4.进行推理并与模型对话
部署端点后,我们就可以使用 predict 方法,开始进行模型推理了。
我们可以使用不同的参数来控制生成,这些参数可以在 payload 的 parameters 属性中定义。Hugging Face LLM DLC 推理容器支持各种生成参数,包括 top_p、temperature、stop、max_new_token 等等。
你可以在以下文档中找到支持参数的完整列表:
https://huggingface.co/blog/sagemaker-huggingface-llm#4-run-inference-and-chat-with-our-model?trk=cndc-detail
截至今天,TGI 支持以下参数:
temperature:控制模型中的随机性。较低的值将使模型更具确定性,而较高的值将使模型更随机。默认值为 0。
max_new_tokens:要生成的最大 token 数量。默认值为 20,最大值为 512。
repeption_penalty:控制重复的可能性,默认为 null。
seed:用于随机生成的种子,默认为 null。
stop:用于停止生成的代币列表。生成其中一个 token 后,生成将停止。
top_k:用于 top-k 筛选时保留的最高概率词汇标记的数量。默认值为 null,它禁用 top-k 过滤。
top_p:用于核采样时保留的参数最高概率词汇标记的累积概率,默认为 null。
do_sample:是否使用采样;否则使用 greedy 解码。默认值为 false。
best_of:生成 best_of 序列如果是最高标记 logprobs 则返回序列,默认为 null。
details:是否返回有关生成的详细信息。默认值为 false。
return_full_text:是返回全文还是只返回生成的部分。默认值为 false。
truncate:是否将输入截断到模型的最大长度。默认值为 true。
typical_p:token 的典型概率。默认值为 null。
watermark:生成时使用的水印。默认值为 false。
因为我们部署的 tiiuae/falcon-40b-instruct 开源大模型,是一种对话聊天模型,我们可以使用以下提示词与大模型聊天了!如下所示:
# define payload
prompt = """You are an helpful Assistant, called Falcon. Knowing everyting about AWS.

User: Can you tell me something about Amazon SageMaker?
Falcon:"""

# hyperparameters for llm
payload = {
  "inputs": prompt,
  "parameters": {
    "do_sample": True,
    "top_p": 0.9,
    "temperature": 0.8,
    "max_new_tokens": 1024,
    "repetition_penalty": 1.03,
    "stop": ["\nUser:","<|endoftext|>",""]
  }
}

# send request to endpoint
response = llm.predict(payload)

# print assistant respond
assistant = response[0]["generated_text"][len(prompt):]
LLM 的输出如下图所示。它会生成一段描述“Amazon SageMaker”的话:
为方便读者们阅读,我把 LLM 的输出拷贝如下:
'Amazon SageMaker is a fully managed platform that enables developers and data scientists to quickly build, train, and deploy machine learning models in the cloud. It provides a wide range of tools and services, including Jupyter notebooks, algorithms, pre-trained models, and easy-to-use APIs, so you can quickly get started building machine learning applications.'
我们可以继续问 Falcon 40B 大模型问题,比如:
new_prompt = f"""{prompt}{assistant}
User: How would you recommend start using Amazon SageMaker? If i am new to Machine Learning?
Falcon:"""
# update payload
payload["inputs"] = new_prompt

# send request to endpoint
response = llm.predict(payload)

# print assistant respond
new_assistant = response[0]["generated_text"][len(new_prompt):]
print(new_assistant)
Falcon 40B 大模型给我的回答如下,供大家参考:
为方便读者们阅读,我把 LLM 的输出拷贝如下:
'If you're new to machine learning, you can start with pre-built algorithms and pre-trained models available in Amazon SageMaker. You can also use Jupyter notebooks to create and run your own experiments. Additionally, you can take advantage of the AutoPilot feature to automatically build and train machine learning models based on your data. The best way to get started is to experiment and try different things to see what works best for your specific use case.'
5.删除资源和清理环境
我们已经把 Falcon 40B 的开源大模型部署到了 Amazon SageMaker 的终端节点上,并使用成功地进行了模型推理。完成这个实验后,请记得删除资源和清理环境,包括删除模型和端点,以避免产生不必要的费用。
删除资源和清理环境的示例代码,如下所示:
llm.delete_model()
llm.delete_endpoint()
6.参考文档
本节的部署方式主要参考以下英文文档,笔者在阐述过程中,做了些细化描述和文字调整:
https://www.philschmid.de/sagemaker-falcon-llm?trk=cndc-detailhttps://aws.amazon.com/cn/what-is/large-language-model/?trk=d...
比较和总结
本文我们分两个章节,分别用两种方式部署了 Falcon 40B 的开源大语言模型。
首先我们使用了 Amazon SageMaker JumpStart 进行了模型部署,其主要核心代码如下:
model_id, model_version = "huggingface-llm-falcon-40b-instruct-bf16", "*”

from sagemaker.jumpstart.model import JumpStartModel
my_model = JumpStartModel(model_id=model_id)
predictor = my_model.deploy()
其次,我们使用了 Amazon SageMaker Notebook 进行了模型部署,其主要核心代码如下:
# Retrieve the new Hugging Face LLM DLC
from sagemaker.huggingface import get_huggingface_llm_image_uri

# retrieve the llm image uri
llm_image = get_huggingface_llm_image_uri(
  "huggingface",
  version="0.8.2"
)

# print ecr image uri
print(f"llm image uri: {llm_image}")
#  Deploy Falcon 40B Model
from sagemaker.huggingface import HuggingFaceModel

# instance config
instance_type = "ml.g5.12xlarge"
number_of_gpu = 4
health_check_timeout = 300

# TGI config
config = {
      'HF_MODEL_ID': "tiiuae/falcon-40b-instruct",
      ……
}

# create HuggingFaceModel
llm_model = HuggingFaceModel(
  role=role,
  image_uri=llm_image,
  env=config
)
llm = llm_model.deploy(
      ……
)
由上述核心代码量的对比可知,如果你是初学者并希望开箱即用,你可以选用 Amazon SageMaker JumpStart 这种快速简洁的部署方式;如果你对 Amazon SageMaker 服务已经有一定的了解,并希望在大模型部署过程,具有更细颗粒度的控制(例如:部署实例类型、image 的版本号、TGI 参数等)时,你就可以选择 Amaon SageMaker Notebook 这种更全面控制配置参数的部署方式。
在下一篇文章中,我们将探讨使用 Amazon SageMaker Notebook 在交互式环境中快速高效地微调大语言模型的话题。我们将使用 QLoRA 和 4-bits 的 bitsandbtyes 量化技术,在 Amazon SageMaker 上使用 Hugging Face PEFT 来微调 Falcon-40B 模型。这个话题在目前的开源大模型领域是一个前沿的先锋话题,尽请期待。
请持续关注 Build On Cloud 专栏,了解更多面向开发者的技术分享和云开发动态!
文章来源:
https://dev.amazoncloud.cn/column/article/64de16134948d629b3ee6ac0?sc_medium=regulartraffic&sc_campaign=crossplatform&sc_channel=CSDN


