第一行代码笔记⑨
第一行代码笔记⑨
- 9.1 服务是什么
- 9.2 Android多线程编程
-
- 1 在子线程中更新UI
- 2 解析异步消息处理机制
- 3 使用AsyncTask
- 9.3 服务的基本用法
-
- 定义一个服务
- 启动和停止服务
- 活动和服务进行通信
- 9.4 服务的生命周期
- 9.5 服务的更多技巧
-
- 前台服务
- 使用IntentService
后台默默的劳动者——探究服务
9.1 服务是什么
服务(Service)是Android中实现程序后台运行的解决方案,它非常适合去执行那些不需要和用户交互而且还要求长期运行的任务。服务的运行不依赖于任何用户界面,即使程序被切换到后台,或者用户打开了另外一个应用程序,服务仍然能够保持正常运行。
9.2 Android多线程编程
1 在子线程中更新UI
Android的UI是线程不安全的,应用程序中的UI元素,必须在主线程中进行,否则就会出现异常。
demo:想利用点击按钮改变文字内容,以下是例子
activity_main.xml
<RelativeLayout xmlns:android="http://schemas.android.com/apk/res/android"
    xmlns:app="http://schemas.android.com/apk/res-auto"
    xmlns:tools="http://schemas.android.com/tools"
    android:layout_width="match_parent"
    android:layout_height="match_parent"
    tools:context=".MainActivity">

    <Button
        android:id="@+id/change_text"
        android:layout_width="match_parent"
        android:layout_height="wrap_content"
        android:text="Change Text" />

    <TextView
        android:id="@+id/text"
        android:layout_width="wrap_content"
        android:layout_height="wrap_content"
        android:layout_centerInParent="true"
        android:text="Hello world"
        android:textSize="20sp" />


RelativeLayout>
MainActivity
public class MainActivity extends AppCompatActivity implements View.OnClickListener {

    private TextView text;

    @Override
    protected void onCreate(Bundle savedInstanceState) {
        super.onCreate(savedInstanceState);
        setContentView(R.layout.activity_main);
        text = (TextView) findViewById(R.id.text);
        Button changeText = (Button) findViewById(R.id.change_text);
        changeText.setOnClickListener(this);

    }

    @Override
    public void onClick(View v) {
        switch (v.getId()){
            case R.id.change_text:
                new Thread(new Runnable() {
                    @Override
                    public void run() {
                        text.setText("Nice to meet you");
                    }
                }).start();
                break;
            default:
                break;
        }
    }
}

修改代码
public class MainActivity extends AppCompatActivity implements View.OnClickListener {

    private TextView text;

    public static final int UPDATE_TEXT = 1;

    private Handler handler = new Handler() {


        @SuppressLint("HandlerLeak")
        public void handleMessage(Message msg){
            switch (msg.what){
                case UPDATE_TEXT:
                    // 在这里可以进行UI操作
                    text.setText("Nice to meet you");
                    break;
                default:
                    break;
            }
        }
    };

    @Override
    protected void onCreate(Bundle savedInstanceState) {
        super.onCreate(savedInstanceState);
        setContentView(R.layout.activity_main);
        text = (TextView) findViewById(R.id.text);
        Button changeText = (Button) findViewById(R.id.change_text);
        changeText.setOnClickListener(this);

    }

    @Override
    public void onClick(View v) {
        switch (v.getId()){
            case R.id.change_text:
                new Thread(new Runnable() {
                    @Override
                    public void run() {
                        Message message = new Message();
                        message.what = UPDATE_TEXT;
                        handler.sendMessage(message);
                    }
                }).start();
                break;
            default:
                break;
        }
    }
}
引入android.os.Handler这个类
首先定义了一个整型常量UPDATE_TEXT,用于表示更新TextView这个动作。新建Hanlder对象,重写父类的handleMessage方法。
点击事件中,我们没有直接在子线程中进行UI操作,而是利用sendMessage方法将消息发出去,再在主线程handleMessage中进行UI操作。
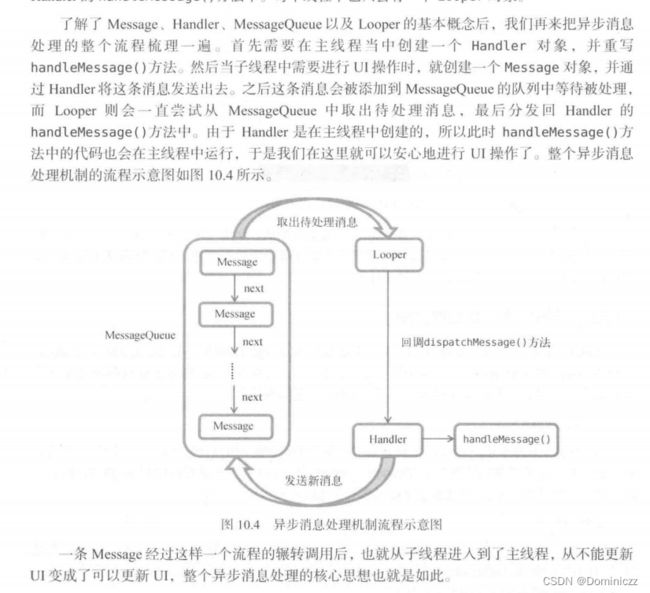
2 解析异步消息处理机制
Android中的异步消息处理主要由4个部分组成
Message:在线程之间传递消息,比如arg1和arg2携带整型数据,obj字段携带object对象
Handler:处理者,主要用于发送和处理消息。sendMessage()和handleMessage()
MessageQueue:消息队列,用来存放所有通过Handler发送的消息。这部分消息会一直存在消息队列中,等待被处理。每个线程中只会有一各MessageQueue对象。
Looper:Looper是每个线程中MessageQueue的管家,调用Looper的loop()方法后,就会进入到一个无限循环当中,然后每当发现MessageQueue中存在一条消息,就会将它取出,并传递到Handler的handleMessage()方法中。每个线程也只有一个Looper对象。
核心思想如下如所示
3 使用AsyncTask
AsyncTast(抽象类)相当于对异步消息处理机制进行了封装,其含有三个泛型参数,params用于是否传入参数给后台任务,Progress表明进度单位,Result指明返回值类型。初次以外,还经常需要重写4个方法。
@Override
    protected void onPreExecute() {
    }
会在子线程任务开始执行前执行,就是进行一些简单的初始化操作。例如进度条对话框的展示。
 @Override
    protected Boolean doInBackground(Void... voids) {
    }
这里就是子线程任务的方法,也就是耗时任务,整个方法都会在子线程里面运行,然后返回值就是操作的结果。如果AsyncTask第三个参数传入的是void,就不需要返回结果。当然,既然是子线程,就不能对UI进行操作,如果需要更新UI,就需要使用publishProgress();
@Override
    protected void onProgressUpdate(Integer... values) {
    }
如果在doInBackground中调用了publishProgress,立马就是调用onProgressUpdate,在这里可以对UI进行修改。
@Override
    protected void onPostExecute(Boolean aBoolean) {
    }
return语句执行后,返回的数据会被传入这个函数,可以进行一些时候事后操作。
9.3 服务的基本用法
定义一个服务
一般需要重写3个方法
onCreate()会在服务创建的时候调用

onStartCommand()会在每次服务启动的时候调用

onDestroy()会在服务销毁的时候调用
服务需要在AndroidMenifest.xml中完成注册
启动和停止服务
启动和停止服务主要借助Intent实现。
activity_main.xml
<LinearLayout xmlns:android="http://schemas.android.com/apk/res/android"
    xmlns:app="http://schemas.android.com/apk/res-auto"
    xmlns:tools="http://schemas.android.com/tools"
    android:layout_width="match_parent"
    android:layout_height="match_parent"
    android:orientation="vertical"
    tools:context=".MainActivity">

    <Button
        android:id="@+id/start_service"
        android:layout_width="match_parent"
        android:layout_height="wrap_content"
        android:text="Start Service" />

    <Button
        android:id="@+id/stop_service"
        android:layout_width="match_parent"
        android:layout_height="wrap_content"
        android:text="Stop Service" />


LinearLayout>
MainActivity
public class MainActivity extends AppCompatActivity implements View.OnClickListener {

    @Override
    protected void onCreate(Bundle savedInstanceState) {
        super.onCreate(savedInstanceState);
        setContentView(R.layout.activity_main);
        Button startService = (Button) findViewById(R.id.start_service);
        Button stopService = (Button) findViewById(R.id.stop_service);
        startService.setOnClickListener(this);
        stopService.setOnClickListener(this);

    }

    @Override
    public void onClick(View v) {
        switch (v.getId()){
            case R.id.start_service:
                Intent startIntent = new Intent(this,MyService.class);
                startService(startIntent);  // 启动服务
                break;
            case R.id.stop_service:
                Intent stopIntent = new Intent(this,MyService.class);
                stopService(stopIntent); // 停止服务
                break;
            default:
                break;
        }
    }
}
public class MyService extends Service {
    public MyService() {
    }

    @Override
    public IBinder onBind(Intent intent) {
        // TODO: Return the communication channel to the service.
        throw new UnsupportedOperationException("Not yet implemented");
    }

    @Override
    public void onCreate() {
        super.onCreate();
        Log.d("Myservice", "onCreate executed");
    }

    @Override
    public int onStartCommand(Intent intent, int flags, int startId) {
        Log.d("Myservice", "onStartCommand executed");
        return super.onStartCommand(intent, flags, startId);
    }

    @Override
    public void onDestroy() {
        super.onDestroy();
        Log.d("Myservice", "onDestroy executed");
    }
}
服务也可以自己停止。只需要在MyService的任何一个位置调用stopSelf()方法就能让这个服务停止下来。
活动和服务进行通信
借助onBind(),在MyService里提供一个下载功能,在活动中可以决定何时开始下载,以及随时查看下载进度。思路是创建一个专门的Binder对象来对下载功能进行管理
public class MyService extends Service {

    private DownloadBinder mbinder = new DownloadBinder();

    class DownloadBinder extends Binder {

        public void startDownload() {
            Log.d("MyService", "startDownload executed");
        }

        public int getProgress() {
            Log.d("MyService", "getProgress executed");
            return 0;
        }
    }

    public MyService() {
    }

    @Override
    public IBinder onBind(Intent intent) {
        return mbinder;
    }

    @Override
    public void onCreate() {
        super.onCreate();
        Log.d("Myservice", "onCreate executed");
    }

    @Override
    public int onStartCommand(Intent intent, int flags, int startId) {
        Log.d("Myservice", "onStartCommand executed");
        return super.onStartCommand(intent, flags, startId);
    }

    @Override
    public void onDestroy() {
        super.onDestroy();
        Log.d("Myservice", "onDestroy executed");
    }
}
新建了一个DownloadBinder类,继承自Binder,然后在它的内部提供了开始下载和查看下载进度的方法。
接着在MyService中创建了DownloadBinder的实例,然后在onBind()方法中返回了这个实例,这样MyService的工作就全部完成了。
接着创建一个ServiceConnection的匿名类,重写两个方法onServiceConnected和onServiceDisconnected,分别在活动和服务成功绑定以及断开的时候调用,在绑定的方法中,我们得到了DownloadBinder的实例,就可以调用服务中的方法。
接下来绑定活动和服务,也就是这里通过Bind Service按钮的点击事件完成。
public class MainActivity extends AppCompatActivity implements View.OnClickListener {

    private MyService.DownloadBinder downloadBinder;

    private ServiceConnection connection = new ServiceConnection() {
        @Override
        public void onServiceConnected(ComponentName name, IBinder service) {
            downloadBinder = (MyService.DownloadBinder) service;
            downloadBinder.startDownload();
            downloadBinder.getProgress();
        }

        @Override
        public void onServiceDisconnected(ComponentName name) {

        }
    };

    @Override
    protected void onCreate(Bundle savedInstanceState) {
        super.onCreate(savedInstanceState);
        setContentView(R.layout.activity_main);
        Button startService = (Button) findViewById(R.id.start_service);
        Button stopService = (Button) findViewById(R.id.stop_service);
        Button bindService = (Button) findViewById(R.id.bind_service);
        Button unbindService = (Button) findViewById(R.id.unbind_service);

        startService.setOnClickListener(this);
        stopService.setOnClickListener(this);
        bindService.setOnClickListener(this);
        unbindService.setOnClickListener(this);

    }

    @Override
    public void onClick(View v) {
        switch (v.getId()) {
            case R.id.start_service:
                Intent startIntent = new Intent(this, MyService.class);
                startService(startIntent);  // 启动服务
                break;
            case R.id.stop_service:
                Intent stopIntent = new Intent(this, MyService.class);
                stopService(stopIntent); // 停止服务
                break;
            case R.id.bind_service:
                Intent bindIntent = new Intent(this, MyService.class);
                bindService(bindIntent, connection, BIND_AUTO_CREATE); // 绑定服务
                break;
            case R.id.unbind_service:
                unbindService(connection); // 解绑服务
                break;
            default:
                break;
        }
    }
}
9.4 服务的生命周期

9.5 服务的更多技巧
前台服务
服务的系统优先级还是比较低的,如果系统内存不足,就有可能会回收掉正在后台运行的服务。如果希望服务可以一直保持运行状态,可以考虑使用前台服务,不同于普通服务,前台服务一直有一个正在运行的图标在系统的状态栏显示。
修改MyService的代码
@Override
    public void onCreate() {
        super.onCreate();
        Log.d("Myservice", "onCreate executed");
        Intent intent = new Intent(this, MainActivity.class);
        PendingIntent pi = PendingIntent.getActivity(this, 0, intent, 0);
        String CHANNEL_ID = "1";
        String CHANNEL_Name = "channel_name";
        NotificationChannel channel = new NotificationChannel(CHANNEL_ID, CHANNEL_Name, NotificationManager.IMPORTANCE_HIGH);
        NotificationManager manager = (NotificationManager) getSystemService(NOTIFICATION_SERVICE);
        manager.createNotificationChannel(channel);

            Notification notification = new NotificationCompat.Builder(this)
                    .setContentTitle("This is content title")
                    .setContentText("This is content text")
                    .setWhen(System.currentTimeMillis())
                    .setSmallIcon(R.mipmap.ic_launcher)
                    .setLargeIcon(BitmapFactory.decodeResource(getResources(), R.mipmap.ic_launcher))
                    .setContentIntent(pi)
                    .setChannelId(CHANNEL_ID)
                    .build();
            startForeground(1, notification);
        }
和通知那一章类似,这里代码过时了,需要添加channel。还有文章说需要添加权限,但是实测没加权限也能运行。
使用IntentService
服务中的代码是默认运行在主线程当中的,如果直接在服务里去处理一些耗时的逻辑,就很容易出现ANR(Application Not Responding)的情况。
服务启动以后就一直处于运行状态,必须调用stopService()或者stopSelf()去停止服务,为了可以简单的创建一个异步、会自动停止的服务,Android提供了一个IntentService类。
MyIntentService
public class MyIntentService extends IntentService {


    public MyIntentService() {
        super("MyIntentService");  // 调用父类有参构造
    }

    @Override
    protected void onHandleIntent(@Nullable Intent intent) {
        // 打印当前线程的id
        Log.d("MyIntentService", "Thread id is " + Thread.currentThread().getId());
    }

    @Override
    public void onDestroy() {
        super.onDestroy();
        Log.d("MyIntentService", "onDestroy executed");
    }
}
在子类中实现onHandleIntent()这个方法
接下来修改activity_main.xml,添加一个用于启动MyIntentService的按钮
    <Button
        android:id="@+id/start_intent_service"
        android:layout_width="match_parent"
        android:layout_height="wrap_content"
        android:text="Start IntentService" />
修改MainActivity代码
        Button startIntentService = (Button) findViewById(R.id.start_intent_service);
        startIntentService.setOnClickListener(this);

            case R.id.start_intent_service:
                // 打印主线程的id
                Log.d("MainActivity", "Thread id is " + Thread.currentThread().getId());
                Intent intentService = new Intent(this, MyIntentService.class);
                startService(intentService);
                break;
最后别忘了在AndroidManifest.xml中注册服务
<service android:name=".MyIntentService" />