node教程(一)
文章目录
- 1.node入门
-
- 1.1CMD常用命令
- 1.2node初体验
- 1.3node注意点
- 2.Buffer
-
- 2.1 概念
- 2.2 特点
- 2.3 使用
- 3.计算机基本组成
-
- 3.1计算机基本组成
- 3.2程序运行的基本流程
- 4.fs模块
-
- 4.1文件写入
- 4.2文件读取
- 4.3文件移动与重命名
- 4.4文件删除
- 4.5文件夹操作
- 4.6查看资源状态
- 4.7fs路径
- 4.8重命名
- 5.path模块
- 6.HTTP协议(⭐⭐⭐)
-
- 6.1协议
- 7.http模块
-
- 7.1创建HTTP服务端
- 7.2HTTP服务注意事项
- 7.3浏览器查看报文
- 7.4获取HTTP请求报文
- 7.5设置HTTP响应报文
- 7.6静态资源与动态资源
- 7.7静态资源目录与网站根目录
- 7.8网页中的URL
- 7.9设置资源类型(mime类型)
1.node入门
node是什么?
node.js是一个开源的,跨平台的JS运行环境(其实可以理解为是一款应用程序,是一款软件,可以运行JS)
node作用:
1.开发服务器应用

vscode是代码编辑工具,Figma是设计工具,Postman是接口测试工具
检查node是否安装成功
![]()
1.1CMD常用命令
盘符::进入对应盘符
dir:查看本路径下文件
dir /s:查看路径下的所有文件,包括子文件
1.2node初体验
console.log('hello Node.js')
直接通过node hello.js运行即可
1.3node注意点
1.node.js中不能使用BOM和DOM的API
浏览器中的JS:
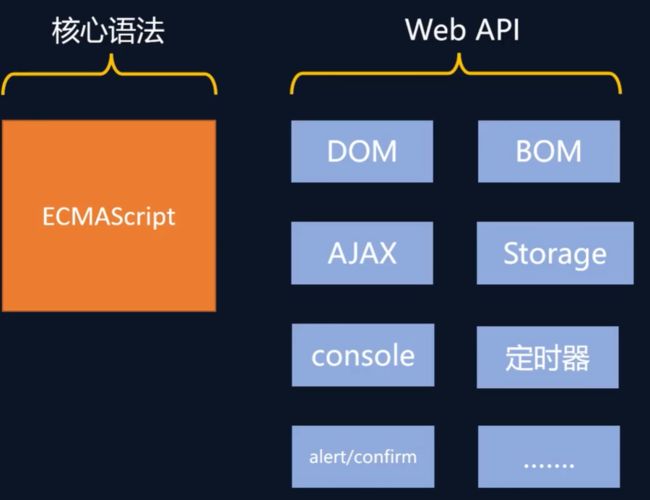
Node.js中的JS:

2.Node.js中的顶级对象为global,也可以用globalThis访问顶级对象。
2.Buffer
2.1 概念
Buffer是一个类似于Array的对象,用于表示固定长度的字节序列。
Buffer本质是一段内存空间,专门用来处理二进制数据。
2.2 特点
2.3 使用
- 创建Buffer
// 1.alloc
let buf = Buffer.alloc(10)
// console.log(buf)

// 2.allocUnsafe(不会清空数据)
let buf_2 = Buffer.allocUnsafe(10000)
// console.log(buf_2)

// 3.from
let buf_3 = Buffer.from('hello')
// 数组
let buf_4 = Buffer.from([105,108,111,118,101,121,111,117]);
console.log(buf_4) //- Buffer与字符串转换
let buf_4 = Buffer.from([105,108,111,118,101,121,111,117]);
// console.log(buf_4) //- Buffer的读写
Buffer可直接通过[]的方式对数据进行处理
//读
console.log(buf_3[1])
//修改
buf_3[1] = 97
console.log(buf_3.toString()) //hallo
3.计算机基本组成
3.1计算机基本组成
cpu:计算机计算和运行的中心
内存:读写速度较快,断电丢失数据
硬盘:读写速度较慢,断电不丢失数据
主板:上面有很多插槽

显卡:处理视频信号,显卡处理完后传递给显示器
3.2程序运行的基本流程
操作系统用来管理和调度硬件资源。
装系统:把操作系统安装到硬盘的过程。
计算机启动过程:

程序一般保存在硬盘中,软件安装的过程就是将程序写入硬盘的过程。
程序在运行时会加载进入内存,然后由CPU读取并执行程序。
4.fs模块
fs模块可以实现与硬件的交互
例如文件的创建、删除、重命名、移动
还有文件内容的写入、删除以及文件夹的相关操作
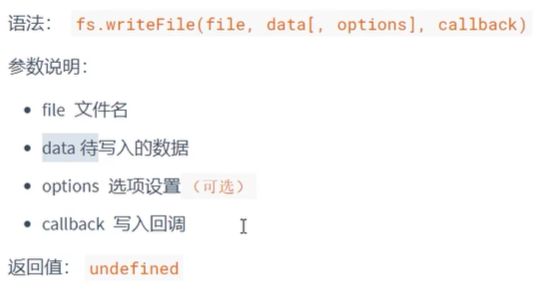
4.1文件写入
//写入文件
// (异步写入,当开始写文件时,采用单独的i/o线程去写,js继续向下进行,然后i/o执行完压入队列,调用回调函数,在进行输出)
fs.writeFile('./座右铭.txt','三人行,则必有我师焉',err => {
    //err 写入失败:错误对象  写入成功:null
    if(err){
        console.log('写入失败');
        return;
    }else{
        console.log('写入成功')
    }
});
console.log(1+1)

// 同步写入
// (JS主线程等I/O线程写完再继续执行)
fs.writeFileSync('./data.txt','test');
追加写入
const fs = require('fs')

// fs.appendFile('./座右铭.txt','择其善者而从之,择其不善者而改之',err => {
//     if(err){
//         console.log('写入失败')
//         return;
//     }else{
//         console.log('追加写入成功')
//     }
// });

//同步追加写入
fs.appendFileSync('./座右铭.txt','\r\n温故而知新,可以为师矣!')

//writeFile实现追加写入
fs.writeFile('./座右铭.txt','love love love',{flag: 'a'},err => {
    if(err){
        console.log('写入失败~');
        return;
    }else{
        console.log('写入成功!');
    }
})
const fs = require('fs')
//2.创建写入流对象
const ws = fs.createWriteStream('./观书有感.txt');

//3.write
ws.write('半亩方塘一鉴开\r\n');
ws.write('天光云影共徘徊\r\n');
ws.write('问渠那得清如许\r\n');
ws.write('为有源头活水来\r\n');

//4.关闭通道
ws.close();
❗❗❗
程序打开一个文件是需要消耗资源的,流式写入可以减少打开关闭文件的次数。
流式写入方式适用于大文件写入或者频繁写入的场景,writeFile适合于频率较低的场景
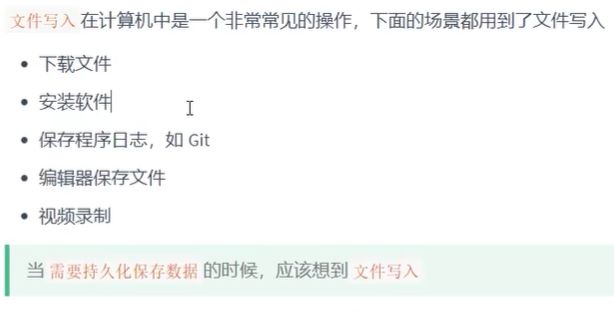
文件写入场景
4.2文件读取
const fs = require('fs');

// 异步读取
// fs.readFile('./观书有感.txt',(err,data) => {
//     if(err){
//         console.log('读取失败~');
//         return;
//     }else{
//         //以utf8方式进行字符转换为字符串
//         console.log(data.toString());
//     }
// })


// 异步读取
let data = fs.readFileSync('./观书有感.txt');

console.log(data.toString())
// 1.引入 fs 模块
const fs = require('fs');

//2.创建读取流对象
const rs = fs.createReadStream('./your.mp4');

//3.绑定data事件 chunk 块
rs.on('data', chunk => {
    // console.log(chunk.length); // 65536字节 =》 64KB
});

//4.end 可选事件
rs.on('end',() => {
    console.log('读取完成');
});
实现复制文件
/**
 *
 * 需求:
 * 复制
 */

const fs = require('fs');
const process = require('process');
// 方式一:readFile
// // 读取文件内容
// let data = fs.readFileSync('./your.mp4');
// //写入文件
// fs.writeFileSync('./your2.mp4',data);
// console.log(process.memoryUsage()); //rss:366481408子节

// 方式二 流式操作
// 创建读取流对象
const rs = fs.createReadStream('./your.mp4');
//创建写入流对象
const ws = fs.createWriteStream('./your4.mp4');

//绑定data事件
// rs.on('data',chunk => {
//     ws.write(chunk);
// });

// rs.on('end',() => {
//     // 输出占用内存大小
//     console.log(process.memoryUsage()); //rss:37101568字节
// })

rs.pipe(ws);
4.3文件移动与重命名
可以使用rename或renameSync来移动或者重命名文件夹

// 1.导入fs模块
const fs = require('fs');

// 2.调用rename方法
// fs.rename('./座右铭.txt','./论语.txt',err => {
//     if(err){
//         console.log('操作失败~');
//         return;
//     }else{
//         console.log('操作成功');
//     }
// });

//文件的移动
fs.rename('../data.txt','./data.txt',err => {
    if(err){
        console.log('操作失败~');
        return;
    }
    console.log('操作成功');
})
4.4文件删除
在node中,我们可以使用unlink和unlinkSync来删除文件

const fs = require('fs');

//2.调用unlink方法   unlinkSync
// fs.unlink('./观书有感.txt',err => {
//     if(err){
//         console.log('删除失败~');
//         return;
//     }else{
//         console.log('删除成功~');
//     }
// });

//3.调用 rm 方法  rmSync
fs.rm('./论语.txt', err => {
    if(err){
        console.log('删除失败~');
        return;
    }
    console.log('删除成功~');

});
4.5文件夹操作
mkdir创建文件夹
// 1.导入fs
const fs = require('fs');

// // 2.创建文件夹  mk make
// fs.mkdir('./html',err => {
//     if(err){
//         console.log('创建失败~');
//         return;
//     }
//     console.log('创建成功~');
// });

// 递归创建
// fs.mkdir('./a/b/c',{recursive: true},err => {
//     if(err){
//         console.log('创建失败');
//         return;
//     }
//     console.log('创建成功');
// });

// 读取文件夹

// fs.readdir('./',(err,data) => {
//     if(err){
//         console.log('读取失败~');
//         return;
//     }
//     console.log(data);
// });

// // 删除文件夹
// fs.rmdir('./a/b/c',err => {
//     if(err){
//         console.log('删除失败~');
//         return;
//     }
//     console.log('删除成功~');
// });

// 递归删除(不推荐)
fs.rmdir('./a',{recursive:true},err => {
    if(err){
        console.log(err);
        return;
    }
    console.log('删除成功');
});

// 递归删除(推荐)
fs.rm('./a',{recursive:true},err => {
    if(err){
        console.log(err);
        return;
    }
    console.log('删除成功');
});
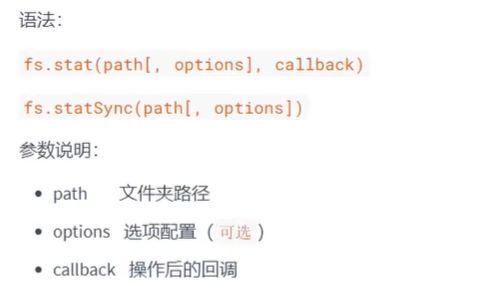
4.6查看资源状态
const fs = require('fs');


fs.stat('./your.mp4',(err,data) => {
    if(err){
        console.log('操作失败');
        return;
    }
    // console.log(data);
/**
* Stats {
  dev: 4002352658,
  mode: 33206,
  nlink: 1,
  uid: 0,
  gid: 0,
  rdev: 0,
  blksize: 4096,
  ino: 4785074604771641,
  size: 345788107,
  blocks: 675368,
  atimeMs: 1697625475660.6055,
  mtimeMs: 1697445115994.354,
  ctimeMs: 1697625483698.9119,
  birthtimeMs: 1697625475498.6052,
  atime: 2023-10-18T10:37:55.661Z,
  mtime: 2023-10-16T08:31:55.994Z,
  ctime: 2023-10-18T10:38:03.699Z,
  birthtime: 2023-10-18T10:37:55.499Z
}
    */
   console.log(data.isDirectory()); //false
   console.log(data.isFile()); //true
});
4.7fs路径
fs模块对资源进行操作时,路径的写法有两种:
4.8重命名
const fs = require('fs');

const files = fs.readdirSync('../08初体验');
// console.log(files)
//遍历
files.forEach(item => {
    //拆分文件名
    let data = item.split('-');
    let [num,name] = data;
    // console.log(num,name);
    // console.log(item);
    if(Number(num) < 10){
        num = '0' + num;
         // 创建新文件名
        let newName = num + '-' + name;
        // console.log(newName);
        //重命名
        fs.renameSync(`./${item}`,`./${newName}`);
    }

})

// console.log(files)
5.path模块
path模块提供了操作路径的功能。
const fs = require('fs');
const path = require('path');
// console.log(__dirname + '/index.html');

// resolve
// console.log(path.resolve(__dirname,'./index.html'));
// console.log(path.resolve(__dirname,'index.html'));


//sep 分隔符:获取操作系统的路径分隔符
// console.log(path.sep); // 、

// parse 方法
// console.log(__filename); // 文件的绝对路径
let str = 'E:\\work_learn\\node\\09path\\01path.js';

// console.log(path.parse(str));
// basename:获取路径的基础名称
console.log(path.basename(str));

//dirname:获取路径的目录名
console.log(path.dirname(str));

// extname:获取文件扩展名
console.log(path.extname(str));
6.HTTP协议(⭐⭐⭐)
6.1协议
双方必须共同遵从的一组约定。
HTTP协议:

⭐HTTP报文
采用fiddler可以查看报文内容
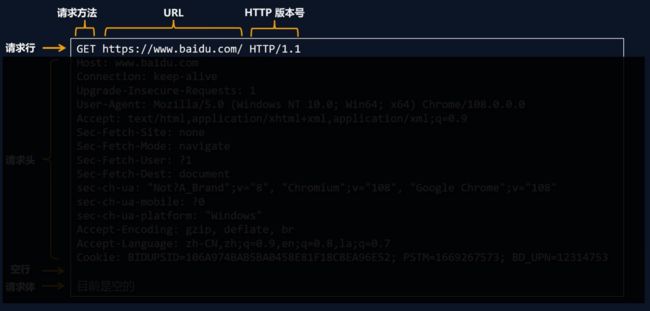
以键值对的形式存在,可以查阅
https://developer.mozilla.org/zh-CN/docs/Web/HTTP/Headers
请求体:
内容形式比较灵活
HTTP响应报文:
相应行:HTTP版本号+响应状态码+响应状态的描述
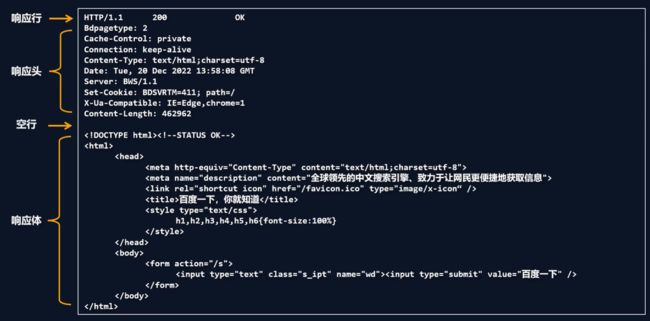
⭐响应状态码:
| 状态码 | 含义 |
|---|---|
| 200 | 请求成功 |
| 403 | 禁止请求 |
| 404 | 找不到资源 |
| 500 | 服务器内部错误 |
⭐响应状态码分类:
| 状态码 | 含义 |
|---|---|
| 1xx | 信息响应 |
| 2xx | 成功响应 |
| 3xx | 重定向消息 |
| 4xx | 客户端错误响应 |
| 5xx | 服务端错误响应 |
⭐响应状态的描述
| 状态码 | 状态描述 |
|---|---|
| 200 | OK |
| 403 | Forbidden |
| 404 | Not Found |
| 500 | Internal Server Error |
⭐响应体
响应体的内容格式是非常灵活的,常见的响应体格式有:
1.HTML
2.CSS
3.JS
4.图片
5.视频
6.JSON
⭐网络基础概念之端口
端口是应用程序的数字标识,一台计算机有65536个端口,一个应用程序可以使用一个或多个端口
端口的主要作用:
实现不同主机应用程序之间的通信。

7.http模块
7.1创建HTTP服务端
// 导入http模块
const http = require('http');

// 创建服务对象
const server = http.createServer((request,response) => {
    response.end('Hello HTTP Server'); //设置响应体
});

// 监听端口,启动服务
server.listen(9000, () => {
    console.log('服务以及启动...')
});
7.2HTTP服务注意事项
1.当服务启动后,更新代码必须重启服务才能生效。
2.响应内容中文乱码的解决办法。

3.端口号被占用
![]()
1)关闭当前正在运行监听窗口的服务。
2)修改其他端口号.
4.HTTP协议默认端口是80.HTTP服务开发常用端口有3000,8080,8090,9000等
![]()
7.3浏览器查看报文
7.4获取HTTP请求报文
⭐1.获取请求行和请求头
想要获取请求的数据,需要通过request对象

// 导入http模块
const http = require('http');

// 创建服务对象
const server = http.createServer((request,response) => {
    response.setHeader('content-type','text/html;charset=utf-8');
    // 获取请求方法
    // console.log(request.method);
    // 获取请求的url
    // console.log(request.url);//只包含url中的路径与查询字符串
    // 获取http协议的版本号
    // console.log(request.httpVersion);
    // 获取http请求头
    console.log(request.headers);
    console.log(request.headers.host);
    response.end('你好 Server'); //设置响应体
});

// 监听端口,启动服务
server.listen(9000, () => {
    console.log('服务已经启动...')
});
⭐2.获取请求体
// 导入http模块
const http = require('http');

// 创建服务对象
const server = http.createServer((request,response) => {
    response.setHeader('content-type','text/html;charset=utf-8');
    // 声明一个变量
    let body = '';
    // 绑定事件
    request.on('data',chunk => {
        body += chunk;
    });
    // 绑定end事件
    request.on('end',() => {
        console.log(body);
        // 响应
        response.end('Hello HTTP');
    });
});

// 监听端口,启动服务
server.listen(9000, () => {
    console.log('服务以及启动...')
});
使用表单发送post请求:
DOCTYPE html>
<html lang="en">
<head>
    <meta charset="UTF-8">
    <meta http-equiv="X-UA-Compatible" content="IE=edge">
    <meta name = "viewport" content="width=device-width,inital-scale=1.0">
    <title>Documenttitle>
head>
<body>
    <form action="http://127.0.0.1:9000" method="post">
        <input type="text" name="username">
        <input type="text" name = "password">
        <input type="submit" value="提交">
    form>
body>

html>
⭐3.提取http报文中URL的路径与查询字符串
const http = require('http');
// 导入url
const url = require('url');
const server = http.createServer((request,response) => {
    // 解析request.url
    // console.log(request.url);
    let res = url.parse(request.url,true);
    // 路径
    let pathname = res.pathname;

    // 查询字符串
    let keyword = res.query.keyword;
    console.log(keyword);

    response.end('url');
});

server.listen(9000,() => {
    console.log('服务已经启动...');
});
// 导入http模块
const http = require('http');

// 创建服务对象
const server = http.createServer((request,response) => {
    // 实例化URL对象
    // let url = new URL('http://www.xxx.com/search?a=100&b=200');
    // let url = new URL('/serach?a=100&b=200','http://127.0.0.1:9000');
    let url = new URL(request.url,'http://127.0.0.1');
    // 输出路径
    console.log(url.pathname);
    // 输出keyword查询字符串
    console.log(url.searchParams.get('keyword'));
    response.end('url new'); //设置响应体
});

// 监听端口,启动服务
server.listen(9000, () => {
    console.log('服务以及启动...')
});
//
const http = require('http');

const server = http.createServer((request,response) => {
    response.setHeader('content-type','text/html;charset=utf-8');
    // 获取请求方法
    // let method = request.method;
    // 简写为结构赋值的方法进行提取
    let {method} = request;
    // 获取请求的url路径
    let{pathname} = new URL(request.url,'http://127.0.0.1');
    // console.log(method);
    // console.log(pathname);
    // 判断
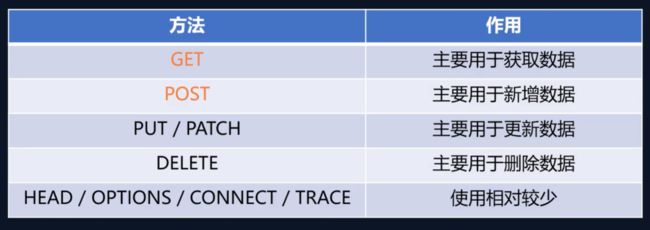
    if(method === 'GET' && pathname === '/login'){
        // 登录情形
        response.end('登录页面');
    }else if(method === 'GET' && pathname === '/reg'){
        response.end('注册页面');
    }else{
        response.end('NOT Fonud');
    }
    // 每次请求只能有一个end方法
    // response.end('practise');
});

server.listen(9000,() => {
    console.log('服务已经启动,端口9000正在监听中...');
});
7.5设置HTTP响应报文
// 导入http模块
const http = require('http');

// 创建服务对象
const server = http.createServer((request,response) => {

    // // 1.设置响应状态码
    // response.statusCode = 200;
    // // 2.设置响应状态描述
    // response.statusMessage = 'iloveyou';
    // response.end('response'); //设置响应体
    // 3.设置响应头
    // response.setHeader('content-type','text/html;charset=utf-8');
    // response.setHeader('myHeader','test test');
    response.setHeader('test',['a','b','c']);
    // 4.设置响应体
    response.write('love');
    response.write('love');
    response.end('response');

});

// 监听端口,启动服务
server.listen(9000, () => {
    console.log('服务以及启动...')
});
// 导入http模块
const http = require('http');
// 创建服务对象
const server = http.createServer((request,response) => {
response.setHeader('content-type','text/html;charset=utf-8');
response.end(`
Document
`); //设置响应体
});
// 监听端口,启动服务
server.listen(9000, () => {
console.log('服务已经启动...')
});
优化实现
html部分
<!DOCTYPE html>
<html lang="en">

<head>
    <meta charset="UTF-8">
    <meta name="viewport" content="width=device-width, initial-scale=1.0">
    <title>Document</title>
    <style>
        td {
            padding: 20px 40px;
        }

        table tr:nth-child(odd) {
            background: rgb(52, 165, 193);
        }

        table tr:nth-child(even) {
            background: #fcb;
        }

        table,
        td {
            border-collapse: collapse;
        }
    </style>
</head>

<body>
    <table border="1">
        <tr>
            <td></td>
            <td></td>
            <td></td>
        </tr>
        <tr>
            <td></td>
            <td></td>
            <td></td>
        </tr>
        <tr>
            <td></td>
            <td></td>
            <td></td>
        </tr>
        <tr>
            <td></td>
            <td></td>
            <td></td>
        </tr>
    </table>
    <script>
        // 获取所有的 td
        let tds = document.querySelectorAll('td');
        // 遍历
        tds.forEach(item => {
            item.onclick = function () {
                this.style.background = '#222';
            }
        })
    </script>
</body>

</html>
nodejs部分
// 导入http模块
const http = require('http');
const fs = require('fs');

// 创建服务对象
const server = http.createServer((request,response) => {
    response.setHeader('content-type','text/html;charset=utf-8');
    // 读取文件内容
    let html = fs.readFileSync(__dirname + '/10table.html');
    response.end(html); //设置响应体
});

// 监听端口,启动服务
server.listen(9000, () => {
    console.log('服务已经启动...')
});
7.6静态资源与动态资源
静态资源是指内容长时间不发生改变的资源,例如图片,视频,CSS文件,JS文件,HTML文件,字体文件等
动态资源是指内容经常更新的资源,例如百度首页,网易首页等。
7.7静态资源目录与网站根目录
HTTP服务在哪个文件夹中寻找静态资源,那个文件夹就是静态资源目录,也称之为网站根目录。
7.8网页中的URL
网页中的URL主要分为两大类:相对路径与绝对路径
⭐绝对路径
绝对路径可靠性强,而且相对容易理解,在项目中运用较多。

⭐相对路径
相对路径在发送请求时,需要与当前页面URL路径进行计算,得到完整URL后,再发送请求,学习阶段使用较多。
![]()
7.9设置资源类型(mime类型)
媒体类型是一种标准,用来表示文档、文件或字节流的性质和格式。
HTTP服务可以设置响应头Content-Type来表示响应体的MIME类型,浏览器会根据该类型决定如何处理资源。
mime:[type]/[subtype]

